
Flutter, Web Sockets and AWS
Flutter, Web Sockets and AWS
How can we create our own streaming mechanism? Hmmm…
All in one Flutter resource: https://flatteredwithflutter.com/flutter-web-sockets-and-aws/
History…..
Prior to Web Sockets, we had…polling
Polling: a synchronous method wherein the client makes a request to the server to see if there is any information available. The client receives a response from the server even if there is no information available.
Drawbacks :
In most real-time applications, message frequency is often unpredictable. In addition, polling requires the client to open and close many unnecessary connections.
Web Sockets….
The WebSocket Protocol is a widely supported open standard for developing real-time applications.
It allows the creation of full-duplex, bidirectional connections between a client and a server over the web.
Difference: Web Socket URL contains a special field called Upgrade…
A typical request that includes Upgrade would look something like:
GET /index.html HTTP/1.1
Host: www.example.com
Connection: upgrade
Upgrade: example/1, foo/2
For detailed info, visit this link
Web Socket URL’s start with ws:// or wss://
ws://destination.server.extwhere wss is for secure WebSocket connection.
Bring Flutter…..
- You need to install the web_socket_channel package.
2. Create a WebSocketChannel
final channel = IOWebSocketChannel.connect('ws://echo.websocket.org');3. Listen to the messages from server using Streambuilder…
StreamBuilder(
  stream: channel.stream,
  builder: (context, snapshot) {
    return Text(snapshot.hasData ? '${snapshot.data}' : '');
  },
);
4. Send data to server using,
channel.sink.add('Hello!');5. Close the socket connection using,
channel.sink.close();Sample example here,….
import 'package:flutter/foundation.dart';
import 'package:web_socket_channel/io.dart';
import 'package:flutter/material.dart';
import 'package:web_socket_channel/web_socket_channel.dart';

void main() => runApp(MyApp());

class MyApp extends StatelessWidget {
  @override
  Widget build(BuildContext context) {
    final title = 'WebSocket Demo';
    return MaterialApp(
      title: title,
      home: MyHomePage(
        title: title,
        channel: IOWebSocketChannel.connect('ws://echo.websocket.org'),
      ),
    );
  }
}

class MyHomePage extends StatefulWidget {
  final String title;
  final WebSocketChannel channel;

  MyHomePage({Key key, @required this.title, @required this.channel})
      : super(key: key);

  @override
  _MyHomePageState createState() => _MyHomePageState();
}

class _MyHomePageState extends State<MyHomePage> {
  TextEditingController _controller = TextEditingController();

  @override
  Widget build(BuildContext context) {
    return Scaffold(
      appBar: AppBar(
        title: Text(widget.title),
      ),
      body: Padding(
        padding: const EdgeInsets.all(20.0),
        child: Column(
          crossAxisAlignment: CrossAxisAlignment.start,
          children: <Widget>[
            Form(
              child: TextFormField(
                controller: _controller,
                decoration: InputDecoration(labelText: 'Send a message'),
              ),
            ),
            StreamBuilder(
              stream: widget.channel.stream,
              builder: (context, snapshot) {
                return Padding(
                  padding: const EdgeInsets.symmetric(vertical: 24.0),
                  child: Text(snapshot.hasData ? '${snapshot.data}' : ''),
                );
              },
            )
          ],
        ),
      ),
      floatingActionButton: FloatingActionButton(
        onPressed: _sendMessage,
        tooltip: 'Send message',
        child: Icon(Icons.send),
      ), // This trailing comma makes auto-formatting nicer for build methods.
    );
  }

  void _sendMessage() {
    if (_controller.text.isNotEmpty) {
      widget.channel.sink.add(_controller.text);
    }
  }

  @override
  void dispose() {
    widget.channel.sink.close();
    super.dispose();
  }
}
Bring AWS…
In the above section, we saw this line,
final channel = IOWebSocketChannel.connect('ws://echo.websocket.org');instead of ws://echo.websocket.org, we will create our own web socket url using AWS…..
Begin…
For creating a web socket api, we need to create a serverless function….
- Install serverless : This is a nodeJS package which helps us to write Lambdas and deploy them onto AWS
npm install -g serverless2. Set up your AWS credentials…..(Follow this video)
serverless config credentials --provider aws --key 'YOUR AWS KEY' --secret 'YOUR AWS SECRET'You should get output as
Serverless: Setting up AWS...
Serverless: Saving your AWS profile in "~/.aws/credentials"...
Serverless: Success! Your AWS access keys were stored under the "default" profile.
3. Create a project (serverless)
# Create a new Serverless Service/Projectserverless create --template aws-nodejshandler.js -> Where you write your logic...
serverless.yml -> Where you describe your deployment...
In the serverless.yml file,
provider:
  name: aws
  runtime: nodejs10.x
  logs:
websocket: trueiamRoleStatements:
- Effect: Allow
Action:
- "execute-api:ManageConnections"
Resource:
- "arn:aws:execute-api:*:*:**/@connections/*"functions:
connectionHandler:
handler: handler.connectionHandler
events:
- websocket:
route: $connect
- websocket:
route: $disconnect
defaultHandler:
handler: handler.defaultHandler
events:
- websocket:
route: $default
sendMessageHandler:
handler: handler.sendMessageHandler
events:
- websocket:
route: sendMessageThis configuration is based according to the AWS Api Gateway, which allows to create web socket apis…
As per AWS Api Gateway, the request should be in the payload format :
{
  "action":"sendMessage",
  "data":"YOUR DATA"
}
Here the action, sendMessage corresponds to the serverless.yml file’s sendMessage
sendMessageHandler:
    handler: handler.sendMessageHandler
    events:
      - websocket:
          route: sendMessage
There are 3 handlers here,
- connectionHandler : which accepts the connection to the web socket api
- defaultHandler : which sends the response if the request is not as per the web socket
- sendMessageHandler : sends the response in case of successful request to the web socket…
Lets program these handlers…..
Handlers….
Before starting, you need to install , aws-sdk
//FIRST
const AWS = require(‘aws-sdk’);
//SECOND
require('aws-sdk/clients/apigatewaymanagementapi');- connectionHandler :
module.exports.connectionHandler = async (event, context) => {

if (event.requestContext.eventType === 'CONNECT') { //IN CASE YOU WANT TO DO SOMETHING
return success;}
else if (event.requestContext.eventType === 'DISCONNECT') { //IN CASE YOU WANT TO DO SOMETHING
return success;}
};This listens to the incoming connections only of type ‘CONNECT’ and ‘DISCONNECT’….
Success is nothing, but another object
const success = {
  statusCode: 200
};
Testing now…..
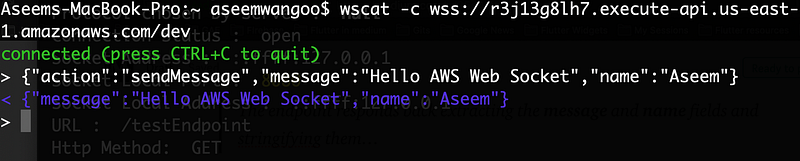
For deploying
serverless deployThis gives you the web socket url……
Now, in order to test this url, you need to install wscat.
wscat -c wss://<generated>.execute-api.<region>.amazonaws.com/dev/If all is well, you should see,

2. defaultHandler :
module.exports.defaultHandler = async (event, context) => {let connectionId = event.requestContext.connectionId;const endpoint = event.requestContext.domainName + "/" + event.requestContext.stage;const apigwManagementApi = new AWS.ApiGatewayManagementApi({
apiVersion: "2018-11-29",
endpoint: endpoint
});const params = {
ConnectionId: connectionId,
Data: 'Seems like wrong endpoint'
};return apigwManagementApi.postToConnection(params).promise();};This connects via AWS ApiGatewayManagementApi and sends back the response (Seems like wrong endpoint) if the request payload is not valid…….
Note : the response can have only ConnectonId and Data at this moment…
Testing now…..
For deploying
serverless deployThis gives you the web socket url……
Assuming, in the prev step, wscat is installed….
wscat -c wss://<generated>.execute-api.<region>.amazonaws.com/dev/If all is well, you should see,

3. sendMessageHandler :
module.exports.sendMessageHandler = async (event, context) => {const body = JSON.parse(event.body);const message = body.message;
const name = body.name;let connectionId = event.requestContext.connectionId;const endpoint = event.requestContext.domainName + "/" + event.requestContext.stage;const apigwManagementApi = new AWS.ApiGatewayManagementApi({
apiVersion: "2018-11-29",
endpoint: endpoint
});const params = {
ConnectionId: connectionId,
Data: JSON.stringify({ message: message, name: name}),
};
return apigwManagementApi.postToConnection(params).promise();
};We have included the fields ‘message’ and ‘name’ in the payload…
The endpoint responds back extracting the message and name fields and stringifying them…
Testing now…..
For deploying
serverless deployThis gives you the web socket url……
Assuming, in the prev step, wscat is installed….
wscat -c wss://<generated>.execute-api.<region>.amazonaws.com/dev/If all is well, you should see,
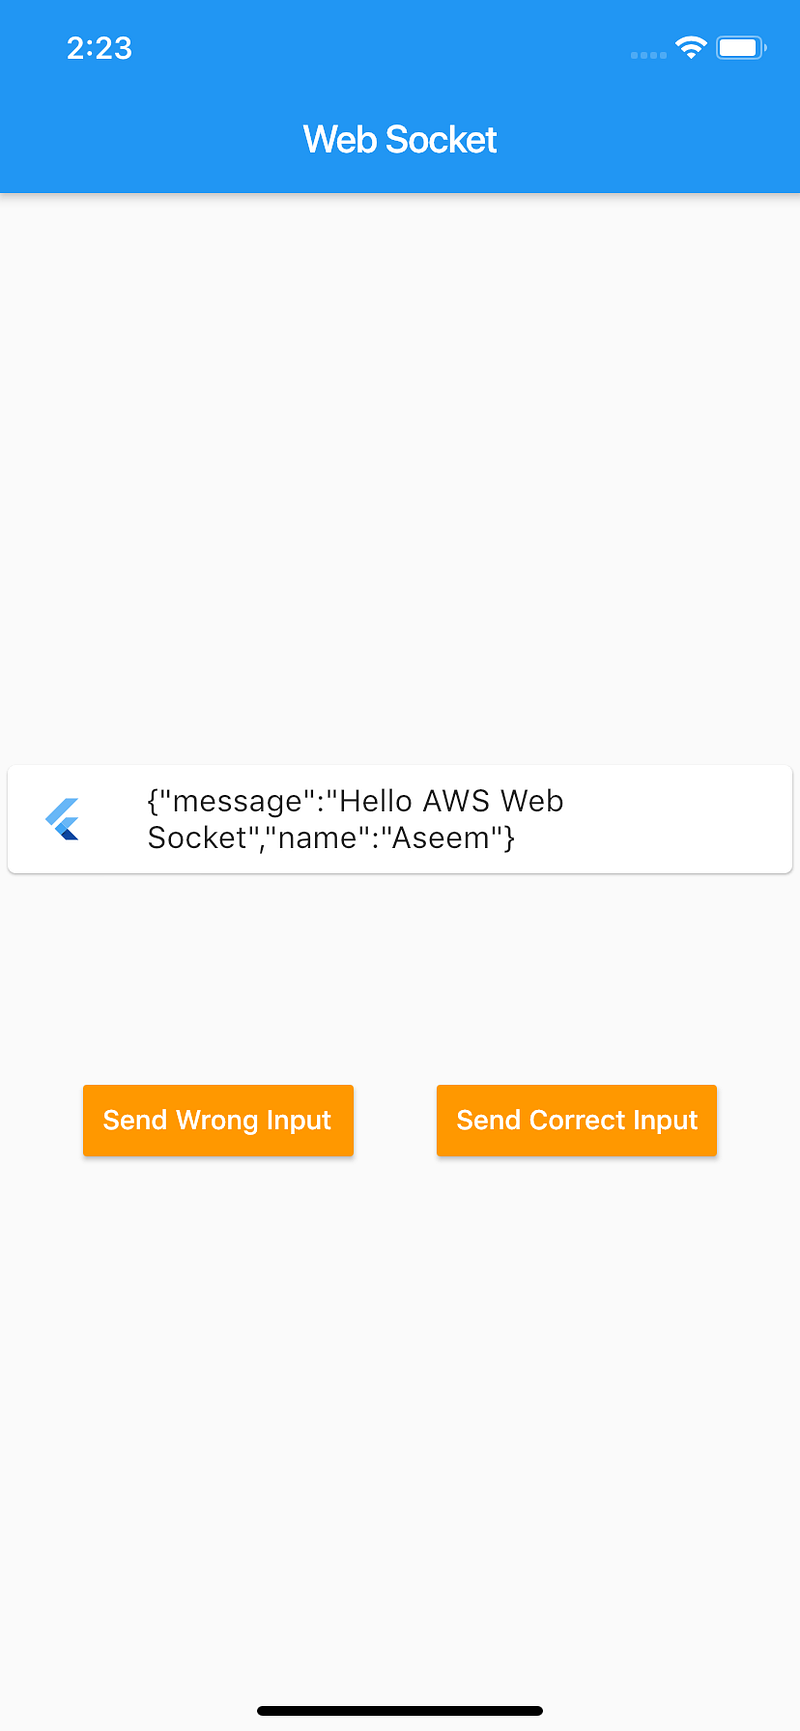
Flutter and AWS…
Finally, in the flutter app
- We have connected to the generated url from above as
final awsChannel = IOWebSocketChannel.connect(
    'wss://<generated>.execute-api.<region>.amazonaws.com/dev/',
);
2. On the click of Send Wrong Input, we send
awsChannel.sink.add('bd!');3. On the click of Send Correct Input, we send
awsChannel.sink.add('
 {
 "action":"sendMessage",
 "message":"Hello AWS Web Socket",
 "name":"Aseem"
 }'
);
Articles related to Flutter:


