
Image and Text Rekognition in Flutter using AWS
Image and Text Rekognition in Flutter using AWS
Wish, I could do some rekognition in Flutter, other than Google….Hmmm
This article sneak peeks into the world of Amazon, typically AWS and Rekognition…
All in one Flutter resource : https://flatteredwithflutter.com/how-to-use-flutter-and-aws-s3-bucket/
Prerequisite…
In the previous article, we have seen the uploading of images in the S3 bucket..

For the programming of this demo, we have used
- Amazon s3 Bucket
- Amazon Lambda Functions
- Amazon Rekognition
- Obviously Flutter :p
This article assumes, you are already having AWS developer account, if not refer this…
Begin…
Lets start with the Image Rekognition….
Note : Text Rekognition is similar to Image
- In the Lambdas, serverless.yaml, you need to add the following :
provider:
  name: aws
  runtime: nodejs10.x
  iamRoleStatements:
   - Effect: Allow
      Action:
        - "rekognition:*"
      Resource: "*"
This is important, otherwise your Lambdas won’t be able to use the Rekognition features…
2. Import the rekognition model in your handler.js using the following :
//FIRST
const AWS = require(‘aws-sdk’);
//SECOND
const rekognition = new AWS.Rekognition(
{ apiVersion: '2016-06-27' }
);Note : Dont skip the aws-sdk .
3. Create the https endpoint for the new api..
detectFace:
    handler: handler.detectFace
    environment:
      BUCKET: ${self:custom.bucket}
    events:
     - http:
         path: /detectFace
         method: post
Our new endpoint is a post request with the final url as /detectFace
4. Inside the detectFace…
module.exports.detectFace = async (event, context) => {

  let request = event.body;

  let jsonData = JSON.parse(request);

  let imageToDetect = jsonData.fileName;

  let faceDetectionParams = {
    Image: {
      S3Object: {
        Bucket: process.env.BUCKET,
        Name: imageToDetect
      }
    },
  };

  let faceResult = await rekognition.detectFaces(faceDetectionParams).promise();

  let details = faceResult.FaceDetails;

  return {
    statusCode: 200,
    body: JSON.stringify({
      details: details,
    }, null, 2),
  };

};- Here, the body which this function expects is :
{
    "fileName":"YOUR FILE NAME" e.g xyz.jpg
}- We create a faceDetectionParams object which contains :
Image: {
 S3Object: {
  Bucket: process.env.BUCKET,
  Name: imageToDetect
 }
},Bucket: //Specify your bucket name…..
Name: Image to detect….
- Pass faceDetectionParams object to
let faceResult = await rekognition.detectFaces(faceDetectionParams).promise();- We get an object of FaceDetails in response from AWS…Pass this object to the api….
let details = faceResult.FaceDetails;

  return {
    statusCode: 200,
    body: JSON.stringify({
      details: details,
    }, null, 2),
  };
Response from AWS (FaceDetails)…
{
"details": [
{
"BoundingBox": {
"Width": 0.07384136319160461,
"Height": 0.15265235304832458,
"Left": 0.29827556014060974,
"Top": 0.10345330089330673
},
"Landmarks": [
{
"Type": "eyeLeft",
"X": 0.32910236716270447,
"Y": 0.1644105166196823
},
{
"Type": "eyeRight",
"X": 0.3609332740306854,
"Y": 0.16504351794719696
}
],
"Confidence": 99.99968719482422
}
]
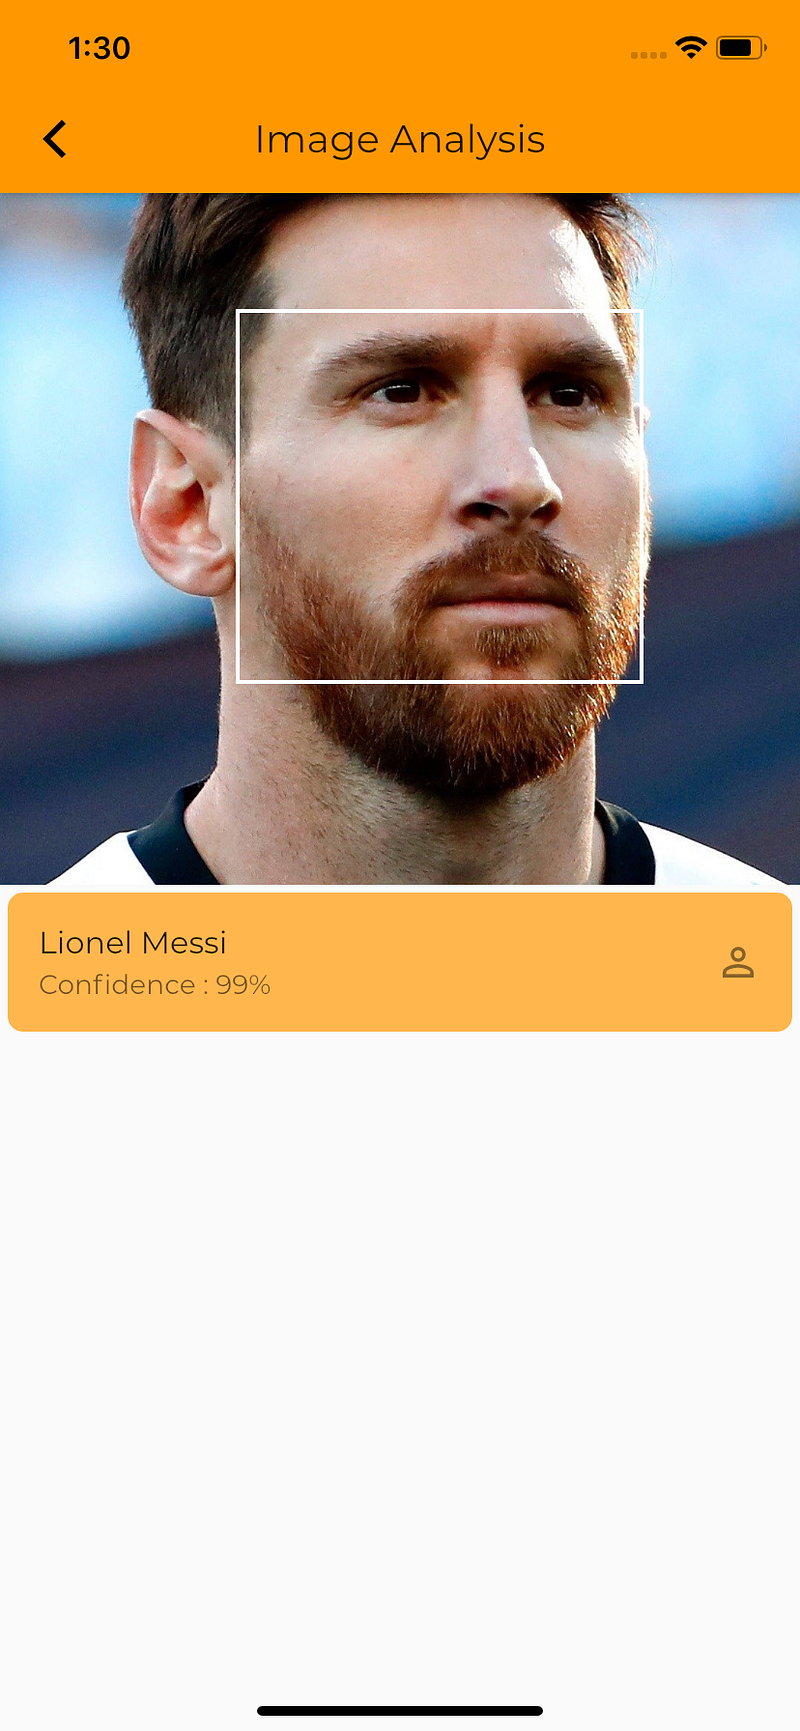
}Extract the Bounding Box object and use the algorithm below to display the box….
e.g For instance, let the bounding box values be :
BoundingBox.Left: 0.3922065 Bounding.Top: 0.15567766 BoundingBox.Width: 0.284666 BoundingBox.Height: 0.2930403Let the image details be :
Image Width : 608
Image Height : 588
Then the display box would be calculated as :
Left coordinate = BoundingBox.Left (0.3922065) * image width (608) = 238Top coordinate = BoundingBox.Top (0.15567766) * image height (588) = 91Face width = BoundingBox.Width (0.284666) * image width (608) = 173Face height = BoundingBox.Height (0.2930403) * image height (588) = 172Text Rekognition…

1. Create the https endpoint for the new api..
detectText:
    handler: handler.detectText
    environment:
      BUCKET: ${self:custom.bucket}
    events:
     - http:
         path: /detectText
         method: post
Our new endpoint is a post request with the final url as /detectText
2. Inside the detectText…
module.exports.detectText = async (event, context) => {

  let request = event.body;

  let jsonData = JSON.parse(request);

  let imageToDetect = jsonData.fileName;

  let textDetectionParams = {
    Image: {
      S3Object: {
        Bucket: process.env.BUCKET,
        Name: imageToDetect
      }
    },
  };

  let textResult = await rekognition.detectText(textDetectionParams).promise();

  let details = textResult.TextDetections;

  return {
    statusCode: 200,
    body: JSON.stringify({
      details: details,
    }, null, 2),
  };

};- Here, the body which this function expects is :
{
    "fileName":"YOUR FILE NAME" e.g xyz.jpg
}- We create a textDetectionParams object which contains :
Image: {
 S3Object: {
  Bucket: process.env.BUCKET,
  Name: imageToDetect
 }
},Bucket: //Specify your bucket name…..
Name: Image to detect….
- Pass textDetectionParams object to
let textResult = await rekognition.detectText(textDetectionParams).promise();- We get an object of TextDetections in response from AWS…Pass this object to the api….
let details = textResult.TextDetections;

  return {
    statusCode: 200,
    body: JSON.stringify({
      details: details,
    }, null, 2),
  };
Response from AWS (TextDetections)…
{
   "details":[
      {
         "DetectedText":"SAS 0-2 JUV 69:57",
         "Type":"LINE",
         "Id":0,
         "Confidence":97.48361206054688,
         "Geometry":{
            "BoundingBox":{
               "Width":0.18672186136245728,
               "Height":0.03612368926405907,
               "Left":0.0781216025352478,
               "Top":0.058347173035144806
            },
            "Polygon":[
               {
                  "X":0.0781216025352478,
                  "Y":0.058347173035144806
               },
               {
                  "X":0.2648434638977051,
                  "Y":0.058287039399147034
               },
               {
                  "X":0.26484712958335876,
                  "Y":0.0944107323884964
               },
               {
                  "X":0.07812528312206268,
                  "Y":0.09447085857391357
               }
            ]
         }
      }
   ]
}
Use the above logic to display the bounding box….
Articles related to Flutter:


