
Build Your Own Blog Portfolio with Web Components: Webpack
Part 3— Bundle JavaScript Modules using Webpack
As developers, we all know that we should reuse code as much as possible. Duplicated code is one of the main causes of software bugs, and it is essential to avoid it. Web Components help us to create reusable markup structures with encapsulated functionality.
In this series of articles, we will learn the fundamentals and advanced features of Web Components by applying them to an example. We will develop step by step a portfolio to showcase medium articles of any medium user.
- Build Your Own Blog Portfolio with Web Components: The Basics
- Build Your Own Blog Portfolio with Web Components: Data Flow (Attributes, Props, Callbacks)
- Build Your Own Blog Portfolio with Web Components: Webpack
- Build Your Own Blog Portfolio with Web Components: Typescript
- Build Your Own Blog Portfolio with Web Components: Lit Library
Short Introduction
In the first article, we have learned about the three main technologies of Web Components: Custom Elements, Shadow DOM, and HTML Templates. We applied those concepts to implement our application in the previous article. Have a look at the live demo or CodePen. You can use this GitHub repository as a basis to follow along with this article.
If you successfully followed along with this series of articles, you should have seven JavaScript files, containing our custom element definitions. Those are JavaScript modules, which are imported somewhere by other modules. Additionally, we have two files containing helper functions.
In this article, we will bundle our files using webpack to only have one static JavaScript file.
Module Bundlers
A module bundler is a tool that preprocesses JavaScript modules and assets to bundle them into a single file. A bundler allows us to bundle the entire source code (including libraries) into one or a few files.
Why?
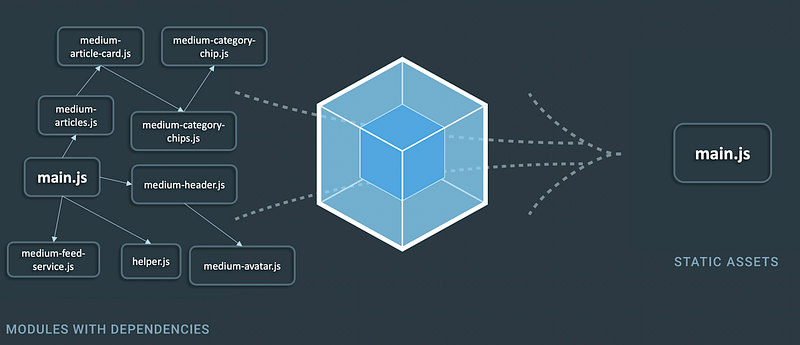
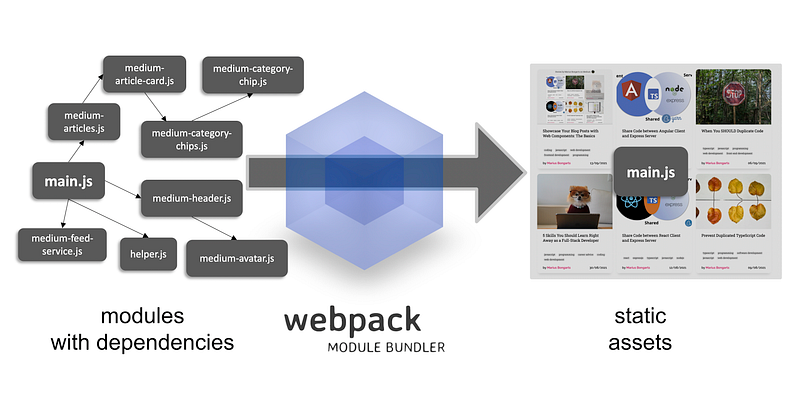
In the beginning, I mentioned that our current application contains 9 JavaScript files, that are loaded when our application renders. Likewise, this means we have to make the same amount of HTTP requests to load our modules.
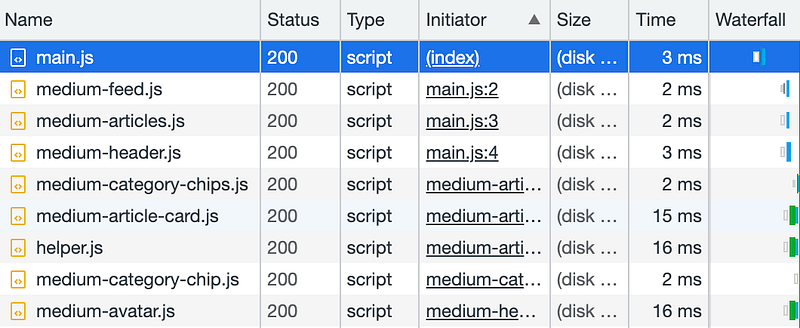
Let’s use the developer tools to have a look at the network tab of our demo application.
Each JavaScript file is loaded individually, starting with our entry-level module main.js. Making a single request to load all of our JavaScript at once would be much more efficient.
There are many JavaScript bundlers out there. Here is an overview of the most popular ones:
- Webpack
- esbuild
- RollUp
- Parcel
- Snowpack
In this article, we make use of Webpack to combine our modules into one bundle.
Webpack
Webpack is probably the most popular JavaScript module bundler. Internally, webpack builds a dependency graph from one or more entry points and combines every module into more bundles, which are static assets from which to serve your content.
“At its core, webpack is a static module bundler for modern JavaScript applications.” — webpack.js.org
Out of the box, webpack can preprocess JavaScript and JSON files. It can also install additional loaders to process other file types. For example, in the following article, we will install the ts-loader to preprocess Typescript files.
“Out of the box, webpack only understands JavaScript and JSON files.” — webpack.js.org
Setup
Let’s bundle our application using webpack. First, we need to create a package.json file by calling yarn init or npm init.
After that, we will install webpack as a development dependency:
yarn add -D webpack webpack-clior
npm install webpack webpack-cli --save-devOur package.json now looks like this:
Also, notice thebuild script to bundle our modules with webpack.
Configuration
To make our build script work, we have to configure our webpack configuration by creating a webpack.config.js file. First things first, let’s define an entry point to indicate where webpack should begin building its internal dependency graph:
Now, the only thing left is to define where webpack should emit the bundle and how to name it. Let’s name our bundle main.js and put it into the ./distfolder:
Build
We can now bundle our modules by calling yarn build or npm run build. That will create the bundled JavaScript file main.js in our dist folder.

Looking at the network tab of our new demo, we can see that only one JavaScript file needs to be loaded to render our application.
Development Server
Let’s install the webpack dev server to develop our application quickly and to see our changes directly applied in the browser:
yarn add -D webpack-dev-serverAdditionally, we need to configure our dev server in the webpack.config.js file to tell webpack from where it should serve our static files. Let’s move our index.html and index.css files to a public folder and configure webpack accordingly:
Then we can add a start script to our package.json file:
We can now run yarn start or npm start and the browser will open our application on port 8080. Changes in our JavaScript files will directly be applied, which makes developing our application much faster.
What’s next?
In this article, we learned how to bundle our JavaScript modules into one single file. In the following article, we will use the ts-loader of webpack to quickly use Typescript in our application. After that, we will refactor our application to use the small and fast HTML templating library lit.
- Build Your Own Blog Portfolio with Web Components: The Basics
- Build Your Own Blog Portfolio with Web Components: Data Flow (Attributes, Props, Callbacks)
- Build Your Own Blog Portfolio with Web Components: Webpack
- Build Your Own Blog Portfolio with Web Components: Typescript
- Build Your Own Blog Portfolio with Web Components: Lit Library
I hope you could follow along with these steps. You can also have a look at the GitHub repository. I am always happy to answer questions, and I am open to criticism. Feel free to contact me at any time 😊
Follow me to not miss the next articles 🙏
Here is the link for unlimited access to every content here on Medium. If you sign up by using this link, I’ll earn a small amount at no additional cost to you.
About the author
Marius Bongarts is a Software Engineering Analyst at Accenture Interactive. He also created the Web Highlights extension, which allows users to organize text highlights and bookmarks with the help of tags and directories.
Get in touch with me via LinkedIn.
More content at plainenglish.io


