
Build Your Own Blog Portfolio with Web Components: TypeScript
Part 4 — Build Web Components using TypeScript and Webpack
As developers, we all know that we should reuse code as much as possible. Duplicated code is one of the leading causes of software bugs, and it is essential to avoid it. Web Components help us to create reusable markup structures with encapsulated functionality.
This series of articles will teach the fundamentals and advanced features of Web Components by applying them to an example. We will develop step by step a portfolio to showcase medium articles of any medium user.
- Build Your Own Blog Portfolio with Web Components: The Basics
- Build Your Own Blog Portfolio with Web Components: Data Flow (Attributes, Props, Callbacks)
- Build Your Own Blog Portfolio with Web Components: Webpack
- Build Your Own Blog Portfolio with Web Components: TypeScript
- Build Your Own Blog Portfolio with Web Components: Lit Library
Short Introduction
In the first article, we have learned about the three main technologies of Web Components: Custom Elements, Shadow DOM, and HTML Templates. We applied those concepts to implement our application in the second article and bundled them with Webpack in the third. Have a look at the live demo or CodePen. You can use this GitHub repository as a basis to follow along with this article.
TypeScript
In this article, we will learn how to integrate TypeScript with webpack. TypeScript adds the ability to add types to JavaScript code. TypeScript is a superset of JavaScript and transpiles to JavaScript. Simply said: TypeScript is always JavaScript but not the other way around.
“TypeScript is JavaScript with syntax for types.” — typescriptlang.org
In my opinion, there is no reason not to use TypeScript in any web project. So let’s get started and add it to our medium portfolio application.
Create a config file
Let’s get started and create a tsconfig.json file in the root folder of our project to configure our TypeScript settings:
npx -p typescript tsc --initYou can also install TypeScript globally npm install -g typescript and execute tsc --init.
Now, you should find the tsconfig.json file in the root directory of the project. We have to adjust two things to transpile our JavaScript modules with custom elements correctly:
We set the JavaScript language target to ES6 as well as the generated module code. We can leave everything else to the default settings.
Configure Webpack
In the previous article, we set up Webpack to bundle our JavaScript modules.
You can install different loaders for Webpack. Let’s install the TypeScript compiler and loader by running:
npm install --save-dev typescript ts-loaderor
yarn add -D typescript ts-loaderNow let’s configure webpack to handle TypeScript by adjusting our webback.config.js file:
We defined a new rule to use the ts-loader for all files ending with the .ts extension.
ts-loaderusestsc, the TypeScript compiler, and relies on yourtsconfig.jsonconfiguration — https://webpack.js.org/guides/typescript/
Also, we defined and extensions array for the resolve property. That enables us to import from modules without writing the specific extension. For example:
import { MediumArticlesComponent } from "./components/medium-articles
Webpack takes care of resolving our file.
Furthermore, notice that we changed our entry file from main.js to main.ts. According to that, let’s also rename this file and run yarn build. We will face some issues because we need to define some types.
Resolve TypeScript errors
When running yarn build we are encountering some typing issues:
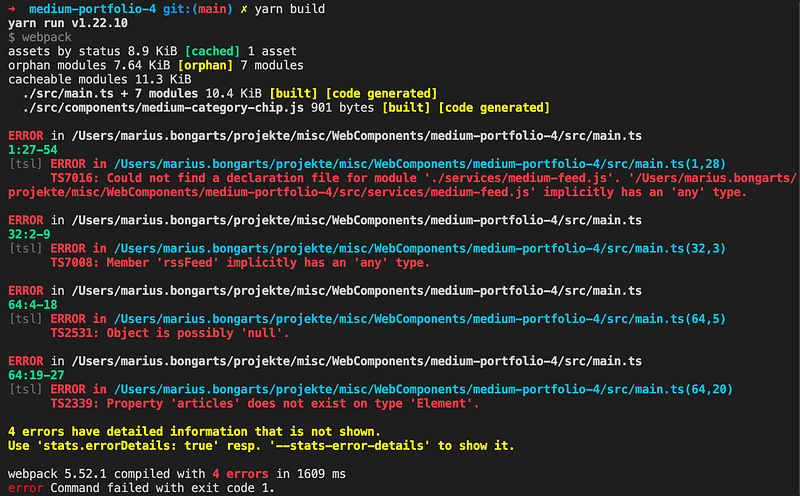
Some of them are saying implicitly has ‘any' type. That is because we set strict to true in our tsconfig.json file. We could resolve those issues by disabling the strict mode, but enabling all strict type-checking options is highly recommended. Only then can you benefit from the most stringent type checking.
Interfaces
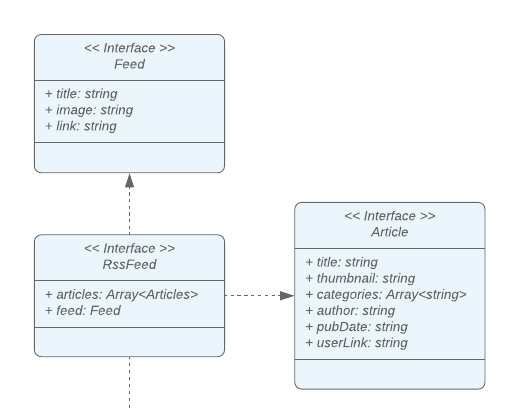
Let’s have a look at the interfaces of our UML diagram. Since we are using TypeScript now, we can declare an interface for each of them:
We can then make use of them to resolve some of the TypeScript errors:
Now, we can go ahead and create a TypeScript file for each of our JavaScript modules. We need to resolve the TypeScript issues and also adjust the import statements. Try it yourself, and if you are stuck, you can compare your solution to the final Github repository of this article.
What’s next?
In this article, we learned how to build Web Components with TypeScript using the webpack ts-loader. In the following article, we will refactor our application to use the small and fast HTML templating library lit.
- Build Your Own Blog Portfolio with Web Components: The Basics
- Build Your Own Blog Portfolio with Web Components: Data Flow (Attributes, Props, Callbacks)
- Build Your Own Blog Portfolio with Web Components: Webpack
- Build Your Own Blog Portfolio with Web Components: TypeScript
- Build Your Own Blog Portfolio with Web Components: Lit Library
I hope you could follow along with these steps. You can also have a look at the GitHub repository. I am always happy to answer questions, and I am open to criticism. Feel free to contact me at any time 😊
Follow me not to miss the next articles 🙏
Here is the link for unlimited access to every content here on Medium. If you sign up by using this link, I’ll earn a small amount at no additional cost to you.
About the author
Marius Bongarts is a Software Engineering Analyst at Accenture Interactive. He also created the Web Highlights extension, which allows users to organize text highlights and bookmarks with the help of tags and directories.
Get in touch with me via LinkedIn.
More content at plainenglish.io


