
Build Your Own Blog Portfolio with Web Components: Data Flow
Part 2 — Attributes, Properties, Lifecycle Callbacks
As developers, we all know that we should reuse code as much as possible. Duplicated code is one of the leading causes of software bugs, and it is essential to avoid it. Web Components help us to create reusable markup structures with encapsulated functionality.
In this series of articles, we will learn the fundamentals and advanced features of Web Components by applying them to an example. We will develop step by step a portfolio to showcase medium articles of any medium user.
- Build Your Own Blog Portfolio with Web Components: Basics
- Build Your Own Blog Portfolio with Web Components: Attributes, Props, Lifecycle Callbacks
- Build Your Own Blog Portfolio with Web Components: Webpack
- Build Your Own Blog Portfolio with Web Components: Typescript
- Build Your Own Blog Portfolio with Web Components: Lit Library
In our last article, we have learned about the three main technologies of Web Components: Custom Elements, Shadow DOM, and HTML Templates.
Mastering them is the foundation of implementing our application in this article. If you are not familiar with these technologies, I highly recommend reading the previous article first.
Web Components — Short Recap
Web Components enable us to develop entirely independently of frontend frameworks/libraries because they are based on official web standards and supported by all major browsers. This doesn’t necessarily mean that we should dump all frameworks/libraries. Instead, it means that we can outsource some parts of our application to reuse them in, e.g., React, Angular, VueJS, etc.… The framework would act more like a wrapper that passes data to its components.
Try it yourself, pass this code snippet to any web application or any website:
What you will see is the medium portfolio we will build in this article. Have a look at the live demo or CodePen.
Architecture
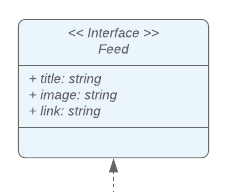
Before we move on to implement our first component of the Medium portfolio, we will look more closely at the architecture of our application. This Unified Modeling Language (UML) diagram defines the parts of our application. It contains three interfaces (blue), one super-class (orange), and seven custom element classes (green).
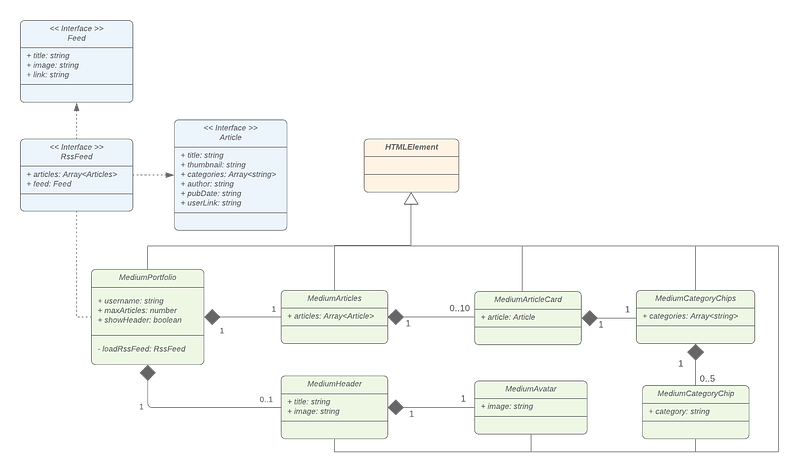
Let’s focus on our custom elements (green).
Our entry point is the MediumPortfolio class, which defines our medium-portfolio custom element. This component fetches our data to pass it to the MediumArticles and MediumHeader components.
The MediumArticles component is responsible for showing our articles by rendering up to 10 MediumArticleCard components for each article.
Furthermore, the MediumCategoryChips and MediumCategoryChip components show up to 5 categories in the form of chips. Besides that, we will show a MediumHeader with a MediumAvatar above the articles.
So now, without further ado, let’s dive into the code to build our Medium portfolio.
Entry Component
Have a look at our MediumPortfolio class, which is the entry point of our application.
Many things are going on here. Let’s go through them step by step.
Lifecycle Callbacks
In our medium-portfolio component, you can see that we are again calling super first in the constructor. Additionally, we defined the connectedCallback method, which is one of the lifecycle callbacks you can define for custom elements. Those are executed at different points in the element’s lifecycle.
The connectedCallback is invoked each time the custom element is appended into a DOM. If you are familiar with Angular, you can compare this to the ngOnInit callback. React developers could use the componendDidMount and VueJS developers the mounted callback as a reference.
Here is an overview of all callbacks by quoting from MDN:
connectedCallback: “Invoked each time the custom element is appended into a document-connected element. This will happen each time the node is moved, and may happen before the element's contents have been fully parsed.”
disconnectedCallback: “Invoked each time the custom element is disconnected from the document's DOM.”
adoptedCallback:”Invoked each time the custom element is moved to a new document.”
attributeChangedCallback: “Invoked each time one of the custom element's attributes is added, removed, or changed. Which attributes to notice change for is specified in a static getobservedAttributesmethod”
Fetching data
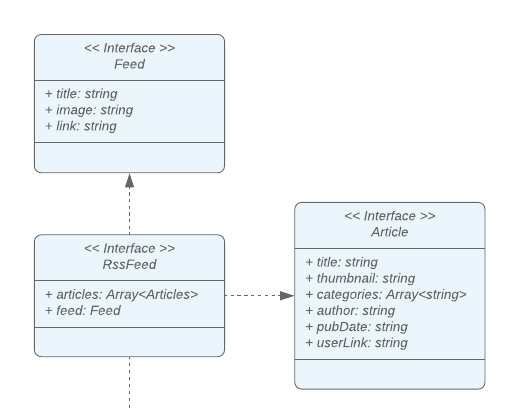
We use the connectedCallback to load our RssFeed by fetching it fromhttps://medium.com/feed/@mariusbongarts11.
This URL returns the latest ten articles of any user in an XML format. Additionally, we use the rss2json API to get the data in a JSON format. Our result object contains our articles and a feed object that gives us information about the author, which we will show in our header. To have a link to the medium user, we will map our Article also to have a userLink.
Attributes
To make our portfolio work for every medium user, we customize our application by passing attributes to it. Then, we can read them by calling getAttribute in our custom element.
In our application, we enable developers to define these three attributes:
username: Medium username from whom the article should be loadedmaxArticles: Option to set the number of articles displayedhideHeader: Option to hide the header component
Showing the articles
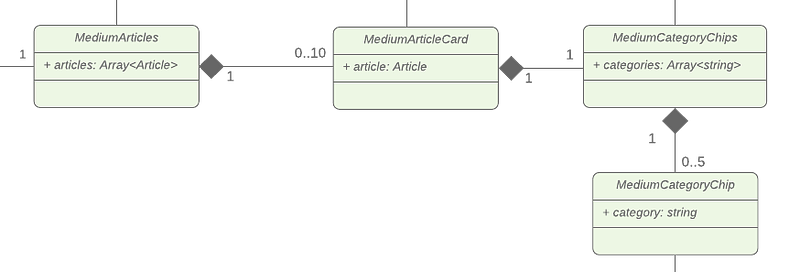
There are four components responsible for rendering our actual articles. The MediumArticles, MediumArticleCard, MediumCategoryChips, and MediumCategoryChip classes. Each of our components expects some data, which needs to be passed by the parent element.
Let’s figure out how to pass our articles array to our MediumArticles component.
Attributes vs. Properties
To pass data down to a custom element, we have two options:
- Attributes
- Properties
The difference between attributes and properties might be confusing at first. So let me try to explain.
Attributes
Attributes are the easiest way to pass data via HTML to a custom element. We already did this when adding our medium-portfolio custom element:
We are passing some string attributes to our custom element, which can be accessed by the custom element with the getAttribute() function. Those attributes are not different from the ones we already know: class, src, alt etc…
With the help of the static observeAttributes and the attributeChangedCallback we can also listen for attribute changes easily.
“attributes is a key/value pair of strings that represents any information regarding that attribute.” — MDN
This means, that we can only pass strings to HTML attributes.
Q: But how do we pass our articles array object?
A: We could serialize our object and pass it on as a string
“Reflecting rich data properties to attributes is needlessly expensive, requiring serializing and deserializing the same JavaScript objects.” — developers.google
I want to emphasize that this is an ugly and inefficient way because it can be expensive to serialize a large object to a string, and any object references will be lost in this stringification process.
Still, let me show you how we could do this using JSON.stringify:
…but there is a better way — properties.
Properties
While attributes can be passed using HTML, properties on the other hand can only be passed with JavaScript.
“Aim to only accept rich data (objects, arrays) as properties.” — developers.google
To set an element’s property, we can query it and just set it like this:
To react to property changes, we can define getter and setter in our custom element to render our HTML once the articles are available:
The ugly way
If you are experienced with any frontend framework/library, you are probably used to set properties directly in the template. That’s why we will make use of the small and fast HTML templating library lit library in the following articles. That allows us to pass properties directly in the template.
Knowing that, let’s finish our medium-articles component by going the ugly, but in my opinion more readable way. Keep in mind, that we will clean this up later and that this solution is not the most efficient one.
We map over our articles and pass a stringified and URL-encoded attribute to our medium-article-card element:
To encode and decode our object, we use these helper functions:
In our MediumArticleCard, we can then easily decode our object and make it accessible with a getter. Now, we can easily render all needed information within our component:
Notice, that our medium-articles as well as our medium-article-card make use of the Shadow DOM to keep the markup and style separate from other code on the page.
Showing category chips
Each article on Medium can have up to five tags, which will be represented as a categories string array in our article object.
In our medium-article element, we pass the categories to our medium-category-chips element like this:
Let’s have a look at our MediumCategoryChips class:
Again, we are attaching a shadow DOM to encapsulate our component. Additionally, we decode our categories string array to iterate over it and render a medium-category-chip for each chip. Inside the element, we display the text of the related category.
If you followed the previous article closely, you probably have already noticed that our MediumCategoryChip is using a template tag and that it defines a slot which allows us to display text inside:
The special part of this component is in the beginning. We create a template element with a slot. As you know, HTML templates allow us to declare reusable fragments that hold HTML content that is not rendered immediately.
In our render function, we create a clone of its content using the template as its basis. Here, too, lit will simplify the process of creating and cloning templates in the following articles.
Showing a headline
We also want to show a headline that displays a title and an avatar of the author. Both information can be read from the Feed interface.
To make our Web Component more flexible, we allow hiding the header by passing the hideHeader attribute to our entry component. In case an HTML attribute is not set, the getAttribute function will return null. This means that we need to conditionally render our medium-header, whenever this getter resolves to false:
In our medium-portfolio we can then generate our medium-header conditionally by using a ternary operator:
Now, we just need to pass the required attributes to our medium-header component that looks like this:
And the medium-header component gives the image URL to the medium-avatar component, which looks like this:
What’s next?
In this article, we started implementing our application and learned about attributes, properties, and lifecycle callbacks.
In the next article, we will bundle our code by using the build tool webpack. After that, we will make use of Typescript and refactor our application to use lit.
- Build Your Own Blog Portfolio with Web Components: Basics
- Build Your Own Blog Portfolio with Web Components: Attributes, Props, Lifecycle Callbacks
- Build Your Own Blog Portfolio with Web Components: Webpack
- Build Your Own Blog Portfolio with Web Components: Typescript
- Build Your Own Blog Portfolio with Web Components: Lit Library
I hope you could follow along with these steps. I am always happy to answer questions, and I am open to criticism. Feel free to contact me at any time 😊
You can also have a look at the Github repository.
Follow me to not miss the next articles 🙏
About the author
Marius Bongarts is a Software Engineering Analyst at Accenture Interactive. He also created the Web Highlights extension, which allows users to organize text highlights and bookmarks with the help of tags and directories.
Get in touch with me via LinkedIn.
Here is the link for unlimited access to every content here on Medium. If you sign up by using this link, I’ll earn a small amount at no additional cost to you.
More content at plainenglish.io


