Build a Notes App With Google Authentication in Node.js
How to add Google OAuth to your web app

Learning Objectives Of This Article
- Know what third-party authentication is.
- Know when to use third-party authentication.
- To be able to build a notes application with the built-in Google OAuth.
Introduction
The word around town is that you’re an amazing web developer who possesses great enthusiasm for learning new skills and loves catching up with cutting edge frameworks and technologies. For this reason, a client has approached you and asked you to build an app with the following requirements:
- A basic notes app with normal CRUD functionality.
- A login and logout system — there will be multiple users of this web app.
“Sure, no problem”, you tell yourself. “I’ve already built a note-taking application, and I’ve also learned how to build a login system. This is really easy”.
“But, there’s one catch,” the client tells you. “Sorry to throw a wrench in your works, but you have to make the user login through his Google account.”
You still accept the offer. After all, it’s a fact that one of the most crucial jobs of a programmer is to tackle challenges that come up. With a few Google searches, you can discover that the process of making the user login through another service is called third-party authentication.
What is third-party authentication?
When signing up for a new service, itç common to have to sign up via another social media site, for example, Google+, Facebook, Twitter, or LinkedIn. The process of logging in through another third-party service is called third-party authentication.
Let’s first discuss the benefits of third-party authentication.
Why Use Third Party Authentication?
According to this Medium article, your development process becomes simpler. Some of the reasons backing up this claim include:
- No need to deal with password security: Think about it — as a developer you no longer need to think about rainbow tables,
bcrypt, hashes and salts. The third-party service that handles authentication has already handled the password security for you. This means that a huge burden has been lifted off the developer’s shoulders. - No more “Forgot Password?” Dilemma: If your web application includes a username/password entry, then it should be crucial for you to include the “Forgot Password” too. This means that you have to write additional code and logic so that the user can reset his password. However, if there was an option to log in through third-party authentication, then the user only has to remember one password (in this case, the social media site that he’s logging in through) to use your app. Looking at this scenario, we can see that the user does not need to remember additional passwords and the developer does not need to write more code for resetting the user’s password.
We’ve talked about its fruition, now let’s get our feet wet!
In this article, we’ll create a note-taking application using Google as a third-party authentication service.
Getting Started
In your project directory, we need to initialize the project. Do it like so:
Installation of libraries and dependencies
We need to install the following libraries:
express: To handle our routing and middleware functions.mongoose: We’ll be storing our notes and the users in a database. For this purpose, we’ll usemongoose. Here’s a refresher on MongooseJS.connect-mongo: This will allow us to store sessions in the database. So when we reset the server, we don’t get logged out.express-handlebars: We’ll use Handlebars as our template engine. You can usepugor other template engines as well.dotenv: For our config and environment variables.method-override: Make PUT and DELETE requests from our templates. Normally, you can’t perform PUT and DELETE requests from the browser but this package makes it possible to do so.moment: To format our dates properly.passport: For authentication.passport-google-oauth20: Since we’ll use Google OAuth 2.0, we’ll be using this package as well.nodemon: This package will continuously watch our server and restart it automatically every time we make changes to the code. This will be a development dependency.
To install these dependencies, run the following command in your terminal:

Next, we’ll install nodemon as a development dependency. Do this like so:
Environment variables
In the root directory of the project, run the following command in the terminal.
Building a MongoDB Cluster
The MongoDB Cluster will allow us to host our data in a cloud server, rather than hosting the data on our local machine.
To do this, first sign in to the MongoDB website. Then follow these steps to create an organization. Using that organization, you can successfully create a cluster by following these steps.
When your cluster has been created, you’ll get a dashboard like this:
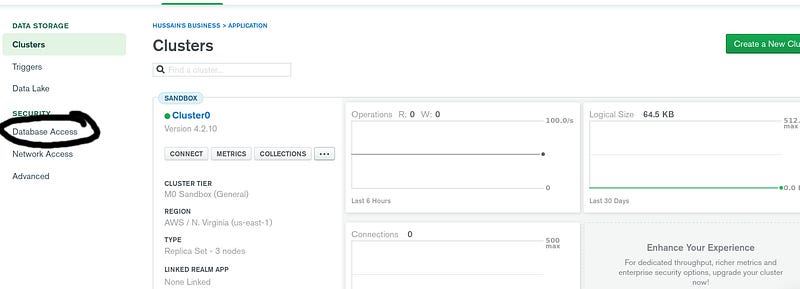
Click the Database button(circled in black) and then click on Add new Database user . There, create your credentials.
Now go back to your dashboard by clicking on Clusters on the sidebar, and click on Connect

There, you’ll be greeted with the following dialog box:
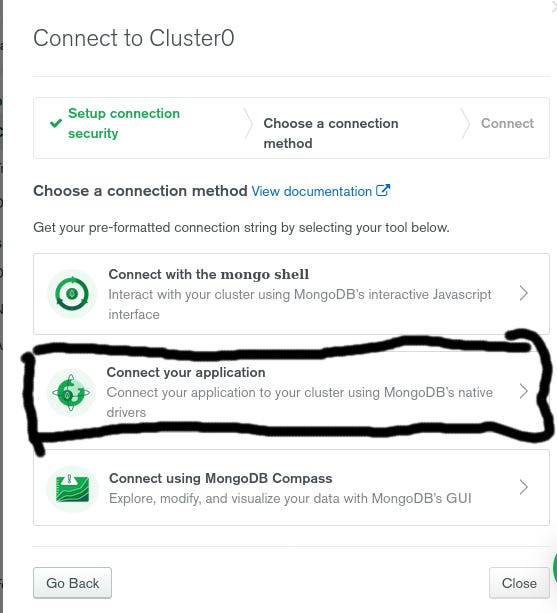
Now press Connect to Application (circled in black) and you’ll receive your connection string.
Copy that connection string into your .env file like so:
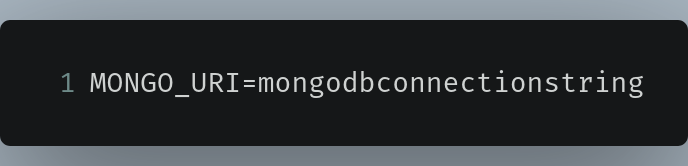
In this case mongodbconnectionstring will be your actual MongoDB Connection String.
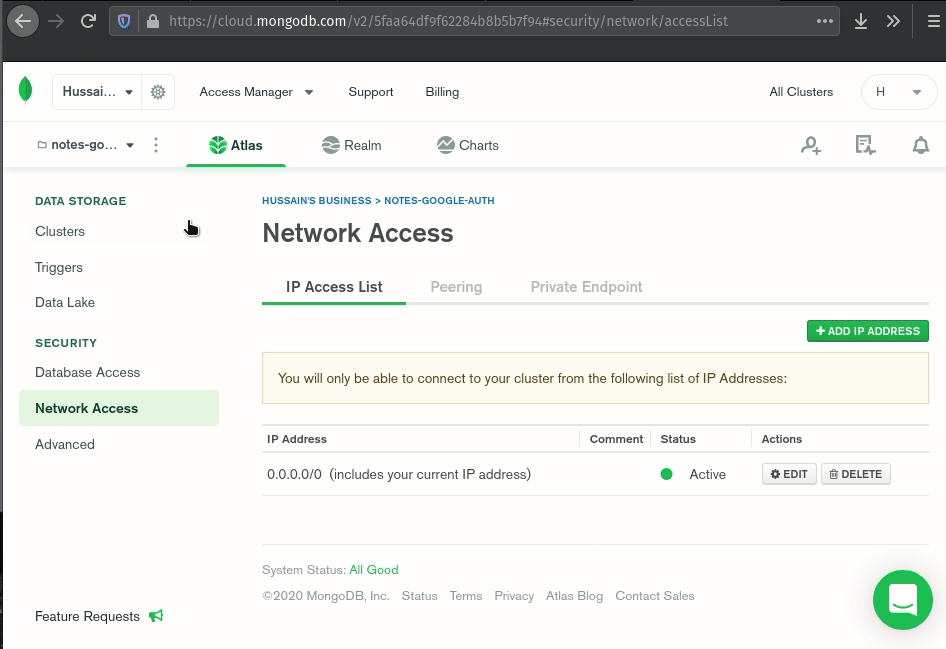
The last step is to enable Network Access from anywhere. To do so, go to your dashboard and click on Network Access . There, click the EDIT button under the Actions column. Ensure that the Access List Entry is 0.0.0.0/0 :
This step is now done! Now let’s move on to getting our Google API Key.
Use Google APIs
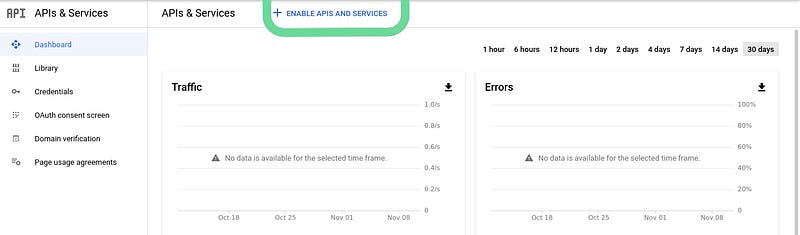
Before implementing Google OAuth in our app, we need to first get our API key. To acquire it, go to the Google Developers Console page, and then follow these steps to create a project.
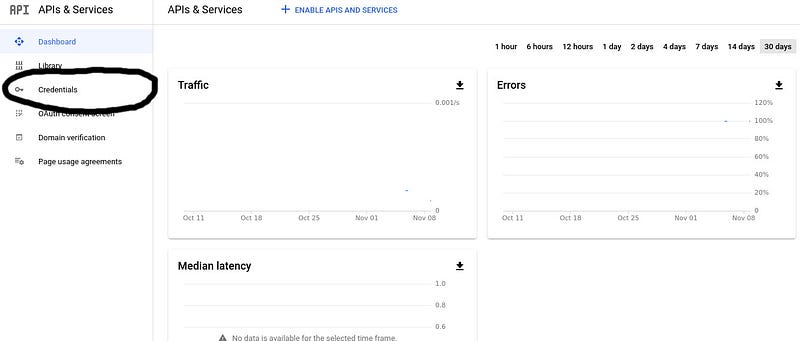
You’ll be greeted with a dashboard. Click on ENABLE APIS AND SERVICES.
Now scroll down to Google+ API under the Socials section.
You’ll see a page that looks like this:
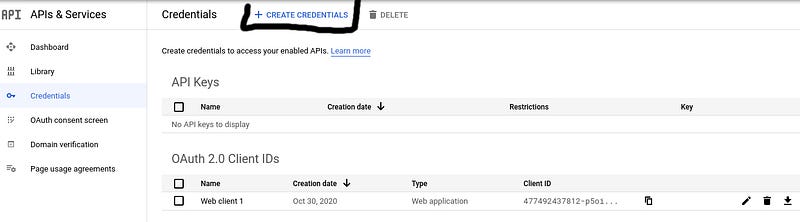
Now click on Credentials and you’ll receive a page that looks like this:
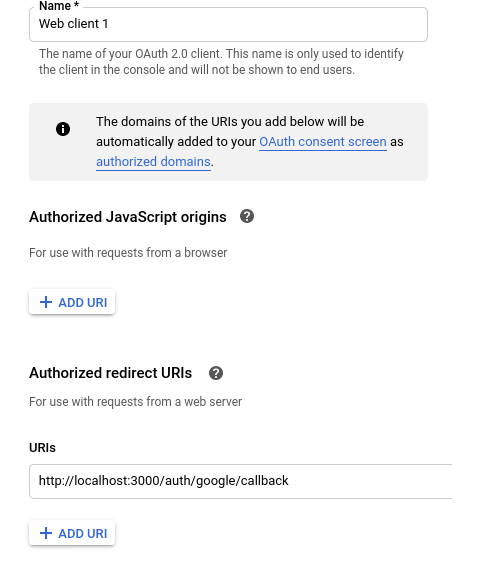
After this, click on Create Credentials, then click on OAuth Client ID. On the Application Type field, select Web Application. Along with that, use the following settings:
When you click on Create, you’ll receive your Client ID Key and the Client Secret Key.
Copy the API Key and Secret into your .env file after the MongoURI variable like this:
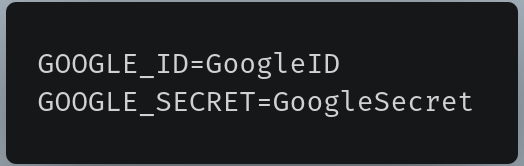
In this case, GoogleID will be your Client ID and GoogleSecret will be your Client Secret.
It’s now time to code! Let’s create the app.js file.
Our main file — app.js
This will be our main project file. For now, we’ll just write some boilerplate code. We’ll also configure our template engine and our static folder. In your project’s root directory, create a file called app.js with the following code in it:
Lines 1–2: Importsexpressand thedotenvmodules into our project.Line 7: Loads the environment variables into our project so that they can be used in development.Line 9: Starts our NodeJS Server atport 3000.
Run the app:
This is the output:

This means that our server has successfully started.
We’re finally done with the initial stages! Let’s move on to setting up our database.
Mongoose User Database Setup
Since we’ll be using MongoDB to store user notes, we’ll be using Mongoose API to get database facilities in the web app.
In your project’s root directory, create two new folders: config and models.
Within the models folder, create a file called User.js. This module will consist of the definition of a User Schema. This file will export a Model which will be derived from the User Schema.
In models/User.js, write the following code:
Lines 1–3: Imports themongooselibrary into our project and then create aSchemavariable.Lines 4-30: Defines theUserSchema. This will tell us that when we create a model, all of the fields given below will be stored. The Google OAuth API provides us with the required data that will later be stored in these fields. We’ll also be storing acreatedAtfield, which stores the account creation date. By default, it will be the date when the user signed up.Line 32: Exports a Model calledUserwhich will be derived from theUserSchemathat we just defined above.
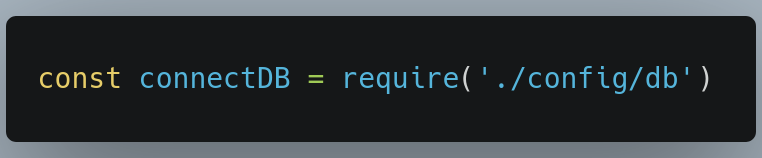
Now go to the config directory and create a module called db.js. This module exports a function that lets us connect to our database.
In config/db.js, write the following code:
Lines 2: When you work with Mongoose, you’re working with Promises, which is why you declare anasyncfunction.Lines 4–9: Connect to our MongoDB database using the connection string that we obtained earlier. Since our connection string is located in our.envfile(it’s an environment variable), we can access it by theprocess.env.MONGO_URIvariable. We’re also configuring the optionsUseNewUrlParser,useUnifiedTopology, anduseFindAndModifyso that Mongoose won’t throw errors and warnings whenever we connect to the database.Lines 11–15: Throw an error if Mongoose encounters a problem during connection.Line 16: Export theconnectDBfunction.
We now need to connect to the database.
In /app.js , perform the following steps:
- First import the
connectDBfunction intoapp.js:
- Just after the
dotenv.config()method call, invoke theconnectDBfunction:
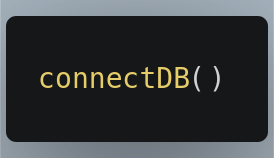
Run the app again and you’ll see the following output:

This means that the connection to the database was successful! In the next step, we’ll configure our template engine and layouts
In the end, app.js should look like this:
Template Engine and Layouts
For our template engine, we’ll use Handlebars. In app.js, import the express-handlebars library:

Let’s now tell Express that we’ll be using Handlebars as our template engine. In /app.js, write the following code:

Line 1: Specify that the extension(extname) of our Handlebar files will behbs. We’re also telling Express that our default layout(defaultLayout) will bemain.hbs. A layout is the HTML page wrapper which can be reused for different views of the app.Line 2: Here, we’re informing Express that our view engine will be Handlebars, orhbsfor short.
When that’s done, go to your root directory and create a folder called views. Within this folder, create another folder called layouts. In the layouts directory, create two files: main.hbs, our default layout, and login.hbs, to be used when the user logs in.
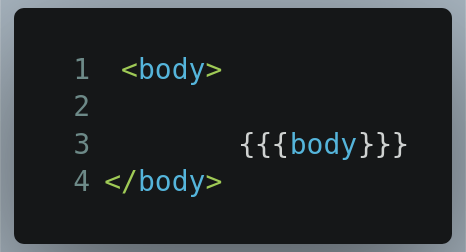
In views/layouts/main.hbs, write the following code:
All of this is standard HTML, but pay attention to Line 6. {{{body}}} is a placeholder for where the main content should be rendered. In other words, all the files that will use main.hbs as their default layout will have the same title (this is evident by the title element content) but will have a different body ({{{body}}}). This concept will be clear to you in the later stages.
Now in views/layouts/login.hbs , write the following code:
Notice that it’s similar to the main.hbs file but the title is different.
Now that we’ve coded our layouts, we now want our users to see the page. It’s now time to create our routes that will render our views.
In the end /app.js, should look like this:
Index Routes and Views
In this section, we’ll code our routes. These routes will render the Handlebar files that we have just created.
To get started, within the root directory, create a new folder called routes .
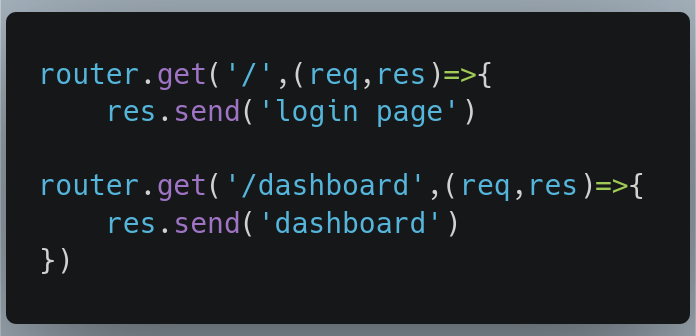
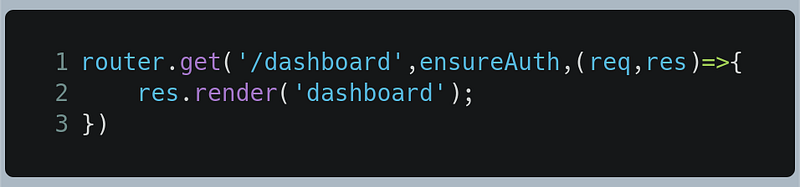
Within the routes directory, create a file called index.js. This file will handle routes that aren’t followed by something, for example /dashboard , or the root directory,/ .
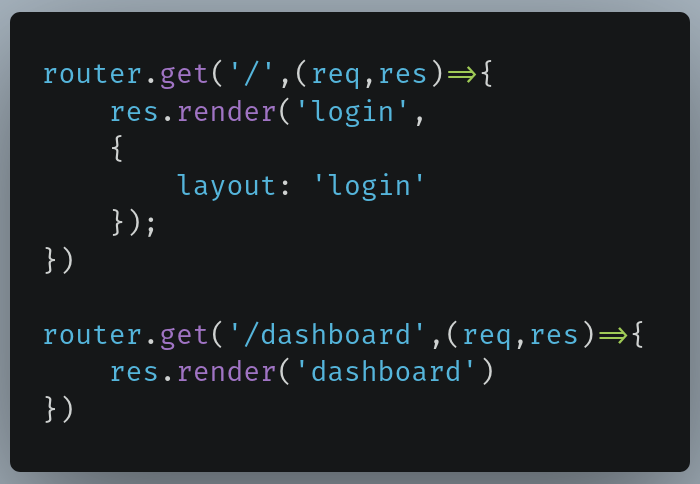
Within routes/index.js , write the following code:
In this piece of code, we’re just exporting a Router that will handle the / and the /dashboard routes. Just for testing purposes, we’re sending basic text to the client. This code will be edited further later on in this tutorial.
Now we need to link the index.js routing file with app.js.
In /app.js , write the following code:
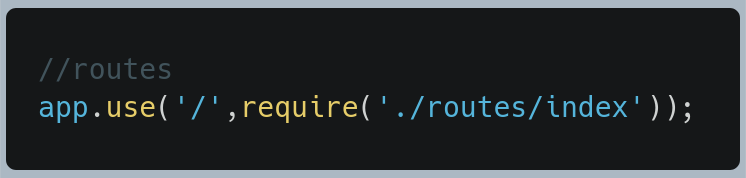
This means that the / (root directory) and the /dashboard directory will now be handled by the index.js file.
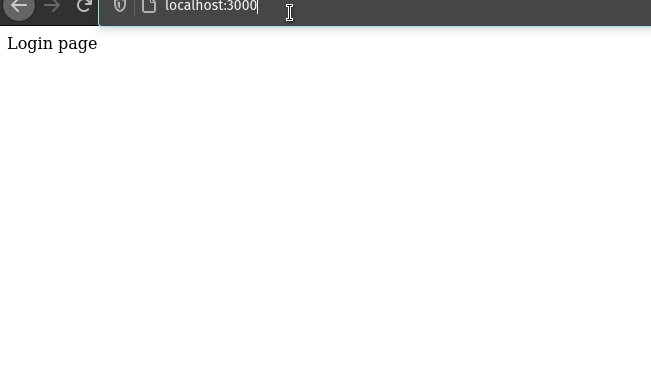
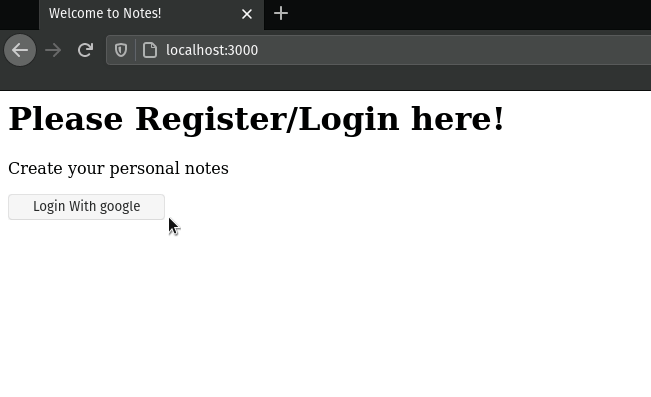
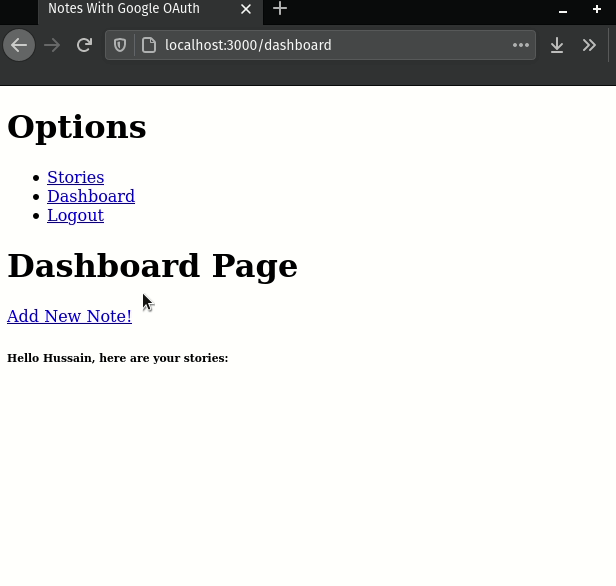
Run the program and point your web browser to localhost:3000 and then to localhost:3000/dashboard. This will be the result:
Our code works! Now let’s create the views that will be rendered when the user visits / or /dashboard.
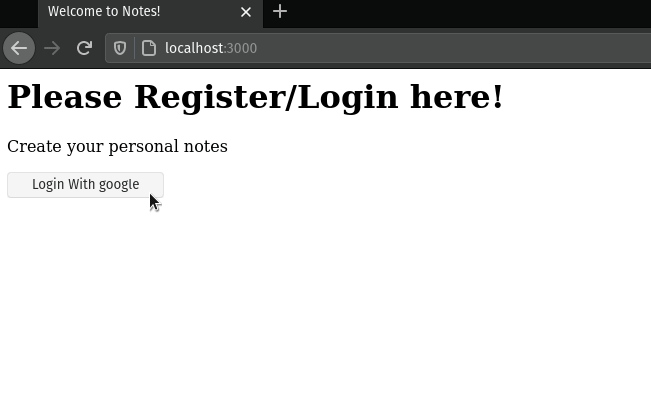
Within your views directory, create two files called dashboard.hbs and login.hbs.
In views/login.hbs, write the following code:
Lines 3–5: Create a button that will redirect the user to the/auth/googleroute. This route will let the user log in to our app using his Google account. We’ll handle this route later on in this tutorial.
Now go to views/dashboard.hbs and write the following code:
We’ll write further code for the dashboard page when we use Passport to enable third party authentication. For now, we’re just testing whether the code works.
Now go to routes/index.js, and perform the following steps.
- Find the following code:
- Now replace these lines of code with the following:
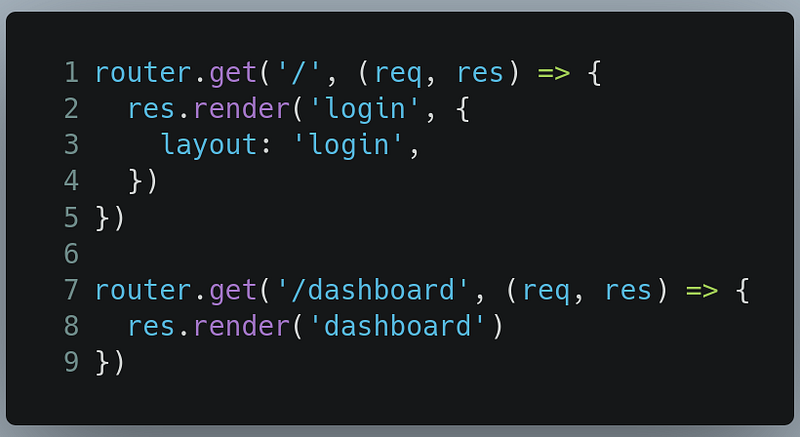
Lines 2 & 3: Render thelogin.hbsfile and tell Express to uselogin.hbsas the default layout(we did this by setting thelayoutoption). Ensure that thelogindefault layout file is located in theviews/layoutsdirectory.
Run the program and this should be your result:
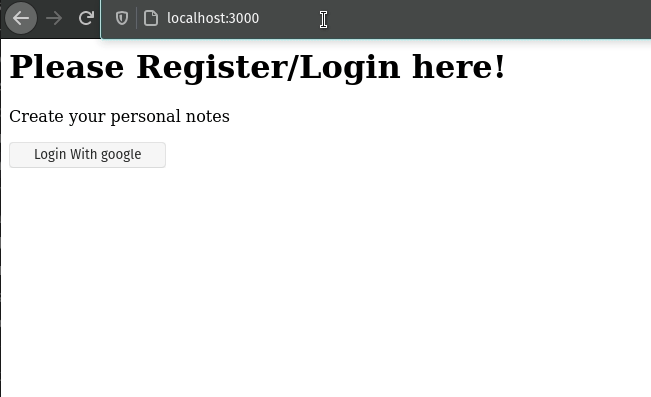
This result indicates that our code works! In the next section, we’ll be using Passport. This library will help us implement Google authentication in our web app.
In the end, app.js should look like this:
And this is how routes/index.js should look:
Authentication With Passport
Passport.js is an extremely useful library that will help us enable third-party authentication in our Notes app. Alternatively, if we want, we can even implement our own login system. For this tutorial, since we’re using Google OAuth, we’ll be using Passport’s Google Auth 2.0 Strategy.
Before starting with Passport, let’s first configure Passport and its sessions.
Passport config and sessions
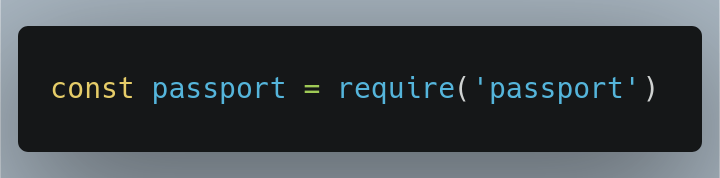
Go to your config folder into your root directory and create a module called passport.js. This is where our Google Strategy will be located.
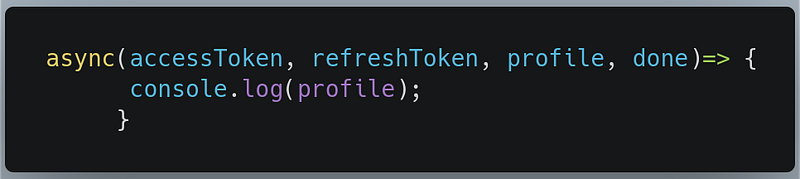
In config/passport.js, write the following code:
Lines 1-3: Importing the Google authentication Passport strategy, Mongoose API, and ourUsermodel into the module.Lines 7–12: Passport requires our Google Client ID and Google Client Secret so that we could proceed with OAuth. This data will be provided by the environment variables that we coded earlier in the tutorial. For more information on environment variables, click here.Lines 14: Log the profile data of the user in the console. Later, we’ll edit this code to save the user data to our database.Lines 17–26: Serializing and de-serializing theuserinstances to support login sessions.
Next, we need to utilize this module with your project. To do so go to /app.js and take the following steps.
- Start by importing the
passportlibrary:
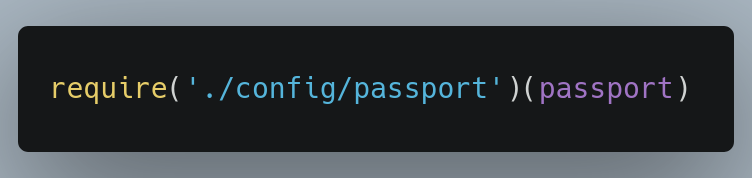
- We need to tell Passport that we’ll be using Google authentication. We’ll do this by importing our Passport config:
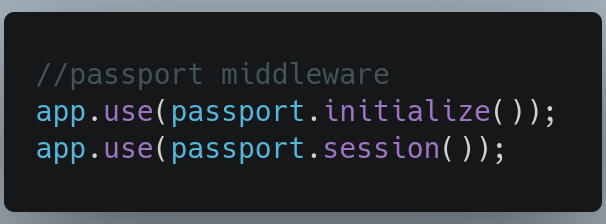
- Now we need to add the Passport middleware:
- In order for Passport to work with sessions, we need to implement
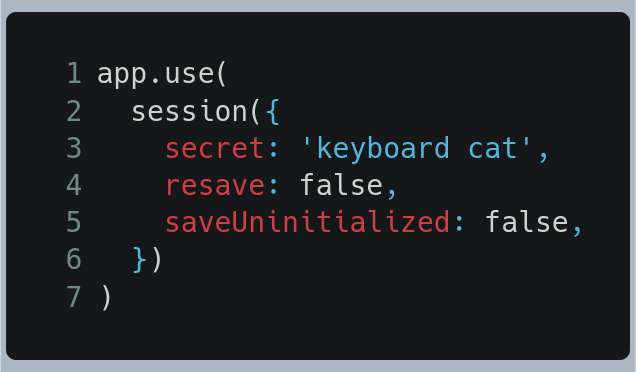
express-sessions. Go back to the top of/app.js, and importexpress-sessions:

express-sessionhas its own middleware. Enter this piece of code just before thepassportmiddleware:
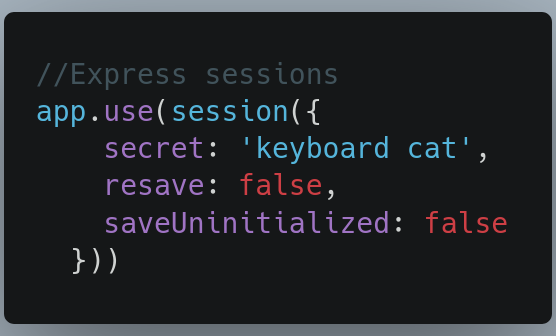
We keep the resave property as false . It means that we don’t want to save the session if nothing is modified. We also set the saveUnitialized property to false which instructs Express to not create the session until something is stored. For more information, you can refer to the express-session documentation.
In the end, app.js should look like this:
Authentication routes
We now need to configure our authentication routes that are needed for Google OAuth.
Go to your routes directory and create a new file called auth.js . There, write the following code:
Line 5: Here we’re handling the/googleroute. We’re telling Express that when the user is directed to this route, thepassport.authenticatefunction is invoked. We’re also instructing Passport to use the Google strategy. The{scope : [‘profile’]}snippet means that we’re asking for the user’s profile data.Lines 7–13: Handle the/google/callbackroute and invoke thepassport.authenticatefunction once again. This time we’re telling Passport that if the authentication process fails, then we should redirect him back to the/(login) page. Otherwise, if the process is successful, redirect the user to the dashboard.Line 15: Export this Router so that it can be used in our project.
Now go to /app.js and add the following line:

This means that all of the routes starting with /auth will now be handled by auth.js.
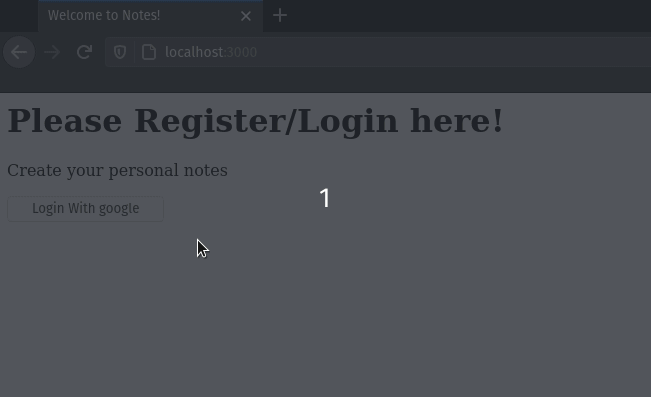
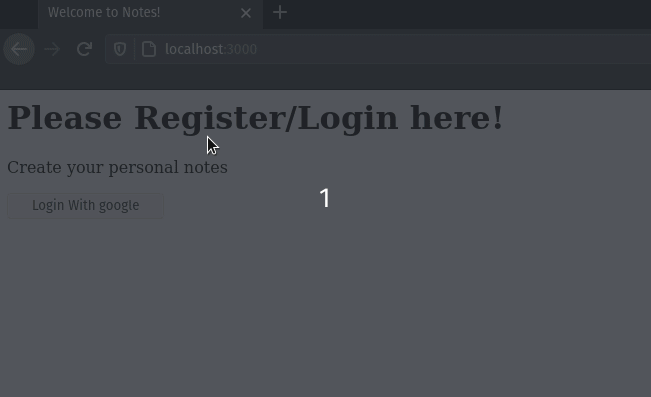
Now run the code and go to localhost:3000 in your web browser. This will be the result:
This will be the output in the console:
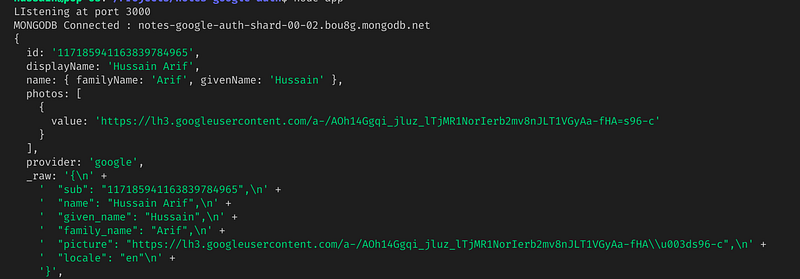
This is because we choose to log the user data in the console. This is evident by the following code snippet in config/passport.js :
Our code works! But there’s one problem — instead of logging in, the application hangs. This is because we haven’t handled the callback that’s in the Google strategy.
In the next section, we’ll move on to saving the user’s profile data into our database.
In the end, /app.js should look like this:
Saving Google profile data
To prevent our application from freezing, let’s save the user data instead of logging it to the console.
In /config/passport.js, find the following piece of code:

And now replace it with the following:
Lines 3–9: Save the data that Google returned to us within an object callednewUser.Line 10–11: Verify whether the user exists in our database. We do this by finding the user through his ID which is unique for every user.Line 13–15: If the user exists, invoke our callback function, and tell Passport that no errors were generated.Line 16–19: If the user does not exist, save his data into our database and tell Passport that no errors were created in this process.
When that’s done, run the code. This is the result:
Success! The user got into the dashboard. However, in usual cases, the user wants to log out as well. Let’s do that.
In the end, config/passport.js, should look like this:
Logout functionality
Within routes/auth.js, write the following code:
Line 2: When the user clicks on the Logout button, they will be directed to the/logoutroute. Here, we’re handling the/logoutroute.Line 3: Invoke thereq.logout()function so that the logout process can be initiated. This method is provided by Passport.Line 5: When the logout process is successful, redirect the user to the login(/) page.
We’ve implemented the /logout route. The next step is to create a logout button on the dashboard.
Here, we need to create a partial. What’s a partial? Partials allow for template reuse. You may think of them as templates within templates.
Within your views folder, create a new folder called partials . Here, create a file with the name of _header.hbs.
In views/partials/_header.hbs, write the following code:
Here, we’ve just created a simple list element that points the user to different routes.
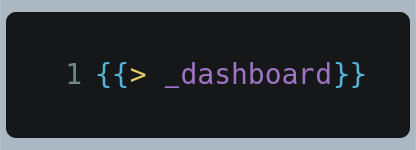
Now in views/layouts/main.hbs, perform the following steps.
- Find this piece of code:
- At
line 2, just above{{{body}}}, write the following:
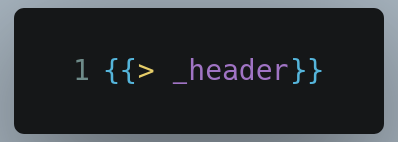
This adds the _header.hbs partial to main.hbs.
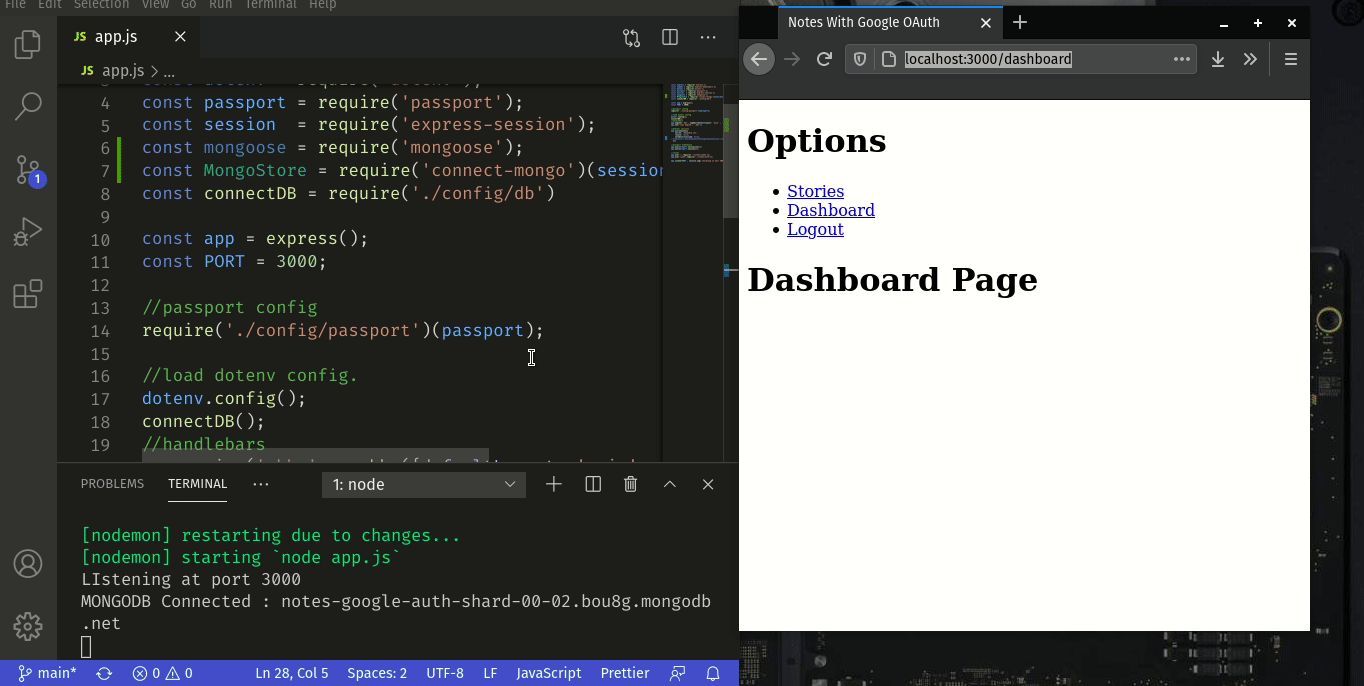
Run the code. This will be the result:
This means that our code ran as expected. However, there’s a major security flaw in our program: even if we log out, we can still access the Dashboard. Here’s an illustration:
In the next section, we’ll mitigate this problem by using authentication middleware.
In the end, this is how routes/auth.js should look:
Auth middleware
In your project, create a new folder called middleware . Here, create a new file called auth.js.
In middleware/auth.js, write the following code:
Line 2–5: Here, we’re checking whether the user has already logged in. If they have, the request can proceed as normal. Otherwise, they are redirected to the login page. Thereq.isAuthenticated()method tells us whether the user has already logged in. TheensureAuthmethod will be used when the user is in/dashboardbut chooses to go to the login page.Line 9–15: Here, we’re also ensuring the authentication of the user. If the user has not logged in, they’ll be booted back to the login page. TheensureGuestmethod will be used when the user hasn’t logged in but chooses to go to the Dashboard.
Now go to routes/index.js, and perform the following steps.
- Find the following piece of code:
- Replace this with the following snippet:
Line 3:ensureGuestmiddleware now runs every time the user goes to the/directory.Line 8: Likewise, theensureAuthmiddleware runs every time the user goes to the/dashboarddirectory.
This will be the output of the code:
In the end, this is how routes/index.js should look:
Store login session in database
Our web app has been running great so far. But there’s one critical problem: if the NodeJS server restarts, then the user is logged out again.
One solution to this problem is to store the user’s login session to the database.
Go to /app.js, and perform the following steps.
- Import
mongooseandconnect-mongo.

In line 2 , we’re passing an express-session as a parameter. This is because connect-mongo requires the express-session middleware to function properly.
- Now, scroll down and find the following piece of code:
- Replace it will the following snippet:
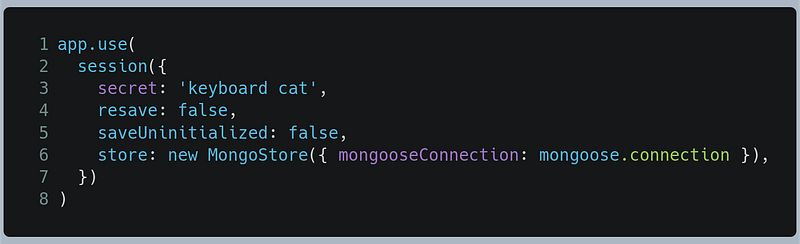
We’ve just added the store property and told it to use the current Mongoose connection that’s in use.
Run the program again. Voila! The problem has disappeared.
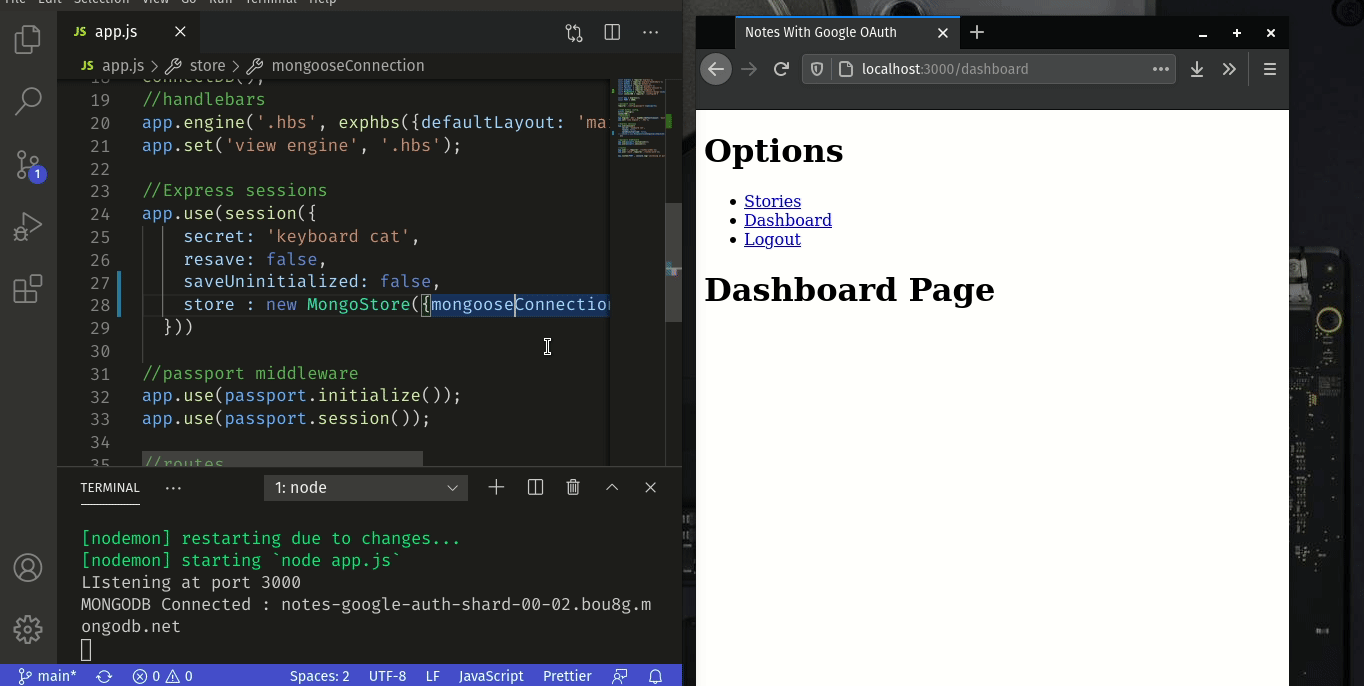
In the end, this is how app.js should look:
Greet the user
To make our user experience better, let’s also greet the user with their name when they enter the dashboard.
To do this, go to views/partials and create a new file called _dashboard.hbs . In views/partials/_dashboard.hbs, write the following line of code:
Here, we’re just using the name data that will be sent to us by Express.
Now go to views/dashboard.hbs and add the following line of code at the end:
This line indicates that we’ll now use the _dashboard.hbs partial in our dashboard.hbs file.
Now go to routes/index.js and perform the following steps.
- Find the following piece of code:
And replace it with the following:
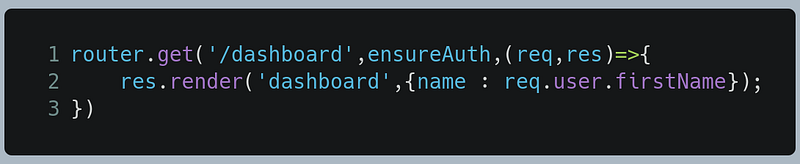
Here, we rendering dashboard.hbs and sending the name variable as data so that it can be displayed.
This will be the output of the code:
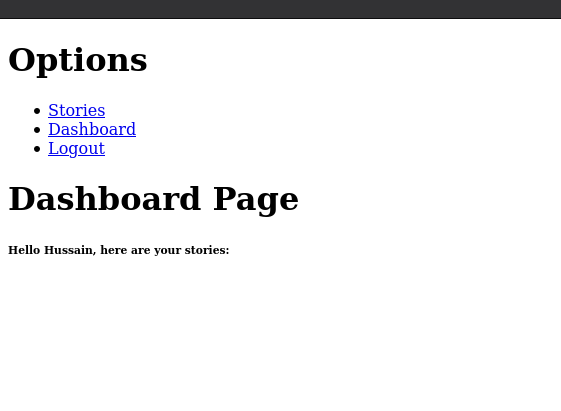
In the end, this is what routes/index.js should look like:
Congratulations, we’re finally done with Google OAuth with Passport! The hardest part is done.
When you’re ready, in the next section we’ll now create our Notes app, which is the Gist of this tutorial.
The Notes App: Getting Started
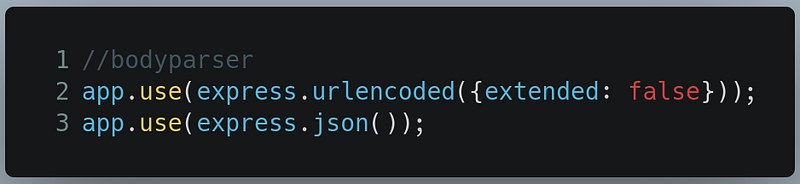
The body-parser middleware
We’ll use this middleware to parse the input that will come from the client.
Go to /app.js and write the following code:
When that’s done, let’s move on to creating the notes.js file.
The notes.js file
Before getting started, go to your routes directory. There, create a file called notes.js . This file will be a Router instance that will handle all of the routes starting with /notes. We will add more code to this file as we progress in this tutorial.
Now go to app.js in your root directory. Here, we will tell Express that all routes starting with /notes.
In /app.js, write the following code:

We’re now done with the initial stages. Let’s create a model in Mongoose for our Note documents.
In the end, /app.js should look like this:
Mongoose Notes Database Setup
The note model
We first need to start out by creating a notes model in Mongoose so that they can be saved to the database.
In your models folder, create a new file called Note.js .
In models/Note.js, write the following code:
Lines 5–16: Save the title and the body of our note. Additionally, we’re also saving the date of creation of the note.Line 17: Saving a reference to theUsermodel. We’re doing this so that users can’t see other users’ personal notes. We will talk about this in detail later on in this tutorial.Line 20: Export the model with the name ofNoteso that it can be used within our app.
We’ve now created the Note model. Let’s now work on the CRUD functionality of this app.
The CRUD Functionality in Notes
Importing Libraries
Before getting started with this section, let’s first import the needed libraries in routes/notes.js.
Go to routes/notes.js and write the following code:
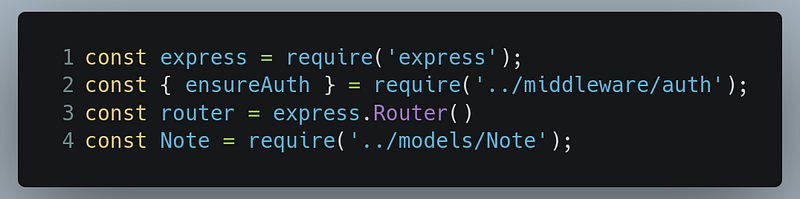
Line 1 & 3: Since we’re dealing with routes, we’ve imported theexpresslibrary and anexpress.Routerinstance.Line 2: We want to ensure that the client stays logged in as long as he is performing CRUD related operations. For this purpose, theensureAuthfunction has also been imported.Line 4: Since we’re performing CRUD operations on ourNotemodel in Mongoose, we’ll import theNotemodel in our module as well.
When this stage is complete, let’s move on to creating a note.
Write or create a note
In your views directory, create a new folder called notes. Within the notes folder, create a file called add.hbs.
In views/notes/add.hbs, write the following code:
Here, we’ve built a simple web page with two textarea elements, in which one of them has the name title and the other has the name body.When submitted, the form will make a POST request to the notes/add directory.
First, we need to create a link for this page on our dashboard. To do so, go to views/dashboard.hbs, and add the following line of code:

This creates a link on the dashboard page so that the user can be redirected to the /notes/add route.
Now we handle the GET and POST requests for this route. Go to /routes/notes.js, and write the following code:
Lines 1–3: Handle theGETrequest to the/notes/adddirectory. When the user goes to/notes/add, then theadd.hbsfile will be rendered. TheensureAuthmiddleware ensures that the user stays logged in at all times.Lines 5: Handle thePOSTrequest to/notes/add.Line 7: We already have the logged-in user’s ID because of Passport. We’re now passing this data into thereq.bodyobject so that MongoDB can store the user’s ID into the Note document.Line 8-9: Store our note into MongoDB and then redirect the user to the dashboard.Line 11: If we encounter an error while saving the document, then log out the error.
In the end, this should be the result of the code:
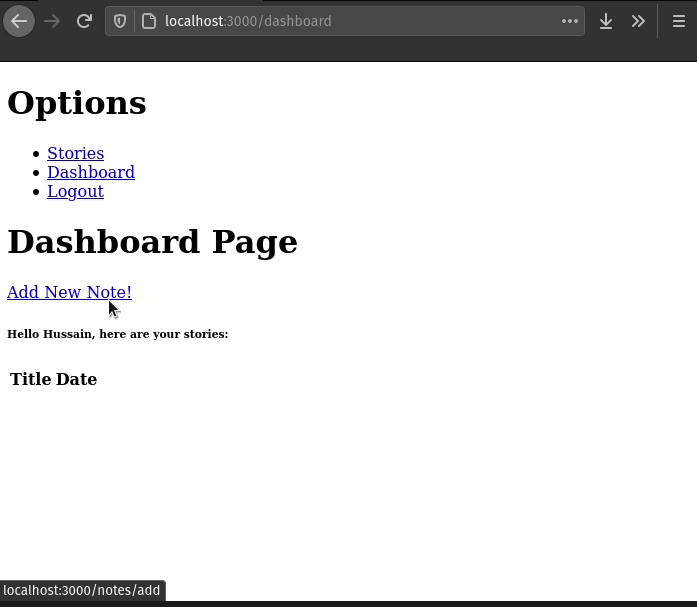
This means that our code works! Now we need to list out all of our saved notes.
List all our notes
First, go to routes/index.js and perform the following steps.
- Import the
Notemodel that we just created:

- Now find the piece of code that handles the
/dashboardroute:
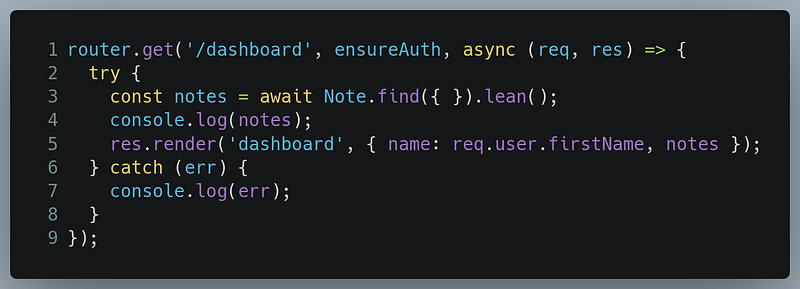
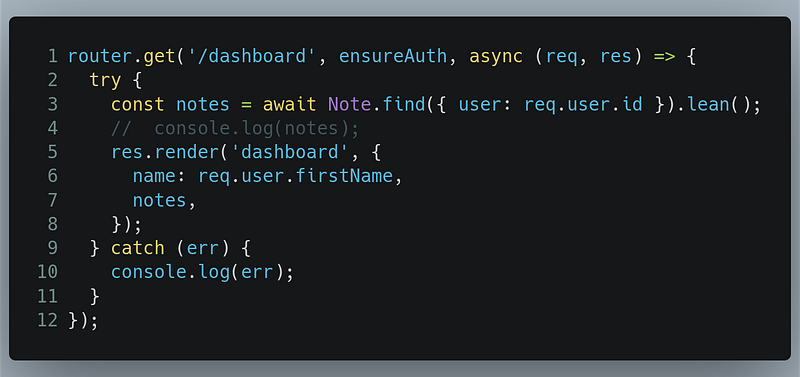
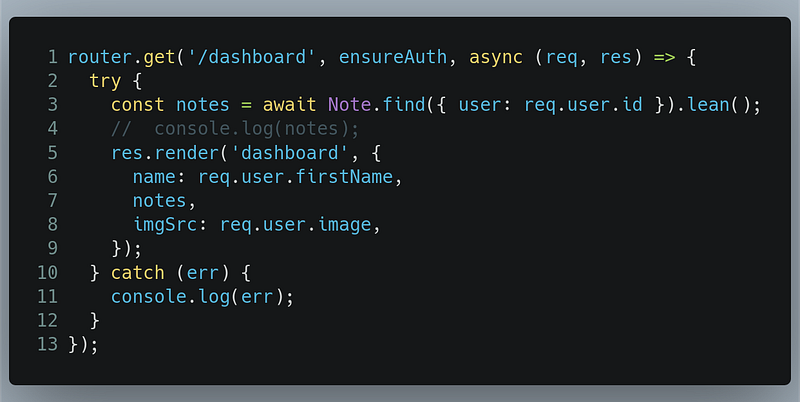
- Here, we will fetch all of our notes and then send them to the
dashboard.hbspage. Write the following code:
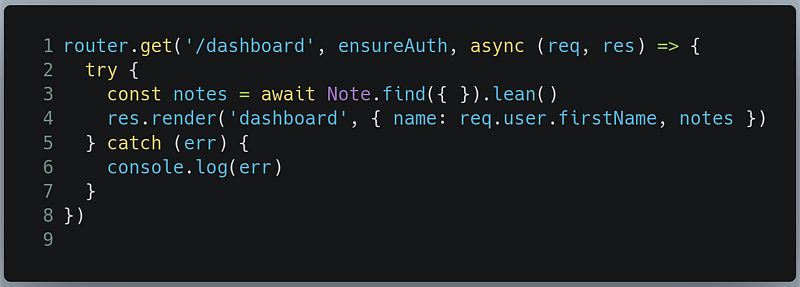
Line 3: Find all of ourNotedocuments in our database, and then convert into a JavaScript array of objects (hence theleanfunction) and then save it to a variable callednotes.Line 4: Render thedashboard.hbspage and send the name of the logged-in user (req.user.firstName) and also thenotesdata.
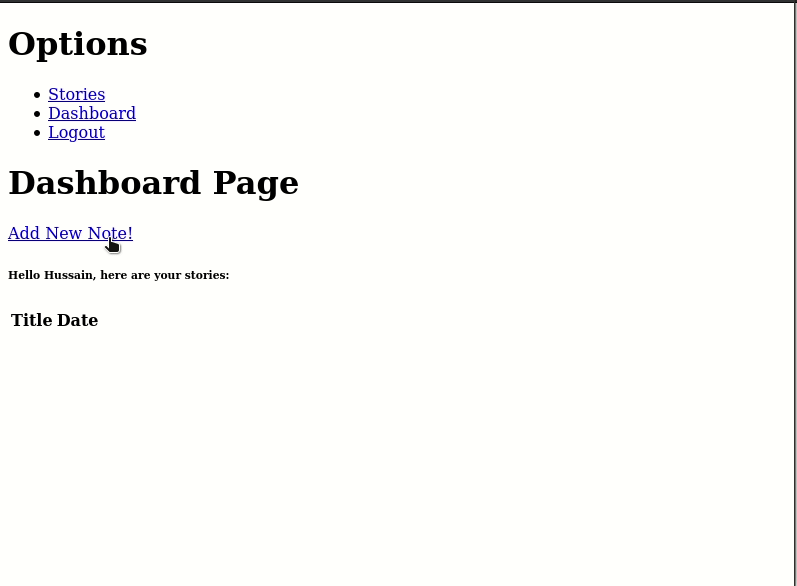
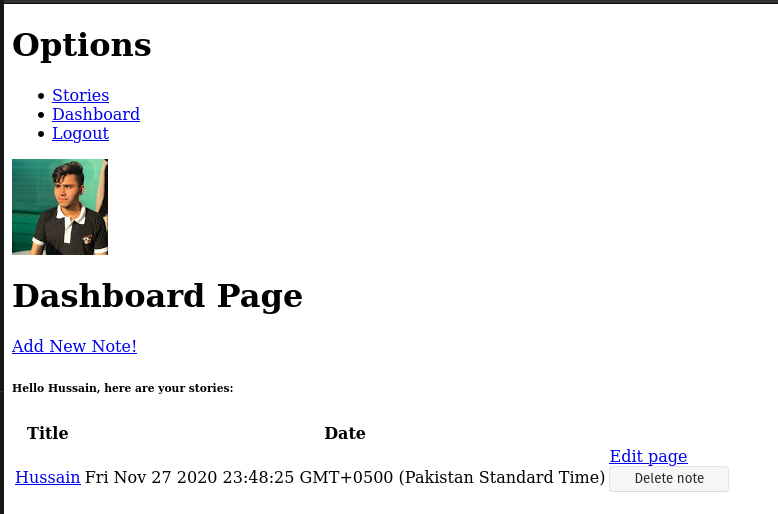
Now we need to render a table that displays our data.
In partials/_dashboard.hbs, append the following code:
Here, we’ve just built a table with two headings: the title and the date of creation. However, we need to pay attention to these lines:
Line 11–15: For each Note document present in thenotesarray, create a separate row. Under theTitleheader, there should be titles of our notes and theDateheader should have the dates of creation of the notes. Keep in mind that we already saved this data inNotemodel. We’re just displaying it.Line 16–24: We’re also creating separatetdelements so that each note can have their own Delete and Edit options. Atline 18, we’re trying to send a DELETE request. Since this is not possible through the browser, we’ll be performing this request by using themethod-overridepackage. We’ll handle these routes later in this tutorial.
Run the code. This will be the result:
However there is one fatal problem: if another user uses his own Google account to create a note, there’s a chance that every other user on the platform can see that user’s notes as well. This is a critical privacy issue since we don’t want users to see each other’s personal notes. This can be demonstrated like so:
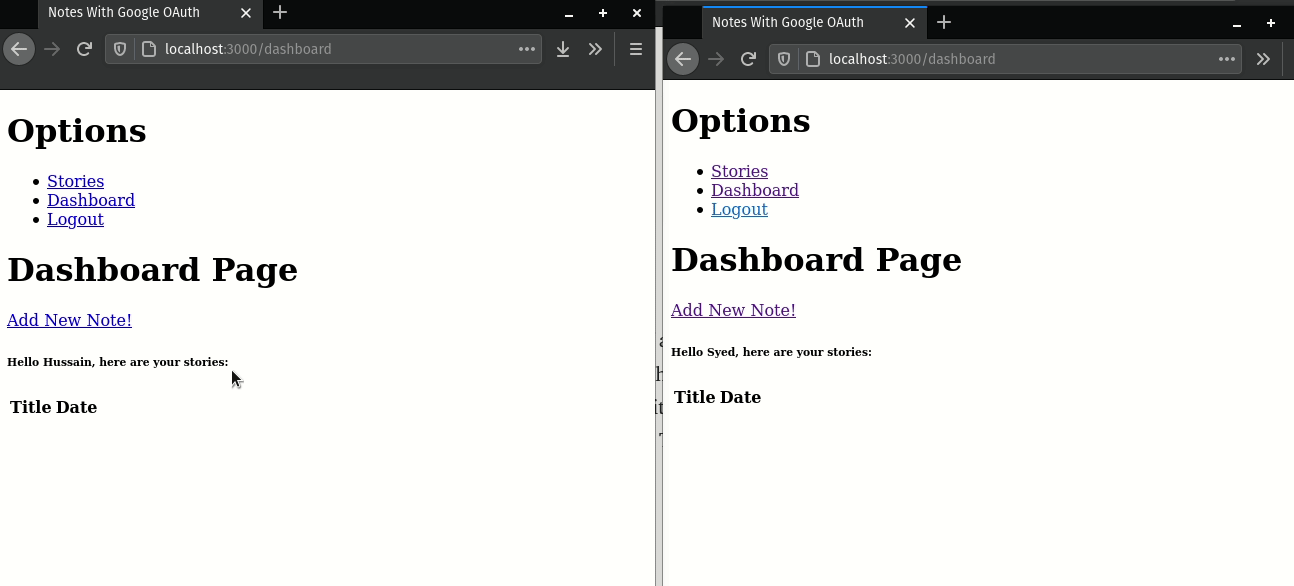
The solution to this problem is incredibly simple. On the dashboard, we only need to show the notes that were written by the logged-in user, not anyone else.
Go to routes/index.js, and perform the following steps:
- Find the following piece of code:
And replace it with the following snippet:

The only change is on Line 3, where we told Mongoose to only find the Notes which were written by the logged-in user.
This will be the output of the code:
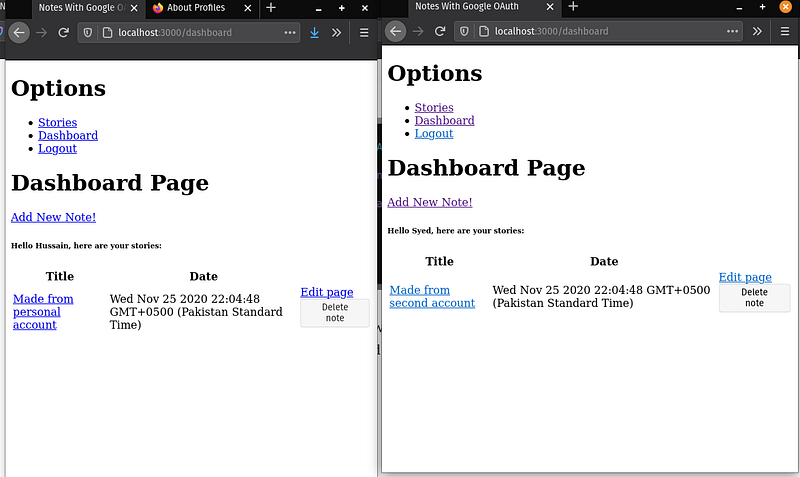
Now neither user can see each other’s notes! We’re now done with this section.
In the end, this is how routes/index.js should look:
When the user clicks on one of his notes, he expects to see a page where he can see the full title and body of the note. Let’s do that in the next section.
Read a single note
To do this, go to your routes/notes.js module. Here, write the following code:
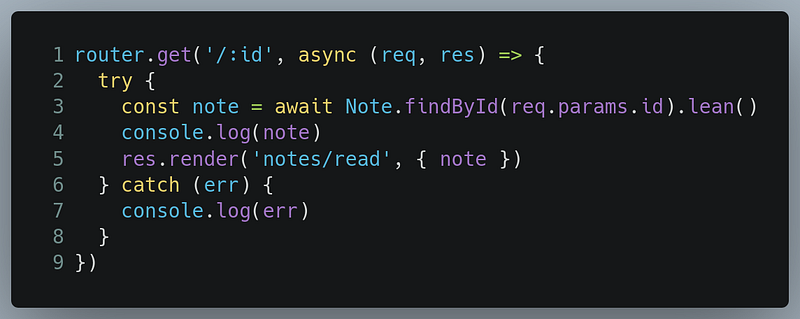
Line 1: Handle the/notesdirectory with theidparameter.Line 3: Find the Note document using its ID. We can obtain the Note’s ID by getting theidparameter withreq.params.id.Line 5: Render theread.hbsfile and send thenoteobject to the file.
Now we need to code the read.hbs file.
In your views/notes directory, create a file called read.hbs.
In views/notes/read.hbs, write the following code:
Line 1-5: Render the Note’s title, body, and its date of creation.Line 8–11: Here, we’re performing aDELETErequest. Create the Delete button. Later in this tutorial, we’ll use themethod-overridemodule to sendDELETErequests.Line 13: Render the Edit page to edit our note. We’ll handle this route later in this tutorial.
Run your code. This will be the result:
This indicates that our code works! In the next section, we’ll learn how to update or edit our notes.
In the end, this is what routes/notes.js should look like:
Update or edit notes
Before getting started, we need to use the method-override module. This module will allow us to perform PUT and DELETE requests through the browser.
Go to /app.js and perform the following steps:
- Import the
method-overridemodule like so:

- Now we need to use this module as middleware. Write the following code:
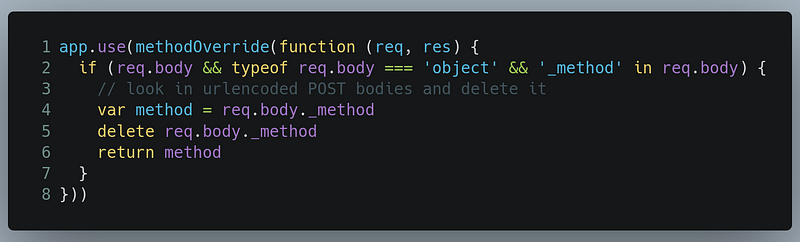
For more information, you’re advised to refer to the method-override documentation.
In our Handlebar files, we’ve specified that the user will be redirected to the /notes/edit directory with the ID parameter. This route will render the Edit page. Let’s first create the Edit page.
Go to your views/notes directory and create a new file called edit.hbs.
In views/notes/edit.hbs, write the following lines of code:
Line 1–2: This essentially tellsmethod-overridethat instead of sending aPOSTrequest, we will create aPUTrequest(as indicated byline 2).Line 4: Create atextareaelement which will already include the title of the note.Line 8: Create atextareaelement which will already include the body of the note.Line 12: Render the Submit button which will send the values of the Text area to the database so that the Note can be edited.
Now in routes/notes.js , we need to first render the edit.hbs file.
In routes/notes.js, write the following code:
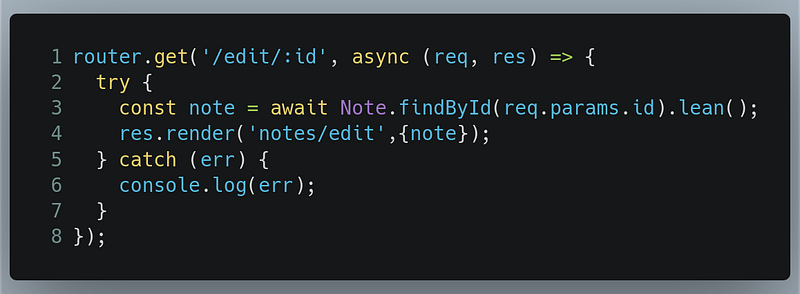
Line 1: Handle thenotes/editdirectory which contains theIDparameter in the URL.Line 3: Find the relevant Note through its ID. We can obtain this ID with thereq.params.idvalue. Next, we’re using thelean()method to convert the document into an ordinary JavaScript object.Line 4: Render theedit.hbsfile and send thenoteobject as data.
Next, we need to handle the PUT request that will allow us to edit the data in our database.
In routes/note.js, write the following code:
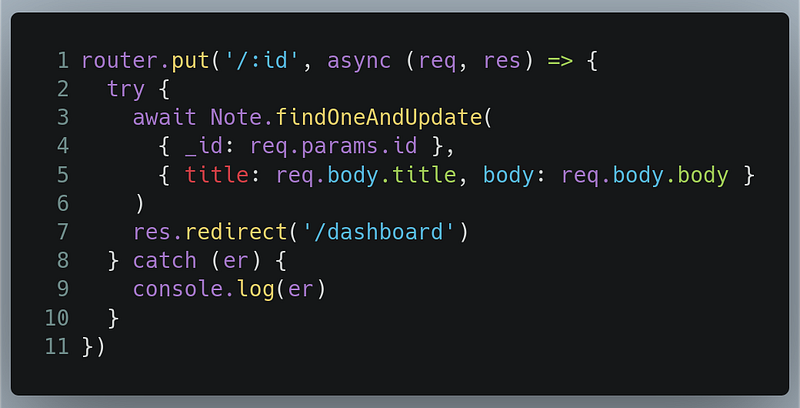
Line 1: Handle thePUTrequest at/notes/directory which contains theIDas the parameter in the URL.Lines 3–4: Find the Note document through its ID. We can obtain the ID through thereq.params.IDvalue.Line 5: Update thetitleandbodyvalues of the document with the values of thetextareaelements.Line 7: When that's done, redirect the user to the/dashboarddirectory.
Now run the code. This will be the output of the code. Here, we are editing from the dashboard.

Great! This code works! Let’s now move on to deleting our note documents.
In the end, this is what routes/notes.js should look like:
And this is what /app.js should look like:
Deletion of notes
Let’s backtrack. Notice that wherever we’ve implemented a Delete button in our Handlebar files, we’ve written the following piece of code:
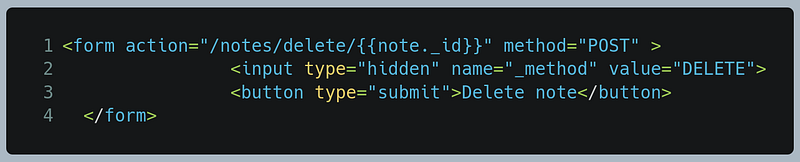
You’ll find this snippet in the views/partials/_dashboard.hbs and views/notes/read.hbs file. This piece of code essentially tells method-override that instead of sending a POST request, we will create a DELETE request (as indicated by line 2).
Now all that’s left is to handle this DELETE request.
To do so, go to routes/notes.js, and write the following piece of code:
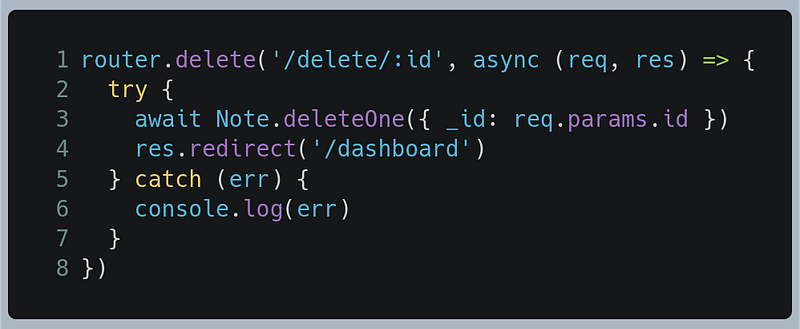
Line 1: Handle the/notes/deletedirectory which contains theIDparameter in the URL.Line 3: Run thedeleteOneMongoose method which will query the Note document with its ID. We can obtain the ID of the Note through thereq.params.idvalue.Line 4: Now redirect the user to the/dashboardroute.
Run the code. Here, we’re deleting from the dashboard page. This will be the result:
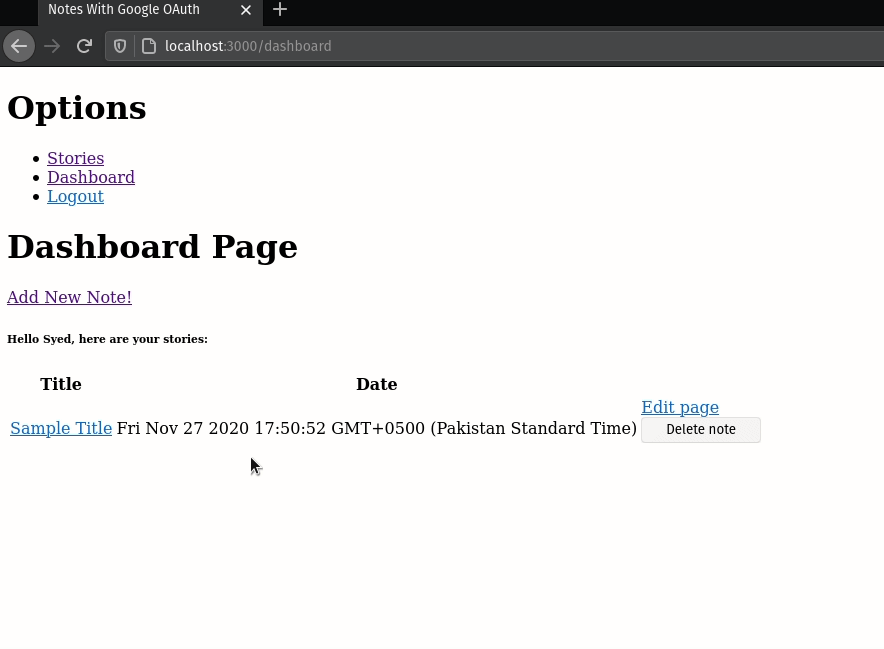
Voila! We were successful! We’re finally done with creating the Notes App with Google OAuth.
However, if you want, there are some finishing touches left to enhance the user experience. This is completely optional.
In the end, this is how routes/notes.js looks:
Improve User Experience
Show the user’s profile photo
When designing our UserSchema , we also included an image property which points to a URL of the user’s profile image.
Let’s start by sending the user’s image to the dashboard.hbs file.
To do this, go to the routes/index.js file and perform the following steps.
- Find the piece of code that handles the
/dashboardroute:
- Replace this with the following:
The only change is on Line 8 , where we’re also sending the user’s image data to dashboard.hbs.
All that’s left is to render the image in dashboard.hbs.
Go to views/dashboard.hbs and write the following line of code at the beginning:
{{!-- Code to write in views/dashboard.hbs --}}
<img src="{{imgSrc}}" referrerpolicy="no-referrer" />
Now run the code. This will be the result on the dashboard page:
Great! We can finally see the user’s profile image.
In the next section, we’ll format the date to make it shorter.
Format the date
We’ll use the moment package to format the date.
First, create a new folder in your root directory with the name of helpers. Within helpers , create a new module called formatDate.js.
In helpers/formatDate.js, write the following code:
Line 1: Import themomentlibrary.Line 3–5: Export a function that will take in date as an argument and return a date with the format ofMonth Date Year H:M:S.
Now we need to tell register formateDate as a helper function.
Go to /app.js and perform the following steps.
- Import the
formatDatefunction:

Now we need to tell express-handlebars to use formatDate as a helper function.
- Find the following piece of code:
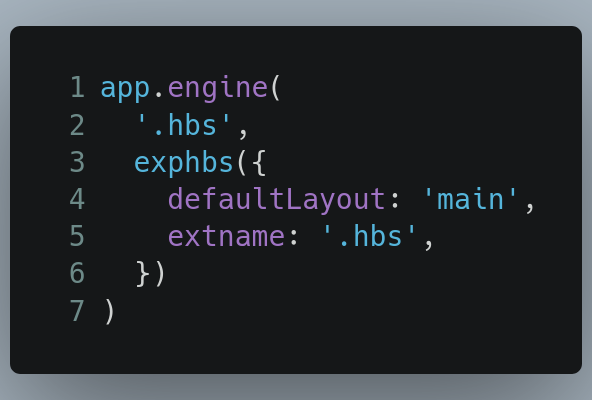
And replace it with the following:
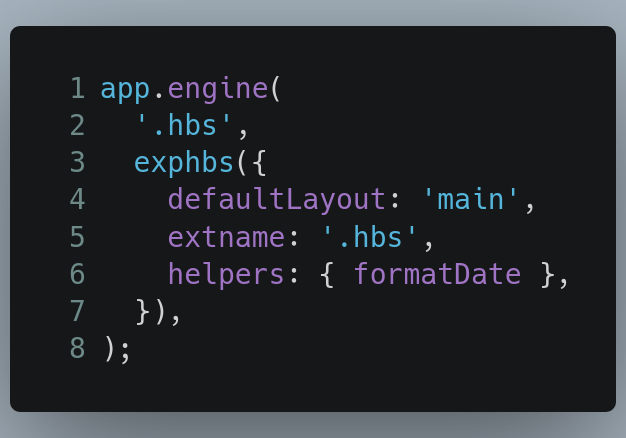
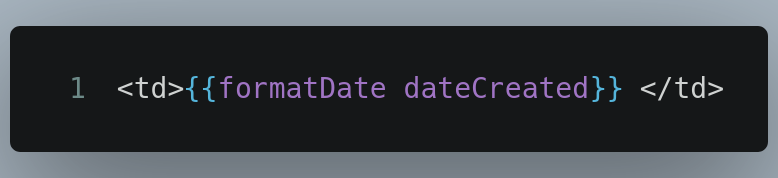
The only change is on Line 6. We’ve now told express-handlebars that we can use the formatDate function as a helper method. All that’s left is to use this.
To do so, let’s first start with the Dashboard page. Go to views/partials/_dashboard.hbs, and perform the following steps.
- Find the line of code that displays the time:
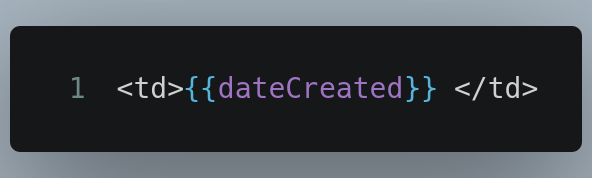
- Now, replace it with the following:
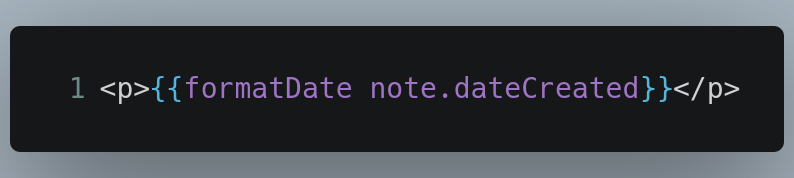
Let’s now do the same with read.hbs.
Go to views/notes/read.hbs, and perform the following steps:
- Find the line of code that displays the date of creation:
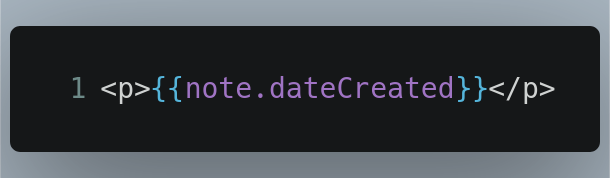
- Now replace it with the following:
Great! We’re all done. Let’s run the code. This will be the result on the dashboard page:
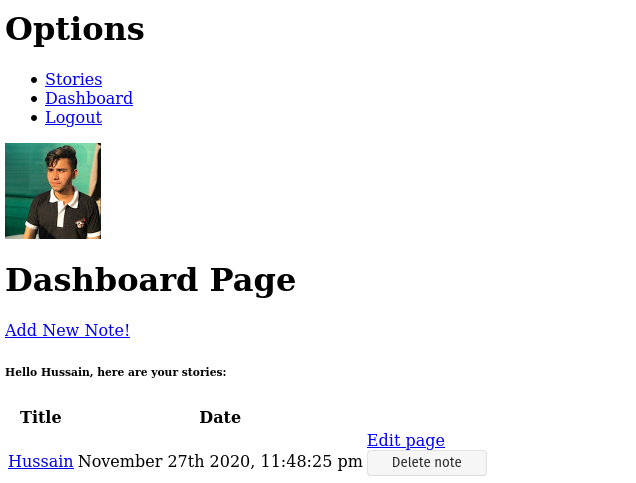
Voila! The code works!
In the end, this is how /app.js should look:
We’re all done now! There are a handful of suggestions you can do to make this app look better.
Improve the app
- Better user interface: To keep the tutorial as simple as possible without losing any functionality, I didn’t focus on making the web app look better. You can use components like Materialize, to make it look eye-catching.
- Encrypt the notes before saving them to database: Some users may want to keep their data confidential and don’t want anyone snooping on them. You can encrypt the user’s notes by using
crypto ormongoose-encryption so that no one can read anyone else’s data if someone looked at the app’s database.
Conclusion
If you have any difficulty, then you’re advised to play with the code and research extensively to fully grasp the inner workings of Passport authentication and the Notes app. Don’t give up!
This tutorial was by no means a short article. Congratulations for making it to the end! I hope you learned a lot from this article. Thanks for reading!
GitHub Links and Other Learning Resources
Github Repository
Here is the Github Repo for the project.
Additional Learning
- Storybooks App — Traversy Media on YouTube
- Express(NodeJS) — Google OAuth2.0 — Vuka on Youtube
- Beginners Guide To Google OAuth With PassportJS on Dev.
- Create a Notes App With Mongoose In NodeJS on Medium
Next Post: Build A React Pomodoro App With TailwindCSS and Material-UI Previous Post: Simple Web Scraping Project With Node.js


