How to Use Mongoose With Node.js
Add more traditional relational database functionality to your MongoDB app

You’ve finally learned how to use MongoDB in your Node.Js app for your library back end. Now, your local supermarket owner has heard what a great job you did and wants you to implement the same thing for him.
However, there are a few caveats. He wants his data records to have a structure and he wants built-in validation in the app. You do some research and find out on Stack Overflow that a tool called Mongoose is a viable solution to his requirements.
Introduction: What is Mongoose?
Mongoose is an object document modeling (ODM) layer that sits on top of the Node.Js MongoDB API. If you’re coming from an SQL background, then Mongoose is similar to an ORM (Object-relational Mapping).
It’s not mandatory to use Mongoose over the MongoDB Native API. However, there are some benefits to doing so.
Why choose Mongoose over MongoDB?
- Schemas: Remember when I said that the supermarket owner needs structure in his data records? That structure is referred to as a schema. These will be discussed in more detail later in this article.
- Built-in validation: This means you don’t have to write the extra code that you had to write with the MongoDB driver. By simply including things like
required:truein your schema definitions, Mongoose provides in-house validations for your collections (including data types). - Instance methods: You can define custom methods on a document with minimal code. While it’s possible to do the same in MongoDB, Mongoose makes it easier to create and organize such methods within your schema definition. In turn, this means you have more boilerplate code in MongoDB.
- Returning results: Returning documents generated by queries is generally easier in Mongoose. One example is the
updatequeries. In MongoDB, this query only returns an object with a success flag and the number of documents modified. Mongoose, on the other hand, provides you the updated document itself so you can easily process the results.
General Terminology
- Schemas: Everything in Mongoose starts with a Schema. Each Schema maps to a MongoDB collection and defines the shape of the documents within that collection. It has information about properties/field types of documents. Schemas can also store information about validation and default values, and whether a particular property is required. In other words, they’re blueprints for documents.
- Model: A model is a class with which we construct documents.
There are other terms as well, that have been covered in-depth in my previous article. However, to sum up:
- Document: A simple data record.
- Collection: A set of documents.
Getting Started
Simply install the mongoose module through npm.
npm install mongooseFor a guide to npm, click here.
Initializing Our Database
Now that Mongoose has been installed on the machine, we will use mongoose.connect to connect to our database, like so:
const mongoose = require('mongoose')
mongoose.connect('mongodb://localhost/test', {useNewUrlParser: true});
Here, we’re connecting to a database called test. The first parameter is the URI and the second parameter is options.
The format of the URL is type://username:password@host:port/database_name.
Defining a Schema
Let’s create a schema, BookSchema which will have a property name of type String.
const Schema = mongoose.Schema
const BookSchema = new Schema({
name : String
})
This means that the documents defined through this BookSchema will have one field, which is a name of type String .
Defining Models
With the BookSchema we just created, let’s create the model Books.
const Model = mongoose.model
const Book = Model('Books',BookSchema)
The first parameter of mongoose.model is the name of our collection. The second parameter is the schema that the model will be using.
In this case, the name of our collection is Books which will be using the schema of BookSchema.
Creating/Inserting Documents
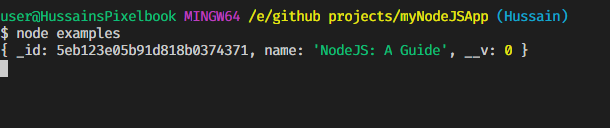
Now that’s done, let’s create a book in our database with the name NodeJS : A Guide.
const NodeJsGuide = new Book({name : 'NodeJS : A Guide' })All that’s left is to save it with book.save, like so:
Here’s the output of the code:
If you’ve also been using MongoDB, note that relatively less code is required to create documents.
Finding/Reading Documents
Read all documents
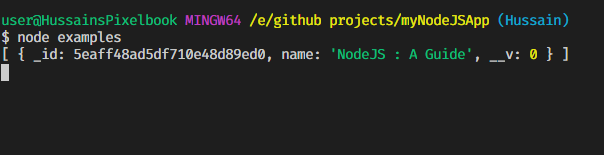
To read all documents, we use the model.find method without specifying a query. This gives an array of all available documents in the collection.
model.find((err,document)=> {
console.log(document)
})
This is the example in our case:
This is the output applied:
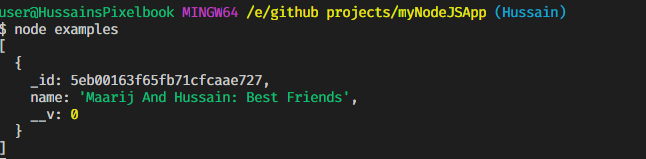
Reading queried documents
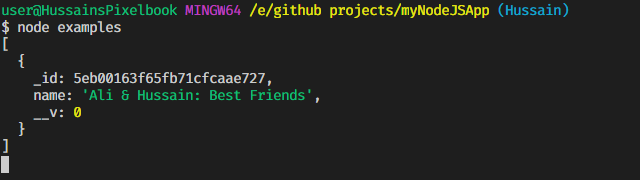
However, to use a query, we specify the queryargument in the model.find method:
model.find(query,(err,document)=> {
console.log(document)
})
To illustrate this example, I’ve added a book in the database called Ali & Hussain: Best Friends. Let’s run a query and output the results:
Updating Documents
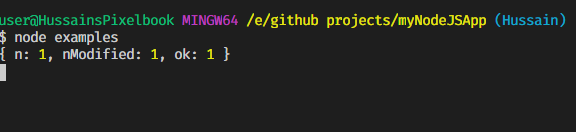
There are multiple methods to update documents, which are discussed here. The most common is model.updateOne. As the name suggests, we’ll update the first document that matches this query.
The method is defined as follows:
model.updateOne(query,fieldsToUpdate,(err,result)=>{
//code
})
The result property in this callback will provide:
- The number of documents matching this query(
n) - The number of documents modified. (
nModified) - Whether the operation was successful or not. (
ok)
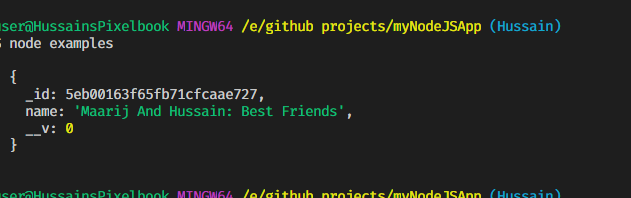
In this example, let's update a book with name of Ali & Hussain: Best Friends to Maarij And Hussain: Best Friends.
The output will be as follows:
Let’s use the find method to iterate through our documents in the end. This is the output:

Deleting Documents
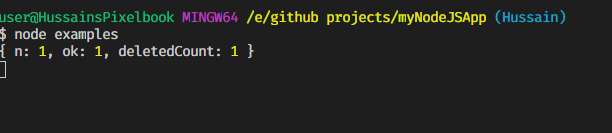
To delete documents, we’ll use either model.deleteOne or model.deleteMany. Both have similar parameters.
model.deleteOne(query,(err,result)=>{
//code
})
The result parameter in the callback provides us with an object that tells us:
- How many documents were deleted, (
deletedCount) - how many documents matched the query, (
n) - and whether the operation was successful or not (
ok)
In this example, we’ll delete one document that matches the name NodeJS : A Guide.
The result of this will be as follows:
Using the find method to iterate the results finally gives us the following result:
Custom Schema Methods
The methods are attached to the schema. Their types are:
Instance methods
The documents derived from their respective schemas can use these methods.
As an example, let’s update our BookSchema to create a method that will provide us with the name of the book and the author.
This is the output of the code:
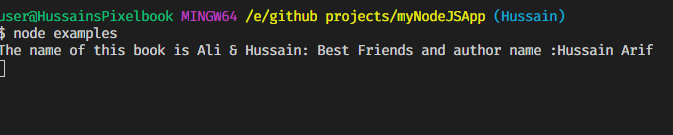
Remember: You need to use a normal function declaration for your static function instead of using the arrow syntax in order to preserve Mongoose’s meaning of this within the function.
Static methods
These are used whenever we don’t have a particular object or we don’t need it. The models derived from their respective schemas can use these methods.
For example, let’s create a function that will search for books in our database by querying their names. Here, we’re assuming the books are already saved.
The output will be as follows:
Hooks
These are also called middleware functions. They’re functions that are passed control upon the execution of asynchronous functions.
Some common middleware functions include:
In this example, we’ll use a pre-hook function — i.e it will execute before a function is executed. Here, we’ll check whether a book exists with the same name — if it does, the book will not be saved. It’s assumed that the book named Maarij And Ali: Best Friends has already been saved and we’re saving it again.
A complete list of using middleware functions can be found here.
The output will be as follows:

Virtual Fields
These are properties don’t need to be stored in your database. They’re typically used for computed properties in documents. For example, you don’t need a full name field in a database — you can just combine lastname and first name present in the database.
Virtual fields have get and set methods.
In this example, we will concatenate the author field and name field and then use the get method to return them.
The output of this code will be as follows:

External Resources and Reading
I’ve only scratched the surface of MongooseJS. It’s best if you read more on this API. Here are the best resources available:
Recap
Finding
model.find(query?,(err,document)=> {
//code
})
Creating
document.save((err,document)=>{
//code
})
Updating
model.updateOne(query,fieldsToUpdate,(err,result)=>{
//code
})
Deleting
model.deleteOne(query,(err,result)=>{
//code
})
Instance methods
schema.methods.functionName = function() {
//code
})
document.functionName()
Statics methods
schema.statics.functionName = function() {
//code
})
model.functionName()
Pre-hook functions
schema.pre('functionName' , function() {
//code
})
document.functionName()
Virtual fields
schema.virtual('fieldName')
       .get() {
        //code
     }.set(value){
       //code
     })
document.fieldName = 'value'
document.fieldName; //returns value
In the next tutorial, we will use all our knowledge of Mongoose and previous Node.Js Tutorials to build a simple Notes App.
At first sight, Mongoose seems like a tricky topic. However, it’s easy to wrap your head around if you try the examples in this article. Remember, you only learn by doing — don’t give up!
Thank you for making it to the end. Have a great day. I hope you learned a lot!