
Angular 11 Modal Form, Dialog, and Toaster with Bootstrap

Announcements
- On May 12, 2021, Google released Angular version 12. The sample Angular app in this tutorial has been upgraded from version 11 to 12. You can find the upgraded source code in the ng-12-upgrade branch. The master branch is still at version 11.
- If you are looking for an end-to-end solution, check out the Angular Starter Kit for Rapid Prototype. The starter kit contains boilerplate code for UI/UX, REST API/CRUD, Single-SignOn (SSO), and Identity/Access Management.
Introduction
Recently I published an Angular pagination/CRUD tutorial in Medium to demonstrate the use of a Master page for pagination and a Detail page for data editing. This approach may not be best for tracking the state of pagination/filtering on the master page. For example, if a user is on page 5 and selects a row for edit, how can the app know to return the user to page 5 on the mast page after editing?
In this tutorial, I will employ the modal technique to remain on the master page and use the popup form for edit. After the edit is done, the modal form is closed. This approach eliminates (a) the need for navigation from the master to the detail page and (b) writing extra code to manage the state of pagination on the master page.
The challenge of the modal technique is to pass the data from the master to the modal form and vice versa. This tutorial includes a walk-thru of source code pertinent to the modal for data-entry form, the dialog for delete confirmation, and the toaster for CRUD status display. The complete source code for Angular 11 frontend and .NET CORE 5 REST API backend is available in GitHub.
The tutorial content is divided into two parts:
Part 1: Clone Angular and WebAPI projects from GitHub
Part 2: Walk-thru modal-related code in Angular
Notice that this tutorial does not go into the detail of CRUD or pagination (filter, sort, paging). You can find the related tutorials below.
- Angular 11 CRUD with .Net 5 REST API Tutorial
- Angular 11 Pagination 100,000+ Rows
- NetCore 5 Pagination 100,000+ Rows
Prerequisites
The following tools and knowledge are recommended
- Visual Code — free code editor for Angular
- Visual Studio 2019 Community — free code editor for C#
- Familiarity with Bootstrap
Opensource Project Highlights
‘ng-bootstrap’ is a set of Angular widgets built from the ground up using only Bootstrap 4 CSS with APIs designed for the Angular ecosystem. Bootstrap widgets for Angular include auto-complete, accordion, alert, carousel, dropdown, pagination, popover, progress bar, rating, table, time-picker, tooltip, rating, and type-ahead.
If you do use ng-bootstrap, please show your appreciation to the project team by giving a ‘star’ on the GitHub Repo.
Tutorial Overview
A modal window creates a mode that disables the main window but keeps it visible, with the modal window as a child window in front of it. Users must interact with the modal window before they can return to the parent application. This avoids interrupting the workflow on the main window. — Wikipedia
User interfaces typically use modal windows to command user awareness and to display emergency states. An existing component such as reactive form can be passed as the content of the modal window. The ng-bootstrap modal component makes it easy to open and pass data in and out of the modal form. See the code walk-thru section later on for a detailed explanation. To learn more about modal, visit ng-bootstrap online demo and documentation.
When programming CRUD, it is important to inform users of the intent and status of data operation. The app source code includes two (2) user-experience features.
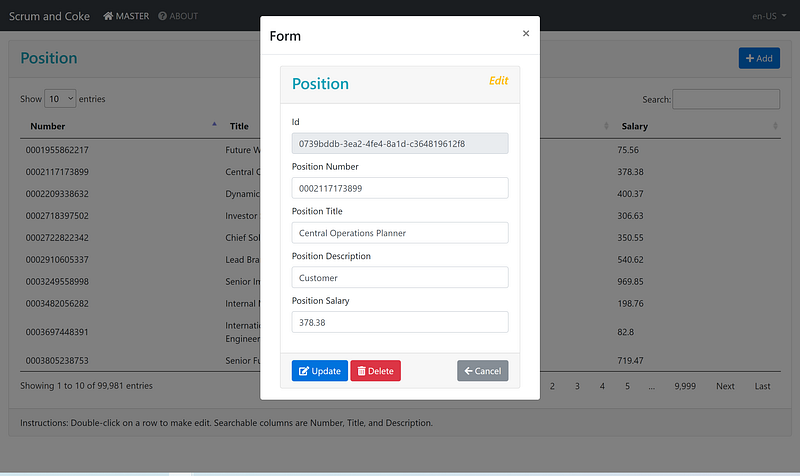
- Reuseable modal management service that displays the data entry form and confirmation of the deletion (Figure 1)
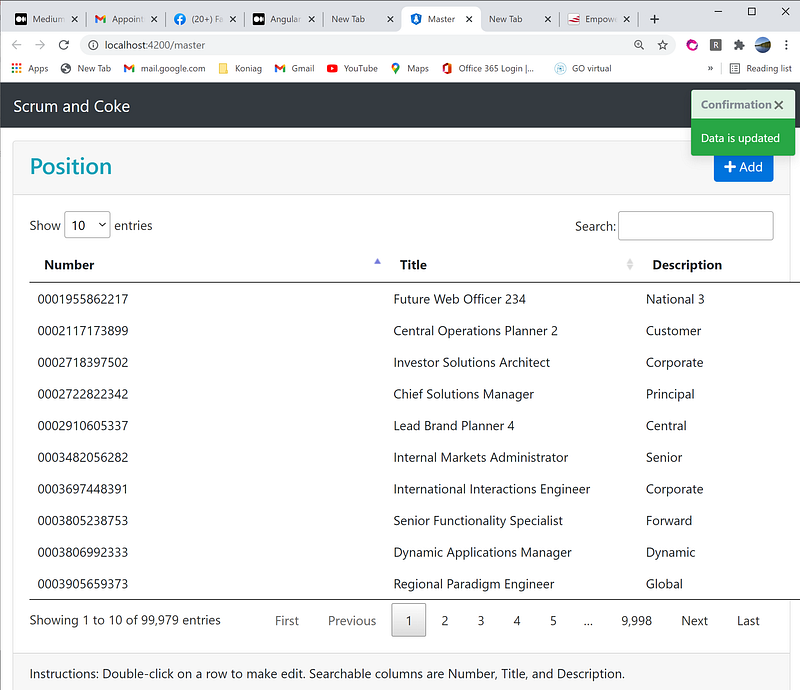
- Reusable toaster management service to let users know the CRUD status (Figure 2)
Part 1: Clone Angular and WebAPI projects from Github
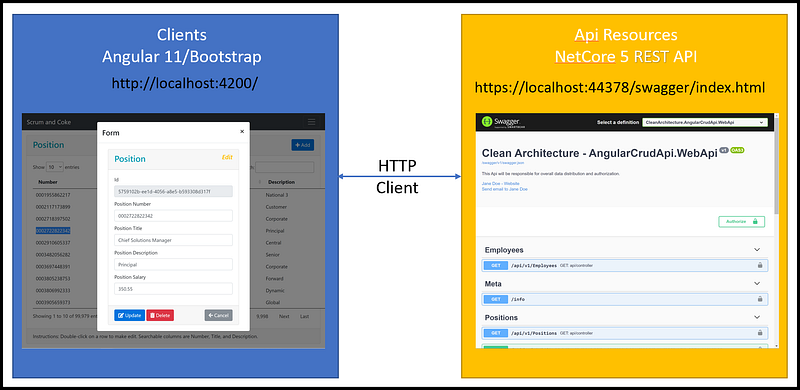
The objective of the Part 1 tutorial is to clone and run the Angular and REST API on localhost. Refer to Figure 3 for the application architecture diagram.
Task 1.1 — Clone Angular Project
In this task, we are going to clone the Angular project from GitHub via Command Pallet in Visual Code. Prior to making the clone, be sure to create a folder (C:\apps\devkit\Clients) on your desktop for storing Angular source code.
- Start Visual Code
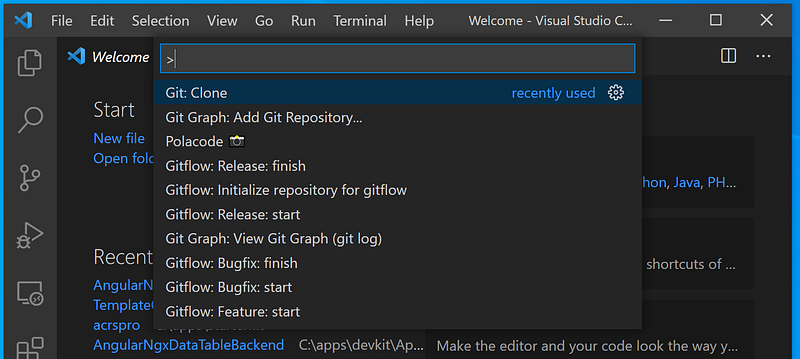
- Go to menu View>Command Pallet (or Ctrl-Shift-P). See Figure 4 for visual aids.
- Type in “Clone” and select Git: Clone. See Figure 5 for visual aids
- Enter https://github.com/workcontrolgit/angularcrudmasterdetailmodal when prompt for Provide repository URL or pick a repository source. See Figure 6 for visual aids.
- Select the folder C:\apps\devkit\Clients to save the source code. You should see the angularcrudmasterdetailmodal project in Visual Code as shown in Figure 7.
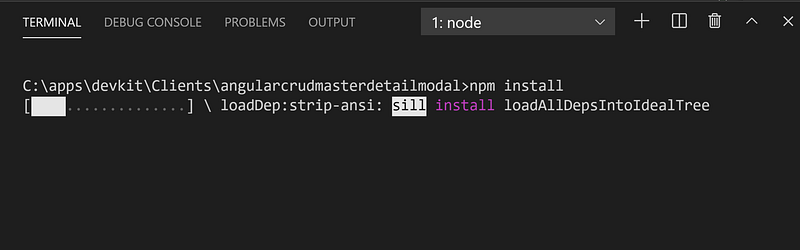
- To restore NPM packages, go to menu View > Terminal (or Ctrl + ‘), type in npm install, and hit Enter. It may take a few minutes to restore the package depending on your network speed. See Figure 8 for visual aids.


Task 1.2 — Clone REST API Project
In this task, we are going to clone the NetCore5 REST API source code from Github using Visual Studio.
The source code for the REST API project is on Github. The solution consists of five projects, structured following the Clean Architecture design pattern. Follow the steps below to open source code:
- Start Visual Studio 2019 and select the option ‘Clone a Repository’
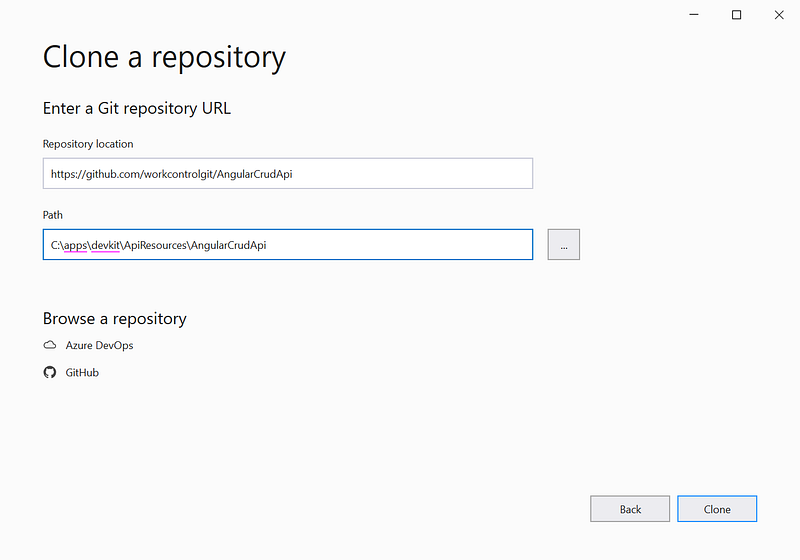
- Clone the repo https://github.com/workcontrolgit/AngularCrudApi to C:\apps\devkit\ApiResources\AngularCrudApi (see Figure 9)
Task 1.3 — Run Application
To run the application, start the ASP.NET Core REST API backend first and then the Angular frontend.
Start ASP.NET Core REST API backend
In Visual Studio, run REST API solution by hitting F5. You should see the ASP.NET CORE REST API swagger running on https://localhost:44378/swagger/index.html.
Notice that when you run the solution for the first time, it may take a few minutes to seed 100,000 rows of position test data.
Start the Angular frontend
To run the Angular frontend, from Visual Code > Terminal screen, run ng serve -o to automatically open the Angular app in the browser pointing to URL http://localhost:4200.
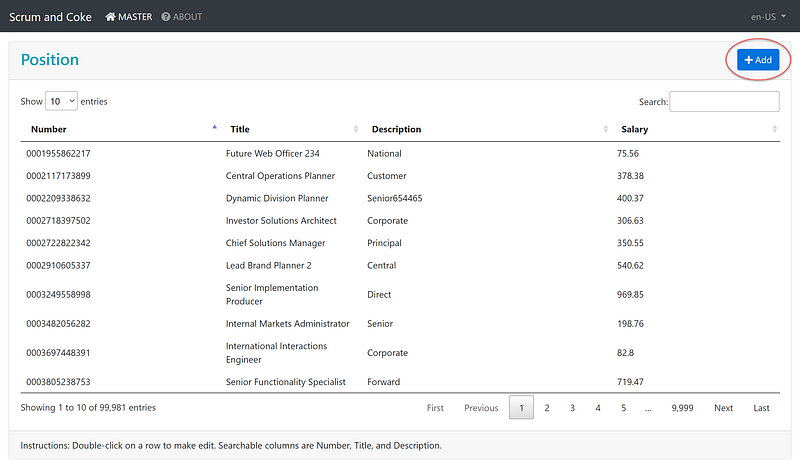
After the app is open, you should see the Position table on the Master page. Click on a Position Number to go to the Detail page.
Part 2: Walk-thru Angular bootstrap modal reactive form
In this part of the tutorial, we will explore UI navigation and CRUD-related source code.
Task 2.1 Explore UI Navigation
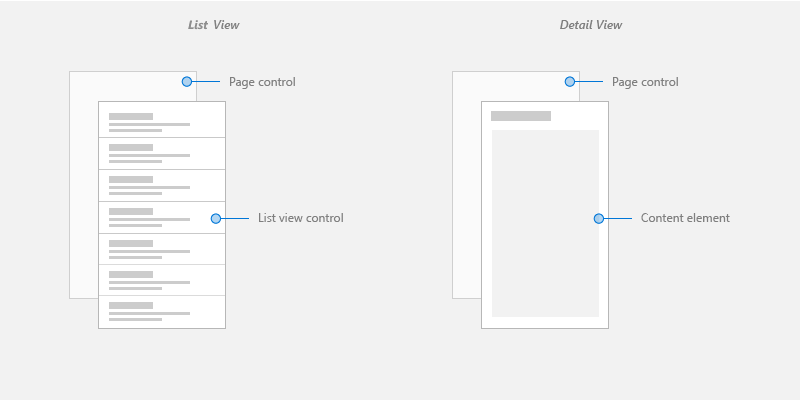
The navigation design supports the app display on desktop, tablet, and mobile. The stacked master/details pattern was chosen — placing the master view on one page, and the detail pane on a modal form. See Figure 10 for the wireframe.
UI Navigation for CRUD > Create
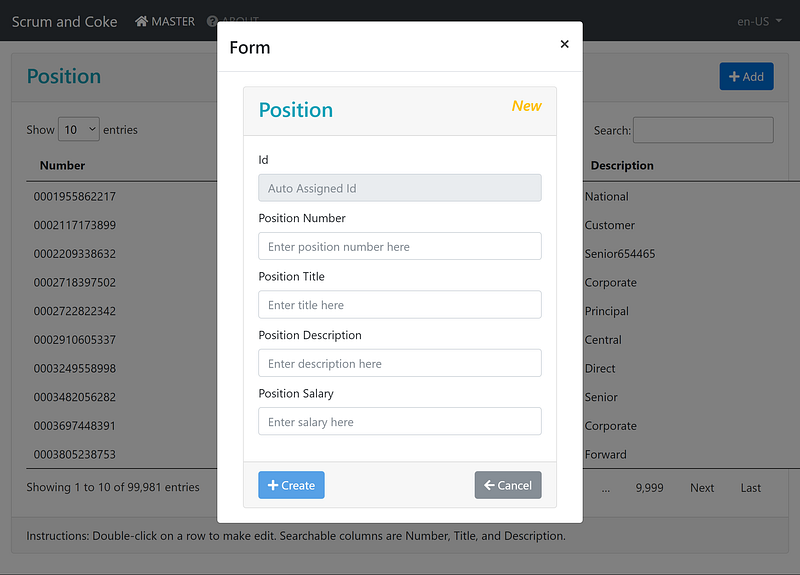
To create a new record:
- On the Master page, click on the Add button on the upper right (see Figure 11)
- Complete the form fields in the modal popup
- Click on Create button (see Figure 12)
UI Navigation for CRUD > Read, Update, Delete
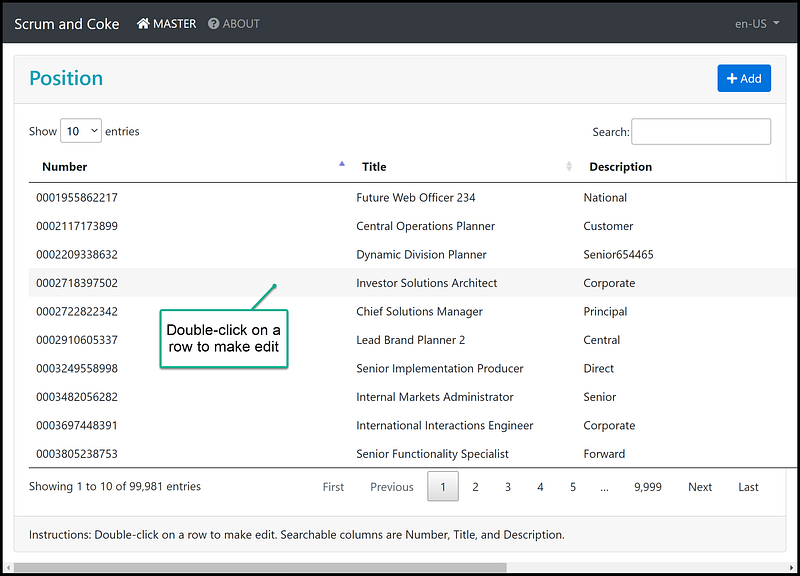
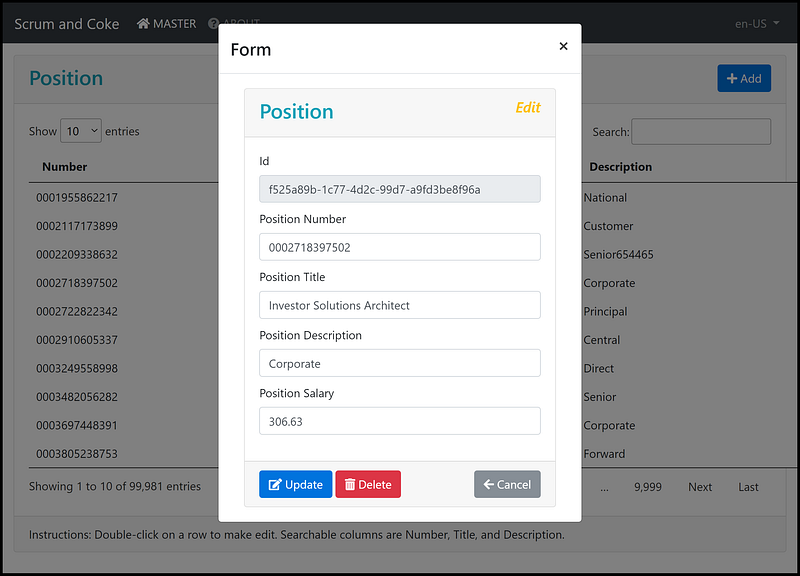
To make an edit to an existing position,
- On the Master page, double-click on a row to open the modal form (Figure 13)
- Click on the Update or Delete button (Figure 14)
Task 2.2 Explore source cod pertain to the modal form
The typescript source code files to facilitate modal form are in the following files:
- src\app\master\master.component.html — contains HTML markup to display the position pagination
- src\app\master\master.component.ts — contains the Typescript code to open modal form
- src\app\master\modal-form\modal-form.component.html— contains HTML markup to display entry form
- src\app\master\modal-form\modal-form.component.ts — contains the Typescript code to call REST API to support CRUD
- src\app\services\confirmation-dialog.service.ts— contains the Typescript code to display a dialog component
- src\app\services\toast.service.ts— contains the Typescript code to display toaster
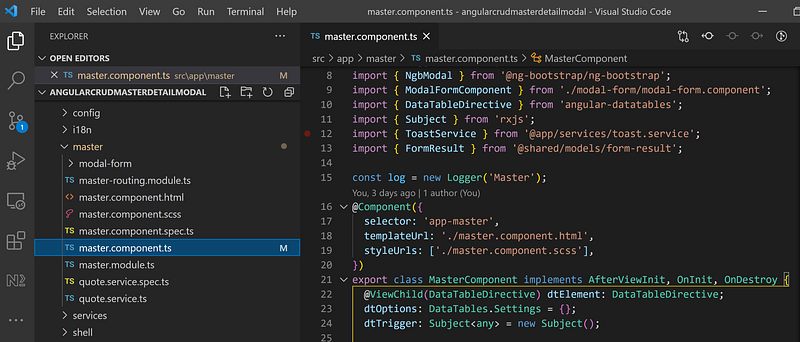
Source code walk-thru of master.component.html (Figure 15)
- Line 10: Add button link to the modal form to add a new record
- Line 17: HTML table markup for pagination (filter, sort, paging)
- Line 28: double-click to open the modal form to edit the row
Source code walk-thru of master.component.ts (Figure 16)
- Line 33–74: display data table with pagination support
- Line 77–121: open modal form with input parameters
- Line 124–126: code to refresh the page after delete or insert
- Line 129–136: display toaster message
Source code walk-thru of modal-form.component.html (Figure 17)
- Line 13–19: display modal form inside bootstrap card header
- Line 20–127: display form fields inside bootstrap card body
- Line 124–126: display form buttons inside bootstrap card footer
Source code walk-thru of modal-form.component.ts (Figure 18)
- Line 22–24: define input variables
- Line 45–54: display form values based on input variable position
- Line 57–77: handle CRUD update
- Line 79–92: handle CRUD delete
- Line 94–106: handle CRUD create
- Line 108–112: handle form button Create click
- Line 114–120: handle form button Update click
- Line 122–134: handle form button Delete click. Notice line 123 to activate the dialog to confirm delete
- Line 137–140: handle form button Cancel click
- Line 143–151: create Angular reactive form
Source code walk-thru of confirmation-dialog.service.ts (Figure 19)
- Line 3: import a component that will display the dialog in line 18 (later on)
- Line 5–7: define service as root
- Line 11–24: display the confirmation dialog (ex. when delete)
Source code walk-thru of toast.service.ts (Figure 20)
- Line 3–5: define service as root
- Line 10–12: show toaster
- Line 15–17: remove toaster
Github Repositories
- AngularCrudMasterDetailModal is the front-end Angular app. The source code for this project was generated by the Ngx-Rocket template. Custom code was added to show server-side pagination and modal form for editing.
- AngularCrudApi is the backend REST API written in ASP.NET Core 5. The source code for this project was generated by the OnionAPI template and custom code was added to support pagination and CRUD.
Tutorial Demo
Developers love to see working code. We all like to experiment with how something works, so we can decide whether we want to spend our valuable time learning it. Check out the live demo.
Recommended Contents
- Fullstack Angular 15, Bootstrap 5 & NET 7 API: Project Demo
- Angular 15 & Net7 Server-Side Pagination, Sorting, Filtering, and Modal Detail Display
Summary
In this tutorial, you learned how to:
- open a modal form for edit
- active a dialog box to confirm delete
- display toaster on successful CRUD
The Angular-Bootstrap ng-bootstrap makes it easy to implement advanced UI features in Angular. Give it a try!
Thanks for reading! Hope you found it useful. Want more? Please follow me and become a member on medium for more articles. With your support, I’ll keep creating awesome content for you. Have a great day ahead! — Fuji Nguyen


