
7 Private Things to Do Before You Lend Someone Your MacBook
Protect your privacy as well as Apple does
MacBook owners are the most vulnerable people.
Most of my pals in the university own Windows lappys. The day when I flaunted my new MacBook M1, nearly 30 people hedged me in. They took it for an hour, opened all the apps, and praised its smoothness and silence.
Fortunately, I got acquainted with the complex-looking MacOS pretty fast. Days later, they started asking me for the maccy as their Windows PCs kept hanging while they’re working.
And I believe these doing 7 things before those naughty guys borrowed it protected my privacy. Let me explain them to you too.
#1. Turn off ‘Text Message Forwarding’
If you don’t know what ‘Text Message Forwarding’ means, it’s a setting that forwards all the messages (including OTPs) from an iPhone to its linked MacBook.
I use it because I’m too lazy to type OTPs from my iPhone. This auto-types them for me.

If you keep this turned on and lend someone your Mac, you risk them knowing your OTPs, which could be a disaster. So, here’s how you turn it off.
On your iPhone, go to Settings ⚙️ < Messages 💬 < Text Message Forwarding and turn it off for the specific Mac. Now, no SMS will be forwarded to your Mac, until you turn it back on.
#2. Log out of vital accounts
Before they borrow your lovely Mac, log out of all the vital accounts like Gmail, Instagram, Twitter, LinkedIn etc. on Safari so they couldn't peep through your chats and other sensitive info.
Also, don’t forget to log out of WhatsApp, Telegram, Teams etc. web apps or Mac apps.
Now you may ask me: All my passwords are already stored in Keychain… How can I be sure they won’t login again?
They can’t. Period. The 3rd point helps you here.
#3. Set 2-FA and delete the code provider
I hope you’ve already set up 2-FA (Two-Factor Authentication) for all your vital accounts. Else, I urge you do do it.
Follow this:
Hope it’s done. Now,
Make sure you have both SMS verification and authenticator verification for your accounts.
- Turn off ‘Text Message Forwarding’ (as already discussed), so they can’t demand 2-FA codes from SMS.
- Delete Verification Codes. Here’s how.
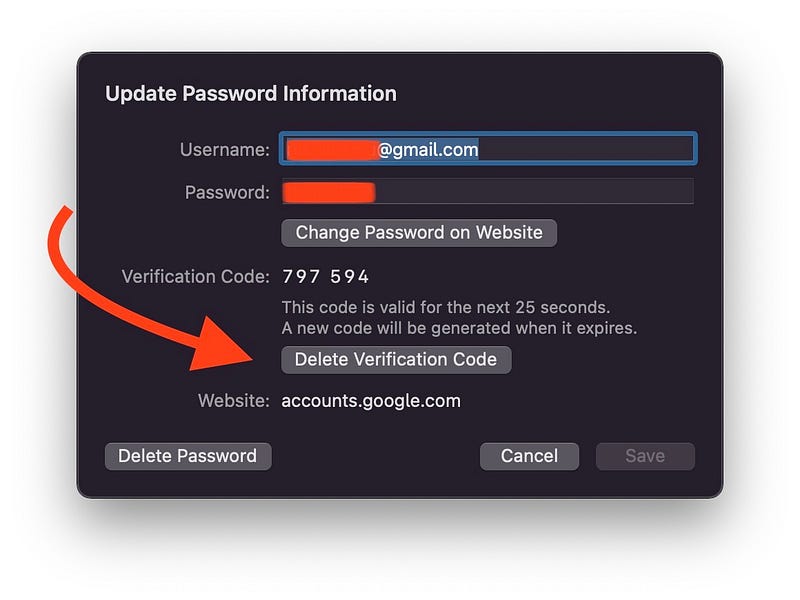
Go to Settings ⚙️ < Passwords 🔑 < (Your account) < Delete Verification Code .
Now your Mac can’t reveal the 2-FA codes, though they might learn your passwords.
Later, you can login via SMS or email authentication, and regain the verification codes.
#4. Set password for important folders
There are two ways you could do this.
1. By Disk Utility:
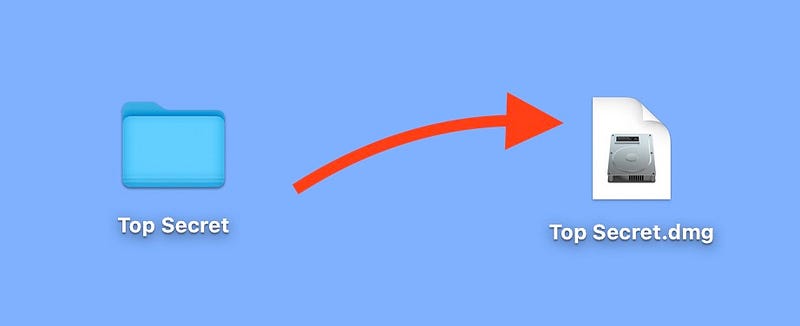
- Open Disk Utility from Spotlight or Launchpad.
- Click
Shift + Command + Nor go toFile < New Image < Image from Folder.... - Select the folder you want to encrypt.
- Choose destination, and the encryption format (128-bit or 256-bit, anything works).
- Set a password and you’re done.
Now you have a password-protected disk image with all your important files! You can now safely delete the original folder.
2. By Terminal (Simpler way):
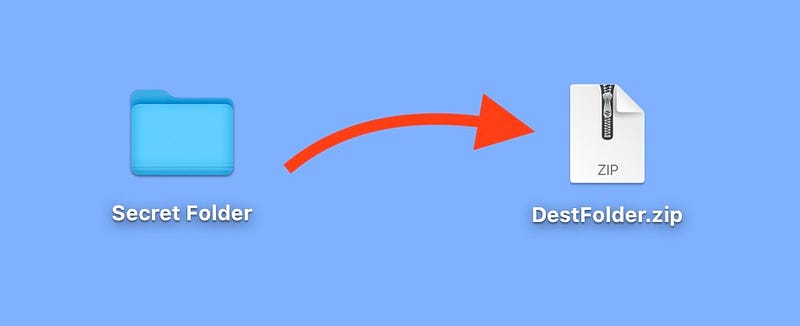
- Get all your important files and folders into a single folder on the desktop. Name it
Secret Folder, for example. - Open Terminal from Spotlight or Launchpad.
- Type
cd Desktopand tap return. - Now, let the encrypted file be
DestFolder.zip, so typezip -er DestFolder.zip "Secret Folder"and tap return. - Set a password, verify it, and tap return.
Now, the DestFolder.zip with all your important files will appear on the desktop! You can now safely delete the original folder.
#5. Hide personal photos
Apple offers a traditional way to hide photos from the default Photos app.
For this, open Photos app, select photos to hide, and click Command + L or Image < Hide Photos . However, this is futile, as the hidden album becomes clearly visible with a single click.
Here are two ways to hide photos more securely.
1. By Markup:

Assuming you have iCloud sync turned on,
- On your iPhone, open the images you want to hide,
- click on
Editand thenMarkup ✏️at the top-right corners. - Now fill the picture with some solid colour, so it appears simply plain.
- Save it and allow for the changes to sync.
If you want the original picture back, open it, click on Edit and Revert the changes.
2. Follow #4 (Securer way)
- Delete the pictures from your MacBook (note they’ll be deleted from iCloud too),
- follow #4 to add them into secure folders. That’s it.
Make sure you’ve deleted the photos from the recently deleted album too.
#6. Clear browsing history if required
It always feels icky to let people know our browsing history. So you might consider clearing your browser history before you lend someone your MacBook.
For this,
- Open Safari,
- click
Command + Yor go toHistory < Show All History, - click on
Clear History...and proceed as prompted.
#7. Stop location sharing
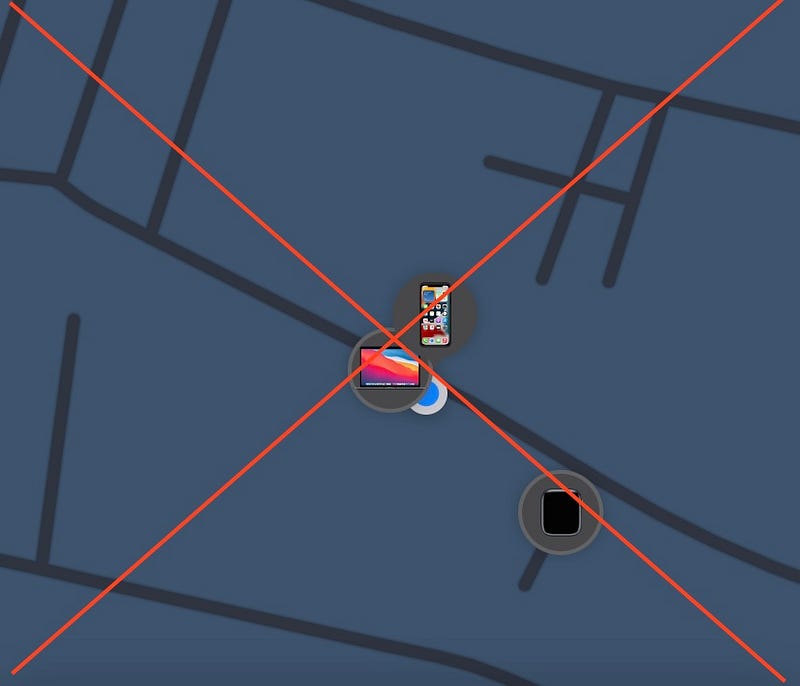
It’s pretty obvious — Not everyone needs to know the live locations of your family and friends. This might potentially put them under risk.
So, you may ask them to stop sharing their location via Find My, if they’re sharing, and to share it by any other way — like Google Maps, WhatsApp etc.
#8. Or, if they’re okay with it, create a fresh user account
If you don’t feel like embarrassing them, and if they too don’t take it that way, create a new user account for them on your MacBook.
This creates for them a completely new and private space on your Mac. However, they won’t be able to access your files, even if they geniunely need them.
For this,
- Go to
Settings ⚙️ < Users & Groups 👨👦, - click on
+below accounts, - and follow the instructions to create a new space for them.
This is the securest way.
Conclusion
Often, lending someone our belongings, especially if they’re tech, feels like a nightmare. A little clue could potentially pave way to a disaster.
So you can treat this listicle as a checklist and follow it before you need to lend someone your MacBook.
If you liked this story, you might also like:
Get notified via email whenever I publish. Join 45+ others!
Not a Medium member yet? To get unlimited access to all stories on Medium, Sign up now!
(It’s an affiliate link so I receive a portion of your payment, with zero extra cost for you.)


