
4. Understanding Airflow User Interface
My personal notes from the book “Data Pipelines with Apache Airflow” by Bas Harenslak and Julian de Ruiter — Chapter 2, Part 4

This series of posts is meant to summarize my learnings from the book by Bas Harenslak and Julian de Ruiter. If you like the content, you can purchase the book on Manning.
Complete list:
Chapter 2: - 1. Introduction to Airflow - 2. Running Airflow Locally (in a Python Environment) - 3. Running Airflow with Docker - 4. Understanding Airflow User Interface
Airflow UI
Whether you are running Airflow in a Python environment or using Docker, it’s standard practice to forward Airflow on port 8080 of the host machine (i.e. your computer).
Once you have Airflow up and running, open a browser and go to http://localhost:8080 . The first screen you will see is a login screen. Enter your Username and Password. If you followed the instructions of the previous posts, they should be Username=admin and Password=admin .

Once you enter, you might see a lot of DAGs. Don’t panic. These are examples automatically loaded.

Let’s just focus on the DAG we have created download_rocket_launches . If you click on the DAG name you should see a screen like this:

On the top of the page, you can see many different visualisations. The most commonly used are the Code View, the Graph View, and the Tree View.
Code View

The code view shows the code that is composing the DAG.
Useful for: double-checking your logic and debugging.
Graph View

This view shows us:
- The DAG structure (in the middle of the page): Airflow has read the Python code and pulled out the different tasks that compose the DAG.
- A toggle (top-left corner) to switch on/off the DAG.
- The type of Operators used (middle-left corner): in this case, we use both a BashOperator and a PythonOperator.
- A Play button to manually trigger the DAG (top-right corner).
- A legend with the different colours you might see when the DAG is on.
Useful for: running a DAG, checking the individual states (see colour legend) and the tasks’ logs.
Tree View
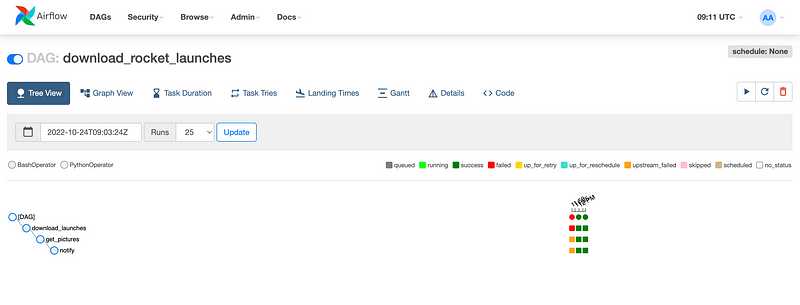
This view has a “rows and columns” layout where a column represents a single DAG run at a given point in time.
If you set the start_date in the past and a schedule_interval , Airflow will automatically start running the DAG.
Useful for: see the DAG structure and the tasks’ state over time.
How to manually run a DAG
A DAG can be triggered in any of the UI views. You just need to:
- Toggle the DAG on using the switch button (top-left corner of the page):

- Click the Play button to run it (top-right corner of the page):

Once the DAG starts running, you will see the different tasks getting coloured.

Schedule a DAG
Once you have checked that the DAG runs as expected, you can schedule it.
Scheduling is controlled on the DAG by setting the schedule_interval argument.
dag = DAG(
    dag_id="download_rocket_launches",
    start_date=airflow.utils.dates.days_ago(14),
    schedule_interval="@daily",
)
You can schedule a DAG to run at certain intervals, for example, once an hour, day, or month or at a specific time using a cron expression. To build your cron schedule you can use this website.
What if a task fails?
A failing task in Airflow UI is indicated by the red colour.

The dependent tasks are marked in orange (i.e. upstream_failed).
You can see a failed task both in the Graph View (above) or in the Tree View (below):

The first thing you can do to debug the issue is to check the logs:
- Click on the task and then on the “Log” button located at top of the pop-up

Debugging the logs can be quite daunting at the start as a lot of output is being displayed. Just keep calm and you will learn with time.
For example, let’s say that we try to create a directory to save the images but we don’t have permission to. This would make the first task fail and the logs would show something like this:

As you can see, a lot of output is displayed but you would get familiar with the standard ones with time.
To fix the issue, in this case, we need to change the code itself. You can do this change locally and then verify that it has been “applied” in the Code View.
Then, clear the task and rerun it. Indeed, one nice feature of Airflow is that, if a task failed, it’s unnecessary to restart the entire workflow and you can just re-run the failed task. In order to do this, click on the failed task, then click the “Clear” button in the pop-up. After clearing the task, Airflow will automatically re-run it.
I hope this helps ❤️ See you in the next post!
References
Data Pipelines with Apache Airflow by Bas P. Harenslak and Julian Rutger de Ruiter


