
YOLOv7 Training on Custom Data?
Object-detection technology is widely used as the backend of many applications in the industry including desktop and web applications. Also, it’s a backbone for many computer vision tasks, which include object segmentation, object tracking, object classification, object counting, etc. In the modern era, The goal of everyone regarding any application is,
The application must be easy to use, take less processing time, and provide the best results.
A year ago, YOLOv7 was released with the contribution of AlexeyAB (YOLOv4 author) & WongKinYiu (YOLOR author). The aim behind the implementation of YOLOv7 is to achieve better accuracy as compared with YOLOR, YOLOv5, and YOLOX.
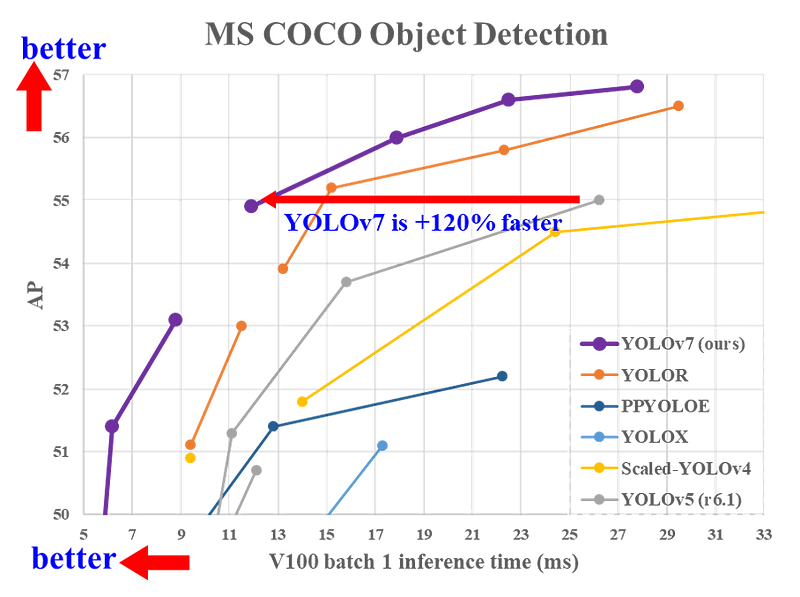
In Fig 1, you can clearly see that YOLOv7 is exceeding YOLOX, PP-YOLOE, YOLOR, and YOLOv5 in terms of accuracy and speed. The development of YOLOv7 is completely in PyTorch.
In this article, we will focus on “Training of YOLOv7 on Custom Data”. You can follow mentioned steps below to train YOLOv7 on your own data. All mentioned steps have been tested on Ubuntu 18.04 and 20.04 with CUDA 10.x/11.x.
- Installation of Modules
- Pretrained Object Detection
- Training on Custom Data
- Inference with Custom Weights
Installation of Modules
Create a folder named “YOLOv7”. Open terminal/cmd in the “YOLOv7” folder, create a virtual environment with the mentioned commands, and activate it.
python3 -m venv yolov7training     #creation of virtual environment
source yolov7training/bin/activate #activation of virtualenv
Note: Above step is not necessary, but recommended if you don’t want to disturb python system packages.
Clone the YOLOv7 repository from the link, upgrade pip, and move to the cloned folder with the mentioned commands.
git clone https://github.com/WongKinYiu/yolov7.git
cd yolov7
pip install --upgrade pip
We need to install all of the libraries that will help in the training of YOLOv7. you can use the mentioned commands to install the required modules.
pip install -r requirements.txt
sudo apt install -y zip htop screen libgl1-mesa-glx
Pre-trained Object Detection
We have installed all of the modules. We now test the detection with pre-trained weights to confirm that all of our modules are working fine. You can use the mentioned command in terminal/cmd to detect objects with the pre-trained weights.
Note: YOLOv7 weights must need to be in the yolov7 folder, download the pre-trained weights file from this link and move the downloaded file to the current working directory {yolov7}
python detect.py --weights yolov7.pt --source inference/images/horses.jpg --img 640If everything is working fine, then you will be able to get results in the directory as mentioned below.
Results Directory : [yolov7/runs/detect/exp/horses.jpg]

Train YOLOv7 on Custom Data
The steps for custom training are as follows:
1- collect data
2- label data
3- split data (train & test)
4- create config files
5- start training
Step 1
We need to create a dataset for YOLOv7 custom training. if you have no data, You can use the dataset from the openimages database.
YOLOv7 takes label data in the text(.txt) file and has the following format:
<object-class-id> <x> <y> <width> <height>
Step 2
For labeling on custom data, check out my article, Labelling data for object detection (Yolo).
Step 3
Once you have labeled your data, we need to split our data into train and test folders. The split ratio will be dependent on the user while the normally preferable split is (80–20)%, which means 80% of the data is used for the training while 20% of the data is used for testing. *The Store images and labels with the mentioned folder architecture.
*For splitting of data, you can take a look at python-library which will split your data randomly into the train, test, and validation.
Folder structure:
├── yolov7
 ## └── train
 ####└── images (folder including all training images)
 ####└── labels (folder including all training labels)
 ## └── test
 ####└── images (folder including all testing images)
 ####└── labels (folder including all testing labels)
Step 4
Now we need to create a custom configuration file. (Make sure to set the correct path), because the training process will totally dependent on that file.
create a file having the filename “custom. yaml”, inside the (yolov7/data) folder. paste the below code in that file. set the correct path of the dataset folder, change the number of classes and their names, and then save it.
train: (Complete path to dataset train folder)
test: (Complete path to dataset test folder)
valid: (Complete path to dataset valid folder)
#Classes
nc: 1 # replace according to your number of classes#classes names
#replace all class names list with your classes namesnames: ['person', 'bicycle', 'car', 'motorcycle', 'airplane', 'bus', 'train', 'truck', 'boat', 'traffic light',
'fire hydrant', 'stop sign', 'parking meter', 'bench', 'bird', 'cat', 'dog', 'horse', 'sheep', 'cow',
'elephant', 'bear', 'zebra', 'giraffe', 'backpack', 'umbrella', 'handbag', 'tie', 'suitcase', 'frisbee',
'skis', 'snowboard', 'sports ball', 'kite', 'baseball bat', 'baseball glove', 'skateboard', 'surfboard',
'tennis racket', 'bottle', 'wine glass', 'cup', 'fork', 'knife', 'spoon', 'bowl', 'banana', 'apple',
'sandwich', 'orange', 'broccoli', 'carrot', 'hot dog', 'pizza', 'donut', 'cake', 'chair', 'couch',
'potted plant', 'bed', 'dining table', 'toilet', 'tv', 'laptop', 'mouse', 'remote', 'keyboard', 'cell phone',
'microwave', 'oven', 'toaster', 'sink', 'refrigerator', 'book', 'clock', 'vase', 'scissors', 'teddy bear',
'hair drier', 'toothbrush'] Step 5
All preprocessing steps are done, it’s time to start training. open the terminal in the main “yolov7”, activate the virtual environment, and run the mentioned commands below.
source yolov7training/bin/activatepython train.py --weights yolov7.pt --data "data/custom.yaml" --workers 4 --batch-size 4 --img 416 --cfg cfg/training/yolov7.yaml --name yolov7 --hyp data/hyp.scratch.p5.yamlorpython3 train.py --weights yolov7.pt --data "data/custom.yaml" --workers 4 --batch-size 4 --img 416 --cfg cfg/training/yolov7.yaml --name yolov7 --hyp data/hyp.scratch.p5.yaml --epochs 50-- img = size of images on which model will train, the default value is 640.
-- batch-size = batch size used in training.
-- epochs = number of training epochs
-- data = path of custom config file
-- weights = pre-trained weights (yolov7.pt / yolov7x.pt / yolov7-w6.pt / yolov7-e6.pt)

Note: Training will not start if any image is corrupted, If some label file is corrupted there will be no issue in training because yolov7 will ignore that image and label files.
Wait for training to complete, and then do inference with newly created weights. Custom-trained weights will be saved in the folder path mentioned below.
[yolov7/runs/train/yolov7/weights/best.pt]
Inference with Custom Weights
Once training is completed, go to the terminal and run the mentioned command below for detection on custom weights.
python detect.py --weights runs/train/yolov7/weights/best.pt --source "path to your testing image"I have used Person data for training, the results with custom weights are shown below.
That is all regarding “Train YOLOv7 on Custom Data”. you can try this on your own data.
- Dataset creation from Videos: *Article Link
- Labeling Data for Custom Training: *Article Link
- Train YOLO-v5 on Custom Data: *Article Link
- How to Prune and Sparse YOLOv5: *Article Link
- How Hyperparameters of YOLOv5 Works: *Article Link
About Authors
- Muhammad Rizwan Munawar is a highly experienced professional with more than three years of work experience in Computer Vision and Software Development. He is working as a Computer Vision Engineer in Teknoir, he has knowledge and expertise in different computer vision techniques including Object Detection, Object Tracking, Pose Estimation, Object Segmentation, Segment Anything, Python, and Sofware Development, Embedded Systems, Nvidia Embedded Devices. In his free time, he likes to play online games and enjoys his time sharing knowledge with the community through writing articles on Medium.
- LinkedIn Profile
Please feel free to comment below if you have any questions


