
Xcode Build System: Everything Everywhere All at Once
Curious about what really happens when you hit ‘Build’ in Xcode? This article breaks it down step by step in an easy-to-understand way. I explore each action Xcode takes behind the scenes, using simple explanations.
Let’s begin at the start.
Xcode
Before we get into the details of Xcode’s Build System tasks, let’s start by understanding the basics of the build process. This will help us grasp the bigger picture.
Xcode IDE has Xcode Command Line Tool, SDKs, etc.
It means you can build an app and run it without using Xcode IDE.
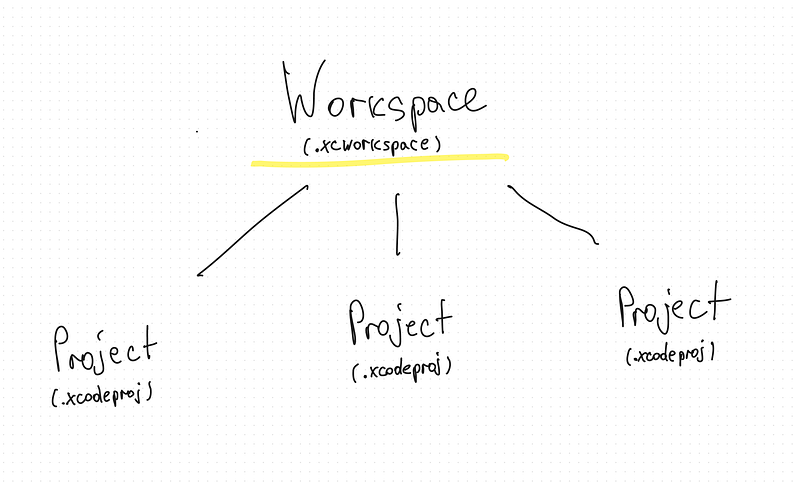
Xcode Workspace
A workspace is an Xcode document that groups projects and other documents so you can work on them together. A workspace can contain any number of Xcode projects, plus any other files you want to include. In addition to organizing all the files in each Xcode project, a workspace provides implicit and explicit relationships among the included projects and their targets. (c) Apple
It can contain many Xcode Projects.
Groups which are used to organize the source files in the structure navigator. They can be match with the directory structure on disk or not.
Each Xcode Project can have different Targets.
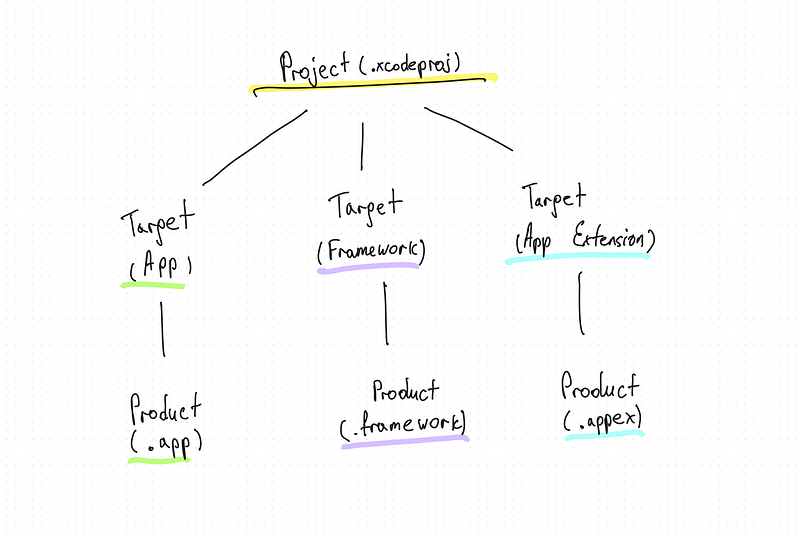
Target can be App, Framework, App Extension and other.
Each Target can produce Product, e.g.:
- .app (App)
- .framework (Framework)
- .appex (App Extension)
But how it works?

In order to obtain the Product, Target has to provide following things:
- Source files (.swift, etc.)
- Instructions: Build settings, Build phases.
Build settings contain options for the compiler, variables, etc. More about that can be checked here, Apple Documentation.
Build phases contain dependencies, custom scripts, etc. More about that you can read here, Apple Documentation.
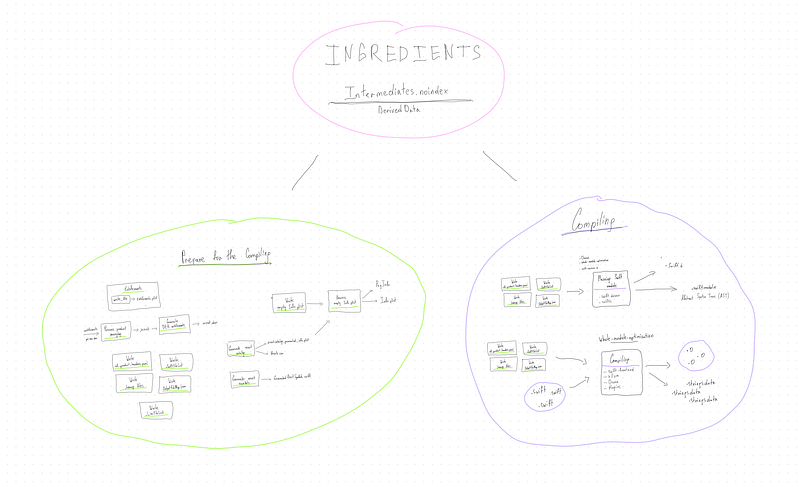
In simple terms, think of a project in Xcode like a big recipe book. Each recipe (Target) in the book is a set of instructions to make a dish (Product). Just like how each recipe results in one dish, each Target creates one Product.
- Targets are like recipes: In a project, you can have many recipes. For example, in the “LongNights” project, you might have one recipe for testing the app (LineTests), another for the actual app (LongNights app), and another for a library used by other apps (LongNightsSDK).
- Source files and instructions are ingredients and steps: Just like how recipes have ingredients and steps, Targets have source files (ingredients) and instructions (steps) for how to build the final dish or Product.
- Build Settings and Phases are like specific cooking techniques: When you’re cooking, you might need to set the oven temperature (build settings) and follow steps in a particular order (build phases). Similarly, in Xcode, Build Settings might tell the computer how to handle the code, like “cook at 350 degrees,” and Build Phases order the steps, like “mix the eggs before baking.”
- Dependencies are like needing one dish to complete another: Sometimes, one recipe might depend on another (like needing a cake base for your frosting). In Xcode, one Target might need to be completed before another can start. This affects the order of cooking (building).
- Executable environments are like setting the table for dinner: Just as you prepare the table differently depending on the meal, in Xcode, the executable environment sets up how the app runs or is tested, like what “utensils” (command-line arguments) are needed or “seasoning” (environment variables) should be added to the program when it runs.
- Xcode Schemes are like meal plans: Just as meal plans outline what to eat on which day, Xcode Schemes help organize which Target (recipe) to run, how to run it, and what settings to use, giving you control over the whole cooking (building) process. More about Xcode Schemes can be checked here
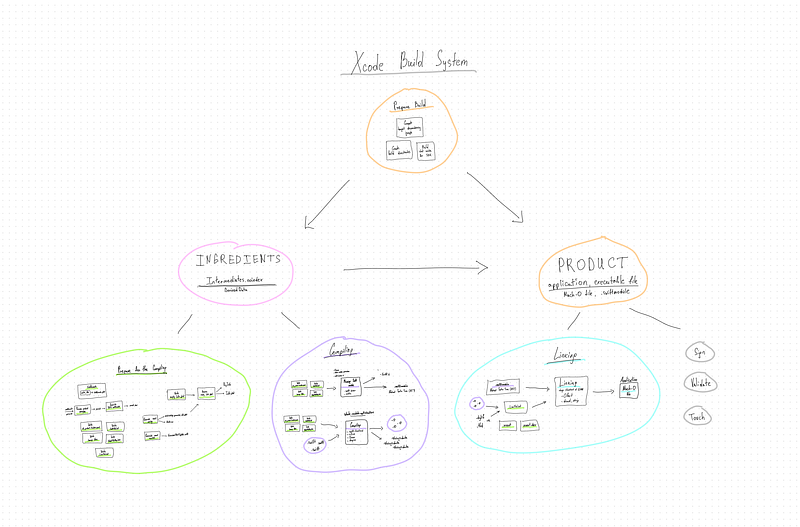
How does the Xcode Build System work?
Let’s build and see! (Setup: Xcode 15.0.1.)
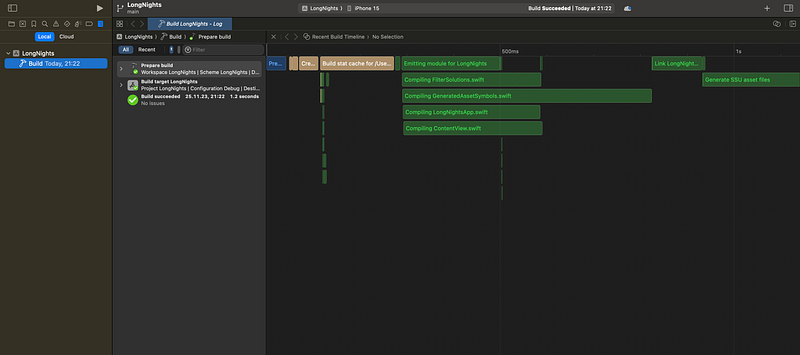
When we run the build action with a timing summary, we get information about the time taken by each task.
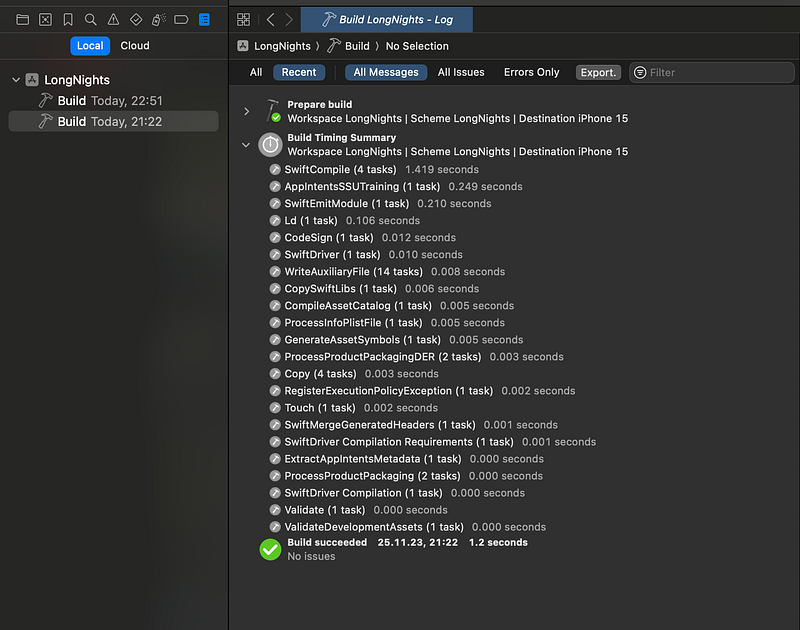
What specific tasks are performed, how long do they take, and how are they interdependent?
Build target LongNights of project LongNights with configuration Debug for iPhone 15 iOS 17.0 SDK.
Due to the article’s extensive length, I’ve divided it into smaller, more manageable sections:
- Preparation
- Compiling
- Linking
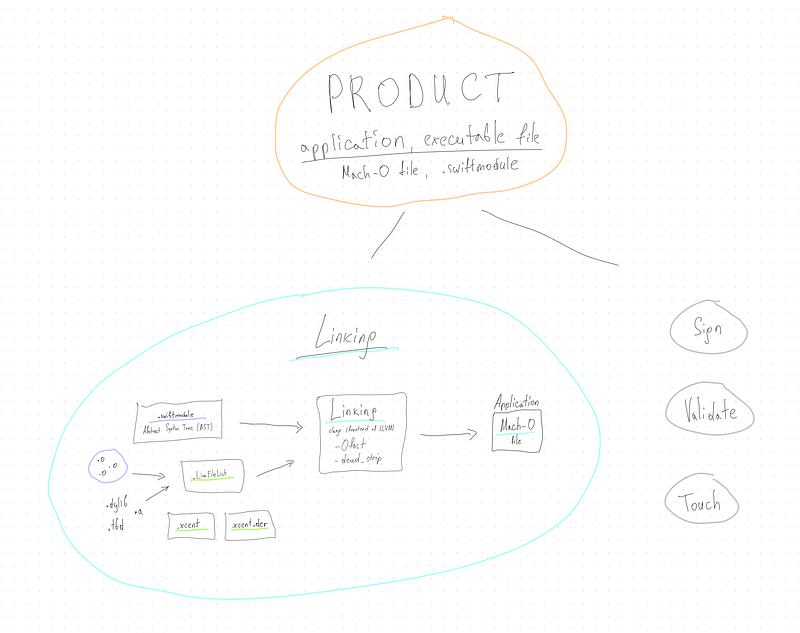
Preparation
Compiling
What do we have so far?
As the result of all the commands that were performed we have Intermediates.noindex ( -> .build ) directory full of files neccesary for the linking process.
Here we see .yaml, .hmap, .xcent, .xcent.der files.
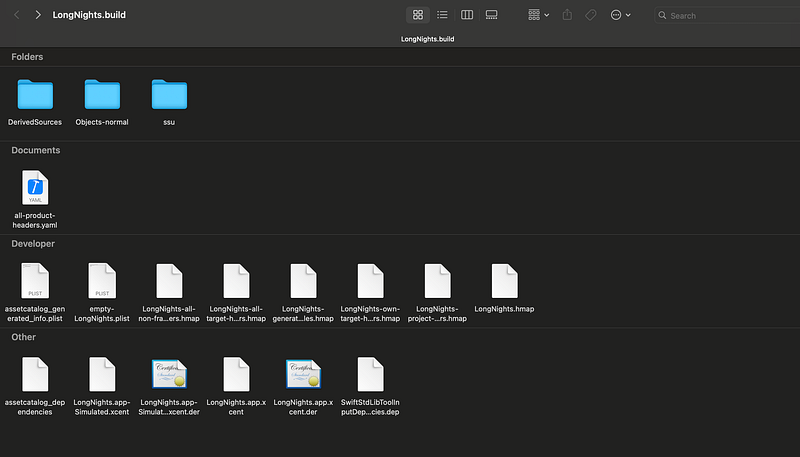
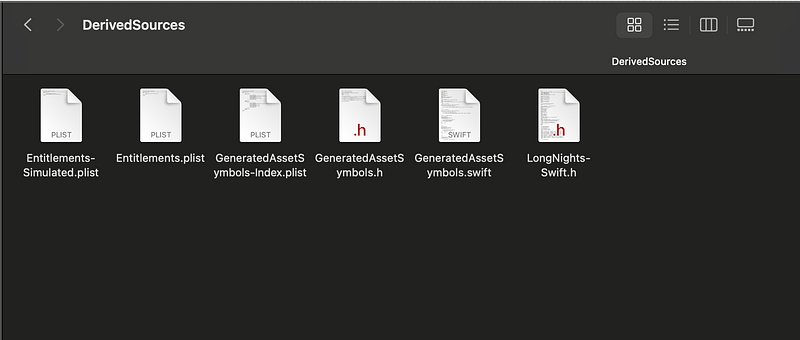
Inside DerivedSources directory we can see Entitlements files, GeneratedAssetSymbols files, and header file.
Objects-normal -> arm64 store following files:
- Object files (.)
- .stringsdata files
- .abi.json
- .LinkFileList
- .swiftmodule
- _Swift.h
- master files (.d, .dia, .swiftconstvalues, .swiftdeps)
- other files (_OutputFileMap.json, supplementaryOutputs, _dependency_info.dat, _const_extract_protocols.json)

Linking
Copy Swift Standard Libraries

cd /LongNights
    builtin-swiftStdLibTool
    --copy
    --verbose
    --sign
    --scan-executable
      ~/Xcode/DerivedData/.../Build/Products/Debug-iphonesimulator/LongNights.app/LongNights
    --scan-folder
      ~/Xcode/DerivedData/.../Build/Products/Debug-iphonesimulator/LongNights.app/Frameworks
    --scan-folder
      ~/Xcode/DerivedData/.../Build/Products/Debug-iphonesimulator/LongNights.app/PlugIns
    --scan-folder
      ~/Xcode/DerivedData/.../Build/Products/Debug-iphonesimulator/LongNights.app/SystemExtensions
    --scan-folder
      ~/Xcode/DerivedData/.../Build/Products/Debug-iphonesimulator/LongNights.app/Extensions
    --platform iphonesimulator
    --toolchain
      ~/Xcode.app/Contents/Developer/Toolchains/XcodeDefault.xctoolchain
    --destination
      ~/Xcode/DerivedData/.../Build/Products/Debug-iphonesimulator/LongNights.app/Frameworks
    --strip-bitcode
    --strip-bitcode-tool
      ~/Xcode.app/Contents/Developer/Toolchains/XcodeDefault.xctoolchain/usr/bin/bitcode_strip
    --emit-dependency-info
      ~/Xcode/DerivedData/.../Build/Intermediates.noindex/LongNights.build/Debug-iphonesimulator/LongNights.build/SwiftStdLibToolInputDependencies.dep
    --filter-for-swift-os
This command is a complex invocation of an internal Xcode tool that manages the inclusion and preparation of Swift runtime libraries for an app being built for the iOS Simulator. It ensures that the app has all the necessary Swift resources bundled with it, that these resources are appropriately signed and optimized, and that unnecessary components like bitcode are stripped out.
--copy: This option tells the tool to copy the necessary Swift standard libraries and resources into the app's bundle.--verbose: This makes the tool provide more detailed output about what it's doing, useful for debugging or understanding the build process.--sign -: This option specifies that the copied libraries should be signed. The dash-indicates that it should use the same signing identity as the app itself.--scan-executable: This points to the app's main executable file. The tool will analyze it to determine which Swift libraries are needed.--scan-folder: These options specify additional folders the tool should scan for Swift dependencies. It includes app frameworks, plugins, system extensions, and other extensions.--platform iphonesimulator: Specifies that the build is targeting the iOS Simulator.--toolchain: Points to the Xcode toolchain being used for the build. This tells the tool which set of compiler, linker, and other tools to use.--destination: Specifies where to copy the necessary Swift standard libraries and resources. Here, it's the app's Frameworks directory.--strip-bitcode: Instructs the tool to strip out bitcode from the Swift libraries. Bitcode is an intermediate representation of the compiled code used by Apple for various purposes, including reoptimizing apps for different architectures in the App Store. However, it's not needed in the final app binary when testing on the simulator.--strip-bitcode-tool: Points to the tool used to strip bitcode, typicallybitcode_strip.--emit-dependency-info: Specifies where to write dependency information, which can be used for incremental builds.--filter-for-swift-os: This option indicates that the tool should filter the copied libraries for the specific OS being targeted, in this case, the iOS Simulator.
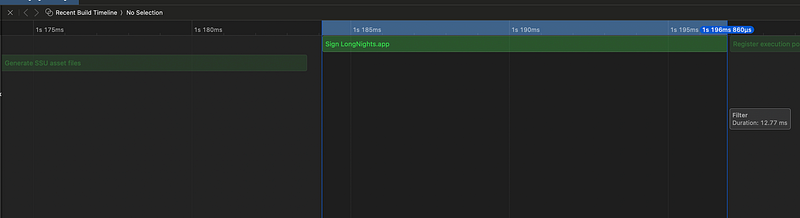
Sign
cd ~/LongNights

    Signing Identity:     "-"

    /usr/bin/codesign
    --force
    --sign -
    --entitlements
      ~/Xcode/DerivedData/.../Build/Intermediates.noindex/LongNights.build/Debug-iphonesimulator/LongNights.build/LongNights.app.xcent
    --timestamp\=none
    --generate-entitlement-der
      ~/Xcode/DerivedData/.../Build/Products/Debug-iphonesimulator/LongNights.app
This command is using the codesign tool to apply an ad hoc signature to the app. It forcibly replaces any existing signature, applies the specified entitlements, and ensures that the signed app doesn't include a timestamp and that its entitlements are in the correct binary format for the system to enforce.
--force: This flag tellscodesignto overwrite any existing signature on the app. This is useful if the app was previously signed and you need to sign it again, perhaps with a different identity or entitlements.--sign -: The--signoption specifies the signing identity to use. The"-"after--signsignifies ad hoc signing.--entitlements: This points to an entitlements file, which specifies the app's capabilities and permissions.--timestamp=none: This tellscodesignnot to include a timestamp with the signature. This might be used in development or specific build scenarios where a timestamp isn't necessary or desired.--generate-entitlement-der: This option tellscodesignto convert the entitlements file into a binary form (DER format) and embed it in the signature. This binary form is necessary for the system to read and enforce the entitlements.
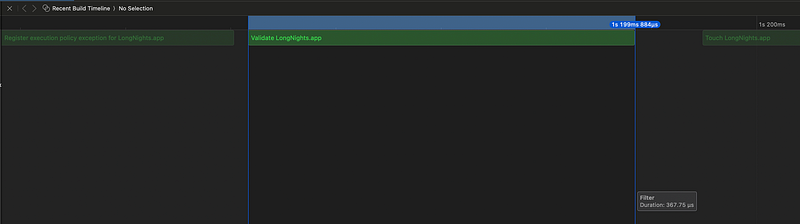
Validate
cd ~/LongNights
    builtin-validationUtility
      ~/Xcode/DerivedData/.../Build/Products/Debug-iphonesimulator/LongNights.app
The builtin-validationUtility performs a variety of checks on an app. While the specific checks can vary, they typically include verifying that:
- The app bundle is correctly structured and contains all the required components.
- Code signing is correct and valid for the intended distribution method (whether for the App Store, enterprise distribution, or development testing).
- Resource files and assets are correctly included and formatted.
- The app meets the necessary requirements for the target platform (iOS in this case).
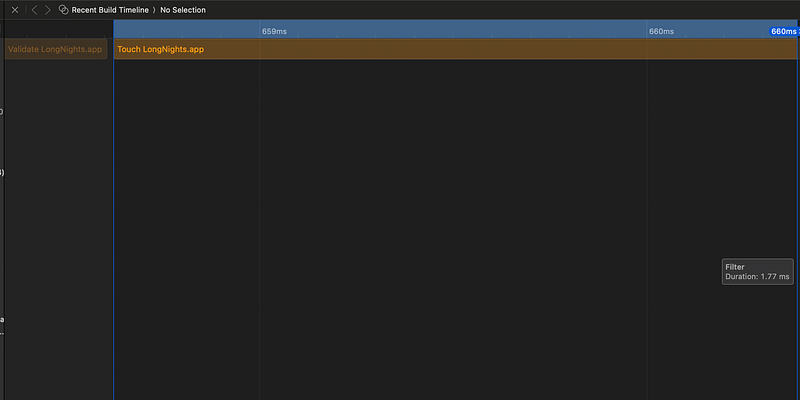
Touch
cd ~/LongNights
    /usr/bin/touch -c
      ~/Xcode/DerivedData/.../Build/Products/Debug-iphonesimulator/LongNights.app
The touch command is used to change file access and modification times. If the file doesn't exist, touch creates it with no content (essentially, an empty file).
-c: This option tells touch not to create any files. Instead, if the file exists, it will update the file's timestamp. If the file does not exist, touch will not create it and will not give any error. This is a way to safely ensure that the timestamps are updated only if the file already exists.
The touch command used to update the timestamp of the app's build product (the .app bundle). This can serve as a simple way to trigger other actions that depend on the file's modification time, like incremental builds, deployments, or packaging processes that need to know if the app has been updated. By using the -c flag, the command ensures that it only updates the timestamp if the .app bundle already exists, avoiding any unintended file creation.
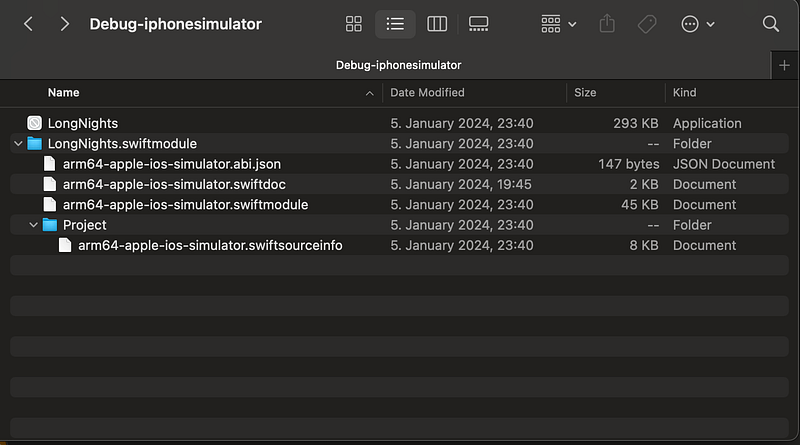
What do we have in the end?
Inside Products directory we can see Product (Products -> Debug-iphonesimulator) for our Target.
Library

Join me on LinkedIn: https://www.linkedin.com/in/salgara/.


