
What I Wish I Knew When I Got Started with Kubernetes
Get acquainted with the key things you need to know to get started with Kubernetes, through hands-on practice.
Kubernetes might seem complex at first glance, with numerous core concepts and terminologies to grasp. What’s more factual is that delving deeper into Kubernetes requires lots of hands-on practice.
So, in this blog post, I wanted to share what I wish I had known when I first got started with Kubernetes. Let’s set up an example local cluster for hands-on learning together.
Why Should You Learn Kubernetes?
Do you know OpenAI is deployed on Kubernetes and scaling to 7,500 worker nodes? And tech giants such as Apple moved from Apache Mesos to Kubernetes in 2022 and made Kubernetes their primary containerization platform.
When we talk about Kubernetes slots into microservices architecture, when we talk about a single unit of the loosely coupled unit, putting it into a container or leveraging Serverless functions are both viable solutions.
A container is a way to package and isolate an application and its dependencies in a way that allows them to be easily moved from one computing environment to another, a.k .a. portability. Plus, it makes deploying apps consistent and reliable, regardless of their computer setup.
I wrote a Medium post to help you learn Kubernetes in the right way in 2024. And if you’d like to extend your learning to start your career in this field, passing a Kubernetes certification is a good path to pursue. The following book helps you get covered
Leveraging Managed Kubernetes Playground
Before we begin, it’s worth noting that the market offers many managed Kubernetes playgrounds.
- Managed Kubernetes playgrounds allow users to experiment with Kubernetes clusters without the hassle of setting up and managing infrastructure. They typically provide pre-configured Kubernetes environments that users can access via a web interface or command-line interface.
- Those platforms also provide educational resources and interactive tutorials, which is a nice option for playing with new Kubernetes features in a hassle-free environment.
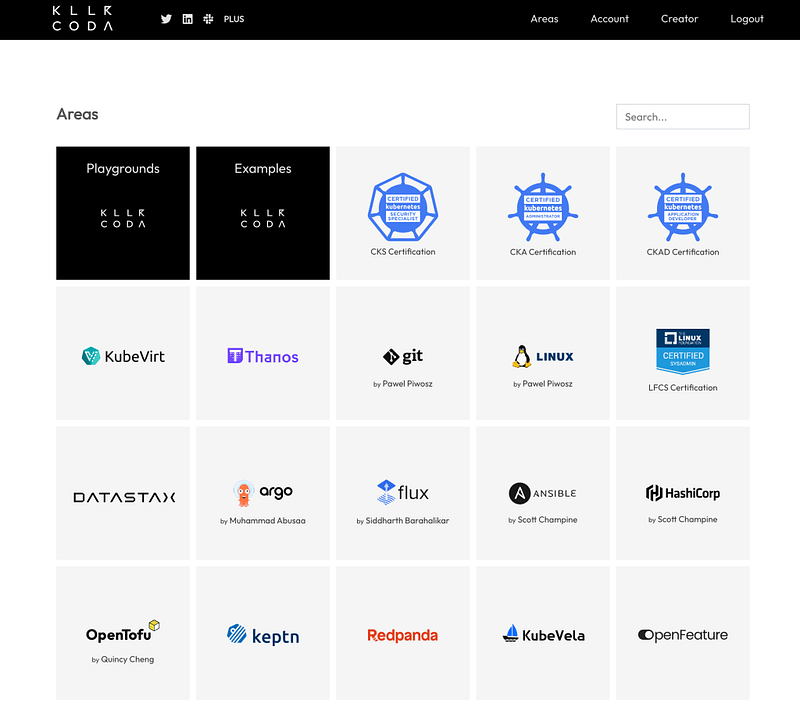
Killercoda Playground
Killercoda is a virtual playground offering instant browser access to fully functional Linux or Kubernetes environments without the hassle of local setup or resource-heavy browsers. Remote maintenance ensures seamless usability when accessed locally. With an ongoing commitment to staying up-to-date, Killercoda consistently updates the latest Kubeadm Kubernetes version just a few weeks post-release.
Users enjoy access to an initial empty Kubeadm cluster featuring two 2GB nodes ( as of the time of this post):
Killer Shell Playground
Those seeking specific scenarios or exam simulations can explore Killer Shell, designed for CKS, CKA, CKAD, LFCS, and LFCT exams. Killer Shell offers realistic simulators and interactive learning environments, allowing users to explore scenarios extensively and at their convenience. If you’re keen to pass any of those exams, we highly recommend that you explore the sample scenarios available on Killer Shell, which is the official CKA exam simulator.
Additionally, time management is the key to those practice-based exams. A nice technique is to bookmark some specific pages of the official documentation , which would be extremely beneficial for your preparation.
We have also made a playlist for you to start learning Kubernetes. Check it out if you’re interested.
Play with Kubernetes Playground
Play with Kubernetes is a Docker-provided labs site offering a K8s playground. Users can swiftly launch K8s clusters and experience a free Alpine Linux VM directly in the browser. It employs Docker-in-Docker (DinD) to simulate multiple VMs/PCs for a seamless experience. Follow their guidance and keep up to date with their GitHub repository here.
Getting a playground is a good way to start learning Kubernetes and experimenting with what you’ve learned while saving time.
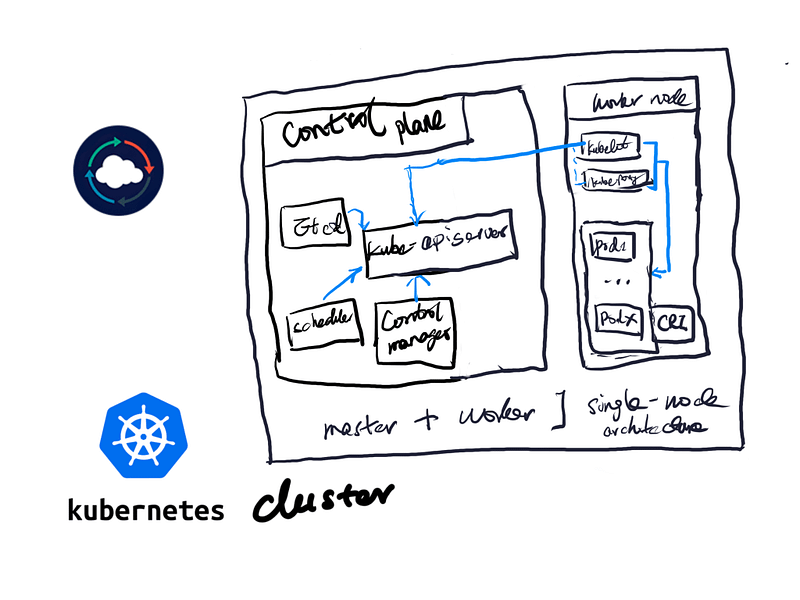
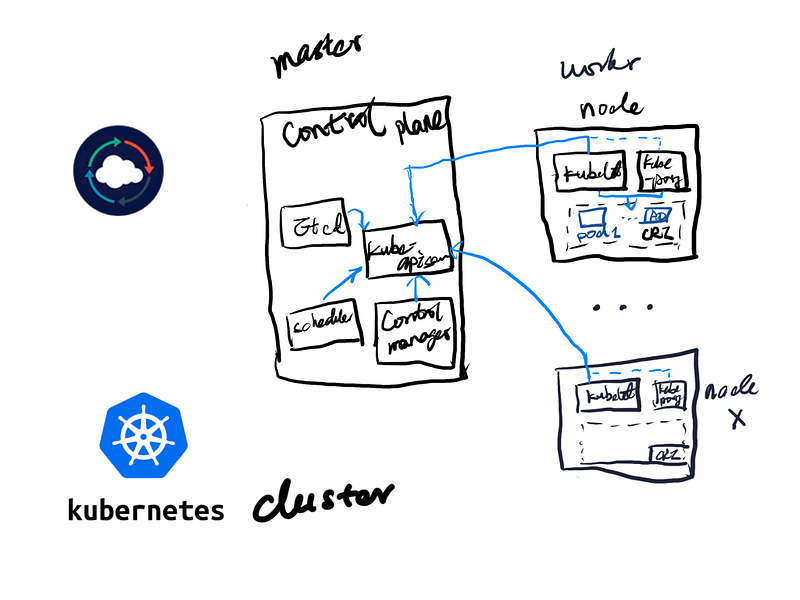
Kubernetes Node Architecture
Kubernetes supports both single-node and multi-node architectures, each with its own advantages and use cases. If you want to learn further about Kubernetes cluster architecture, you can check out this post.
Let’s take a look at each of them here :
Single-node Architecture
In a single-node architecture, all Kubernetes components run on a single machine. This setup is suitable for local development or testing environments where simplicity is prioritized over scalability and high availability.
One example of a Kubernetes distribution that supports single-node deployments is Minikube. Minikube provides a lightweight Kubernetes cluster that runs locally on a user’s workstation, allowing developers to experiment with Kubernetes features and applications easily without the need for a full-scale cluster.
Another example is MicroK8s, which offers a minimal, single-node Kubernetes distribution designed for edge computing and IoT devices. These Kubernetes distributions streamline the setup and management of single-node clusters, making it convenient for developers to get started with Kubernetes development and testing.
Multi-node Architecture
However, most enterprise-grade environments typically require more than a single-node cluster to meet their needs. They are primarily multi-node setups.
In Kubernetes, a multi-node architecture distributes Kubernetes components across multiple machines, providing redundancy and scalability. It enables high availability and fault tolerance, making it ideal for production environments and large-scale deployments.
Configuring and managing a multi-node cluster is more complex and requires careful planning to ensure optimal performance and resource utilization.
Ultimately, the choice between single-node and multi-node architectures depends on the specific requirements and goals of the Kubernetes deployment.
Set Up Your First Local Kubernetes Cluster
Creating a Kubernetes cluster using minikube is the easiest way to spin up a local Kubernetes cluster and can be achieved in a few minutes. Here’s what you need to do :
Install minikube
In your local or cloud-based Linux VM create using the curl command to retrieve minikube binary, and then install it under /usr/local/bin/minikube as the following :
curl -LO https://storage.googleapis.com/minikube/releases/latest/minikube-linux-amd64
sudo install minikube-linux-amd64 /usr/local/bin/minikube
Go to /usr/local/bin/minikube to check if you have the minikube binary installed before moving to the next steps. You can also check that by typing in the terminal to see if Minikube is available for you :
minikube –-helpProvision a Single-node Kubernetes Cluster
Using Minikube to provision a single node Kubernetes cluster, you can simply use the minikube start command :
sudo minikube start
If you’d like to set up the CPU cores and memory to start off your minikube cluster by adding memory and CPUs flag as the following :
sudo minikube start --memory 8192 --cpus 4
After the command is executed, your minikube cluster is in the provisioning process. By the end, you will see a message telling you we’re set to use the minikube Kubernetes cluster.
Installation Verification
The Minikube cluster consists of a single node, which functions as both the control plane and worker node. This setup allows you to begin scheduling workloads within your local Kubernetes cluster once it’s configured. To check if the node is ready for use, you can utilize the following command:
Kubectl get node
Use the shortcut of this command :
alias k=kubectl
k get no
The output comes back will show you :
- The status of the node, whether it’s ready to use
- The role of that node
- Kubernetes version
- The age of the node since initial deployment
Configure minikube cluster
In the event you’d like to configure the minikube cluster without reprovisioning a new one, you need to stop the minikube cluster.
Bash
minikube stop
The minikube config set command will help you apply the settings that you desired to the minikube cluster.
Once you finalize configuring the Minikube cluster, you need to start it. From there, you’ll work on the cluster with the new configurations.
Let’s configure minikube cluster using more memory and CPUs :
minikube stop

minikube config set memory 8192
minikube config set cpus 4
minikube start
Now you’re ready to play with your minikube cluster.
Delete minikube cluster
Deletes a local Kubernetes cluster and all profiles :
minikube delete --all
Hands-on is the King
The following video shows you how to easily Set Up A Minikube Cluster in a matter of minutes. We set up the environment on Apple silicon (ARM-based), such as M1/M2 MacBooks:
You can replicate what you have learned from this section for quick testing of the latest Kubernetes release for most new features featured in the release note here.
Looking Forward
I’m glad that we have many options to spin up a local Kubernetes now, and most playgrounds are free to use. So pick up your path wisely and don’t fear to try different ways out. I really hope this blog helps those seeking to get started on Kubernetes in 2024! Please feel free to follow me here on Medium subscribe to my YouTube channel if you’d like to learn more, and share your thoughts in the comment section.
In Plain English 🚀
Thank you for being a part of the In Plain English community! Before you go:
- Be sure to clap and follow the writer ️👏️️
- Follow us: X | LinkedIn | YouTube | Discord | Newsletter
- Visit our other platforms: Stackademic | CoFeed | Venture | Cubed
- More content at PlainEnglish.io


