
Unity Shader Graph: Creating a Custom Specular Shader
In the last article we dove into the Lambert light model and created a custom diffuse shader. In this article we are going to use the Blinn-Phong light model to make a custom specular shader using the Shader Graph. If you haven’t already, check out my whole Unity Shader Graph series.
The editor version used in this example is 2022.3.2 URP
We will cover:
- Create a URP unlit shader
- Create a custom specular lit shader
- Introduce the normalize node, add node, saturate node, view direction node, and power node
- Continue working with shader properties
Prerequisites
Just have Unity and the Unity Shader Graph ready. This should work in URP 2020, 2021, and this example is in 2022.3.
Optional: Read Intro to Shader Graph
The Steps
Step 1: Make a New Shader
Okay first step is to make a new unlit URP shader in the shader graph.
We are going to right-click the project window, then select Create->Shader Graph->URP->Unlit Shader Graph.
Step 2: Setting Our Shader Properties
We will only need two properties for this shader. A type Vector3, and a type Float. So we are going to need to open our new shader in the Shader Graph and add our properties to the Blackboard. Then we are going to need to set each properties’ default value.
Opening our new shader in the Shader Graph window can be done by double clicking. Or you could select the shader and in the inspector window, select Open Shader Graph.

Now we can add our properties. I’m going to name the type Vector3 “Light Source” and the type Float “Specular.”

Now we are just going to set their default values in the graph inspector so that we don’t have to later and will be able to see our changes live in the preview window.
Select each property, and in the graph inspector set their default values to something that isn’t 0.
Step 3: Making the halfway vector
For those that read the Intro to Shaders you may recall the Blinn-Phong lighting model and how it uses a halfway vector to simulate specular lighting. We are going to be using that to create this shader. So to create the halfway vector, we need data to represent the user’s view and the light source. For the keen among us, you may have seen that we created a property for the light source already but not one for the viewer’s vector.
Introducing the view direction node.

The view direction node doesn’t take any input and outputs a type Vector3. This node gives us access to the vector from the vertex or fragment to the camera.
So lets make our halfway angle! We are going to need to create a view direction node, then add its vector with our light source property. For that we will need to create an add node.

Now the last thing we need to do before moving on is normalizing the vector. To do this we are going to create a normalize node and connecting our current output to it.

Awesome! Now we are ready for the next step.
Step 4: Combine the Halfway Vector and the Normal Vector
The second part of the Blinn-Phong specular lighting model is to combine the halfway vector to the object face’s normal vector.
So for this we need to create a new node for the normal vector and use our current normalized halfway vector with a dot product node. This is going to be done in three mini steps.
- We create the normal vector node
- We create the dot product node
- We connect everything up
Step 5: Add Saturation
You may have noticed that the preview window finally looks like something cool. We now have a specular lighting effect happening in our preview on the final dot product node!
So now we are going to take it a step further and add saturation for customization. This is where that other shader property is going to come into play.
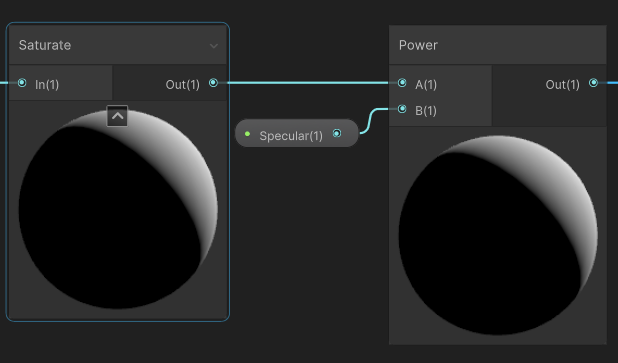
What we are going to do in this step is create a saturate node then we are going to create a power node which will take the output of the saturate node and the Float property called “Specular” which will give us mor control over the look.
Now this is one word of warning here. Previously it didn’t matter what order you connect your pins, but for the power node it will matter a lot. The top pin is the base value and the bottom pin will be the exponent. So the order will change everything.
Finally, we are going to output this to the master stack and finish this shader.

Just as a final point of warning. Please make sure your power node looks like the following with your property connected to the bottom pin and not the top pin. When done correctly we are bringing A to the power of B.
That’s it, you now have a custom URP lit specular shader made in the shader graph.
Make sure you hit Save at the top left of the window and you don’t see a little star next to the shader name!
Step 6: Setting Up the Scene to Test
We are going to make a material, assign the shader, create a cube in a scene and then hit play.

The Author
I am a software engineer, project manager, and self-taught Unity/Unreal developer currently working in cutting edge enterprise AR/VR. I spent over a decade in the food service industry starting as a dishwasher and leaving as a general manager when I switched careers into tech.
If you would like to support me so that I can continue putting out articles and videos please consider becoming a Medium member or joining our community on Patreon. Patreon subscribers will have access to these written tutorials from myself and other creators as well as video form tutorials, project files, and even games.
If you would like to give a more direct donation, feel free to buy me a coffee Ko-Fi/MikeQ. If you have any questions, complaints, or funny jokes, be sure to throw them in the comments.
Want to know more about me? Feel free to checkout my latest interview with BadVR or connect with me on LinkedIn.


