Ubiquiti Dream Machine Pro ~ First Impressions
Initial attempt to set up the device, use the phone app, and set up a VLAN
~~~~~~~~~~~~~~~~~~~~~~~~~~~~~~~~~~~~~~~~~~~~~~~~~~~~~~~~~
⚙️ Check out my series on Automating Cybersecurity Metrics. The Code.
🔒 Related Stories: Unifi | Dream Machine Pro | Ubiquiti | Network Security
💻 Free Content on Jobs in Cybersecurity | ✉️ Sign up for the Email List
~~~~~~~~~~~~~~~~~~~~~~~~~~~~~~~~~~~~~~~~~~~~~~~~~~~~~~~~~
Update: The user interface got better since I wrote this — but it still had some issues that made me resort to the old UI. I did finally get the wifi working behind pfSense if you read the whole thing and so far the wifi working reasonably well (after a couple of days.) I mainly got the UDM Pro for the wifi and ability to inspect wifi traffic so we’ll see how it does with that.
Update 4/24/24 — As it turns out I may have been shipped a device with old software. More to follow.
This is just me clicking around trying to set up a Dream Machine Pro. If you want someone to click on every wrong button on your UI that would be me. I like things to be intuitive and have little patience when it comes to confusing user interfaces. I think that is why I like to build very simple and intuitive user interfaces that align with how someone is trying to achieve a task in an application.
That’s how I defined back-office banking applications. In one case I sat down with the users and watched them work on the existing application, where they took a lot of steps to do simple things, where things broke, and how they resolved problems. In the end, I added a screen that reported errors with one click to fix them. The manager of that department told me that was her favorite feature and it wasn’t in the initial project requirements. I added it because it was an obvious need.
I also like zero trust networks. I only want to allow what is required. So, that confuses the matter a bit compared to someone who just fires up a device and lets it connect all over the Internet without any concern for the connections it makes. I’m a security researcher. Business people and home users may opt to trust the company. I like to see how things work.
Now before I go into my confusion below, let me just say that I love, love, love not dealing with that Cloud Key anymore. Trying to set up a zero trust network with that, or trying to set up a controller on my own hardware was undesirable. I like having everything in one box. It’s a step in a better direction. Now onto the experience I had trying to set up the device behind a PFSense. (I’m not done — I’m waiting on the support team as noted below and will provide step-by-step details if and when I figure this out completely.)
Networking experience
Before I tell you about my clicky approach to figuring out what I am trying to do :) I want to explain something. My networking experience is varied. I wouldn’t say I’m an expert at all on every topic related to networking but I have done a lot of things network-related and I guess you could say I’m a network hacker (in the non-derogatory sense of the word) because I hack around trying to figure things out when I have time. Here are some of the things I’ve done that included some reverse-engineering to solve network-related problems:
- My career started out in networking working with telecom companies, video conferencing that never worked on the first try from AT&T (no Zoom back then!), T1 lines, ISDN using D channel switching which I had to reverse engineer to troubleshoot a project (18 pages of configuration that always went wrong), frame relay, cell phone management including cell fraud which was prevalent back then, phone line installations, telecom budgets, and inaccurate phone bills.
- Ran a web server and an email server out of my home at one point (a very long time ago.)
- Ran an e-commerce company and had a rack in a co-location facility and later used managed hosting. I had to deal with some networking there but I hired others to actually implement the physical networking up to the point of the servers for the most part. I had a Cisco-certified network engineer walk me through the configuration of a load balancer when I ran a web application that needed more capacity.
- Faced a data breach on my own servers at that company and had to learn more about VPNs and firewalls at that point. Networking got me into cybersecurity. I became a fan of zero trust networking. I told the hosting company I wanted to block outbound firewall traffic I didn’t need and they told me no one does that. I did. Now everyone does.
- Worked on the Capital One cloud engineering, cloud networking, and security teams. I set up network proxies and helped design and deploy networking for over 11,000 developers rolling out applications to AWS. I helped implement subnets, security groups, routes, peering, VPNs, gateways, and networking for AD servers on AWS with a very complex forest that exceeded cloud network limitations, HSMs, DNS, bastion hosts, and cloud proxies to overcome transitive peering limitations (be careful with this one) ~ among other things. I discussed how to implement Transit Networks to put all your security appliances in a single VPC with AWS — an idea I had and spoke about prior to transit VPCs becoming a thing the way they are now on AWS. I understand cloud networking pretty well and provide consulting on that.
- Have numerous security certifications that involved dissecting packets and advanced pentesting on Cisco devices and VLAN trunk ports and protocols among other things but I don’t use it much on cloud penetration tests. I’m going to be reviewing all that with this new network setup though I’m only using one Cisco device right now. The UDM and PFSense support the spanning tree protocol (STP).
- Worked for a security vendor that creates a network security appliance — primarily a firewall with a bunch of other components baked into one box. I architected a cloud solution for their firewalls all over the world to connect to AWS. I got a little tripped up on the routing when first connecting that to the cloud. I also provide insight on the automated deployment of those devices in cloud environments. I got my team to troubleshoot with the responsible team why that device didn’t work properly with an AWS VPN configuration.
So when you read this post, if you have done a lot of networking, you might think I don’t know what I’m doing because I am clicking around on things and don’t know certain details about a particular device. However, I figure things out as I go and as I need to solve a certain problem. I work not only in networking but have 25 years of software development experience and do pentesting and cybersecurity. My goal is always to solve a particular problem and right now my problem is that I want to set up a VLAN across a PFSense (specifically a Netgate device with an integrated switch) and a UDM Pro.
I tried to set up VLANS between the PFSense and a Cisco switch in the past. I never quite got that working and ran out of time because I’m always so busy! I might try that again as well. I have resolved some issues I had back then with the PFSense VLANs and pretty happy about that. But when it comes to connecting the UDM still working out a few glitches.
The documentation from vendors, especially when you need to connect different brands or want to set up zero-trust networking seems to be incomplete and hard to find. Maybe some of these posts will help someone else get things done more quickly.
For now, here are my first impressions of the Ubiquiti Dream Machine while trying to achieve my objectives.
Specifications
I read some posts in newsgroups saying the UDM Pro has no power over ethernet (POE) so I bought a POE switch to go with it. I suppose I should have done more homework but I wanted to try that out anyway. I’ll share a video later I’ve been taking a look at when I get into the specific instructions. But after I bought the device I saw a forum post that says half the ports are POE and another press release in 2021 showing that POE ports were supposed to be coming soon. The photo of the device had lightning bolts on the ports. Mine does not.
In this UDM Pro datasheet I see a diagram showing the switch has POE but the UDM Pro does not:
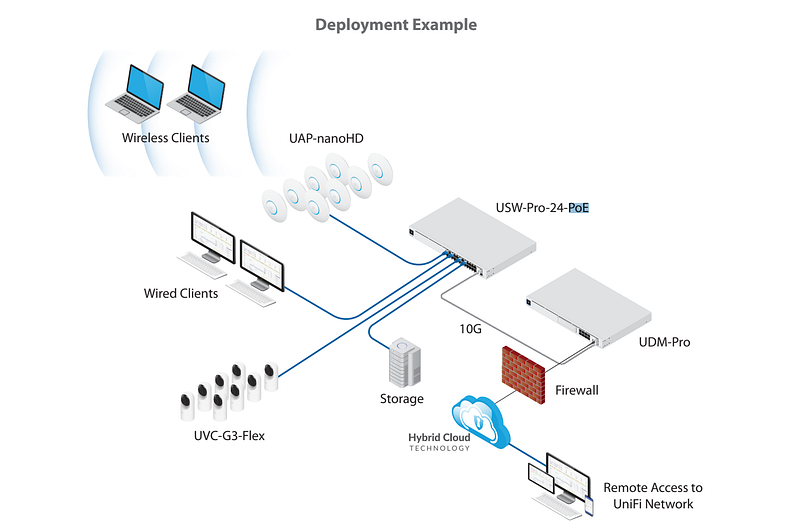
Maybe I’ll just plug something in and see. One post said ports 5–8 are POE.
Out of the box instructions
The out of the box documentation is short and looks like IKEA instructions. You get icons and pretty much no words. I guess this is aimed at people who don’t understand networking and are using the default configuration and allowing things to just connect to anything else on the Internet. They have a nice video showing a quick setup in a few minutes. Of course, that is when you have the device exposed directly to the Internet and allow all traffic. I’m trying to inspect the traffic and allow what is required as I go.
I find the IKEA instructions to be a bit lacking, personally. I would like to see a list of domains or CIDRs, ports, and protocols that explains what the device connects to and which are required. I would also like instructions for offline setup.
I am not sure that the diagram for wiring the UDM to the Switch I got with the switch printed on paper didn’t match the instructions I got when I clicked on the QR code. It seemed like different ports were connected in each case. Also, it shows the cables plugged into the non-ethernet ports on the side of the box in a couple of different ways. To be honest, I’m not familiar with that type of jack for this cable, but I think I had to get special cables in the past for something else like this. Is this related to a VLAN trunk port?
If I needed a special cable to connect those two things I wish I had been informed at checkout. I know a lot of long-time network people may scoff at this, but why make it difficult for newbies? I’ll figure out what that cable is and if I want to use it or not. Don’t worry.
I also read that I can run without it by connecting two ethernet ports on each device. I did try that out but the adoption failed. I’m taking a step back to review the purpose of those additional ports. Personally, I like to understand how things work instead of just plugging things in and guessing. I’d like to know my options and what solution best meets my needs.
Phone App
The phone application pretty much never worked for me. I don’t know if that is because I was blocking some network traffic because I was running this all behind a firewall or what.
First of all, if you don’t care about what your device is connecting to on the Internet, you can just follow these super simple instructions:
It looks really easy in that case. Of course, in my quest to understand the details I must make my life difficult.
I started the UDM with no network connectivity at all. At some point during this process when all network connectivity was failing, I was able to get an option for an offline setup. I went through the process and after multiple tries, because the app kept disconnecting and I had to start over, I got through the process. I skipped the firmware update and the speed test, the latter of which never worked for me, and got the green checkmark at the end finally and the “ding!” indicating success.
When I looked at the phone app I saw two Ubiquiti devices instead of one. Neither of them, when I clicked on them, allowed me to do any sort of configuration. I reported this issue to Ubiquiti. I noticed that an update came out in the app store recently to fix the issue with two devices showing up so that’s good! However, I was never able to even get a device to show up at all after that point.
What I did next was start to allow connectivity. First I enabled DNS connectivity but I noticed the device was connecting to all kinds of DNS servers and not the ones my network allows. I wish that configuration of DNS servers was an option during the setup steps. (And on every other IoT device!)
Later I figured out how to get the device to only use my DNS servers. There are other DNS options you can configure in other places I’ll explain later. I could see the UDM trying to ping and access CloudFlare default DNS servers (1.1.1.1) and Google DNS (8.8.8.8). That created a lot of unnecessary noise in my logs if I could just specify the correct DNS servers in the setup process. The same goes for NTP.
Next, I started to reverse-engineer which domain names the device was trying to connect to as I explained in my last post. I added the domains as explained there so the device could connect through my PFSense to those domains. However, I had only plugged a cable from a port on the PFSense to the WAN port on the UDM.
At this point, it seemed like the traffic was getting out to the Internet but upon doing a packet capture inspection the return traffic was not reaching the UDM. I think this has something to do with NAT and would really like to dig into those details but I saw a video showing that I also need to connect a cable from the UDM LAN to a LAN port on the PFSense. That allowed the UDM to reach the Internet.
One odd thing here is that maybe because the PFSense is stateless, it never showed the blocked return traffic in the firewall logs. The only way I could see that was by doing a packet capture as explained in the previous post. Then I could see the details of the request and response traffic. This request for a bit of improvement would be directed at PFSense not Ubiquiti. Make it easier to see that problem.
Once I started allowing traffic to the Internet for the UDM and going through the setup process I could never get back to the offline setup. It would be nice if Ubiquiti would give you that option. The offline setup allows you to set a local user name and password instead of storing it in the cloud.
I wanted to try out some of the cloud services anyway so eventually I put in my user name and password to connect. At that point, I couldn’t set a local user name and password even after resetting the UDM, which I had to do numerous times before I got things halfway working. (Again, if you just let everything connect to the Internet you likely won’t have these problems.)
I can’t remember at what point the app finally got me to the green checkmark again and the “Ding!” sound indicating success, but it may have been after I resolved the NAT issue with the second cable. However, the device never showed up in my phone app. I reset everything multiple times.
I was able to perform the firmware update, but I could never run the speed test. It still doesn’t work in the UDM UI. Not sure what’s wrong there so need to keep researching that later.
Finally, I realized I could just plug in a laptop directly to the UDM and get to the UI (Duh, I know.) I got the UDM console but I couldn’t log in for some reason. I tried resetting my cloud password. I tried the local password I had set on the device and the cloud user name and password. Nothing would work.
One thing I’m not sure of thinking back is if there are separate user names and passwords for the forum (which I haven’t used), support, and the UDM console. That would be confusing. But I wrote down the user name and password I used when I created an account in the app so was pretty sure I was using the correct one.
I kept inspecting the traffic to see if anything was blocked and adjusting my firewall rules to allow the appropriate traffic. I can’t remember if I allowed something new that might have triggered this, but the next day when I fired everything up and possibly reset the device again with the exact same steps, I was able to log in. I don’t know exactly but from that point forward I’ve been able to log in using a local connection.
The Ubiquiti UI is both very pretty and very confusing
After watching some videos I wanted to set up a VLAN on the UDM. I researched many videos and blog posts on connecting a PFSense and a UDM. There are various ways to configure this. I knew one person was at a screen where he could set up a VLAN-only network and I wanted to get to that. At some point, support told me to add a VLAN tag to a specific port to resolve another issue. I’ll explain all that in a separate post but for now, I want to explain that I’ve already done both those things.
Here’s my experience even after going through this once trying to remember how to do it a second time. I wanted to add the VLAN Tag to a second port to see if that resolves a problem I’m having.
When I log in, I see a network icon in the middle of the screen so, of course, I click on it. I get to a generic network dashboard. That’s nice. I want to edit my VLANs. Where should I go next?
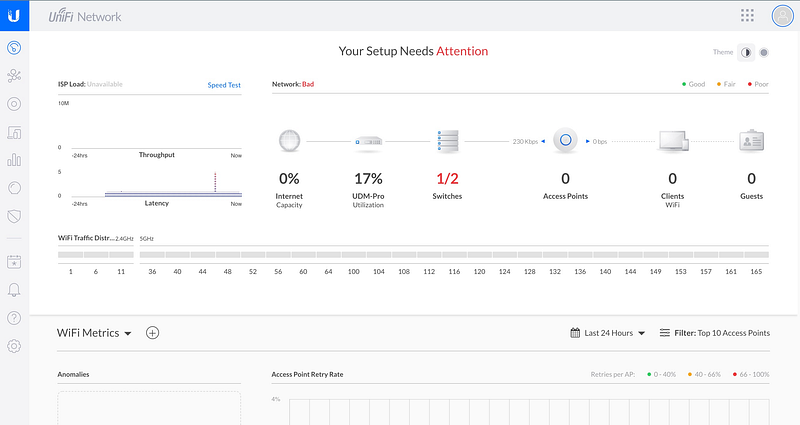
When I click on the device icon on the side of the home screen and then click on the UDM Pro IP address I get to a big “Network” icon in the middle of a mostly empty screen. It’s the same screen I got when I logged in. So of course, clicking on the network icon takes me back to the generic network dashboard.
I would expect when I click on the IP address for the UDM Pro that I would get something specific to the UDM Pro configuration or at least something specific to that device alone. This seems to be a generic network dashboard.
I clicked back into devices, then the UDM Pro, and see “Manage Settings” at the bottom under the network icon. It seems to me that “Manage Settings” should be front and center if I click on the IP or skip that click altogether. Go straight to manage settings for the UDM Pro.
Steve Jobs was a master at keeping things obvious. I’ve written before about how I got a Microsoft phone in the past and it took me 4 clicks to get to the screen where I could dial the phone. Really? I walked into the store and said show me how to make a call on an iPhone. There’s a phone icon on the first screen. You click and the keypad comes up. I said, “I’ll take it.” The Microsoft phone went in the trash.
OK, so I go back to the devices screen and click on “Manage settings.” From here I get to a screen that says check for updates and shows performance stats. The update is important and I like that it’s front and center. However, the performance stats have nothing to do with changing settings.
On the side, I see General, Applications, Locations, and Advanced.
General is the screen I’m on after clicking through and it has no settings other than “update.” I’m trying to set up networking and VLANs on the UDM. so this screen isn’t really helpful for my purposes. I do like that the ability to see the version and update is front and center. But maybe that should show up on the first screen you see when you click on the device like the PFSense dashboard.
Applications shows me Network, Protect, Access, and Talk.
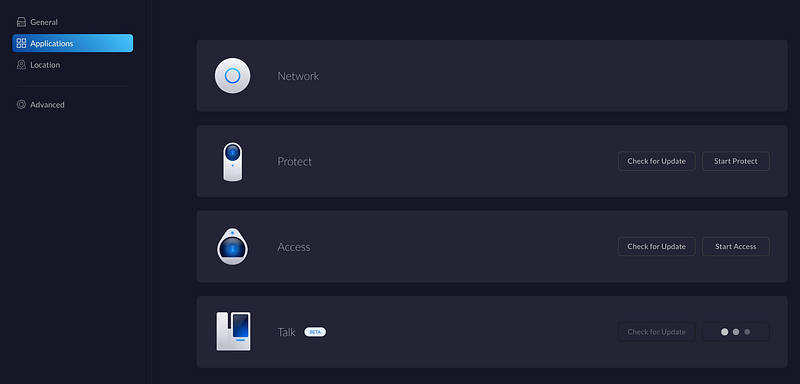
- The Network icon doesn’t do anything.
- The Protect icon is for security devices or cameras I think. You can check for an update or start the Protect app, I guess.
- Access I think is for a doorbell or door security. I don’t know I haven’t looked into that yet.
- Talk is for phones. It says beta and has a greyed-out check for update button and three dots that keep blinking like it’s trying to connect to something. Maybe the stun port I blocked as explained in my last post.
I didn’t buy any of those devices so far I’m only interested in my network configuration at the moment when I’m just trying to get set up and connected to VLANs. Later I want to set up WiFi. I don’t understand why this network icon doesn’t go to the same place as all the other similar network icons.
When I click on Locations it just spins. I suppose it’s trying to connect to a domain name I haven’t allowed yet and so it can’t do whatever it is supposed to do. That’s not what I’m looking for anyway.
Advanced has a bunch of settings like SSH, remote access from unifi.ui.com, automatic updates, restart, power off, factory reset, and download support file. I’m not really sure if these are advanced but none of these are what I need.
At this point, I’m clicking around trying to figure out how to get back to the main screen. It’s not obvious. I’ve studied both advertising layouts and UI design. A good UI should have a button to get back to the starting point or a menu that will take you there in a consistent location on every screen.
I’m looking on the left because that’s where the menu and all the items are but I notice a grid of dots on the upper right. This is another confusing design choice by a lot of applications but don’t get me started on that. The dots show me a popup menu with an icon and link to the device configuration I’m currently looking at. I suppose that would be more useful if I had more devices set up. It also shows a Network icon which takes me back to the network dashboard with some performance info.
Since manage settings associated with the UDM Pro IP address had a gear icon, I click the gear icon on the bottom left of the menu on the main dashboard. Finally. There I see WiFi, Networks, Security, Internet, System Settings, and Advanced Features.
I remember I set up a VLAN-only network under Networks so I click on it just to confirm. At this point, the screen doesn’t work. It worked before so I’m not sure what is going on. It’s just spinning with the bar at the top flashing a blue line across it. Up there it says “Not seeing everything? Go to Classic Settings.” I was in the beta UI I think.
I click on Classic Settings. The blue line goes away. I see a bunch of interesting settings and a nice menu bar on the left. Thank you. So much. Better than those little icons. So many people online are giving this same feedback in blog posts and videos. They are using the old UI, so maybe it will change back. I’m new to all of this and I agree so it’s not like I’m just used to the old UI. The new one is extremely unintuitive.
One of the options on the left is Networks. Remember what I said earlier about making a phone call? Why does it take me so many clicks to get to the network settings — on a network appliance? Ah yes, there’s my VLAN-only network that I previously created. Woohoo! But where did I made that change to assign my VLAN ID to a port?
I click on Routing & Firewall. Oh, that is interesting. WAN In has two rules:
- Allow All
- Deny All
LAN in has a rule:
- Allow all on the default CIDR range.
Lan out has a rule:
- Allow all on the default CIDR range.
So what that means is that if you set this up directly connected to the Internet all traffic is allowed by default. If you want to tighten those rules up you’ll need to do it after you configure the device and after it connects to the Internet unless you block all network connectivity to get the phone app to show you the offline option or go through the hoops I did to only allow the necessary traffic to the required domain names. Interesting, but not what I’m looking for at this point.
After clicking on a bunch of things I found it. Maybe this makes sense to networking folks who are familiar with the term “Profiles” but I was looking for ports or VLANs. Anyway here’s how I got to the place where I can set a VLAN tag on a specific port.
Profiles > Switch Ports > Add New Port Profile
I think the only real actionable advice I’ve gotten from the Ubiquiti support team may have been to set up a VLAN tag on a specific LAN port. I’ve resolved most of the issues myself, but they did provide me with that very useful piece of information, but I still must be doing something wrong since a laptop plugged into the port with the VLAN assigned doesn’t get an IP address from the PFSense DHCP server. I could have gone back and looked at the email for how they told me to get to that screen, but I figured I wouldn’t need that since I’d already done it once. I’m not sure this is the correct screen.
What is interesting here is that I can see the profile I created previously, but not edit it. Maybe this was not actually the screen I’m seeking. I was able to actually assign a VLAN tag to a physical port on the UDM. I don’t see that here even though the item I clicked says “Switch Ports.”
I give up. I’m going to have to go back to that email to figure out where that setting was where I could say “Port X on the physical device should be assigned to VLAN Y.” It’s in that email I have to go back and look at and I’ll post a walkthrough once I get this all working with screenshots.
Edit: I went back to the email and figured out that you have to click on the device, but not on the IP address, and a side window pops up on the right. First of all, that’s not at all intuitive. Secondly, the problem with that side window is that it covers up other things such as the edit options on the side of some lists. It wasn’t initially clear how to close it. Finally, this is a completely different layout and now I have things on the right and left and top and all over the place. I would prefer a single list down the left hand side with all the options so I can easily find them. All the functionality for VLANs should be accessible in one place or at least one group. (And by the way, I find some things related to PFSense and specifically the SG3100 to have some of this same confusion but not quite this disjointed.)Once that pop-up comes up there are some little icons at the top. You click one of them for ports and there, finally, I could edit the VLAN for a specific port. And that's where I discovered that probably I made a mistake and assigned the VLAN to the wrong port, but I still have a few questions out to support. I should be able to post the other blog posts shortly with the full configuration!In the meantime, I clicked on “Try new settings” again to see the beta version I was looking at before. Under networks, my VLAN does not exist. I see WAN and LAN only in two separate places. WAN is associated with “Internet” which only confuses the matter. Why not list all the Interfaces in one place and call them WAN and LAN like everyone in networking is used to seeing?
Anyway, that’s all I have time for today. Apologize for typos. I have too much work right now. Currently, I have figured out the PFSense configuration I want which is pretty cool and something I hadn’t yet figured out so I’ll probably write about that next.
I’m still trying to figure out how to let a host on the UDM that is in a VLAN configured on PFSense to reach the Internet the way I’ve set up my PFSense (which is not exactly like the videos where people are using PFSense but no integrated switch with VLANs enabled). I have a request out to the support team and waiting to hear back. They want screenshots and support dumps but I’ve literally only changed two settings since I set up the device:
- I configured the Network only VLAN.
- I followed their email instructions to add that VLAN ID to the port which my laptop is plugged into on the UDM.
I’ll keep tinkering with it and hope to provide a complete working scenario in a future post, along with some other things I’m hoping to accomplish but this is my first impression. I realize I’m probably not the typical user!
Follow for updates.
Teri Radichel | © 2nd Sight Lab 2022
About Teri Radichel:
~~~~~~~~~~~~~~~~~~~~
⭐️ Author: Cybersecurity Books
⭐️ Presentations: Presentations by Teri Radichel
⭐️ Recognition: SANS Award, AWS Security Hero, IANS Faculty
⭐️ Certifications: SANS ~ GSE 240
⭐️ Education: BA Business, Master of Software Engineering, Master of Infosec
⭐️ Company: Penetration Tests, Assessments, Phone Consulting ~ 2nd Sight Lab
Need Help With Cybersecurity, Cloud, or Application Security?
~~~~~~~~~~~~~~~~~~~~~~~~~~~~~~~~~~~~~~~~~~~~~~~~~~~~~~~~~~~~~
🔒 Request a penetration test or security assessment
🔒 Schedule a consulting call
🔒 Cybersecurity Speaker for PresentationFollow for more stories like this:
~~~~~~~~~~~~~~~~~~~~~~~~~~~~~~~~~~~~~~~~~~~~~~~~~~~~~~~~~~~~~
❤️ Sign Up my Medium Email List
❤️ Twitter: @teriradichel
❤️ LinkedIn: https://www.linkedin.com/in/teriradichel
❤️ Mastodon: @teriradichel@infosec.exchange
❤️ Facebook: 2nd Sight Lab
❤️ YouTube: @2ndsightlab