The Complete Guide to Using GraphQL in Node.js With Apollo Server
How to integrate GraphQL into your Node.js app

Objectives of This Article
We will learn the following in this article:
- What GraphQL is
- When to use it, and what its advantages over REST are
- Basic GraphQL functionality with Apollo Server
- Advanced GraphQL functionality, like resolver chains and mutations in GraphQL
- Important things to remember when using GraphQL
Introduction
GraphQL’s popularity has caused many developers to jump ship from REST to using GraphQL in their new apps. If you’re a new or a learning developer with enthusiasm to learn, you might be thinking of GraphQL as a technology that is extremely tricky to use.
To that my answer is no. GraphQL has become one of the hottest technologies to learn, and this is with good reason. Let’s first learn what GraphQL is.
What GraphQL is
To put it simply, it is a way to query data from APIs. Furthermore, GraphQL lets programmers make requests to pull data from a server to a client. All of this seems similar to using the REST method, so what is the difference between them and why use GraphQL instead? Over 90 companies, including GitHub and Twitter, are using it, so there must be something different about it.
Why use it
When fetching data with REST, you have multiple endpoints and other requests like POST , DELETE , GET, and PUT . Additionally, you get your desired data by fetching from multiple endpoints. On the other hand, GraphQL gets rid of different endpoints and just gives you one single endpoint. The data you desire depends on the query that you send to this single endpoint.
Let me demonstrate this with an example. Let’s say you are building an app that only displays the names of coffees from this Coffee API.
In REST, you would first make a request for hot coffees and then for cold coffees. In the end, you only want to display the title field from the returned response. It would be done like so:
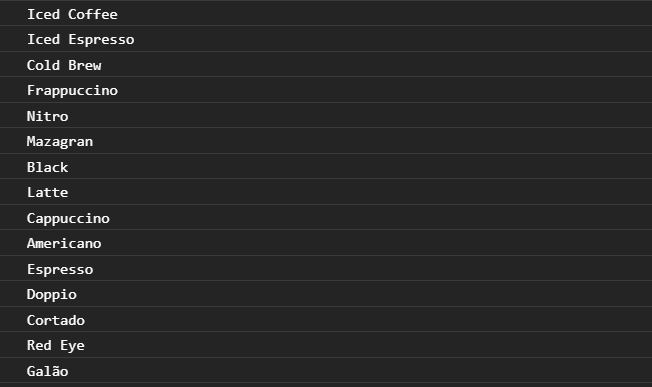
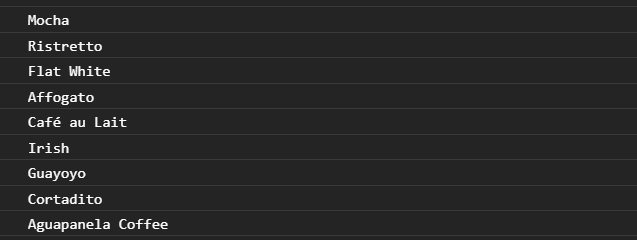
- As a first step, you would see all of the data available, along with its fields:
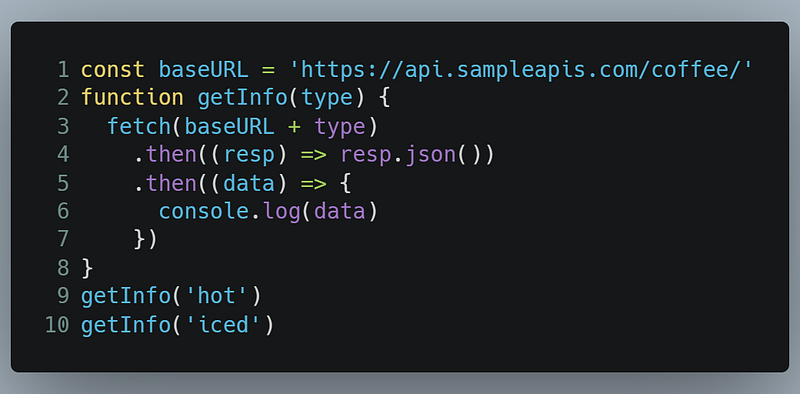
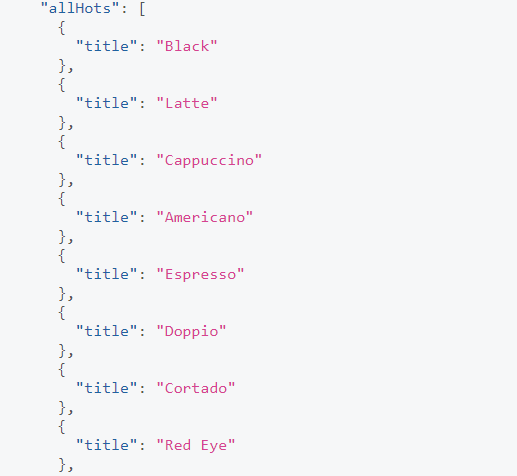
This would give you output that looks like this:
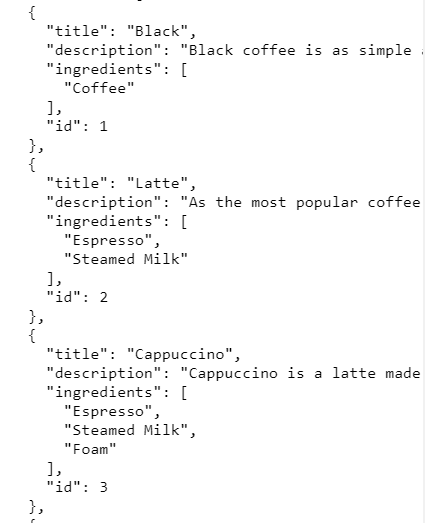
- All of this data is unnecessary to us. To only procure the
titlefield, we need to rewrite our code like so:
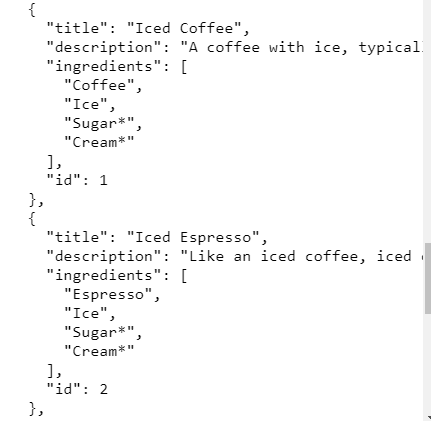
Which would bring the following output:
As you can see, this was fairly easy. But notice that when our response came, so did the unneeded fields, for example, description and ingredients. We only needed the title and nothing else. Notice that we also performed a GET request a couple of times. In some circumstances, GET requests are also performed more times than necessary. This is called over-fetching. So how do we prevent this while also receiving only the data we want?
This is where GraphQL steps in. You specify to the API what data you need (in this case, just the title), and as a result, you get the response that filters out the unneeded data and returns just the filtered data (here, this is just the title field of every object).
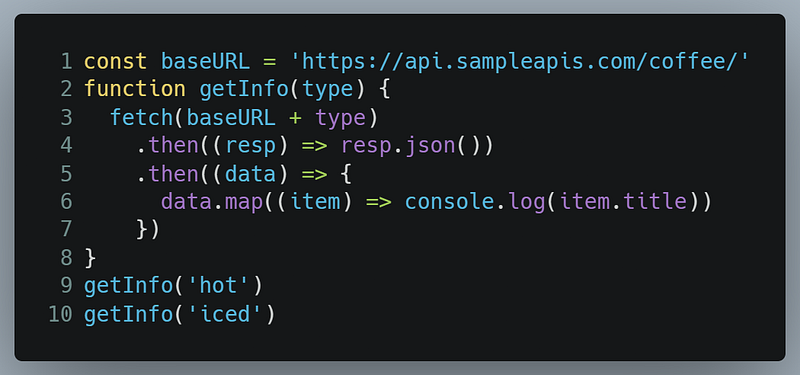
Let’s replicate this with GraphQL. You can run the query yourself as well.
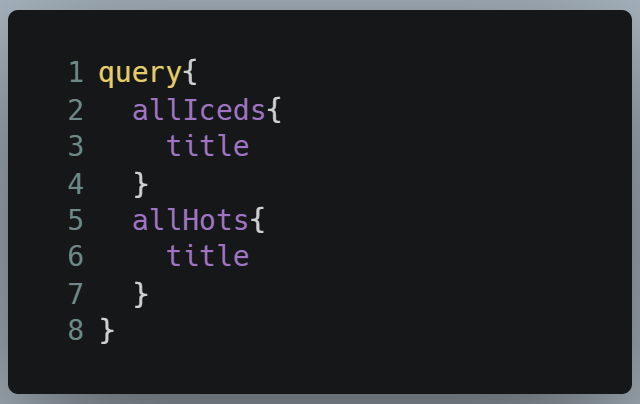
- Lines 2–4: We are first making a query to get the
titleof iced coffees. - Lines 5–7: Then we are making another query to get the
titleof cold coffees.
That is all there is to it. When we run the query, this will be the output:
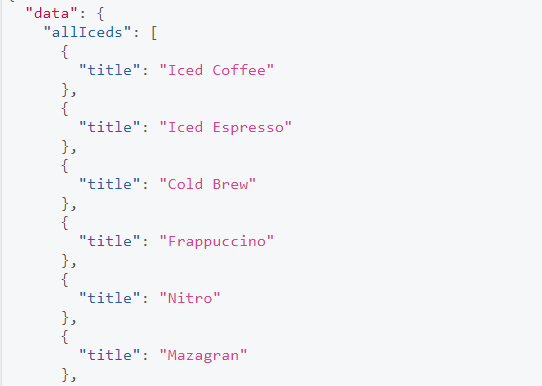
As you can see, we successfully got a response without receiving other fields that we had no need for. There was no need to sieve out the unneeded fields. In the programming space, this is a game changer.
Now that we have talked about GraphQL’s results, let’s write some code!
Get Started
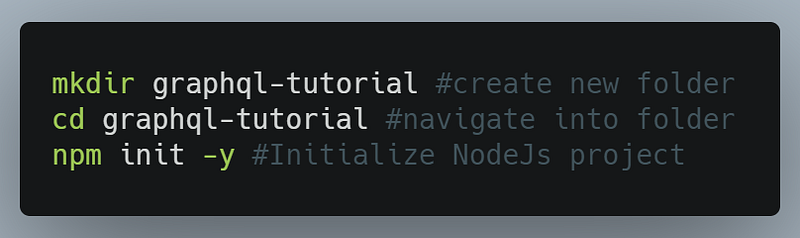
First, initialize the project’s repository with the following terminal commands:
When that is done, let’s now install the required libraries for our project.
Install libraries and dependencies
We will use the following libraries:
apollo-server: This is the core library for Apollo Server. The Apollo Server technology will allow us to use GraphQL in our Node.js app.graphql: This library will be used to build GraphQL schemas. Moreover,graphqlis also a dependency for theapollo-servermodule. We will talk about schemas in detail later on in this tutorial.
We are now done with this section. In the next section, we will learn the basics of GraphQL.
GraphQL: Basic Querying With Apollo Server
In this section, we will learn the foundations of GraphQL and working with a simple data set. Additionally, we will also learn the basics of GraphQL’s querying language.
Setup
In your project directory, create a file called basic-server.js. This will be the main file of our project.
In basic-server.js, we will import the following dependencies from the apollo-server module:
gql: This is for the creation of our schemas.ApolloServer: This will build and run our GraphQL server.
Go to basic-server.js and import these like so:

When that is done, let’s now work on our schemas.
Define our schema
What is a schema? According to Apollo’s documentation, the schema is essentially informing GraphQL about the structure or shape of the data that clients can query. In other words, this schema is a description of the data clients can request from a GraphQL API.
In basic-server.js , write the following code:
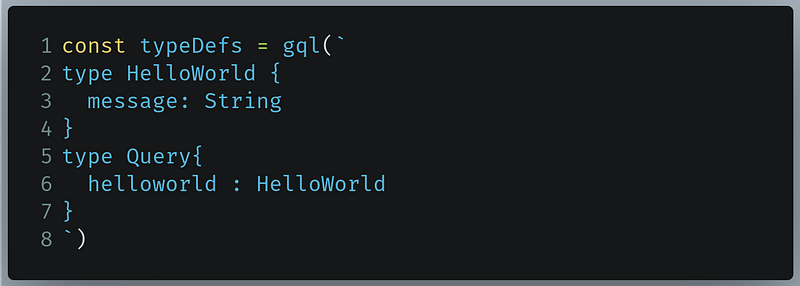
- Lines 2–4: Here we are telling GraphQL that
HelloWorldis an object type that will have a field with the name ofmessage. Themessagefield will contain String data. - Lines 5-7: Here we are telling GraphQL that clients can execute a query called
helloworld, and as a result, the data returned will be of typeHelloWorld.
Here, String is a scalar type. Scalar types are similar to the data types you use in other programming languages, for example, Int, Boolean, and so on. For more details on scalar types, refer to Apollo Server’s documentation.
On the other hand, HelloWorld and Query are known as object types. An object type contains a collection of fields, and each field can be either a scalar type or even another object type. This is similar to an object you use in other programming languages.
An important note: Query is a special object type which defines all of the data that clients can query against our GraphQL API.
Now that we have informed GraphQL about our schema, let’s now work on actually creating our data set.
Define our data set
Here we will simply create an object which will have a field name of message.
In basic-server.js , write the following piece of code:

As you can see, the message field contains the words “Hello World from GraphQL!”.
Now that is done, let’s work on resolvers.
Fetch data with resolvers
To put it simply, a resolver is a function that tells GraphQL where to get the information from. In other words, it tells GraphQL what data to return if the user performs a query. For example, if the user performs a query on helloworld, GraphQL will then refer to the resolver function for what data to return as a response.
In our case, we want our resolver to return the value of the message field (that is, “Hello World from GraphQL!”) in the HelloWorld object if the user does a query against helloworld.
In basic-server.js , write the following code:
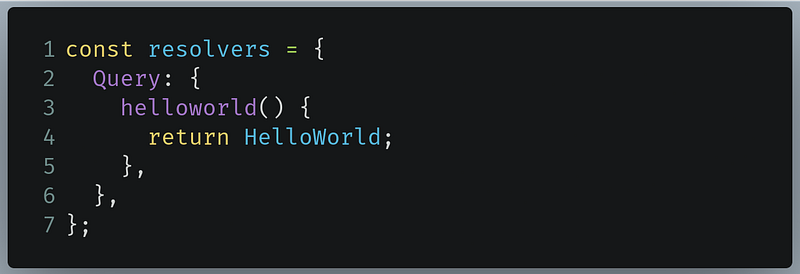
- Lines 3–4: Here we are creating a resolver which tells GraphQL that if the user does a query for the name
helloworld, then the returned result will be theHelloWorldobject that we defined as our data.
When that is done, as our final step, we will run our GraphQL server.
Run the server
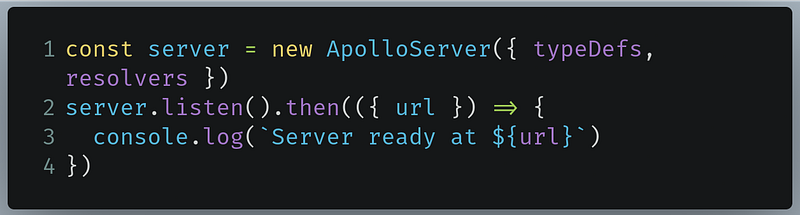
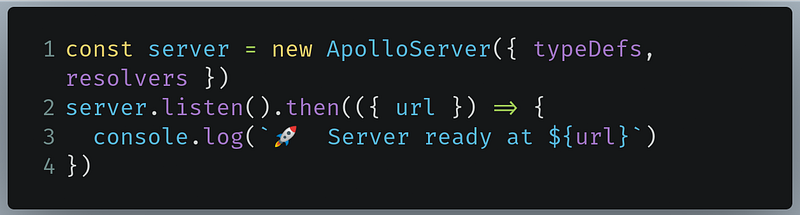
- Line 1: Here we are creating an instance of
ApolloServerand informing GraphQL to use our recently defined schema and resolver. - Lines 2-4: Start our server.
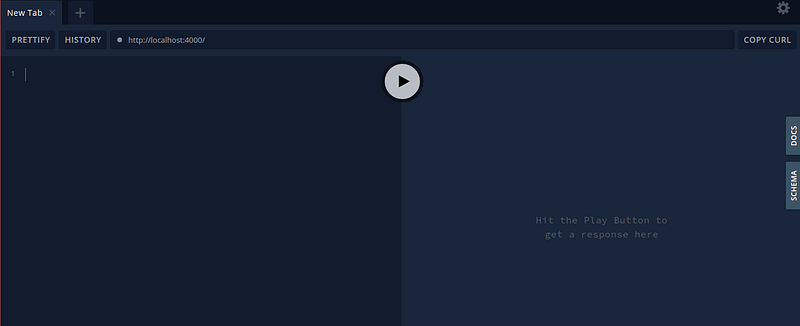
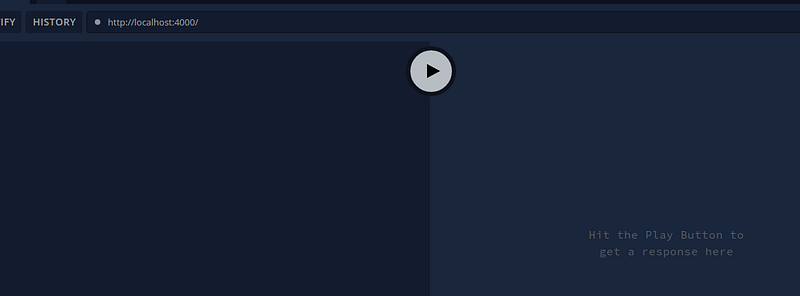
Now run the code. To see the output, go to localhost:4000.
You will then be greeted with a page that looks like this:
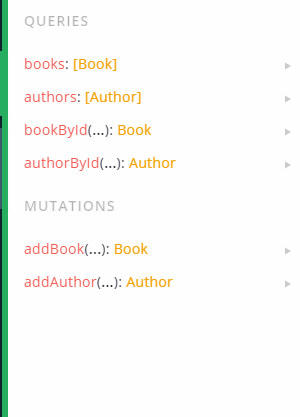
On the right of your app, click on the Docs button. This will give you a summary of what data you can query on.

As we can see, this is exactly what we defined in our schema. We can perform a query named helloworld. Furthermore, the Docs menu proves that helloworld is of type HelloWorld.
Next, click on the helloworld item in this list so that we can get further information about the fields present in the HelloWorld object type.
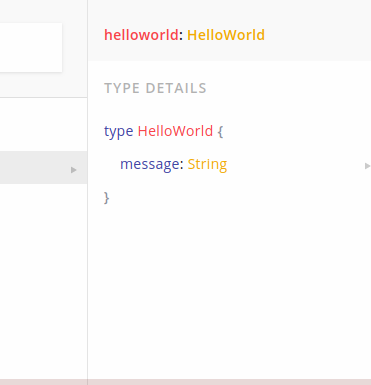
We can now see the fields present in the HelloWorld object type. Furthermore, observe that the HelloWorld has one single field called message, which has a scalar type of String. We need to perform a query to get the value of this field.
Now jump back to GraphQL’s query editor and write the following code:

- Line 1: This tells GraphQL that we are performing a query.
- Line 2: Here we are querying from
helloworld.
Now press the Play button. This will be the output:
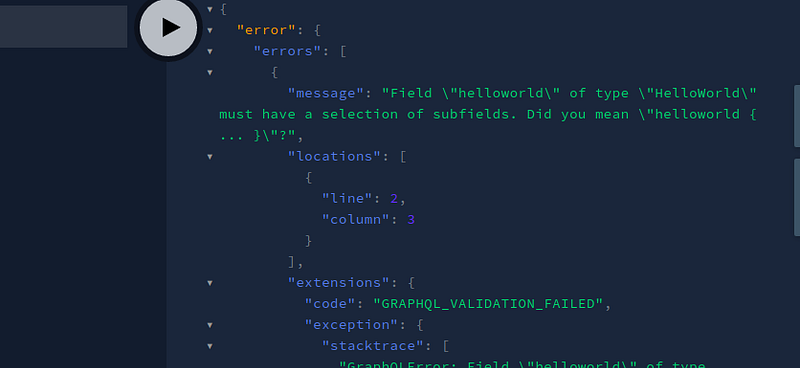
We got an error. Why is that? We simply requested GraphQL to give us data about the HelloWorld object. It should have just given us the object as a response, right?
Instead of our desired response, we got an error because we were not specific enough. We need to tell GraphQL specifically what we want.
In this case, we want the value of the message field present in the HelloWorld object. In your query editor, change the code to the following:
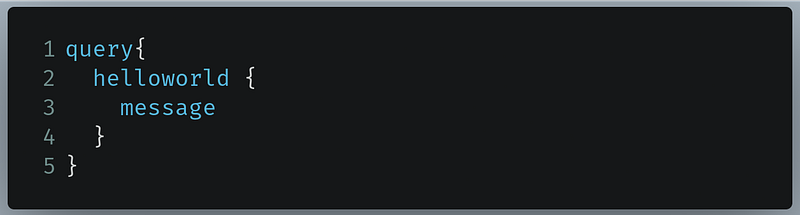
- Line 3: Here we are querying for the value of the
messagefield located inhelloworld.
When you press the Play button, this will be the returned response:

Great! As you can see, we got our desired data. Recall that we defined the value of this message field in our data set.
Furthermore, notice that GraphQL’s query language is similar to JSON. If you know Javascript then JSON is not new to you. Thus, its learning curve becomes shallower.
We are now done with this section. In the next one, we will up our GraphQL game by using concepts like resolver functions and mutations.
In the end, basic-server.js should look like this:
And this is the query to get our desired data:
GraphQL: Working With Resolver Chains And Performing Mutations
In this section, we will be working with moderately complex data sets and even learn how to link two data sets together, for example, an authors database and a book database. Furthermore, we will also work on editing our database within GraphQL.
Create a file called advanced-server.js. The setup of this file will be similar to that of basic-server.js.
When the setup is complete, let’s first work on the schema.
Define our schema
In our schema, we will define two object types:
Book: This will be linked to our database that contains the list of books.Author: This will be linked to our database that contains the list of authors.
In basic-server.js, write the following piece of code:
- Lines 2-6: Here we are defining our
Bookobject type. It will have anamefield of typeStringand anidfield of typeID. Additionally, we have also have anauthorIdfield, which will help us to link the books database to the authors database. The!on Line 5 indicates that the presence of this field in our database is mandatory. - Lines 7-10: Here we are defining our
Authorobject type. It will have anidfield of typeIDand anamefield of typeString. - Line 12:
[Book]indicates that if the client queries for books, then they will receive an array ofBookobjects as a response. - Line 13:
[Author]indicates that if the client queries for authors, then they will receive an array ofAuthorobjects as a response.
Now that we have defined our schema, let’s move on to defining our data sets.
Create our data sets
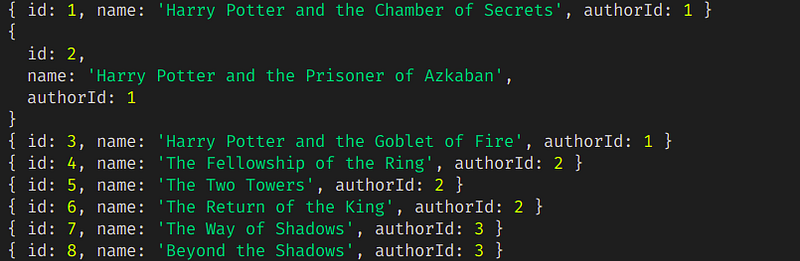
Here we will create two arrays of objects. One will have information about books and the other will have data on authors.
In advanced-server.js, copy and paste the following code:
As you can see, we have an authors array containing information on three authors. On the other hand, we have a books array containing information on eight books.
Let’s now move on to creating our resolvers.
Define our resolvers
For now, we will define two resolver functions:
books: This will return thebooksdata set.authors: This will return theauthorsdata set.
In advanced-server.js, write the following piece of code:
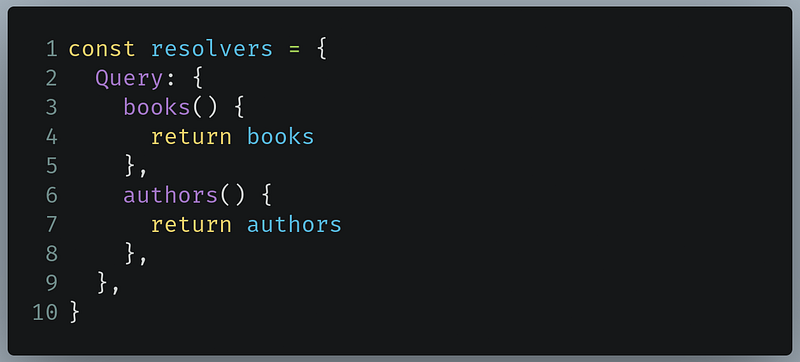
- Line 3: The
booksresolver will return the books database. - Line 6: The
authorsresolver will return the authors database.
Let’s now run our server like so:
Now run the code. This will be the result:
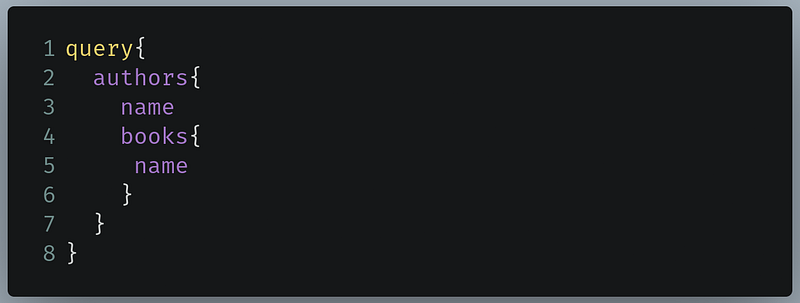
Now write the following code in the query editor:
- Lines 2–5: Here we are querying for authors and getting the
nameandidfields from theauthorsobject. - Lines 6-10: Here we are querying for books and getting the
name,idandauthorIdfields from thebooksobject.
When you press the Play button, this will be the output:
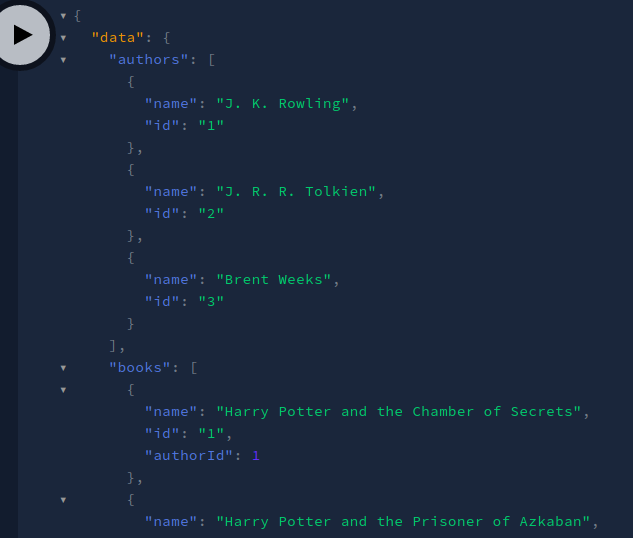
Viola! Our code was successful. We got our desired data. We learned how to return an array of objects as a response.
Let’s now move on to learning about resolver chains.
In the end, advanced-server.js should look like this:
Resolver chains
In some cases, we want to link two data sets. For example, we can link our Books database and Authors database by comparing the authorId of our Books and the id of our Authors .
To make this possible, go to advanced-server.js and find the following piece of code:
Now change it like so:
- Line 6: We added another field, which is of type
Author. This will facilitate the linking process betweenBookandAuthor. - Line 11: We added another field to
Author, which is of type[Book]. This is because an author can have multiple books.
Run the code. In your query editor, write the following code:
- Lines 4–6: Since the
Authorobject type also has aBookobject as one of its fields, we can further run yet another query on the embeddedBookobject’s fields. Here we are querying for the book’s name.
This will be the output:
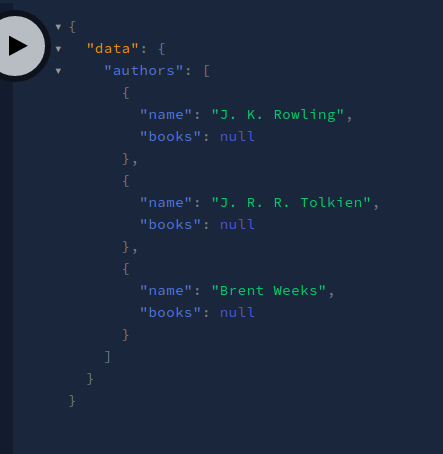
As you can see in our response, we got null on the books array. This is because we have not written a resolver function for this yet.
When that is done, our second step would be to write a resolver function. In advanced-server.js, find the following piece of code:
Now replace it like so:
- Line 11: Here we are handling the query when the client queries on the embedded
authorfield in theBookobject type. Theparentparameter also contains additional data. To find out the value ofparent, we are just logging out the value ofparentfor now. - Line 17: Likewise, we are implementing the same process on the
Authorobject. This time, we are handling the query for when the client queries on the embeddedbooksfield in theAuthorobject field.
Run the code and perform the following query:
This is the same query as before. However, this time look at the logs in your console. This will be the result:

As you can see, the parent contains the return value of the resolver for this field’s parent. In this case, the parent of the books field is authors, which is why we got the return value for authors.
Now go to your query editor and write the following code:
- Lines 4-5: Here we are performing a query on the
authorfield, which is a child field of thebooksobject.
This will be the output in your console:
Great! As you can see, we once again got the return value of the parent object (books).
To link both of the databases, this is what we can do:
- In the
authorsdatabase, find the authors where the bookauthorIdfield and authorauthorIdfield is matching. We will do this with the arrayfindmethod. - In the
booksdatabase, extract books where the authoridfield and bookauthorIdfield is matching. We will do this with the arrayfiltermethod.
Let’s implement this in code. To do so, find your resolver function in advanced-server.js:
Now change it like so:
- Line 12: Invoke the array
findmethod to get the author whoseidfield matches with the bookauthorID. When the author is found, then that author’s information is returned. - Line 17: Invoke the array
filtermethod to get the list of books in which theirauthorIdfield matches with the authoridfield. When the list of books is found, then an array of the filtered books is returned.
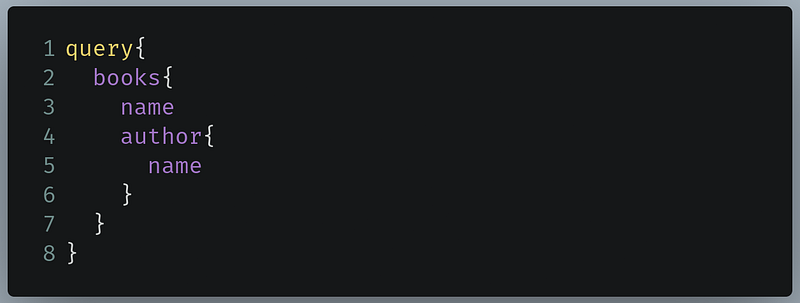
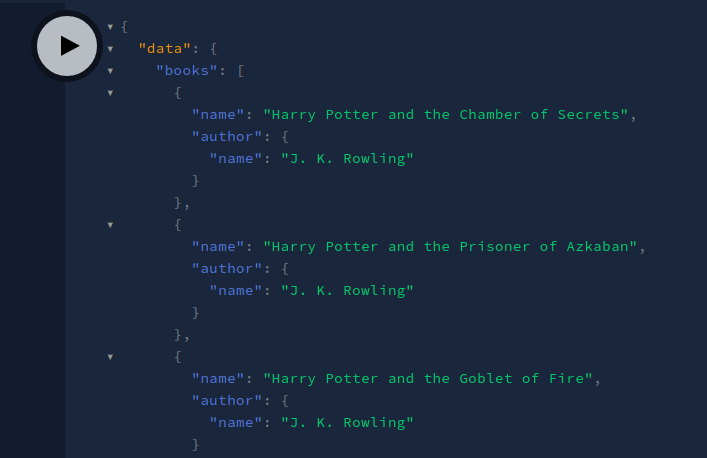
Now run the code. In your query editor, perform the following query:
This query tells GraphQL to get the list of books and then print out the author name for each book.
This will be the output:
Voila! We got our desired output. Let’s now get the list of authors with their respective books. In your query editor, run the following query:
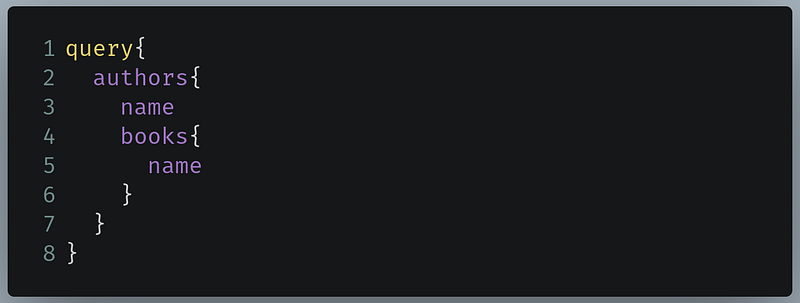
This query tells GraphQL to print out the list of authors and also print out the list of books for each author.
This will be the output of the code:
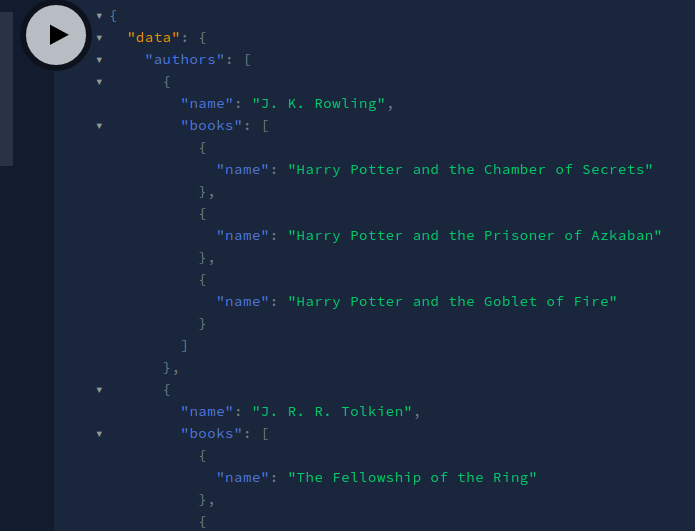
Awesome! We got the output we wanted. As you can see, we have finally linked both of our databases with each other.
In the next section, we will use arguments in our schemas.
Arguments in schemas
In some cases, we only want information about a single author or a single book. In REST, these would be the endpoints:
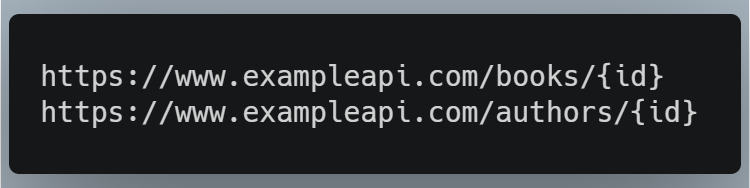
Currently in our GraphQL code, we can only get the whole data set of books or authors.
To only query information about a single book or data, we need to modify our schema in such a way that our query could take an argument of id so that GraphQL would only return the data that contains that specific id.
In advanced-server.js, find your schema:
Now change it like so:
- Line 16: Here, we are telling GraphQL that if the client executes a query against
bookById, then they also have to specify an argument calledid, which should always be an integer value(Int). The value returned by this query should always be of typeBook. - Line 17: Here we are telling GraphQL that if the client executes a query against
authorById, then they also have to specify an argument calledid, which should always be an integer value(Int). The value returned by this query should always be of typeBook.
We have not defined a resolver for these queries yet. In advanced-server.js, find your resolver:
Now edit it like so:
- Lines 9–11: Here we are handling the query if the user queries against
bookById. There are multiple parameters provided by Apollo Server. In this tutorial, we are only concerned with theargsparameter. Theargsparameter contains the value of an object that contains all of the GraphQL arguments provided in this field. For now, we are logging out the value ofargs. - Lines 12–14: We are handling the query for
authorById. Here too we are logging out the value ofargs.
Now run the code. In your query editor, execute the following query:
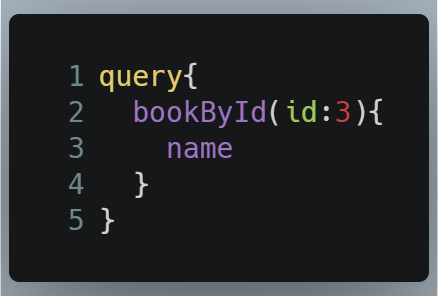
- Line 2: Here we are querying for
bookByIdand passing in our argument forid. - Line 3: Get the
namefield of the returned book.
This will be the output:
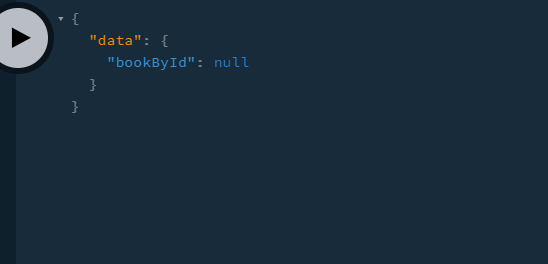
We did not get a valid response since we have only logged out the value of args. This should be the output in your console:

Great! So we know that args is an object that contains the arguments passed into the field.
Now perform this query in your query editor:
This will be the output in the console:

This ensures that we are getting an object containing the arguments and the values. Let’s now use the args parameter to get data on a single book or author. In advanced-server.js, find your resolver:
Now edit it like so:
The changes are present in Line 10 and Line 13.
- Line 10: Invoke an array
findfunction that finds the book with theidfield that matches theidargument that was passed into our query. - Line 13: The same operation is being done as before. However, this time we are finding the author.
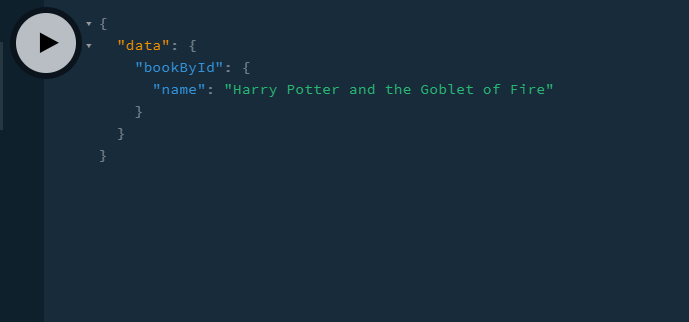
When that is done, invoke this query:
This will be the output:
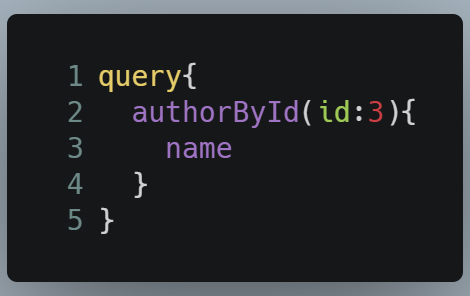
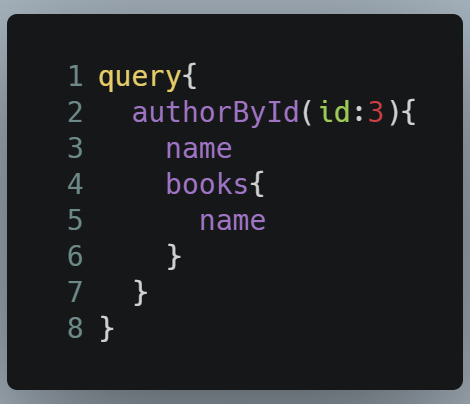
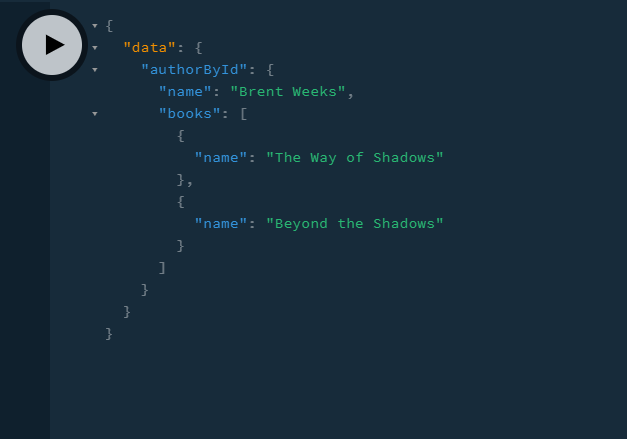
Great! Now perform this query, which finds the author with the id of 3:
This will be the output:
Great! This means that our code works.
Recall that in our schemas, we also said that Book has a field of Author, and Author also has its own subfields. This means that we can perform the following query to find the book by id and even the linked author:
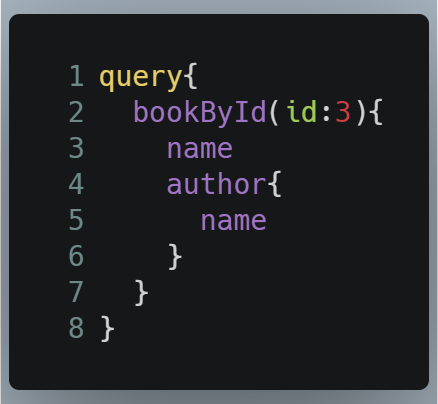
This will be the output:
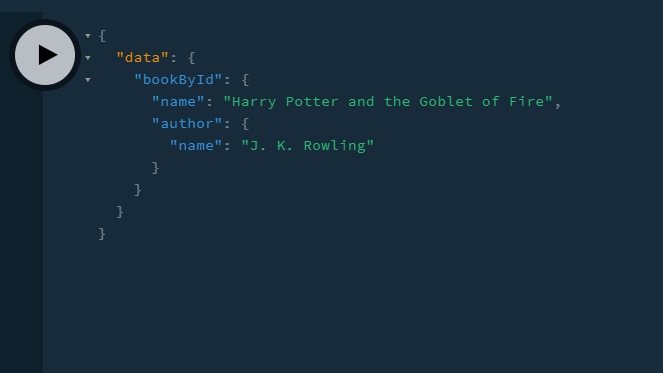
Everything is now linked, and it was really simple to do so. This shows how capable GraphQL is.
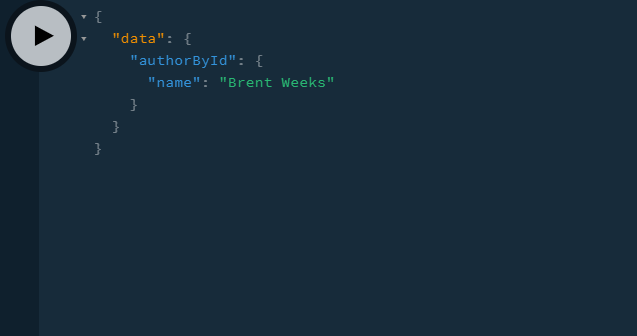
Optionally, we can also run this query to get the author by id and get their books:
This will be the output:
Viola! Our code works.
In the next section, we will learn about mutations.
In the end, this is how advanced-server.js should look:
Edit data with mutations
Let’s say you want to edit a book’s information or change an author’s name. In REST, you would perform a POST or a PUT request like so:

We can do the same process in GraphQL using something called mutations. In GraphQL, you do not POST or PUT data, you mutate it instead.
As a first step, we have to define a mutation in our schema. In advanced-server.js, find your schema:
Add the Mutation type to your schema definition like so:
The changes are present in Lines 20 and 2.
- Line 20: This means that the client can now perform a mutation of
addBook. This function accepts two arguments: anamefield ofStringdata and anauthorIdofIntdata. This function returns a response of typeBook. - Line 21: This line of code means that the user can now perform an
addAuthormutation. It accepts an argument with the name ofnamewhich is of theStringtype. This mutation will give us a result of typeAuthor.
All that is left is to define a resolver for these mutations.
Find your mutations in advanced-server.js:
Now edit it like so:
- Line 27: Here we are handling the resolver when the client performs a mutation. All of the functions located in this
Mutationobject will handle their corresponding mutations that were defined in the schema. - Lines 28–33: This function will be invoked when the user performs an
addBookmutation. ThenameandauthorIdfields will be assigned by the argument values that will be provided by theargsparameter. Later, this newbookobject will be pushed to thebooksdatabase. Finally, this result will be returned. - Lines 34-41: When the client performs an
addAuthormutation, then assign thenamefield to the one provided by the client’s arguments. Then the newauthorobject will be pushed to theauthorsdata set. Finally, thisauthorobject will be returned.
We’re now done. Let’s test it out. Go to your Docs toolbar in Apollo Server and you will find out that a new heading is present, called Mutations:
Now type this code in your query editor:
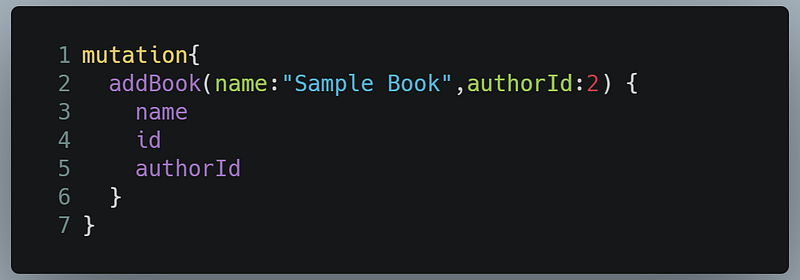
- Line 1: Tell GraphQL that we are going to make a mutation request.
- Line 2: Invoke the
addBookfunction with thenameandauthorIdrequirements. - Lines 3-5: Get all of the fields of the new
Bookobject.
This will be the result:
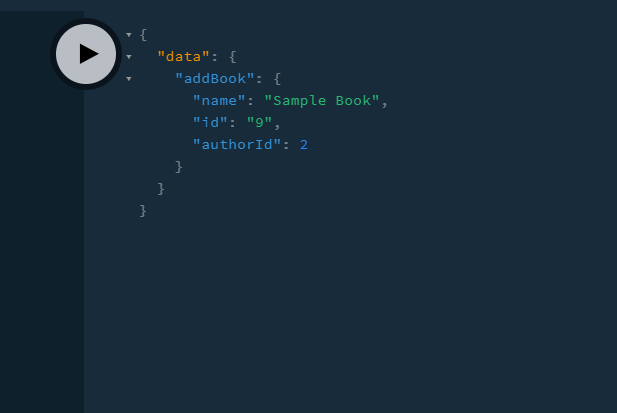
Great! Our code works. Let’s now make a query for all available books in our data set:
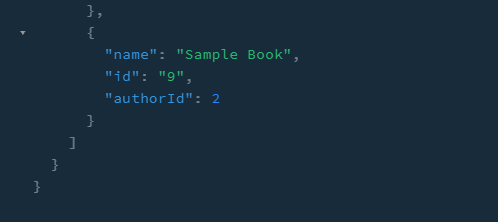
As you can see, the book was successfully added. Since all of these Book objects are chained to their Author object, we can even perform a mutation and also receive its corresponding author data, like so:
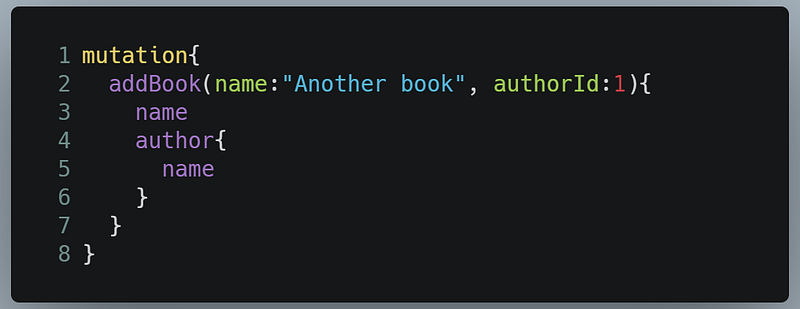
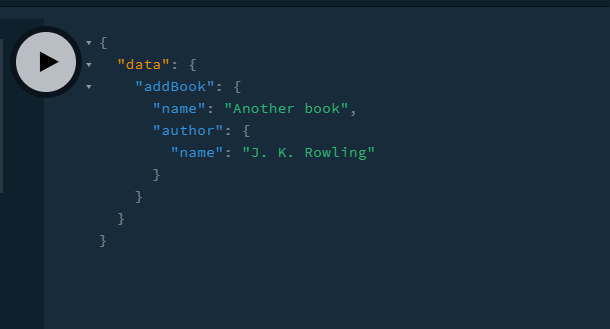
This will yield the following result:
Let’s now perform an addAuthor mutation. Go to your query editor and write the following code:
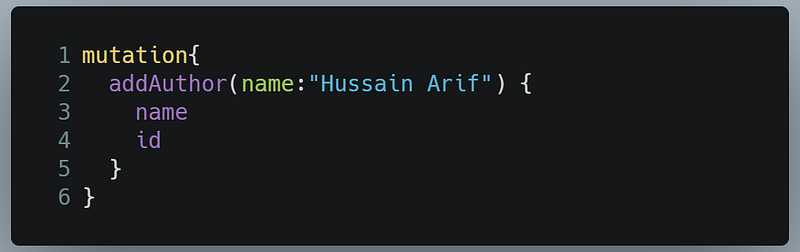
Running this query will bring this result:
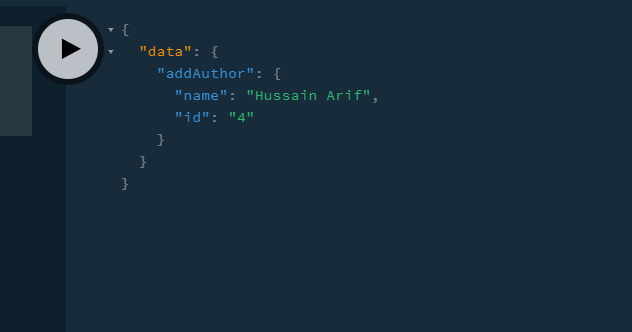
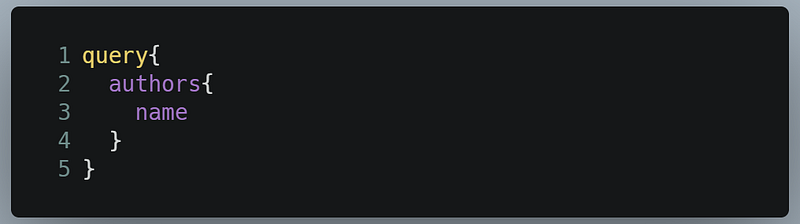
We got our response! Let’s now confirm if it has been added to our database with the following query:
This will be the result:
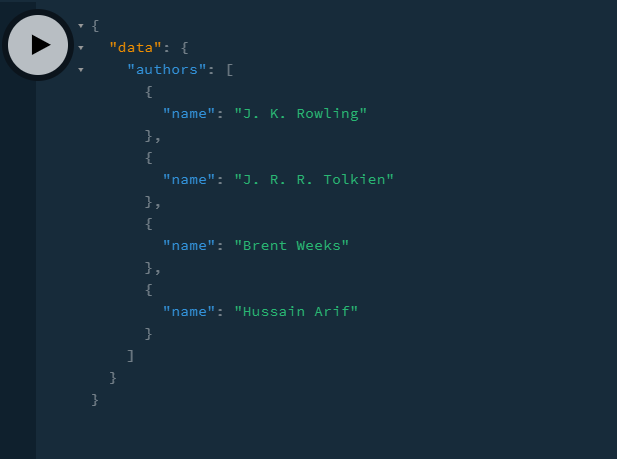
This is great! Our code works and we got our desired output.
However, there are some rules for using GraphQL to ensure that your app runs perfectly. In the next section, we will talk about those rules.
Things To Remember While Using GraphQL
Field of data set should match field of schema
For example, if your schema definition of Author is like so:
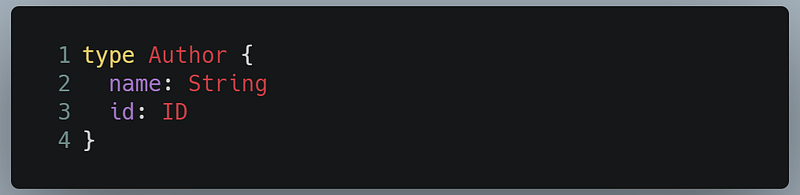
And your data set looks like this:

Then your code should not produce an error.
On the other hand, if your schema looks like this, it’s incorrect:
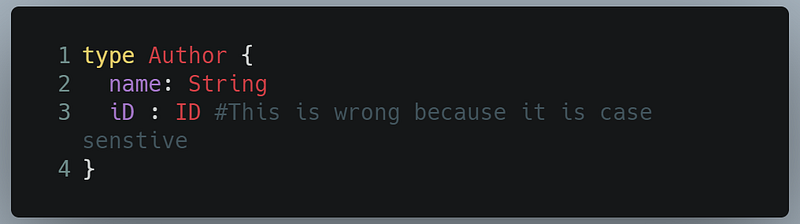
Notice that one of the fields is iD. GraphQL’s language is case sensitive. If it was id, then there should be no problem.
So in summary, all of the fields of both the schema and the data sets should match.
Code and Other Resources
Final code
basic-server.jsshould look like this:
advanced-server.jsshould look like this:
Other reading resources
- Apollo GraphQL Introduction (to cover the basics)
- Apollo Server GraphQL Introduction
- Learn GraphQL in 40 minutes: Web Dev Simplified
Conclusion
Looking at how easy-to-use and powerful GraphQL is, we can acknowledge that GraphQL will undoubtedly take over as the de facto standard of fetching data through an external database or API. While still new, it has cemented its place as an extremely powerful technology.
This tutorial was a really long one. If you encounter any issues, you are advised to deconstruct the code and research extensively about GraphQL and its integration with Node.js. Don’t give up!
Thank you so much for reading!
Next Post: Create Animations In React With Framer Motion Previous Post: React Routers, Explained


