
Angular 17 and NET Core 8: Secure Angular Application with JWT-Based Authentication, Authorization, and Role-Based Access Control (RBAC)
Tutorial 7

Preface
This is another installment in our comprehensive series, Building a Talent Management SPA with Angular 17 and NET Core 8. For a broader view of the series and to access other parts, you can refer back to the series’ table of contents, where each segment is meticulously organized to guide you through every stage of building a robust Talent Management SPA.
Introduction
Welcome to Tutorial 7 of the blog series! In this installment, we’ll be exploring the fascinating Auth guard, a security mechanism used in Angular to control route access. We’ll be taking a deep dive into the demo project source code to understand how the Auth guard and JSON Web Tokens (JWT) work together to support anonymous access, require a login, or require both login and user roles.
Please watch the video below for a quick demonstration of the demo application. The Home, Employee, and About pages are accessible to anonymous users. However, the Position listing page is restricted to authenticated users only. Furthermore, access to the drill-down Position details is limited to users in the HRAdmin role.
Source Code Discussed in This Blog Post
This blog series comes with a demo app called Talent Management. Please refer to the blog post entitled Talent Management SPA with Angular 17 and .NET Core 8 | Setting Up the Project for instructions to download and run the demo project on localhost.
Prerequisites
- Familiarity with Token Service concepts and technologies (e.g. Duende IdentityServer).
- Familiarity with the Building a Talent Management SPA with Angular 17 and .NET Core 8 Tutorial Series.
Credit where credit’s due
To develop this tutorial, I have reviewed and integrated tools and techniques from the following high-quality open-source projects and online resources.
- manfredsteyer/angular-oauth2-oidc — this open-source project has 1.7K stars on GitHub. It is a NPM package supporting OpenId Connect (OIDC) and OAuth 2 and in Angular. The library provides developer-friendly methods to work with JWT
- DuendeSoftware/IdentityServer — this project has 948 stars on Github. It is the #1 open-source project for securing enterprise SPA/NET WebAPI by Duende Software company.
- Duende.IdentityServer4.Admin — this project has 346 stars on GitHub. It is the best Admin UI for the Duende IdentityServer and Asp.Net Core Identity by Jan Škoruba. If you want to see high-quality C# coding, this is the project to learn from ♥.
Table of Contents
Chapter 1: Introduction to JWT and Auth Guard
- Overview of JWT
- Introduction to Angular Guard
- Integration of Angular Guard and JWT to control access to specific resources and functionalities
Chapter 2: Auth Guard to prevent un-authorized access
- Creating a new Auth Guard service
- Implementing canActivate method to require login
Chapter 3: Role Guard service for role-based access control (RBAC)
- Creating a new Role Guard service
- Implementing canActivate method for RBAC support
Chapter 4: Applying Auth Guards and Role Guards in Angular routes
- Auth Guard for authentication example code
- Role Guard for RBAC example code
Chapter 1: Introduction to JWT and Auth Guard
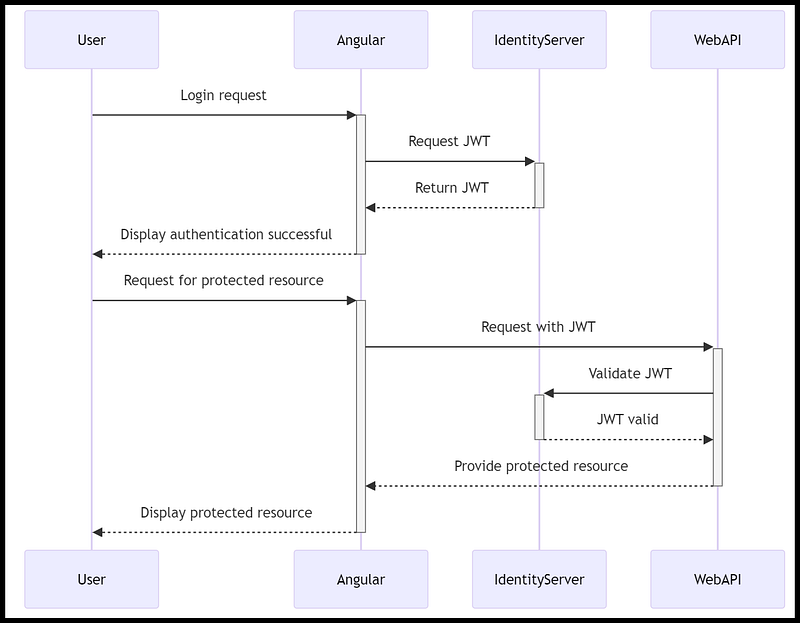
Angular utilizes JWTs (JSON Web Tokens) to enhance its authentication guard feature, which relies on the data within the JWT to decide if a user has the necessary permissions to visit a specific route or access certain resources. Refer to Figure 1 to understand the login and authorization process, showcasing how JWTs facilitate secure access in an Angular application when interacting with IdentityServer.
Let’s simplify how this technology works, using the scenario of booking a hotel room during your journey to New York City. Imagine you’re on a new adventure, traveling to a New York city, and you need a place to stay overnight. Here’s how it works, similar to getting a room in a hotel:
- Showing Your ID (Login with IdentityServer): First, when you arrive at the hotel, you need to show your ID at the front desk. This is like logging into the IdentityServer. The hotel needs to know who you are before they can give you a room key. By showing your ID, you’re proving that you’re a guest who has a reservation.
- Getting Your Room Key (Obtaining the JWT): After the hotel knows who you are and that you have a place to stay, they give you a room key. This key is special because it lets you into your room and proves you have the right to be there. In our computer story, the room key is like the JWT (a special code) that IdentityServer gives to the Angular client after you’ve logged in. This code says, “Yes, this person is allowed to access the services.”
- Using Your Room Key (Accessing the Web API): Now that you have your key, you go to your room and use the key to open the door. This is like the Angular client using the JWT to ask the Web API for access to its services. Just as the door lock checks if your key is the right one, the Web API checks the JWT to make sure it’s valid.
- Enjoying Your Stay (Accessing Protected Resources): Once the door opens, you can enter your room, relax, and use all the amenities provided for you. This is like accessing the protected resources on the Web API. You’ve proven you have the right to be there, so now you can enjoy what you came for.
So, in this adventure, your ID gets you your room key, and your room key lets you into your room, just like logging in gets you a JWT, and the JWT lets you access the special parts of a web application.
Overview of JWT
JWT stands for JSON Web Token. It is a compact, URL-safe means of representing claims to be transferred between two parties. The claims in a JWT are encoded as a JSON object that is digitally signed using cryptography.
JWTs are commonly used for authentication and authorization purposes. When a user logs in to a system, they are often issued a JWT that contains information about their identity and permissions. This token can be sent with subsequent requests to the system to prove the user’s identity and access rights, without the need for the user to reauthenticate with each request.
JWTs consist of three parts: a header, a payload, and a signature as shown in Figure 2. The header contains information about the type of token and the algorithm used to sign it. The payload contains the claims, which are statements about an entity (typically the user) and additional data. The signature is used to verify that the sender of the JWT is who it says it is and to ensure that the message wasn’t changed along the way.

JWTs can be transmitted as part of a URL, as a query string parameter, or within an HTTP header. They are widely used in web applications, especially those that use RESTful APIs.
Introduction to Angular Guard
In an Angular application, an AuthGuard and a RoleGuard are two types of route guards that are used to control access to different parts of the application based on the user's authentication status and role.
AuthGuard: TheAuthGuardis a route guard that checks if the user is authenticated before allowing them to access a protected route. If the user is not authenticated, theAuthGuardcan redirect them to a login page or show an error message. TheAuthGuarduses authentication tokens such as JWTs to determine if the user is authenticated.RoleGuard: TheRoleGuardis a route guard that checks if the user has the required role(s) to access a protected route. If the user does not have the required role(s), theRoleGuardcan redirect them to a forbidden page or show an error message. TheRoleGuarduses information about the user's role(s) that is provided by the server or stored in the client application.RoleGuardis used to support role-based access control (RBAC)
Both AuthGuard and RoleGuard are used in conjunction with the Angular RouterModule to protect routes in an Angular application. By using these guards, you can ensure that only authorized users can access certain parts of your application and prevent unauthorized access to sensitive data.
Integration of Angular Guard and JWT to secure Angular applications
Authentication and authorization are two critical concepts in web application development. Authentication is the process of verifying the identity of a user, while authorization is the process of granting or denying access to specific resources or functionalities based on the user’s identity and permissions. In Angular applications, we can implement authentication and authorization using AuthGuard and RoleGuard.
When a user logs in to an Angular application, the Token Service server typically generates a JWT that contains information about the user’s identity and permissions. This token is then sent to the client and stored, usually in local storage or a cookie.
When the user navigates to a protected route, the authentication guard service intercepts the route activation request and checks whether the JWT exists and is valid. If the JWT is valid, the authentication guard retrieves the user’s information from the JWT and determines whether the user is authorized to access the requested route. If the user is authorized, the canActivate() method returns true, and the user is allowed to access the route. If the user is not authorized, the canActivate() method returns false, and the user is redirected to a different page or presented with an error message.
In summary, Angular uses JWTs to support its authentication guard functionality by verifying the user’s identity and permissions using the information contained within the JWT, and allowing or denying access to protected routes based on this information.
Chapter 2: Implementing Auth Guard to prevent unauthorized access
Angular provides a feature called Auth Guard to protect your application’s routes and allow access only to authorized users. Here’s a summary of how to implement Auth Guard in Angular:
- Create an Auth Guard service: Create an Auth Guard service by using the Angular CLI command
ng generate guard auth. This generates an Auth Guard file, which contains the initial Auth Guard implementation. - Define the Auth Guard logic: In the
canActivate()method of the Auth Guard file, define the logic to determine whether the user is authorized to access the requested route. For example, you can check whether the user has a valid JWT token or whether they belong to a specific user role. - Add the Auth Guard to your routes: In your Angular routing configuration, add the Auth Guard to the routes you want to protect.
- Handle unauthorized access: If a user tries to access a protected route without authorization, you can redirect them to a login page or display an error message. In the
canActivate()method of the Auth Guard, you can return afalsevalue to prevent access to the route and then handle the unauthorized access in the component that navigates to that route.
That’s a summary of how to implement Auth Guard in Angular. Auth Guard is a powerful feature that allows you to protect your application’s routes and provide a secure user experience.
Code Walk Thru
The Talent Management demo project includes two auth guards that use the third-party library manfredsteyer/angular-oauth2-oidc to validate the presence and correctness of JWTs. These are:
auth-guard.service.ts: This auth guard displays a pop-up dialog (toaster) to alert unauthenticated users to log in.auth-guard-with-forced-login.service.ts: This auth guard redirects the unauthenticated users to the Token Service server to log in and then redirects back to the Angular app afterward.
Code walk thru: auth-guard.service.ts
Below is a code snippet of AuthGuard service from the source code file auth-guard.service.ts.
//https://github.com/workcontrolgit/TalentManagement-Client-Angular15/blob/master/src/app/core/auth/auth-guard.service.ts
import { Injectable } from '@angular/core';
import { ActivatedRouteSnapshot, CanActivate, RouterStateSnapshot } from '@angular/router';
import { Observable } from 'rxjs';
import { tap } from 'rxjs/operators';
import { AuthService } from './auth.service';
import { ToastService } from '@app/services/toast/toast.service';
import { Logger } from '@app/core';
@Injectable()
export class AuthGuard implements CanActivate {
  profile: any;
  constructor(private toastService: ToastService, private authService: AuthService) {}
  canActivate(route: ActivatedRouteSnapshot, state: RouterStateSnapshot): Observable<boolean> {
    return this.authService.canActivateProtectedRoutes$.pipe(
      tap((canActivateProtectedRoutes: boolean) => {
        if (canActivateProtectedRoutes) {
          return true;
        }
        console.log('Access denied', 'Please login to continue access');
        this.showToaster('Access denied', 'Please login to continue access');
        return false;
      })
    );
  }
  // ngbmodal service
  showToaster(title: string, message: string) {
    this.toastService.show(title, message, {
      classname: 'bg-danger text-light',
      delay: 2000,
      autohide: true,
      headertext: title,
    });
  }
}
This is an implementation of the AuthGuard service in an Angular application. The service implements the CanActivate interface from the @angular/router package, which allows it to be used to protect routes in the application.
The service imports the following packages and services:
Injectablefrom@angular/core: A decorator that marks a class as a service that can be injected into other components or services.ActivatedRouteSnapshotandRouterStateSnapshotfrom@angular/router: Classes that represent the current state of the activated route and the router state, respectively.Observablefromrxjs: A class that represents an asynchronous stream of data.tapfromrxjs/operators: An operator function that allows you to perform side-effects on the emitted values of an observable without modifying them.
The service also imports the following services:
AuthServicefrom./auth.service: A service that provides authentication-related functionality.ToastServicefrom@app/services/toast/toast.service: A service that provides toast notifications.
The AuthGuard class has a constructor that injects the ToastService and AuthService services.
The canActivate method takes two parameters: route and state, which represent the current route and router state, respectively. The method returns an Observable<boolean> that indicates whether the user is authorized to access the protected route.
The canActivate method calls the canActivateProtectedRoutes$ method from the AuthService service, which returns an observable that emits a boolean value indicating whether the user is authorized to access the protected route.
The method uses the tap operator to perform a side-effect when the observable emits a value. If the value is true, the method returns true to allow access to the protected route. If the value is false, the method shows a toast notification using the showToaster method and returns false to deny access to the protected route.
The showToaster method is a helper method that uses the ToastService to show a toast notification with the specified title and message.
Overall, this implementation of AuthGuard uses the AuthService to determine whether the user is authorized to access the protected route, and shows a toast notification if the user is not authorized.
Code walk thru: auth-guard-with-forced-login.service.ts
Below is the code snippet of the AuthGuardWithForcedLogin from source code file auth-guard-with-forced-login.service.ts
//https://github.com/workcontrolgit/TalentManagement-Client-Angular15/blob/master/src/app/core/auth/auth-guard-with-forced-login.service.ts
import { Injectable } from '@angular/core';
import { ActivatedRouteSnapshot, CanActivate, RouterStateSnapshot } from '@angular/router';
import { Observable } from 'rxjs';
import { filter, switchMap, tap } from 'rxjs/operators';
import { AuthService } from './auth.service';
@Injectable()
export class AuthGuardWithForcedLogin implements CanActivate {
  constructor(private authService: AuthService) {}
  canActivate(route: ActivatedRouteSnapshot, state: RouterStateSnapshot): Observable<boolean> {
    return this.authService.isDoneLoading$.pipe(
      filter((isDone) => isDone),
      switchMap((_) => this.authService.isAuthenticated$),
      tap((isAuthenticated) => isAuthenticated || this.authService.login(state.url))
    );
  }
}
This is a TypeScript code snippet that defines an Angular authentication guard called AuthGuardWithForcedLogin. The guard implements the CanActivate interface, which allows it to be used to protect Angular routes.
The AuthGuardWithForcedLogin constructor takes an instance of the AuthService class as a parameter, which it uses to check if the user is authenticated. The canActivate method is then called when the user navigates to a protected route, and it returns an observable that emits a boolean value indicating whether the user can access the route.
The observable returned by canActivate first filters out the isDoneLoading$ observable until it emits a true value. Then it switches to the isAuthenticated$ observable, which emits true if the user is authenticated and false otherwise. Finally, the observable uses the tap operator to check if the user is authenticated. If not, it calls the login method of the AuthService with the current URL as a parameter to redirect the user to the login page.
Overall, this guard ensures that the user is authenticated before they can access a protected route. If the user is not authenticated, the guard will redirect them to the login page.
Chapter 3: Role Guard service for role-based access control (RBAC)
RBAC (Role-Based Access Control) is a security model that restricts access to resources based on the roles of individual users within an organization. It defines roles based on job functions or responsibilities and assigns permissions to those roles. Users are then assigned to those roles, giving them the appropriate level of access to resources based on their job requirements.
For example, in an RBAC system for a hospital, a doctor might have a role that includes permission to access and edit patient records, while a nurse might have a role that includes permission to view patient records but not edit them. An administrator might have a role that includes permissions to manage user accounts and assign roles, but not access patient records directly.
RBAC is a widely used security model in enterprise systems and is particularly useful for large organizations with many employees and complex access control requirements. It helps to ensure that users can only access the resources they need to do their jobs, reducing the risk of unauthorized access and data breaches.
Role-Based Access Control (RBAC) can be implemented in Angular auth guard by following these steps:
- Define roles and permissions: The first step is to define the roles and permissions that will be used to restrict access to certain routes or features. For example, you may have roles like
HrAdmin,Manager, andEmployee, with corresponding permissions likecanEdit,canView, andcanCreate. - Add role and permission check in the auth guard: The auth guard should check if the user has the required roles and permissions to access the requested route or feature. This can be done by injecting the auth service into the auth guard and calling a method on the auth service that checks the user’s roles and permissions. If the user has the required roles and permissions, the auth guard should return
trueto allow access. Otherwise, the auth guard should returnfalseor redirect the user to an error page.
Source code walk thru: role-guard.service.ts
Below is the code snippet of the RoleGuard from source code file role-guard.service.ts
//https://github.com/workcontrolgit/TalentManagement-Client-Angular/blob/master/src/app/core/auth/role-guard.service.ts
import { AuthService } from './auth.service';
import { Injectable } from '@angular/core';
import { CanActivate, ActivatedRouteSnapshot, RouterStateSnapshot, Router, Route } from '@angular/router';
import { Observable } from 'rxjs';
import { tap, map } from 'rxjs/operators';
import { ToastService } from '@app/services/toast/toast.service';
@Injectable()
export class RoleGuard implements CanActivate {
  userProfile: any;
  constructor(private authService: AuthService, private toastService: ToastService) {}
  canActivate(route: ActivatedRouteSnapshot, state: RouterStateSnapshot): Observable<boolean> {
    return this.authService.canActivateProtectedRoutes$.pipe(
      map((canActivateProtectedRoutes: boolean) => {
        if (canActivateProtectedRoutes) {
          // role check only if route contain data.role
          // https://javascript.plainenglish.io/4-ways-to-check-whether-the-property-exists-in-a-javascript-object-20c2d96d8f6e
          if (!!route.data['role']) {
            const routeRoles = route.data['role'];
            this.userProfile = this.authService.identityClaims;
            if (!!this.userProfile.role) {
              const userRoles = this.userProfile.role;
              if (userRoles.includes(routeRoles)) {
                // user's roles contains route's role
                return true;
              } else {
                // toaster-display role user needs to have to access this route;
                this.showToaster('Access denied', 'You do not have role ' + routeRoles);
              }
            }
          }
        }
        return false;
      })
    );
  }
  // ngbmodal service
  showToaster(title: string, message: string) {
    this.toastService.show(title, message, {
      classname: 'bg-danger text-light',
      delay: 2000,
      autohide: true,
      headertext: title,
    });
  }
}
The RoleGuard is an injectable class that implements the CanActivate interface provided by the @angular/router module. This interface requires the implementation of the canActivate method, which determines whether the user is allowed to access the requested route.
The RoleGuard has a constructor that takes in two dependencies: AuthService and ToastService. These are injected into the class using Angular's dependency injection system. The userProfile variable is also defined here to hold the user's profile information.
The canActivate method takes in two parameters: route and state, which contain information about the current route and router state. The method returns an observable of boolean values, indicating whether the user is allowed to access the route or not.
The method then calls the canActivateProtectedRoutes$ observable on the AuthService. This observable determines whether the user is authenticated and allowed to access protected routes.
If the user is allowed to access protected routes, the method checks whether the current route contains a role data attribute. If this attribute is present, the method checks whether the user's role matches the required role for the route. If the user's role matches, the method returns true, allowing access to the route.
If the user’s role does not match, the method displays a toast message using the showToaster method and returns false, denying access to the route.
The showToaster method displays a toast message using the ToastService injected into the class.
Overall, this code creates a RoleGuard that can be used to guard against unauthorized access to protected routes by checking if a user has the necessary roles.
Chapter 4: Applying Auth Guard and Role Guard in Angular routes
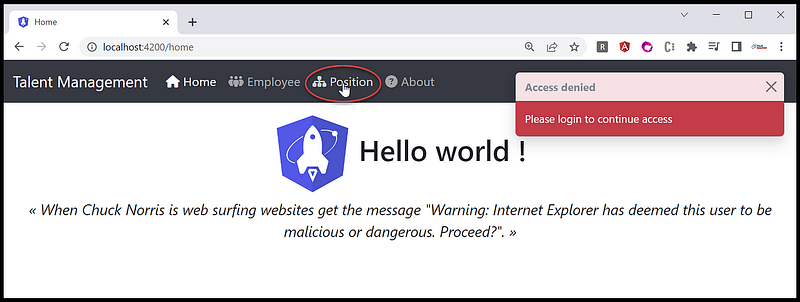
In the Talent Management demo application, accessing the Position menu requires authentication. Unauthenticated users attempting to access this menu will be shown a toaster message indicating Please login to continue as shown in Figure 3.
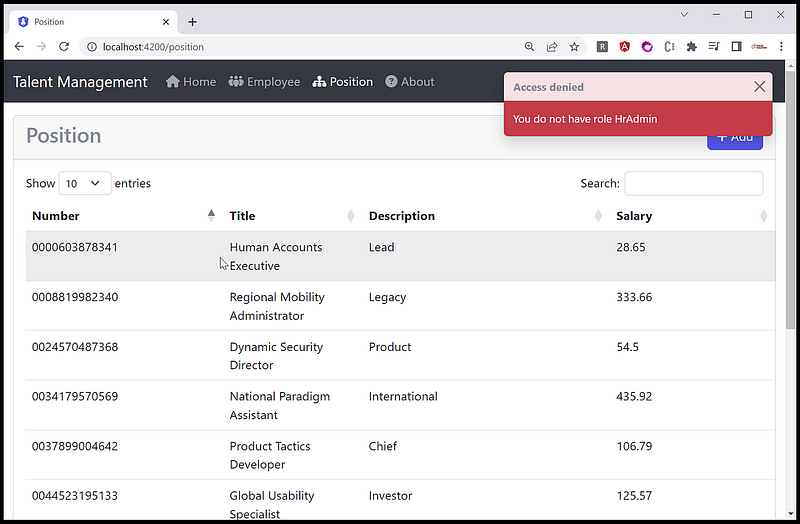
Authenticated users are able to view the listing of the Position. However, when attempting to view the details of a specific Position, a popup alert will appear indicating You do not have role HrAdmin as shown in Figure 4.
In order to use the auth guard in a route service, you will need to follow these steps:
- Import the Angular guard in the route service: Once the Angular guard is created, you will need to import it into the route service that you want to protect. This can be done by adding an
importstatement for the auth/role guard at the top of the file. - Add the auth/role guard to the route configuration: You will need to add the Angular guard to the route configuration for the route service. This can be done by adding a
canActivateproperty to the route object and setting it to the auth guard class.
Code Wak Thru
You can find the source code for Position menu routing in the source code file position-routing.module.ts.
//https://github.com/workcontrolgit/TalentManagement-Client-Angular15/blob/master/src/app/features/position/position-routing.module.ts
import { NgModule } from '@angular/core';
import { RouterModule, Routes } from '@angular/router';
import { PositionListComponent } from './list/position-list.component';
import { PositionDetailComponent } from './detail/position-detail.component';
import { marker } from '@biesbjerg/ngx-translate-extract-marker';
import { AuthGuard } from '@app/core/auth/auth-guard.service';
import { RoleGuard } from '@app/core/auth/role-guard.service';
const routes: Routes = [
  {
    path: '',
    component: PositionListComponent,
    canActivate: [AuthGuard],
    data: { title: marker('Position')},
  },
  {
    path: 'detail',
    component: PositionDetailComponent,
    canActivate: [AuthGuard, RoleGuard],
    data: { title: marker('Position New'),
    role: 'HRAdmin' },
  },
  {
    path: 'detail/:id',
    component: PositionDetailComponent,
    canActivate: [AuthGuard, RoleGuard],
    data: { title: marker('Position Detail'),
    role: 'HRAdmin' },
  },
];
@NgModule({
  imports: [RouterModule.forChild(routes)],
  exports: [RouterModule],
})
export class PositionRoutingModule {}
This is a module file in an Angular application that defines routes for the Position feature. The @angular/core and @angular/router modules are imported to use the relevant classes and interfaces. The PositionListComponent and PositionDetailComponent components are imported as well to be used as route components.
Here’s a breakdown of the code:
const routes: Routes = [...]defines an array of routes for the feature. Each route is an object with properties that define the path, component, and additional route data.{ path: '', component: PositionListComponent, canActivate: [AuthGuard], data: { title: marker('Position')}, }defines a route for the default path (empty string) that loads thePositionListComponentcomponent and requires authentication using theAuthGuard. Additional data is provided to set the page title usingmarker()function from@biesbjerg/ngx-translate-extract-markerpackage.{ path: 'detail', component: PositionDetailComponent, canActivate: [RoleGuard], data: { title: marker('Position New'), role: 'HRAdmin' }, }defines a route for thePositionDetailComponentcomponent, also requiring authorization using theRoleGuardto only allow users withHrAdminrole. Additional data is provided to set the page title.{ path: 'detail/:id', component: PositionDetailComponent, canActivate: [RoleGuard], data: { title: marker('Position Detail'), role: 'HRAdmin' }, }defines a route for thePositionDetailComponentcomponent, passing anidparameter in the URL path to load a specific position. Also requires authorization using theRoleGuardwith the sameHrAdminrole requirement as the previous route.@NgModule({ imports: [RouterModule.forChild(routes)], exports: [RouterModule], })imports theRouterModuleand defines thePositionRoutingModuleas a feature routing module with its own routes.
Overall, this module defines the routes for the Position feature in the application, allowing users to navigate to the position list, and the position detail with proper authentication and authorization (RBAC).
Frequently Asked Questions
- How can user roles be assigned? User roles are managed through the Token Service Admin UI. Please refer to Tutorial 5 of this blog series for detailed instructions. Once the roles are assigned, they will appear as role claims in the JWT Access Token. For further clarification, please refer to Figure 1.
- In Angular, how can unauthenticated users be automatically redirected to the Token Service server’s login page when attempting to access a protected route? To achieve this, you can specify the AuthGuardWithForcedLogin for the canActivate property in the route configuration. For example, you can set it as follows: canActivate:[AuthGuardWithForcedLogin].
Recommended Contents
- Angular Guard for Role-Based Access Control (RBAC) Driven by JWT ♥
- Role Based Access Control in Angular 16 Applications
Summary
Ironman: Where are you from? Thor: Asgard. Ironman: ASS-GUARD? ☹

Implementing RBAC on the frontend client alone may provide a level of security, but it is not a reliable solution as the client-side code can be easily manipulated or bypassed. An attacker could modify the client-side code to gain unauthorized access to restricted resources or perform actions that they are not authorized to do.
However, it is still important to consider security on the frontend client. The frontend client can implement RBAC for user experience purposes, such as hiding or disabling certain UI components for users who do not have the necessary privileges. This can improve the usability of your application by providing a better user experience and minimizing confusion.
In general, it is recommended to implement RBAC on the backend web API to ensure proper control and validation of access. This is because the backend API is the primary interface for accessing data and performing actions, and it provides a centralized point for enforcing security policies.
What’s next, you ask? Now that we’ve mastered the art of gatekeeping UI elements in the Angular frontend, it’s time to take it up a notch! My next blog will spill the beans on how to use JWT to lock down access to your precious data in the Web API backend. Don’t miss it, or you might just end up with some unauthorized visitors!
Thanks for reading! Hope you found it useful. Want more? Please follow me and become a member on medium for more articles. With your support, I’ll keep creating awesome content for you. Have a great day ahead! — Fuji Nguyen


