Setup Windows Gaming Laptop with Nvidia GPU for LLM
While LLM (Large Language Model) is getting more and more popular, lots of people asks me how to setup home lab to train, fine tune, or inference LLM models. We will publish a few articles on how to setup different GPU backed single lab step by step.

In this article, we will work through the installation on how to turn a Windows gaming laptop into a LLM home lab.
The Laptop
The laptop we are using for this article is MSI GE65 Raider Gaming Laptop. It was bought around 2018. I cannot find an identical spec from MSI website today. Here are main hardware components built-in:
- CPU: Intel Core-i7
- Memory: 32GB
- GPU: RTX 2070 8GB
- Disk: 500GB
- OS: Microsoft Windows Home Edition
Overview
Installing LLM environments inside Windows environment is not yet a good idea due to lack of builds from vary key libraries. The most popular practice is to use WSL2 with Linux. If you don’t familiar with WSL2 installation, please refer to below article.
Although Docker provides GPU support inside container service, using Windows Host is still not an option by the time of writing this article. Please refer to below link for further updates.
Below is what we are going to install:
- Nvidia Driver — This is the hardware driver from Nvidia. Find out your graphic card model before the installation. This driver needs to be installed in host (The windows operating system).
- CUDA Toolkit — The CUDA Toolkit is provided by Nvidia. It contains libraries, compilers, development tools and samples, CUDA runtime, etc. in a GPU-accelerated environment. This one is to be installed in WSL2.
- PyTorch — PyTorch is a open source framework for building deep learning models commonly used in LLM (Large Language Model). It is written in Python ad relatively easy to use. This libaray and all below will be installed inside each Python virtual environment.
- BitsAndBytes — The BitsAndBytes is a open source library which wraps CUDA custom functions, in particular 8-bit optimizers, matrix multiplication, and quantization. It is very popular used in LLM world, especially when you want to load a bigger model in smaller GPU memory board.
- Hugging Face and transformers — Hugging Face provides a model hub community for sharing pre-trained models. Hugging Face created transformers library that provides APIs and tools to easily download and train state-of-the-art pretrained models.
For more readings, please go to below links:
Now, let’s begin!
Install Nvidia Driver
Install Nvidia Driver is very straight forward. First, you need to know which graphic card you have. For in article, the laptop comes with RTX 2070. Next, let’s use advanced search page this time to get ourself more options.
https://www.nvidia.com/Download/Find.aspx?lang=en-us
Note: Make sure you select the “Notebooks” series, and click on “Search”.

Next, go to CUDA compatible list to match the CUDA version from drivers above.
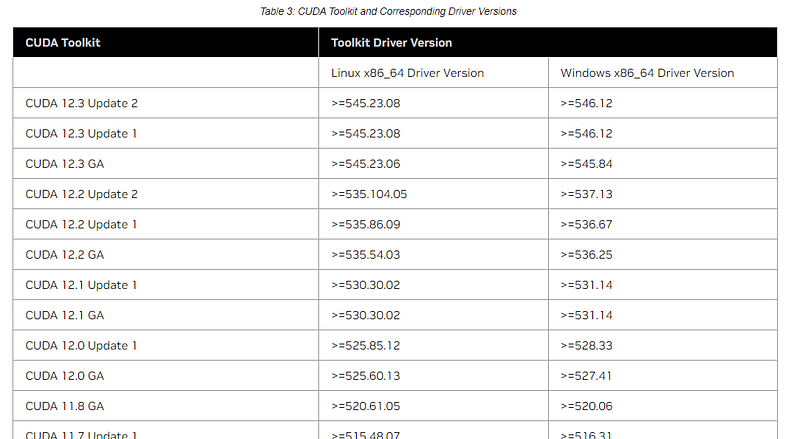
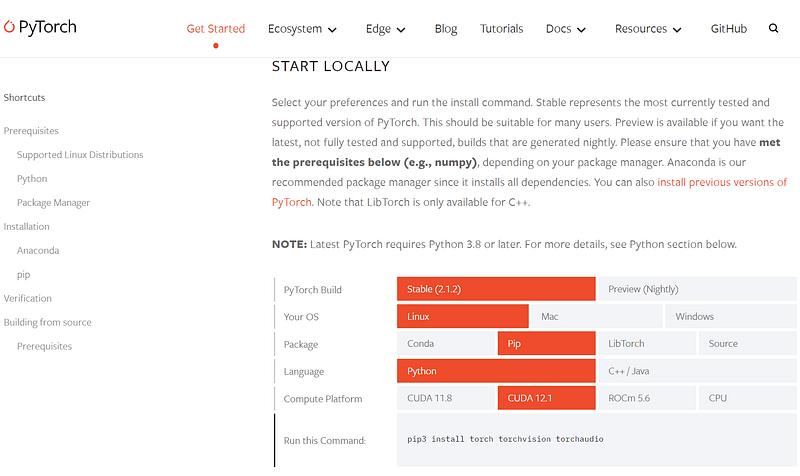
Then, check with PyTorch builds. Note, you need select “Linux” not “Windows” for WSL2.
Last, check with Bits-and-Bytes installation. Unless you want to build from source codes yourself, pay attention to the builds below.

Mismatching GPU driver version, CUDA toolkit version, OS build, Python version, PyTorch build, and bitsandbytes build, would make your LLM experience unstable or weird result.
I would suggest you to spend some time playing around. It would be very helpful for you to better understand how runtime environment works. For now, I will provide you two solutions. Both of them works fine in my laptop:
- The most safe solution is to use CUDA 11.8. This is the stable build, and widely used in AI/ML world. The GPU driver version is 522.25.
- Align CUDA 12.1 to match PyTorch. The GPU driver version is 531.18.
Let’s move on. Pick one solution above, download the installation package, and go ahead to install the driver in Windows host.
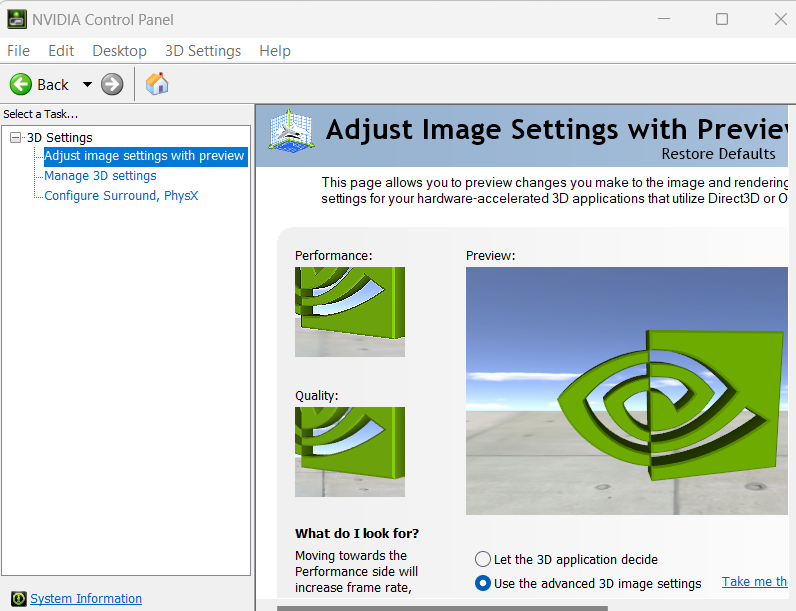
Once installed, open NVIDIA Control Panel from system tray (located at the right end of task bar. Normally you will see a small triangle. Click on it.). Make sure no issues in NVIDIA Control Panel.
Now, we have GPU driver successfully installed in Windows. Open a DOS window, and type below command:
DOS> nvidia-smi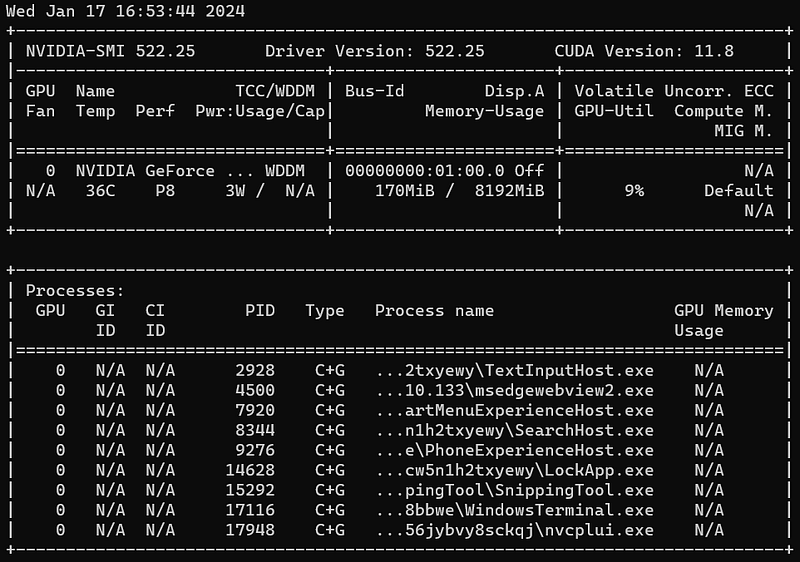
Install CUDA Toolkit
Now, let’s move into WSL2. In DOS window, type command:
DOS> wsl --install Ubuntu

or

DOS> wsl
If you don’t have WSL2 setup already, please look into below article.
We will install CUDA Toolkit via Bits-and-Bytes to keep the libraries compatible.
$ git clone https://github.com/TimDettmers/bitsandbytes.git
$ cd bitsandbytes/
$ bash install_cuda.sh 118 ~/local 1
Note, if you choose CUDA 12.1, modify 118 above to 121. You will need to do the same in all rest steps in this article.
Once installation completed, run below command to verify the compiler version:
$ ~/local/cuda-11.8/bin/nvcc --version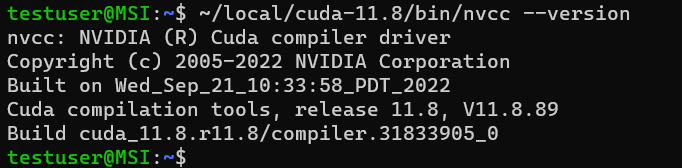
Now we have the driver, CUDA, and the Toolkit installed. Now let’s setup environment variables. You will need those throughout all activities.
$ export CUDA_HOME=/home/testuser/local/cuda-11.8/
$ export LD_LIBRARY_PATH=/home/testuser/local/cuda-11.8/lib64
$ export BNB_CUDA_VERSION=118
$ CUDA_VERSION=118
Install cuDNN
You need download cuDNN package from Nvidia developer website.
This website requires a Nvidia account (free). Depends on which CUDA version you pick from above, select the right download from below page.
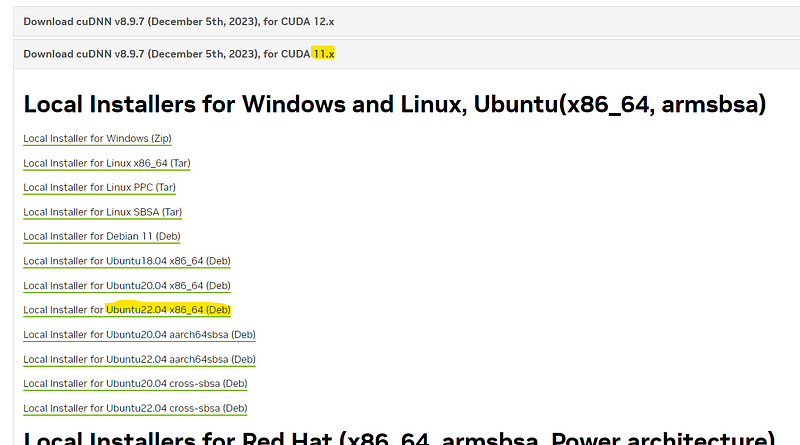
Select the Ubuntu 22.04 package, and download. Then, install it.
$ sudo apt install ./cudnn-local-repo-ubuntu2204-8.9.7.29_1.0-1_amd64.debWhile installation completed, look at terminal outputs. You should find a copy command to below

Now, run the command from your terminal.
$ sudo cp /var/cudnn-local-repo-ubuntu2204-8.9.7.29/cudnn-local-08A7D361-keyring.gpg /usr/share/keyrings/Next, let’s install libraries and samples.
$ sudo apt update
$ sudo apt install libcudnn8
$ sudo apt install libcudnn8-dev
$ sudo apt install libcudnn8-samples
Setup Python virtual environment
Ubuntu 22.04 comes with Python 3.10, but virtual environment is not part of default installation. If you haven’t done so, please run below command to get virtual environment installed.
$ sudo apt-get install python3-pip
$ sudo apt install python3.10-venv
Now, let’s create and activate our virtual environment.
$ cd
$ mkdir test-gpu
$ cd test-gpu
$ python3 -m venv venv
$ source venv/bin/activate
We are not going to explore further details on Python setup and virtual environment. In case if you don’t familiar with those, please take a look below articles:
Install Bits-and-Bytes from source codes
Since we already checked out the source codes from Bits-and-Bytes, we will jump into the directory and build from there.
$ cd ~/bitsandbytes
$ CUDA_HOME=/home/testuser/local/cuda-11.8/ \
LD_LIBRARY_PATH=/home/testuser/local/cuda-11.8/lib64 \
BNB_CUDA_VERSION=118 \
CUDA_VERSION=118 \
make cuda12x
$ CUDA_HOME=/home/testuser/local/cuda-11.8/ \
LD_LIBRARY_PATH=/home/testuser/local/cuda-11.8/lib64 \
BNB_CUDA_VERSION=118 \
CUDA_VERSION=118 \
python setup.py installInstall PyTorch
PyTorch comes with core framework, and a few extension libraries, like vision and audio. It is recommended to install all libraries you might need in one-shot to avoid future compatibility issue. (As long as disk space is not an issue.)
$ pip install torch torchvision torchaudio --index-url https://download.pytorch.org/whl/cu118Now, let’s verify if the installed PyTorch could recognize our GPU device.
$ python -c "import torch; print(f'CUDA available? {torch.cuda.is_available()}'); print(f'GPU Name: {torch.cuda.get_device_name(0)}'); print(f'GPU Memory: {round(torch.cuda.get_device_properties(0).total_memory / 1024 / 1024 / 1024)} GB')"
Prefect!
Let’s play
We will use Hugging Face’s transformers API to load and inference a LLM model. We will challenge the limitation of our GPU.
Now, let’s install transformers and accelarate. The accelerate is required when using bits-and-bytes with transformers.
$ pip install transformers
$ pip install accelerate
Since RTX2070 comes with 8GB GPU memory, we have to pick a small LLM model. We are not going to explore further here about LLM. We will publish different articles soon.
from transformers import pipeline
summarizer = pipeline('summarization', model='facebook/bart-large-xsum')

article = """
What is the BART HuggingFace Transformer Model in NLP?
HuggingFace Transformer models provide an easy-to-use implementation of some of the best performing models in natural language processing. Transformer models are the current state-of-the-art (SOTA) in several NLP tasks such as text classification, text generation, text summarization, and question answering.
ProjectPro Free Projects on Big Data and Data Science
The original Transformer is based on an encoder-decoder architecture and is a classic sequence-to-sequence model. The model’s input and output are in the form of a sequence (text), and the encoder learns a high-dimensional representation of the input,which is then mapped to the output by the decoder. This architecture introduced a new form of learning for language-related tasks and, thus, the models spawned from it achieve outstanding results overtaking the existing deep neural network-based methods.
Since the inception of the vanilla Transformer, several recent models inspired by the Transformer used the architecture to improve the benchmark of NLP tasks. Transformer models are first pre-trained on a large text corpus (such as BookCorpus or Wikipedia). This pretraining makes sure that the model “understands language” and has a decent starting point to learn how to perform further tasks. Hence, after this step, we only have a language model. The ability of the model to understand language is highly significant since it will determine how well you can further train the model for something like text classification or text summarization.
BART model is one such Transformer model that takes components from other Transformer models and improves the pretraining learning. BART or Bidirectional and Auto-Regressive Transformers was proposed in the BART: Denoising Sequence-to-Sequence Pre-training for Natural Language Generation, Translation, and Comprehension paper. The BART HugggingFace model allows the pre-trained weights and weights fine-tuned on question-answering, text summarization, conditional text generation, mask filling, and sequence classification.
So without much ado, let's explore the BART model – the uses, architecture, working, as well as a HuggingFace example.
"""

result = summarizer(article, min_length=5, do_sample=False)
print(result)


