
Recreate a Dribbble App Design with UIKit Episode 1 — Part 2
This article will guide you through my thought process and approach to programmatically recreating a cool UI design.
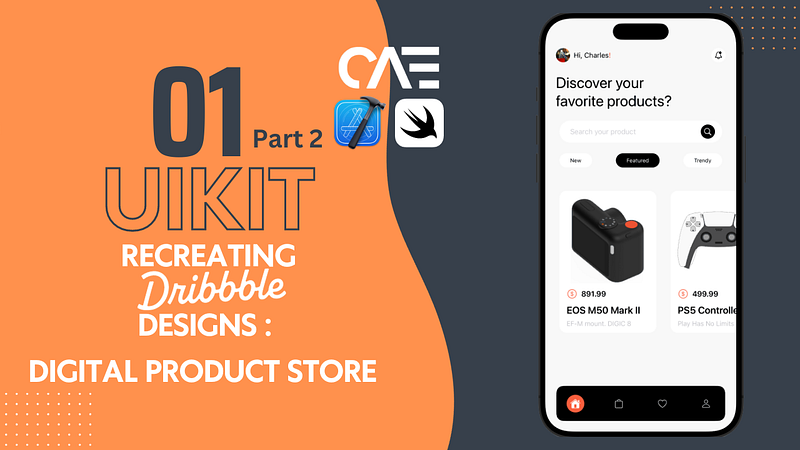
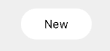
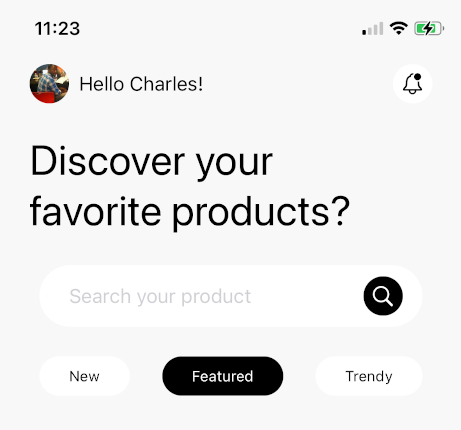
Welcome back to the article series(missed part one? click here ) on how I recreated this Dribbble design using UIKit. Picking up right where we left off…it seems that I may have promised you guys some ‘pills’…didn’t I?
The approach to this was a bit of an interesting one,
- I created a custom UIView, styled in the shape of the ‘pills’ — some background color with rounded corners and some text on the inside.
- Added them to a horizontal UIStackview (distributed equally).
- Placed the UIStackview within the parent view.
Here’s how the custom UIView was made, I’ve called it a CategoryView
//CategoryView inherts from UIView
class CategoryView: UIView {

    override init(frame: CGRect) {
        super.init(frame: frame)

        configViews()
        configConstraints()
    }

    required init?(coder: NSCoder) {
        fatalError("init(coder:) has not been implemented")
    }

//This view contains a UILabel,
// which will be used to set the text for the 'pills'
    var categoryLbl: UILabel = {
        let label = UILabel()
        label.font = .preferredFont(forTextStyle: .caption1)
        label.translatesAutoresizingMaskIntoConstraints = false
        return label
    }()


    func configViews(){
//The view's corners are rounded to give it the 'pill' shape
        layer.cornerRadius = 16
//The label is added to the parent view
        addSubview(categoryLbl)
    }

    func configConstraints(){
//The label is then then centered horizontally within the view
//with 24 pts of space from the view's leading and trailing anchors
        NSLayoutConstraint.activate([
            categoryLbl.leadingAnchor.constraint(equalToSystemSpacingAfter: leadingAnchor, multiplier: 3),
            categoryLbl.centerYAnchor.constraint(equalTo: centerYAnchor),
            trailingAnchor.constraint(equalToSystemSpacingAfter: categoryLbl.trailingAnchor, multiplier: 3)
        ])
    }

}
Next I created 3 instances of this CategoryView, and a horizontal UIStackView to place them into
//The first instance of the CategoryView,
//The text value of the UILabel within it is set to "New",
//While the text color of the UILabel is set to "black"
//And fnally the view's background color is set to "white"
var newCategory: CategoryView = {
       let category = CategoryView()
        category.categoryLbl.text = "New"
        category.categoryLbl.textColor = .black
        category.backgroundColor = .white
        category.translatesAutoresizingMaskIntoConstraints = false
        return category
}()

// This CategoryView is set to "Featured"
// And is basically a reverse of the previous
var featuredCategory: CategoryView = {
       let category = CategoryView()
        category.categoryLbl.text = "Featured"
        category.categoryLbl.textColor = .white
        category.backgroundColor = .black
        category.translatesAutoresizingMaskIntoConstraints = false
        return category
}()

// The final Category view is pretty much a copy of the first
// Scroll up and take another look at the 'pills' image for a quick refresher
var trendyCategory: CategoryView = {
       let category = CategoryView()
        category.categoryLbl.text = "Trendy"
        category.categoryLbl.textColor = .black
        category.backgroundColor = .white
        category.translatesAutoresizingMaskIntoConstraints = false
        return category
}()

// The stackview has it's spacing and distribution properties set
let categoryStackView: UIStackView = {
        let stackView = UIStackView()
        stackView.spacing = 8
        stackView.axis = .horizontal
        stackView.alignment = .center
        stackView.distribution = .equalSpacing
        stackView.translatesAutoresizingMaskIntoConstraints = false
        return stackView
    }()
That wasnt so bad huh? It’s not done as yet tho, we still need to add all these new (for lack of a better word) ‘components’ to the parent view, and then handle how they are constrained.
func configViews(){

// First, the stackview is added
  view.addSubview(categoryStackView)

// Then each of the categoryView items
// are added to the stackview, in order
  categoryStackView.addArrangedSubview(newCategory)
  categoryStackView.addArrangedSubview(featuredCategory)
  categoryStackView.addArrangedSubview(trendyCategory)
}

// This constraint stuff should be pretty straight forward by now, right?
// ...right??
func configConstraints() {
  NSLayoutConstraint.activate([
  categoryStackView.topAnchor.constraint(
  equalToSystemSpacingBelow: searchView.bottomAnchor, multiplier: 3),

  categoryStackView.leadingAnchor.constraint(
  equalToSystemSpacingAfter: view.leadingAnchor, multiplier: 4),
  categoryStackView.heightAnchor.constraint(equalToConstant: 32),
  view.trailingAnchor.constraint(equalToSystemSpacingAfter: categoryStackView.trailingAnchor, multiplier: 4),

// The CategoryViews are given a height of 32,
// in order for those rounded corners which were set to 16
// to give it a circular shape
  newCategory.heightAnchor.constraint(equalToConstant: 32),
  featuredCategory.heightAnchor.constraint(equalToConstant: 32),
  trendyCategory.heightAnchor.constraint(equalToConstant: 32),
])
}
And voila, pills.
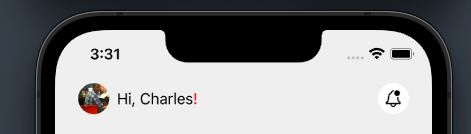
The header is pretty much finished, except for one minor detail ; the exclamation mark in the greeting isn’t the correct color. To resolve this, we’ll use the UILabel’s attributedText property to apply styling to a specific portion of the string.
// This function requires two strings
// the first being the greeting
// the second being the exclamation mark
// it will then set the color of the exclamation mark to orange
func configAttributedTitle(_ greeting: String,_ coloredGreeting: String) -> NSAttributedString {
  let attributedText = NSMutableAttributedString(attributedString: NSAttributedString(string: greeting, attributes: [.font: UIFont.preferredFont(forTextStyle: .callout),.foregroundColor: UIColor.label]))
  attributedText.append(NSAttributedString(string: coloredGreeting, attributes: [.font:UIFont.preferredFont(forTextStyle: .callout), .foregroundColor: UIColor(named: "orangeColor")!]))
  return attributedText
}

// Set the attributedText on the label by calling the function in configViews
func configViews(){
  greetingLabel.attributedText = configAttributedTitle("Hi, Charles", "!")
}
Now the header is complete! Thanks for reading, you can find part 3 below.
As always, check out the github repo, in case you missed a step!


