
React Native — Full authentication flow with Spotify— Chapter 2: Backend Proxy (Firebase Functions + Express)
In chapter 1 we created a React Native application with authentication via Spotify. This part of the series will zoom into the Backend handling the secure part of our authorization flow.
Content
I will publish this series through different chapters:
- Introduction
- Chapter 1: Building our React Native app
- Chapter 2: Backend Proxy based on Firebase Functions and Express
Coming up next:
- Chapter 3: Bringing Backend and Frontend together
- Chapter 4: React Native Navigation based on authentication state
- Chapter 5: Keeping your user base in Firestore
What are we building?
An express API running in Firebase Functions to act as a proxy so we can handle our authentication flow in a secure way. As mentioned in the previous chapter, we need to find a way to hide our Spotify Client Secret in our backend.
What do we need?
- Node JS / NPM (or Yarn)
- A Firebase project
- Express JS
- oAuth provider (We will be using Spotify)
- Client ID and Client Secret
Create a Firebase Project
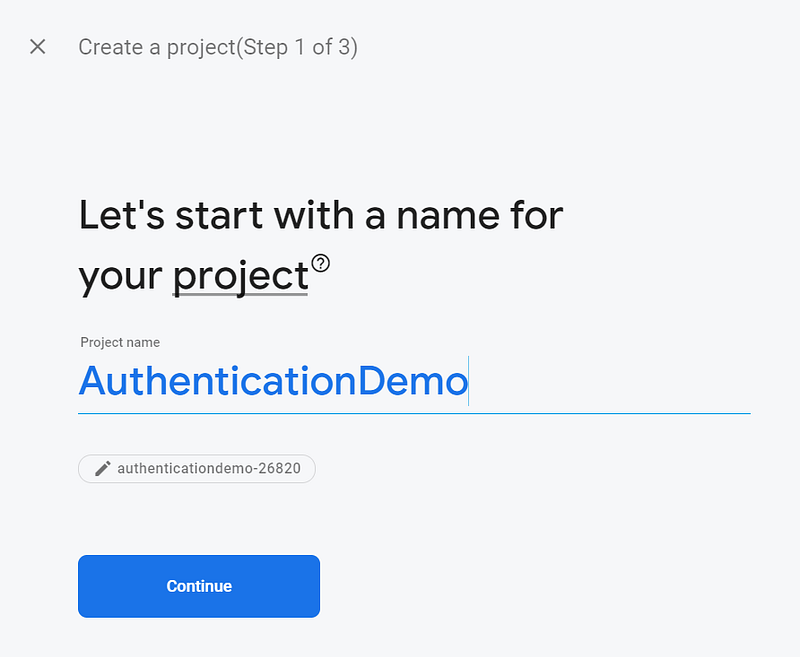
Create a Firebase project in the Firebase Console. You can skip this part if you know how to do this.
Go to https://firebase.google.com/ and press “Get started”. Login with your Google account or create a new one.
After logging in, you will see this screen:
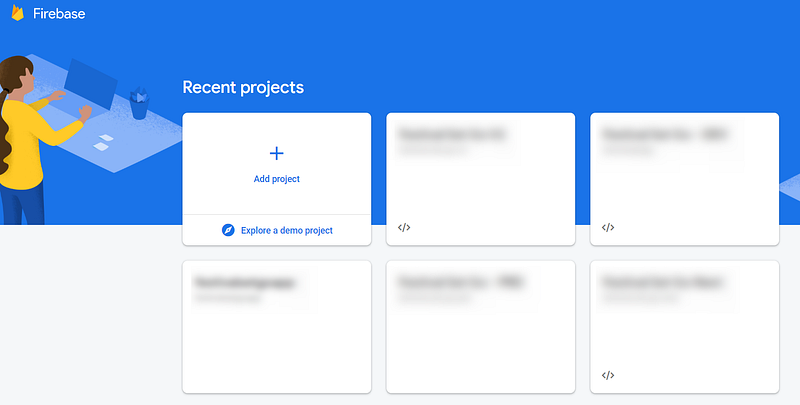
Press “Add Project” to create a new Firebase Project.
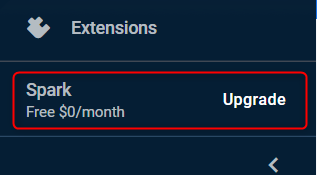
Enable a Blaze account
When creating a new project, the standard project plan will be ‘Spark’. This is the free version of Firebase, but it doesn’t allow our functions to perform external API calls.
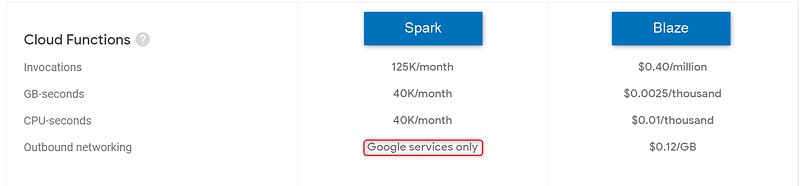
The blaze pricing plan is a Pay as you go plan. This means that you will have to keep an eye on your billing plan. I have been using this plan for a lot of demo projects and PoCs’s. The highest monthly bill I ever received was €0.07. Pleases note that an infinite loop calling your Firebase Function can get you a really messed up bill.
You can read this story to see what could be the worst-case scenario.
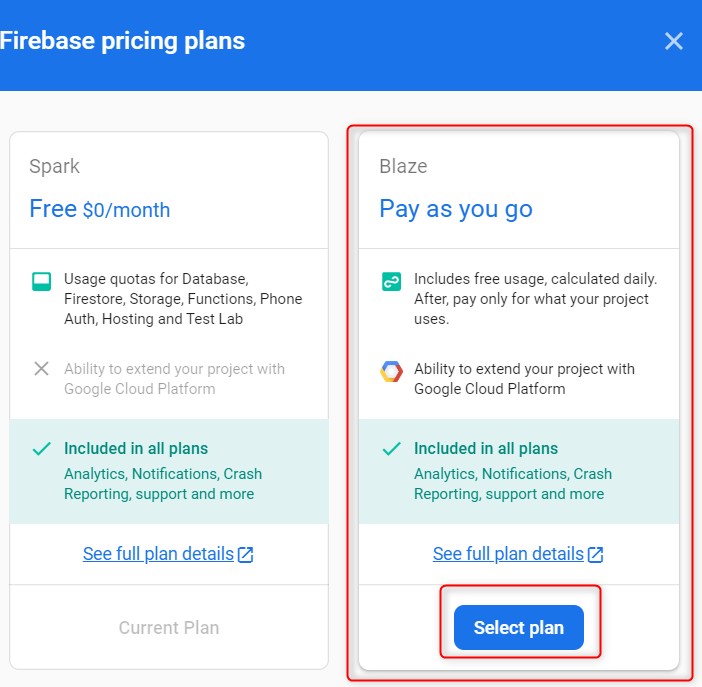
You can configure budget alerts to keep track of your bills. I would recommend doing this, to avoid unexpected bills.
Create a Firebase project in Firebase Console + install Firebase Tools
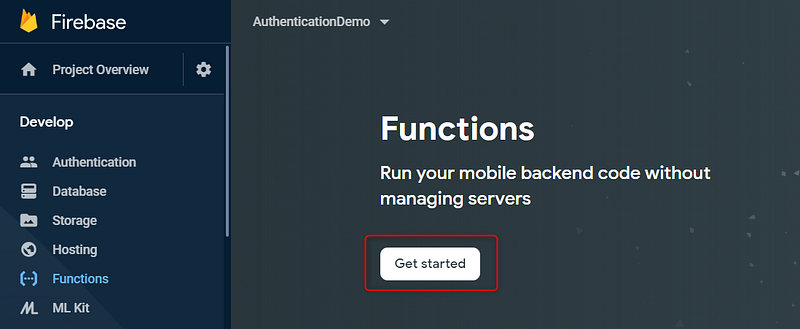
In the Firebase console, choose your newly created project and choose Functions in the left side menu.
Press “get started”
- Install the firebase tools (-g means we will install this globally, so we can use the firebase tools anywhere):
npm install -g firebase-toolsInitialize our Firebase Functions + Express project
Now open the command prompt and navigate to the folder where you want to initialize your project.
- Initialize your firebase project:
firebase init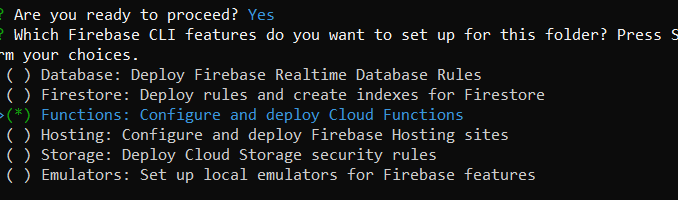
- Choose Functions
- Use an existing project
- Select your newly created project
- Choose Javascript We will not be using ESLint for this demo, but I would recommend to use it for real projects
- Don’t install dependencies with npm now
You should get this screen:
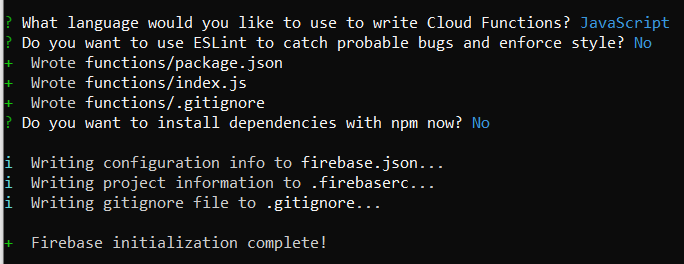
Dive into the functions folder and install express:
cd functionsnpm install express --saveYou successfully initialized your project!
Let's install the npm dependencies and deploy our first (empty) project
npm installcd ../firebase deployIf you don’t get any errors, your empty app is deployed!
So far so good. But your app won’t do anything yet :-)
Build, Deploy and Test our first API
Go to your functions folder (created by the firebase tools)
npm install body-parser --saveBody-parser is a middleware which will parse the incoming request in an easier to use format. You can work without body parser, but it makes life a lot easier.
Create this file structure:

Note: There are a lot of articles about “best practices” concerning file structure in a React Native project. For the sake of this demo, I will keep it simple. To be honest, I do not have a goto structure, so all of my projects have a slightly different structure. (Note to self; I should look for the best structure for my own needs.. ;-) )
index.js
This will be our main file for the Firebase Functions. In this file, we will define which function we want to export and make available via Firebase Functions. By using runWith, we can define how much memory we want to allocate to our function and after how many seconds we want to time out our function.
In this case, we define a function “api” which, on request, will run our server function. (Imported from out ./src/server.js file)
Read this part of the Firebase documentation to get a full overview of all the possibilities when defining functions.
So basically, our index.js will define which functions we want to expose through Firebase.
As you can see in this screenshot, Firebase now recognizes a function “api” with a Memory of 2GB and a Timeout of 120 seconds.

server.js
This will be our entry file for our express api. Every call to our /api/* url will be handled via this file.
In this case, we defined a path /user which will be handled via ./user/route.js.
So for example, if we want to make an API endpoint /api/user/getuser/:id: we will define the last part of the route (getuser/:id:) inside of ./user/route.js, which is the next file we will discuss
user/route.js
We defined one route: /authentication/
(Full path api/user/authentication)
This route expects a POST request and will handle this call via the function controller.authentication which is imported via the ./controller file.
user/controller.js
Important note: We are working in the backend, so it’s okay to use your clientSecret. Don’t do it in your frontend application!
The controller file will handle the logic. I built one specific controller file for the user API endpoint. Once again, it’s up to you to find a file structure which fits for your project.
In this case, I have a proxySpotifyToken method that will handle our authorization calls and inject the Client Secret of our oAuth provider where required.
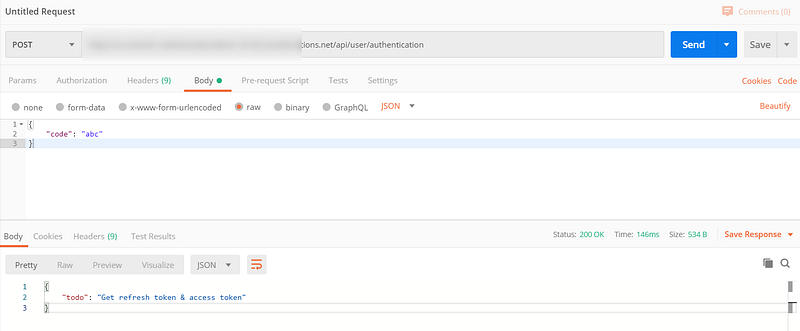
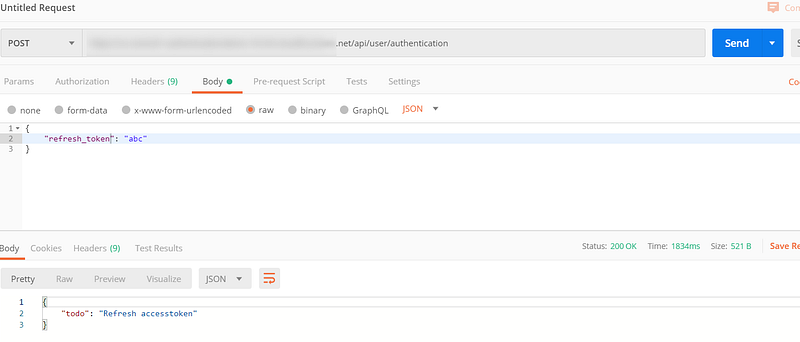
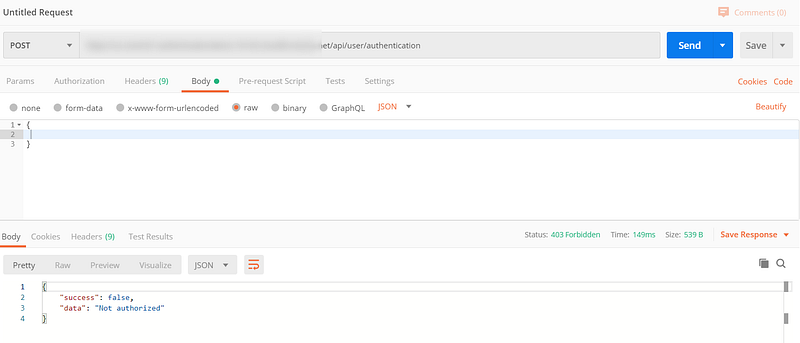
So at this point, we can perform a Post request to out endpoint (api/user/authentication). In our body we except “code” or “refresh_token” filled in. There are three scenarios:
- code and refresh_token are empty: We send a response 403 which tells our client that the user is not authorized.
- refresh_token is filled out: Our user has already authenticated previously and the client is asking a new access token to perform new API calls in name of our user. Our response will be: { todo: “Refresh accesstoken”}
- code is filled out: the client doesn’t have a refresh token so this is a new “fresh” authentication. The code will be used to request an access token and a refresh token. Our response will be: { todo: “Get refresh token & access token”}
Does this work?
let’s test this in Postman!
- Retrieving refresh token & access token: Check!
- Refresh access token: Check!
- Unauthorized call — 403 status: Check!
So now, we have a working mini API which basically does.. nothing.
But we are nonetheless a little excited because we are getting the expected response! This means we can start implementing some logic and do some loco freestyling!
So let’s do this!
Write the important logic
Now we want our backend to communicate with our oAuth provider (Spotify) and to return valid access tokens and refresh tokens.
In the introduction article, we talked about the Spotify authentication flow. This part is mainly focused on step 2 and 3.
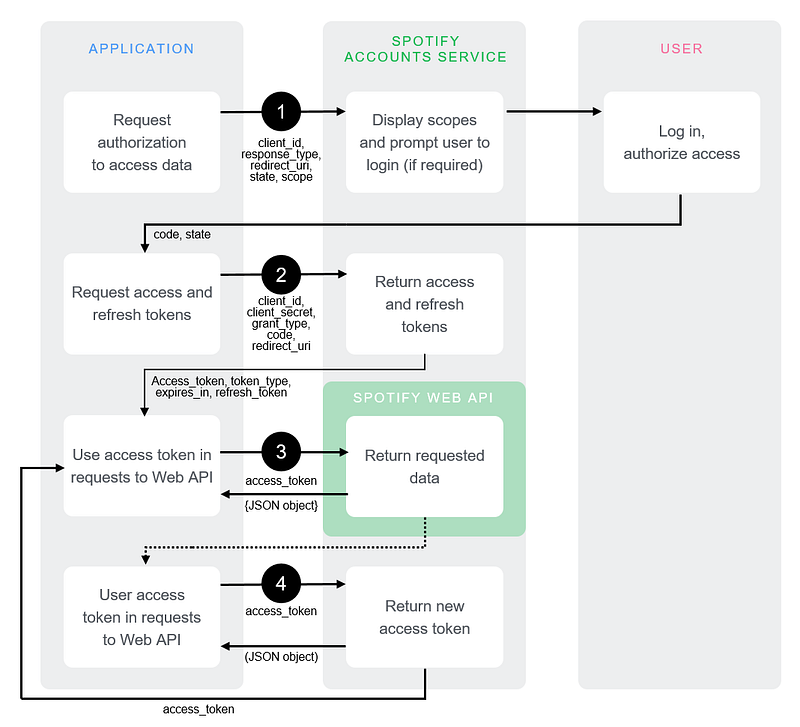
So we have 2 scenario’s that we want to work out:
- Exchange an authorization code for an access token and a refresh token
- Exchange a refresh token for a new access token
let’s define our configuration:
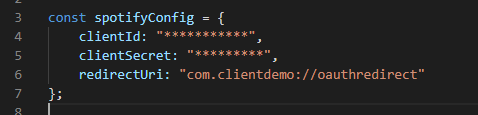
- Client ID & Client Secret: You can find this in your developer dashboard on Spotify.
- Redirect URI: An URL that you will have to whitelist inside of your Spotify Dashboard. Whenever you have to fill out a redirect URL during this blog, you will need to use the same URL.
So let’s work on the first scenario in our controller.js:

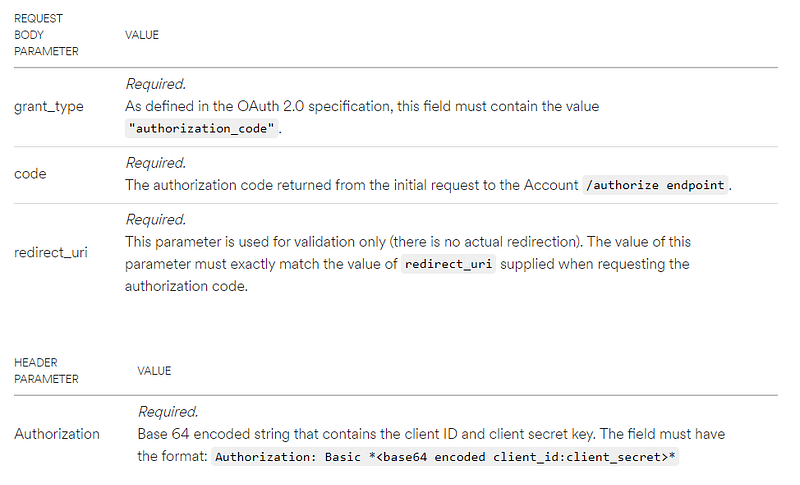
To do this according to the Spotify documentation we will have to perform a post call to this endpoint: https://accounts.spotify.com/api/token
The following headers and body request parameters should be filled out:
I am not going to show you how to perform a post request. For the moment I will be using a NPM package which wraps the Spotify API in Javascript.
https://github.com/thelinmichael/spotify-web-api-node
So open your command prompt again and go to your functions folder:
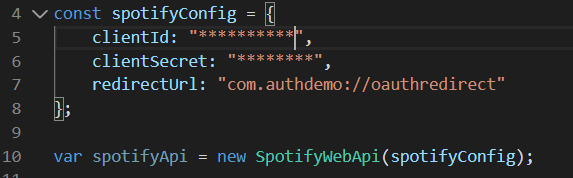
npm install spotify-web-api-node --saveNow you can use the library by importing it:
var SpotifyWebApi = require(‘spotify-web-api-node’);We will initialize a variable spotifyApi with our spotifyConfig as a constructor parameter. This way all our calls will be using the right client id, client secret and redirect url.
So we will add a little bit of code to handle our request:
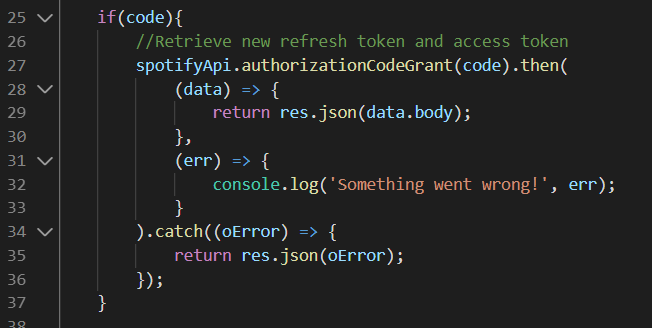
We will use the incoming authorization code to get an access token and request token. The authorizationCodeGrant is a method inside of the library which we are using that handles this request. The response of this method will be a body with the access token and refresh token (and some additional information). At this point we just want to return this body to our client, so we will directly do this by using: res.json(data.body)
So now it should become clear why I am calling this a proxy. Actually we are just redirecting the call from the client to the spotify API and injecting the client id and client secret. From a client perspective, we are just calling Spotify and asking it for an access and refresh token. But because we don’t want to expose our client secret, we use this little proxy to hide it.
Let’s dive into the second scenario!
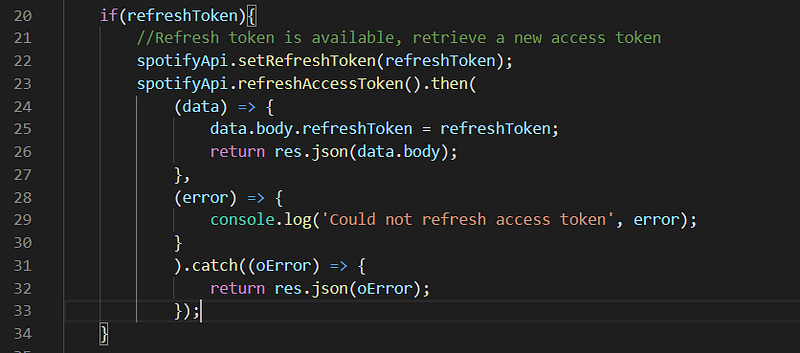
In this scenario, we want to request a new Access Token by using the existing Refresh Token.
We will still be using the Spotify API wrapper library. First, we will set our Refresh Token by using the method spotifyApi.setRefreshToken().
Then we will refresh our access token using refreshAccessToken()
When this call succeeds, we will return the body to our client. I also added the refresh token to our body (line 25) so we can use it from there.
Just like the previous scenario, for our client application, it just looks like we are directly calling the Spotify API. But because we want to hide or Client Secret we use our firebase functions as a proxy.
Alright, we successfully created our proxy on Firebase functions!
In the next chapter, we will test the whole flow from our client application!