
Provisioning VMs In Hyper-V with PowerShell
In this article, we will learn how to provision VMs in your Hyper-V environment with PowerShell. If you haven’t set up your Hyper-V Lab yet, check out the article below.
Setting Up an IT Homelab Environment | Hyper-V | by Jonathan Ingram | IT Homelabs
Create a Virtual Machine Template in Hyper-V | by Jonathan Ingram | IT Homelabs
Every time you need a new VM in your lab, you could go through the motions of manually creating it. It’s good to do it a few times to practice and learn the UI. After that, though you can save huge amounts of time provisioning your VMs with a PowerShell script.
In my Hyper-V lab, I’m going to need one server that will be my Active Directory Domain Controller and two desktop clients that I will join to the domain.
Servers: 1
Server Name: DC-001
Desktops: 2
Desktop Names: Desktop-1, Desktop-2
If you haven’t worked with PowerShell before, don’t worry! I’ll go over each part in an easy-to-understand way. Later in the series, I’ll go over some other PowerShell tips every IT professional should have in their toolbox.
Let’s go over each section of the script. I’ll add a GitHub link at the bottom of this article so you can get the latest version as time goes on.
PowerShell Comments
Throughout the script, you will see lines that begin with the # character. In PowerShell, any line that begins with that character lets the computer know it is a comment and not actual code. Below is an example from my script.
# =================================================================
# Script for provisioning Virtual Machines in Hyper-V via template
# VMs.
# =================================================================
PowerShell Variables
The next part of the script shows an example of variables. Every variable in PowerShell begins with a $ sign. In the section below, I’m setting up some variables for my lab.
$LabRootFolder contains the main location of my lab. I’m keeping my lab on a hard drive labeled “H:” inside a folder called “IT-Homelabs”. Inside that folder I’m storing my Hyper-V environment in a folder called “Hyper-V”.
$LabName contains the name of the folder I want to store this lab in. I could have several Hyper-V labs, so I like to keep everything organized in their own folders.
$LabFolder has a lot going on. In this variable, I’m constructing a new path by adding the variables together. If I were to print out $LabFolder in the console, it would show me: H:\IT-Homelabs\Hyper-V\Work-Lab
To use a variable inside of a string, you must surround the variable with $().
$myString = "This is a string with a variable: $($myVariable)."Here is what the section looks like in the script.# =============================================================
# Lab Information
# =============================================================
$LabRootFolder = "H:\IT-Homelabs\Hyper-V"
$LabName = "Work-Lab"
$LabFolder = "$($LabRootFolder)\$($LabName)"In the next section, I’m storing the name of my virtual network switches. Default Switch is created when you enable Hyper-V on your computer. I created another switch called Internal Switch that my lab computers will connect to.
# =============================================================
# Lab Network Information (Created ahead of time.)
# =============================================================
$ExternalSwitch = "Default Switch"
$InternalSwitch = "Internal Switch"The next section contains variables that tell Hyper-V where my virtual machine templates are. The .vhdx extension notes we are looking at the virtual machine’s hard drive.
# =============================================================
# Template Information
# =============================================================
$DesktopTemplate = "H:\IT-Homelabs\Hyper-V\Templates\Windows-10-Client\Template - Windows 10.vhdx"
$ServerTemplate = "H:\IT-Homelabs\Hyper-V\Templates\Windows-Server-2022\Template - Windows Server 2022\Virtual Hard Disks\Template - Windows Server 2022.vhdx"The next section has a variable type we haven’t seen yet. The previous examples were String variables. You know they are string variables because the value is surrounded by double quotes.
$example = "My String"The next variable is called a String Array. You can think of it like a bucket that contains several Strings. In this case, I’m creating an array that contains my Virtual Machine names. Each string value is separated by a comma.
# =============================================================
# VM Information
# =============================================================
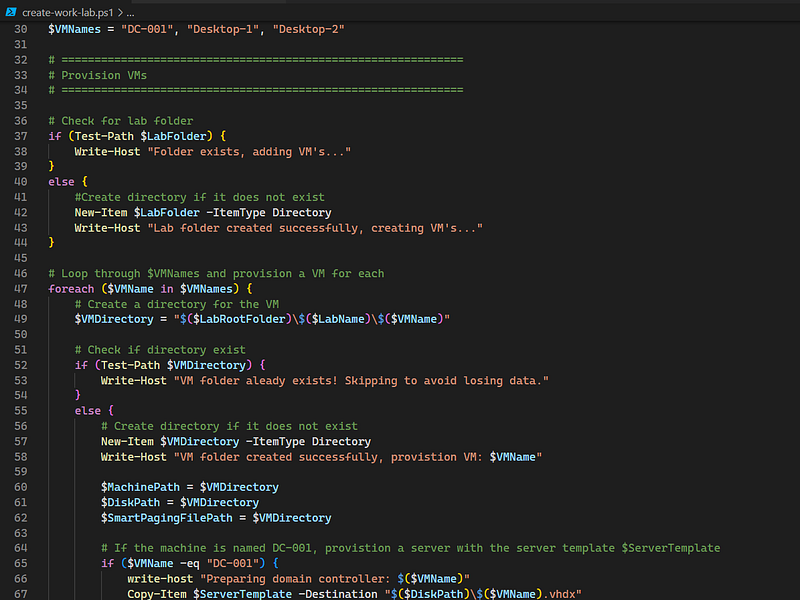
$VMNames = "DC-001", "Desktop-1", "Desktop-2"PowerShell If/Else Statements
Now the real fun beings! In the next section, the script checks if our lab folder exists. If it doesn’t, it creates it for us. This is done with an if/else statement.
if(condition is true) {
Do something.
} else {
Do something else.
}You’ll notice three special commands in this section of the script:
Write-Host — “Writes something to the console.”
Test-Path — “Test if a file or folder exists. If it does, it returns true. Otherwise, it returns false.
New-Item — “Creates something. In this case a folder/directory. This is noted by the -ItemType flag.
# Check for lab folder
if (Test-Path $LabFolder) {
Write-Host "Folder exists, adding VM's..."
}
else {
#Create directory if it does not exist
New-Item $LabFolder -ItemType Directory
Write-Host "Lab folder created successfully, creating VM's..."
}PowerShell ForEach Loop
In the next section, we are going to use a ForEach loop to go through each computer name in our $VMNames variable and do something with it.
# Example
foreach ($VMName in $VMNames) {
# Create a VM
}There is a lot going on in the loop. Let’s go through it a couple of sections at a time.
First, we want to create a folder for the virtual machine. We store the path to that folder in $VMDirectory
# Create a directory for the VM
$VMDirectory = "$($LabRootFolder)\$($LabName)\$($VMName)"Now we need to check if that folder already exists. Mistakes happen. So we want to make sure we are starting with an empty folder to avoid having issues. If the folder for that Virtual Machine name already exists, we don’t do anything and move on to the next VM name. If the folder doesn’t exist, then we continue to create the folder and begin provisioning the VM.
# Check if directory exists
if (Test-Path $VMDirectory) {
Write-Host "VM folder already exists! Skipping to avoid losing data."
}
else {
#Provision VM
}Let’s go over the section of code inside the else statement. First, we create the folder for the VM.
# Create a directory for the VM
New-Item $VMDirectory -ItemType Directory
Write-Host "VM folder created successfully, provistion VM: $VMName"Next, we set some variables we will use in other portions of the script. The VM needs to know where to store the virtual machine itself, where to store its virtual hard drive, and where to store its page file. We are going to store all those things in the folder we created for the VM, $VMDirectory.
$MachinePath = $VMDirectory
$DiskPath = $VMDirectory
$SmartPagingFilePath = $VMDirectoryThe next section is another if/else statement. I want to create a server named DC-001 and then two desktop clients called Desktop-1 and Desktop-2. The if/else statement is checking the name. If the current name it’s looping through is “DC-001” it will use the server template we created in the last article. If the name is anything else, it will use a desktop template. I created the desktop template the same way we created our server template. The only difference is the ISO file and OS I used.
Let’s go through the first part of the if statement. We are using a few different PowerShell commandlets.
Write-Host — “Write some text to the console.”
Copy-Item — “Copy an item from one location to another.
New-VM — “Provisions a new virtual machine in your Hyper-V environment.
Add-VMNetworkAdapter — “Add the machine to the network specified.”
Set-VMKeyProtector — “Configures a key protector for the virtual machine.”
Enable-VMTPM — “Enables a virtual TPM chip for the virtual machine.”
Set-VM — “Configures the virtual machine.”
Checkpoint-VM — “Creates a restore point for the virtual machine.”
(optional) Start-VM — “Powers on the virtual machine.”
write-host "Preparing domain controller: $($VMName)"
Copy-Item $ServerTemplate -Destination "$($DiskPath)\$($VMName).vhdx"
New-VM -Name $VMName -Path $MachinePath -Switch $InternalSwitch -Generation 2 -VHDPath "$($DiskPath)\$($VMName).vhdx" -MemoryStartupBytes 4GB | Out-Null
Add-VMNetworkAdapter -VMName $VMName -Switch $ExternalSwitch
Set-VMKeyProtector -VMName $VMName -NewLocalKeyProtector | Out-Null
Enable-VMTPM -VMName $VMName | Out-Null
Set-VM -Name $VMName -AutomaticCheckpointsEnabled $false -ProcessorCount 2 -SmartPagingFilePath $SmartPagingFilePath | Out-Null
Checkpoint-VM -Name $VMName -SnapshotName "OOBE" | Out-Null
#write-host "Starting "$VMName
#Start-VM -Name $vmname | Out-Null Let’s go over these lines in greater detail.
First, we copy the hard drive from our template machine and store it in the folder we created for our virtual machine. We name the copied file the name of the VM and add the “.vhdx” extension to it.
Copy-Item $ServerTemplate -Destination "$($DiskPath)\$($VMName).vhdx"Next, we create the new VM and set several properties.
- Name — The name of the virtual machine.
- Path — The folder we created for the virtual machine.
- Switch — The Internal Switch we created in the last article.
- Generation — We want to create a 2nd generation VM since we are using newer Operating Systems.
- VHDPath — The path to the hard drive we copied from our template.
- MemoryStartupBytes — The amount of Memory we want to assign to the machine.
What is the other section at the end of the line? “ | Out-Null” The | character is used to pipe the results of one command and send it to another. In this case Out-Null.
Out-Null — “Hides the output instead of sending it down the pipeline or displaying it.”
New-VM -Name $VMName -Path $MachinePath -Switch $InternalSwitch -Generation 2 -VHDPath "$($DiskPath)\$($VMName).vhdx" -MemoryStartupBytes 4GB | Out-NullFor my server, I want to add a second network connection so I can enable my private network to have access to the internet via my server. To do that we use the line below. We tell the Add-VMNetworkAdapter the name of the machine we want to add the network connection to and what switch we want it to connect to. In this case, $ExternalSwitch.
Add-VMNetworkAdapter -VMName $VMName -Switch $ExternalSwitchThen we create a key protector for our VM and add a virtual TPM chip.
Set-VMKeyProtector -VMName $VMName -NewLocalKeyProtector | Out-Null
Enable-VMTPM -VMName $VMName | Out-NullNext, we configure the new VM.
- Name — The name of the virtual machine.
- AutomaticCheckpointsEnabled — We disable automatic restore point creations by setting this to false.
- ProcessorCount — We give the machine two virtual CPUs also known as vCPUs.
- SmartPagingFilePath — We set the location for the VM’s page file.
Set-VM -Name $VMName -AutomaticCheckpointsEnabled $false -ProcessorCount 2 -SmartPagingFilePath $SmartPagingFilePath | Out-NullThen we create a restore point before we interact with the VM. This way we can roll back all our changes if we want to start over within the VM.
OOBE — “Out of Box Experience”
Checkpoint-VM -Name $VMName -SnapshotName "OOBE" | Out-NullOptionally we can start the VM after it has been created and configured with the line below. I have that line commented out so I can start them manually when I’m ready.
Start-VM -Name $vmname | Out-NullThe else part of the if/else statement does the same thing. The only difference is we copy a different template hard drive.
Copy-Item $DesktopTemplate -Destination "$($DiskPath)\$($VMName).vhdx"Finally, we show a table of all the VM’s we have with the line below.
# Show a list of VMs
Get-VM | Format-TableGet-VM — List all the VM’s in our Hyper-V environment.
Format-Table — Formats the output of another command into a table for easier reading.
This line is a good example of using the | character to tell PowerShell to take the results of Get-VM and send it as input to the Format-Table commandlet.
Here is the script in its entirety. The most up-to-date version will be in my GitHub Repo linked at the bottom of this article.
# =============================================================
# Script for provisioning Virtual Machines in Hyper-V via
# template VMs.
# =============================================================
# =============================================================
# Lab Information
# =============================================================

$LabRootFolder = "H:\IT-Homelabs\Hyper-V"
$LabName = "Work-Lab"
$LabFolder = "$($LabRootFolder)\$($LabName)"
# =============================================================
# Lab Network Information (Created ahead of time.)
# =============================================================
$ExternalSwitch = "Default Switch"
$InternalSwitch = "Internal Switch"
# =============================================================
# Template Information
# =============================================================
$DesktopTemplate = "H:\IT-Homelabs\Hyper-V\Templates\Windows-10-Client\Template - Windows 10.vhdx"
$ServerTemplate = "H:\IT-Homelabs\Hyper-V\Templates\Windows-Server-2022\Template - Windows Server 2022\Virtual Hard Disks\Template - Windows Server 2022.vhdx"
# =============================================================
# VM Information
# =============================================================

$VMNames = "DC-001", "Desktop-1", "Desktop-2"
# =============================================================
# Provision VMs
# =============================================================
# Check for lab folder
if (Test-Path $LabFolder) {
    Write-Host "Folder exists, adding VM's..."
}
else {
    #Create directory if it does not exist
    New-Item $LabFolder -ItemType Directory
    Write-Host "Lab folder created successfully, creating VM's..."
}
# Loop through $VMNames and provision a VM for each
foreach ($VMName in $VMNames) {
# Create a directory for the VM
$VMDirectory = "$($LabRootFolder)\$($LabName)\$($VMName)"
# Check if directory exists
if (Test-Path $VMDirectory) {
Write-Host "VM folder already exists! Skipping to avoid losing data."
}
else {
# Create a directory for the VM
New-Item $VMDirectory -ItemType Directory
Write-Host "VM folder created successfully, provistion VM: $VMName"
$MachinePath = $VMDirectory
$DiskPath = $VMDirectory
$SmartPagingFilePath = $VMDirectory
# If the machine is named DC-001, provistion a server with the server template $ServerTemplate
if ($VMName -eq "DC-001") {
write-host "Preparing domain controller: $($VMName)"
Copy-Item $ServerTemplate -Destination "$($DiskPath)\$($VMName).vhdx"
New-VM -Name $VMName -Path $MachinePath -Switch $InternalSwitch -Generation 2 -VHDPath "$($DiskPath)\$($VMName).vhdx" -MemoryStartupBytes 4GB | Out-Null
Add-VMNetworkAdapter -VMName $VMName -Switch $ExternalSwitch
Set-VMKeyProtector -VMName $VMName -NewLocalKeyProtector | Out-Null
Enable-VMTPM -VMName $VMName | Out-Null
Set-VM -Name $VMName -AutomaticCheckpointsEnabled $false -ProcessorCount 2 -SmartPagingFilePath $SmartPagingFilePath | Out-Null
Checkpoint-VM -Name $VMName -SnapshotName "OOBE" | Out-Null
#write-host "Starting  "$VMName
#Start-VM -Name $vmname | Out-Null
}
else {
# Otherwise, provision a desktop with the desktop client template $DesktopTemplate
write-host "Preparing "$VMName
Copy-Item $DesktopTemplate -Destination "$($DiskPath)\$($VMName).vhdx"
New-VM -Name $VMName -Path $MachinePath -Switch $InternalSwitch -Generation 2 -VHDPath "$($DiskPath)\$($VMName).vhdx" -MemoryStartupBytes 4GB | Out-Null
Set-VMKeyProtector -VMName $VMName -NewLocalKeyProtector | Out-Null
Enable-VMTPM -VMName $VMName | Out-Null
Set-VM -Name $VMName -AutomaticCheckpointsEnabled $false -ProcessorCount 2 -SmartPagingFilePath $SmartPagingFilePath | Out-Null
Checkpoint-VM -Name $VMName -SnapshotName "OOBE" | Out-Null
#write-host "Starting "$VMName
#Start-VM -Name $vmname | Out-Null
}
}
}
# Show a list of VMs
Get-VM | Format-TableGitHub Link: IT-Homelabs/create-work-lab.ps1 · jsingram/IT-Homelabs (github.com)
There you have it! In the next article, I’ll describe how to set up an environment in Proxmox. Thank you for reading!


