
Setting Up an IT Homelab Environment | Hyper-V

The first way of creating an IT Homelab I’m going to go over involves a technology you may already have if you’re running a Windows machine. Microsoft Hyper-V lets you run multiple operating systems as virtual machines on Windows. You can use it to run software that runs on an older OS or a different OS than your Windows Host OS. You can use it to learn a new operating system without erasing the one you are currently using. If you are a software developer, you can use it to test your software in different environments.
System Requirements
Hyper-V is only available on 64-bit editions of Windows. Specifically, Windows 10/11 Pro, Enterprise, and Education.
How Do I Enable Hyper-V?
Make Sure Hardware Virtualization Is Enabled
Before you can use Hyper-V, you must enable hardware virtualization in your system BIOS menu. Every device manufacturer has its own unique BIOS menu. I would recommend searching for “How to enable Hardware Virtualization on
On Windows 10 and Windows 11
To enable Hyper-V with PowerShell, open a PowerShell console as an administrator and run the following:
Enable-WindowsOptionalFeature -Online -FeatureName Microsoft-Hyper-V -All
Then reboot your system.
How Do I Disable Hyper-V?
To disable Hyper-V with PowerShell, open a PowerShell console as an administrator and run the following:
Disable-WindowsOptionalFeature -Online -FeatureName Microsoft-Hyper-V -All
How Do I Open Hyper-V?
To open Hyper-V, search for Hyper-V in your Start Menu and look for “Hyper-V Manager”. Right-click the application and select “Run as administrator”.
Alternatively, you can open a command prompt or PowerShell window as an administrator and run the following command.
virtmgmt.msc
If you see the screen below, you’re good to go!

Configure Our Lab Network
Now that we have Hyper-V up and running. We need to create a virtual network our lab machines will connect to.
Step 1 — Create A New Virtual Network
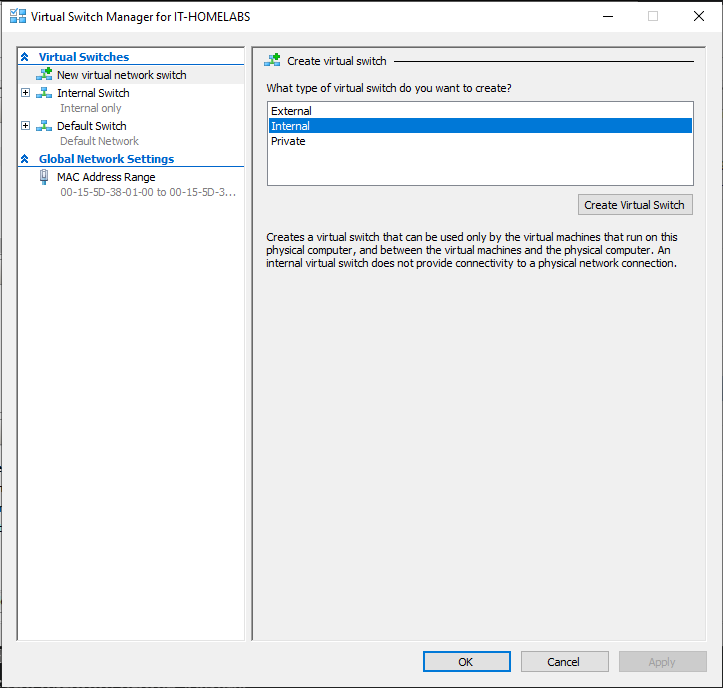
With Hyper-V Manager open, click on Virtual Switch Manager on the right side of the window under Actions.
You should see the screen below. Make sure Internal is selected and click the Create Virtual Switch button.
Step 2— Creating an Isolated Virtual Network
We want to create an isolated network for our lab machines to connect to. You can learn more about the different switch types from the article below.
Expand your knowledge of Hyper-V virtual switch types | TechTarget
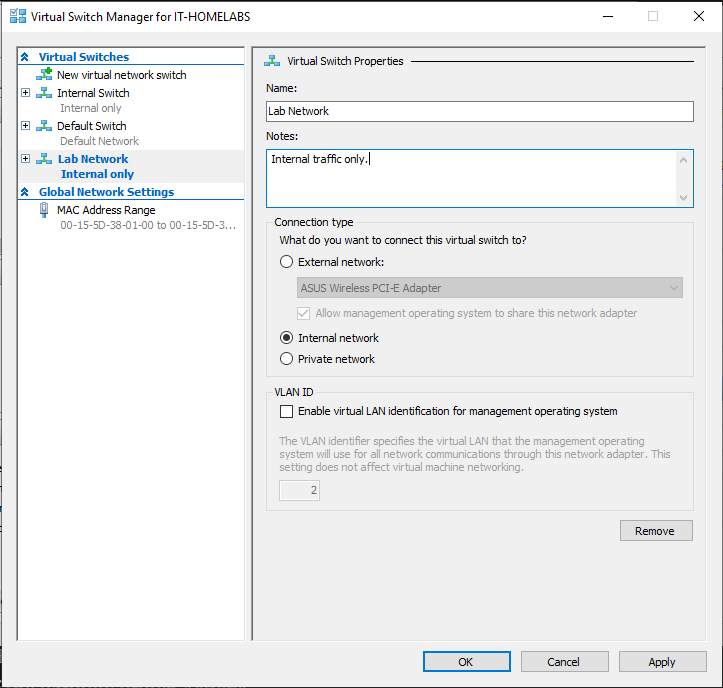
On the left, you will see the Virtual Switches you already have. On the right, we can configure the settings for our new switch.
I’m naming mine Lab Network and I added a brief description in the Notes field. Once you’ve decided on a name for your switch, make sure the Internal network option is selected under Connection type, and then click Apply and OK.
In the next article, we’ll go over how to create a virtual machine template in Hyper-V. See you there!


