
AWS- Provision Amazon EKS Cluster Using Terraform Modules
Exploring the features and benefits provided by Amazon EKS.
Amazon Elastic Kubernetes Service (EKS) is a managed service that makes it easy to run Kubernetes on AWS. With EKS, you can focus on building and running your applications, while AWS takes care of managing the Kubernetes control plane, worker nodes, and cluster resources.
EKS offers a number of features that make it a good choice for running Kubernetes applications, including:
- High availability: EKS clusters are highly available, with the control plane running across multiple Availability Zones.
- Scalability: EKS clusters can be scaled up or down to meet demand.
- Security: EKS clusters are secure by default, with features such as Role-Based Access Control (RBAC) and encryption at rest.
- Managed Services: EKS integrates with other AWS services, such as Amazon CloudWatch, Amazon Elastic Load Balancing, and Amazon Route 53.
If you are looking for a managed Kubernetes service, EKS is a good option. It is easy to use, scalable, and secure.
Here are some of the benefits of using EKS:
- Reduced operational overhead: EKS takes care of managing the Kubernetes control plane, worker nodes, and cluster resources. This frees you up to focus on building and running your applications.
- Increased reliability: EKS clusters are highly available, with the control plane running across multiple Availability Zones. This means that your applications will be available even if one Availability Zone fails.
- Improved security: EKS clusters are secure by default, with features such as Role-Based Access Control (RBAC) and encryption at rest. This helps to protect your applications from unauthorized access and data breaches.
- Cost savings: EKS is a pay-as-you-go service, so you only pay for the resources that you use. This can help you to save money on your Kubernetes deployments.
If you are considering using EKS, here are some of the things that you should keep in mind:
- EKS is a managed service: This means that you do not have control over the underlying infrastructure. If you need to customize the underlying infrastructure, you may want to consider using a self-managed Kubernetes solution.
- EKS is not free: You will need to pay for the resources that you use. However, the cost of EKS is typically lower than the cost of running a self-managed Kubernetes cluster.
- EKS is still under development: EKS is a relatively new service, so it is still under development. There may be some features that are not yet available or that are not yet fully supported.
Prerequisite
- AWS Account: You should have an active AWS account with the necessary permissions to create and manage resources.
- Terraform: Terraform is an infrastructure provisioning tool that you’ll need to install on your local machine.
NOTE:
Before using the AWS provider, you must configure it with the appropriate credentials. There are several common authentication methods available:
- AWS shared credentials/configuration files: You can specify AWS credentials in a shared credentials file (
~/.aws/credentials) or an AWS configuration file (~/.aws/config). - Environment variables: Another option is to set the AWS access key ID and secret access key as environment variables (
AWS_ACCESS_KEY_IDandAWS_SECRET_ACCESS_KEY). - Static credentials: You can directly set the AWS access key ID and secret access key in the provider configuration within your Terraform code.
- EC2 instance metadata: If you are running Terraform on an EC2 instance with an IAM role assigned, the AWS provider can automatically use the IAM role’s credentials by leveraging the EC2 instance metadata service.
Below are the steps for the Provision of the Amazon EKS Cluster using Terraform:
1. Provider: The provider is responsible for authenticating and establishing a connection with your AWS account. Begin by configuring the AWS provider to authenticate with your AWS account and give it a name provider.tf.
terraform {
  required_providers {
    aws = {
      source  = "hashicorp/aws"
      version = ">= 5.5.0"
    }
    helm = {
      source  = "hashicorp/helm"
      version = ">= 2.6.0"
    }
    kubectl = {
      source  = "gavinbunney/kubectl"
      version = ">= 1.7.0"
    }
  }
  required_version = ">= 0.13"
}


provider "aws" {
  region = var.region
  #   access_key = var.aws_access_key
  #   secret_key = var.aws_secret_key
}
2. Network Infrastructure Setup: Define the Virtual Private Cloud (VPC) resources required for the EKS cluster. VPC with the specified CIDR block and a subnet within that VPC will be created. Let’s name it vpc.tf.
Module- terraform-aws-module/vpc
module "vpc" {
  source  = "terraform-aws-modules/vpc/aws"
  version = "5.0.0"

  name = var.vpc_name
  cidr = "10.0.0.0/16"

  azs             = var.azs
  private_subnets = var.private_subnets
  public_subnets  = var.public_subnets

  enable_nat_gateway     = var.enable_nat_gateway
  enable_vpn_gateway     = var.enable_vpn_gateway
  one_nat_gateway_per_az = var.one_nat_gateway_per_az

  enable_dns_hostnames = var.enable_dns_hostnames
  enable_dns_support   = var.enable_dns_support

  tags = var.vpc_tags
  public_subnet_tags = {
    Name                                        = "Public Subnets"
    "kubernetes.io/role/elb"                    = 1
    "kubernetes.io/cluster/${var.cluster_name}" = "shared"
  }
  private_subnet_tags = {
    Name                                        = "private-subnets"
    "kubernetes.io/role/internal-elb"           = 1
    "kubernetes.io/cluster/${var.cluster_name}" = "shared"
  }
}
Deploying Kubernetes workers in the private subnets with a default route to NAT Gateway. To expose the application to the Internet, you would need public subnets with a default route to the Internet Gateway.
3. EKS Cluster Setup: EKS module in charge of Creating the control plane, and instance groups ( EKS-managed nodes, self-managed groups, Fargate profile). Let’s name it eks.tf.
module "eks" {
  source  = "terraform-aws-modules/eks/aws"
  version = "~> 19.0"

  cluster_name    = var.cluster_name
  cluster_version = "1.27"

  cluster_endpoint_private_access = var.cluster_endpoint_private_access
  cluster_endpoint_public_access  = var.cluster_endpoint_public_access

  vpc_id     = module.vpc.vpc_id
  subnet_ids = module.vpc.private_subnets

  enable_irsa = var.enable_irsa


  cluster_addons = {
    coredns = {
      most_recent = true
    }
    kube-proxy = {
      most_recent = true
    }
    vpc-cni = {
      most_recent = true
    }
  }

  eks_managed_node_group_defaults = {
    disk_size = 30
  }

  eks_managed_node_groups = {
    general = {
      desired_size = 1
      min_size     = 1
      max_size     = 10

      labels = {
        role = "general"
      }

      instance_types = ["t3.micro"]
      capacity_type  = "ON_DEMAND"
    }

    spot = {
      desired_size = 1
      min_size     = 1
      max_size     = 10

      labels = {
        role = "dev"
      }

      #   taints = [{
      #     key    = "dedicated"
      #     value  = "spot"
      #     effect = "NO_SCHEDULE"
      #   }]
      taints = {
        dedicated = {
          key    = "dedicated"
          value  = "spot"
          effect = "NO_SCHEDULE"
        }
      }
      instance_types = ["t3.micro"]
      capacity_type  = "SPOT"
    }
  }
  # manage_aws_auth_configmap = true
  # aws_auth_roles = [
  #   {
  #     rolearn  = module.eks_terraform_admin_iam_assumable_role.iam_role_arn
  #     username = module.eks_terraform_admin_iam_assumable_role.iam_role_name
  #     groups   = ["system:masters"]
  #   },
  # ]

  tags = var.eks_tags
}


# data "aws_eks_cluster" "cluster" {
#   name = module.eks.cluster_name
# }

# data "aws_eks_cluster_auth" "cluster" {
#   name = module.eks.cluster_name
# }

# provider "kubernetes" {
#   host                   = data.aws_eks_cluster.cluster.endpoint
#   cluster_ca_certificate = base64decode(data.aws_eks_cluster.cluster.certificate_authority.0.data)
#   token                  = data.aws_eks_cluster_auth.cluster.token
#   exec {
#     api_version = "client.authentication.k8s.io/v1beta1"
#     args        = ["eks", "get-token", "--cluster-name", data.aws_eks_cluster.cluster.id]
#     command     = "aws"
#   }
# }
4. Terraform Variables: Define Terraform variables for AWS resources. Name it variables.tf.
#### provider Variables defined #######
variable "region" {
  type        = string
  description = "Name of the region to select"
  default     = "eu-west-2"
}

##### VPC Variables defined #######

variable "vpc_name" {
  type        = string
  description = "Name to be used on all the resources as identifier"
}
variable "public_subnets" {
  type        = list(string)
  description = "A list of public subnets inside the VPC"
  default     = ["10.0.101.0/24", "10.0.102.0/24", "10.0.103.0/24"]
}
variable "private_subnets" {
  type        = list(string)
  description = "A list of private subnets inside the VPC"
  default     = ["10.0.1.0/24", "10.0.2.0/24", "10.0.3.0/24"]
}

variable "azs" {
  type        = list(string)
  description = "A list of availability zones specified as argument to this module"
  default     = ["eu-west-2a", "eu-west-2b", "eu-west-2c"]
}
variable "enable_nat_gateway" {
  type        = bool
  description = "Should be true if you want to provision NAT Gateways for each of your private networks"
  default     = "false"
}
variable "enable_vpn_gateway" {
  type        = bool
  description = "Should be true if you want to create a new VPN Gateway resource and attach it to the VPC"
  default     = "false"
}

variable "one_nat_gateway_per_az" {
  type        = bool
  description = "Should be true if you want only one NAT Gateway per availability zone"
  default     = "false"
}
variable "enable_dns_hostnames" {
  type        = bool
  description = "Should be true to enable DNS hostnames in the VPC"
  default     = "true"
}
variable "enable_dns_support" {
  type        = bool
  description = "Should be true to enable DNS support in the VPC"
  default     = "true"
}
variable "vpc_tags" {
  type = map(string)
  default = {
    Terraform   = "true"
    Environment = "dev"
  }
}


##### EkS Cluster Variables defined #######
variable "cluster_name" {
  type        = string
  description = "Name of the EKS cluster"
}

variable "cluster_endpoint_private_access" {
  type        = bool
  description = "Indicates whether or not the Amazon EKS private API server endpoint is enabled"
  default     = "true"
}
variable "cluster_endpoint_public_access" {
  type        = bool
  description = "Indicates whether or not the Amazon EKS public API server endpoint is enabled"
  default     = "false"
}
variable "enable_irsa" {
  type        = bool
  description = "Determines whether to create an OpenID Connect Provider for EKS to enable IRSA"
  default     = "true"
}
variable "eks_tags" {
  type = map(string)
  default = {
    Environment = "dev"
  }
}
5. terraform.tfvars: To define input variables and their values for vpc and cluster. Name as terraform.tfvars.
#### VPC ###
vpc_name = "eks-terraform-vpc"
enable_nat_gateway = true
enable_vpn_gateway = true


### Cluster ##
cluster_name = "eks-terraform-project"
cluster_endpoint_private_access = true
cluster_endpoint_public_access  = true
6. Output.tf: To define outputs that can be retrieved after applying your Terraform configuration. Name as output.tf.
################################################################################
# VPC
################################################################################

output "vpc_id" {
  value       = module.vpc.vpc_id
  description = "VPC ID"
}
output "public_subnets" {
  value       = module.vpc.public_subnets
  description = "VPC public subnets' IDs list"
}
output "private_subnets" {
  value       = module.vpc.private_subnets
  description = "VPC private subnets' IDs list"
}

################################################################################
# Cluster
################################################################################
output "cluster_arn" {
  description = "The Amazon Resource Name (ARN) of the cluster"
  value       = module.eks.cluster_arn
}
output "cluster_certificate_authority_data" {
  description = "Base64 encoded certificate data required to communicate with the cluster"
  value       = module.eks.cluster_certificate_authority_data
}

output "cluster_endpoint" {
  description = "Endpoint for your Kubernetes API server"
  value       = module.eks.cluster_endpoint
}

output "cluster_name" {
  description = "The name of the EKS cluster"
  value       = module.eks.cluster_name
}

output "cluster_oidc_issuer_url" {
  description = "The URL on the EKS cluster for the OpenID Connect identity provider"
  value       = module.eks.cluster_oidc_issuer_url
}

output "cluster_platform_version" {
  description = "Platform version for the cluster"
  value       = module.eks.cluster_platform_version
}

output "cluster_status" {
  description = "Status of the EKS cluster. One of `CREATING`, `ACTIVE`, `DELETING`, `FAILED`"
  value       = module.eks.cluster_status
}

output "cluster_security_group_id" {
  description = "Cluster security group that was created by Amazon EKS for the cluster. Managed node groups use this security group for control-plane-to-data-plane communication. Referred to as 'Cluster security group' in the EKS console"
  value       = module.eks.cluster_security_group_id
}

################################################################################
# IRSA
################################################################################

output "oidc_provider" {
  description = "The OpenID Connect identity provider (issuer URL without leading `https://`)"
  value       = module.eks.oidc_provider
}

output "oidc_provider_arn" {
  description = "The ARN of the OIDC Provider if `enable_irsa = true`"
  value       = module.eks.oidc_provider_arn
}

output "cluster_tls_certificate_sha1_fingerprint" {
  description = "The SHA1 fingerprint of the public key of the cluster's certificate"
  value       = module.eks.cluster_tls_certificate_sha1_fingerprint
}
let’s go to the terminal and run Terraform. Initialize first and then apply.
$ terraform init
$ terraform apply -auto-approve
Before connecting to the cluster, update the Kubernetes context.
$ aws eks update-kubeconfig --name eks-terraform-project --region eu-west-2
Updated context arn:aws:eks:eu-west-2:<ACCOUNT_NUMBER>:cluster/eks-terraform-project in /Users/.kube/config
a quick check to verify access to EKS.
$ kubectl get nodes
NAME                                       STATUS   ROLES    AGE     VERSION
ip-10-0-1-38.eu-west-2.compute.internal    Ready    <none>   7m6s    v1.27.1-eks-2f008fe
ip-10-0-2-110.eu-west-2.compute.internal   Ready    <none>   7m16s   v1.27.1-eks-2f008fe
Optional:
You can use the eks-kubeconfig module to generate a kubeconfig file Name as eks-auth.tf.:
module "eks-kubeconfig" {
  source     = "hyperbadger/eks-kubeconfig/aws"
  version    = "1.0.0"

  depends_on = [module.eks]
  cluster_id =  module.eks.cluster_name
  }

resource "local_file" "kubeconfig" {
  content  = module.eks-kubeconfig.kubeconfig
  filename = "kubeconfig-${var.cluster_name}"
}
$ KUBECONFIG=./kubeconfig-eks-terraform-project kubectl get nodes
NAME STATUS ROLES AGE VERSION
ip-10-0-1-226.eu-west-2.compute.internal Ready <none> 3m4s v1.27.1-eks-2f008fe
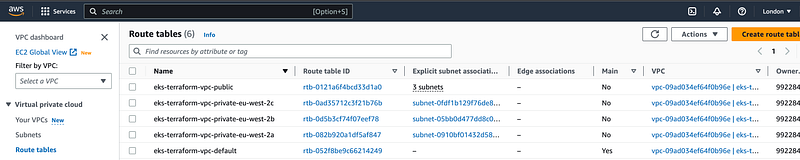
ip-10-0-1-95.eu-west-2.compute.internal Ready <none> 2m53s v1.27.1-eks-2f008feVPC Components:

- route table:
- nat-gateway:

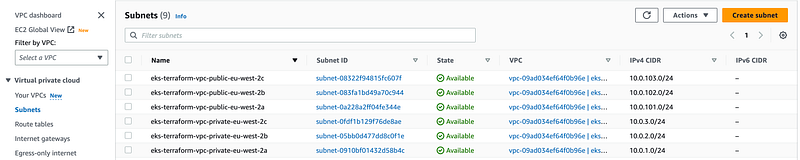
- subnets:
- internet-gateway:

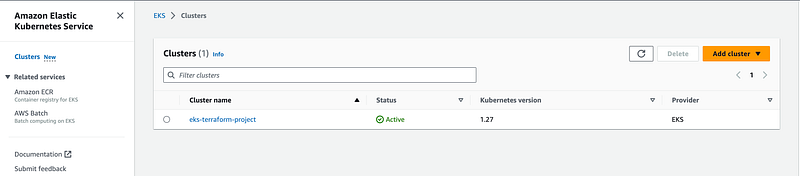
EKS Components:
- eks cluster:
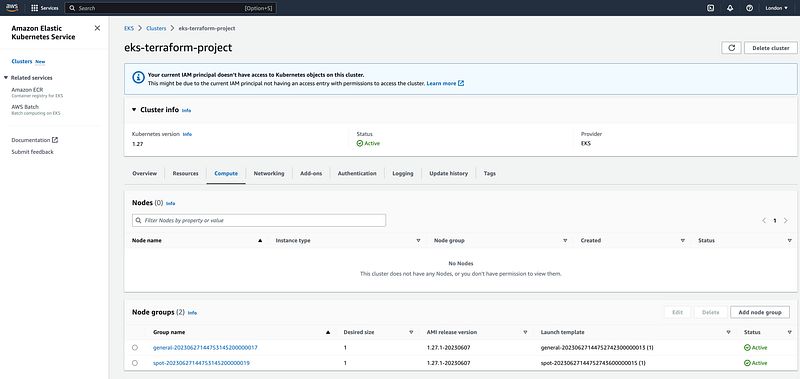
- ec-2 instances:

7. Setting up the IAM Roles and Policies for EKS: To grant access to Kubernetes workloads to others IAM users and IAM roles.
The Terraform module used for EKS can handle permissions for you. You can either directly add IAM users to the eks configmap or grant access to an IAM role through the aws-auth configmap, which is the preferred approach for managing access outside of EKS.
Access to the EKS cluster is managed using the aws-auth ConfigMap, which is located in the kube-system namespace of the Kubernetes cluster.
let’s create an IAM role with the necessary permissions and allow the IAM user to assume that role.
##Create the "allow-eks-terraform-admin" IAM policy with the "eks:DescribeCluster" action is to grant the necessary permissions for managing an Amazon EKS cluster##

module "iam_policy_eks_admin_access" {
  source        = "terraform-aws-modules/iam/aws//modules/iam-policy"
  version       = "5.22.0"
  name          = "allow-eks-terraform-admin"
  create_policy = true
  policy = jsonencode({
    Version = "2012-10-17"
    Statement = [
      {
        Action = [
          "eks:DescribeCluster",
        ]
        Effect   = "Allow"
        Resource = "*"
      },
    ]
  })
}

#### Creating an IAM role called "eks-terraform-admin" and associating it with the Kubernetes 'system:masters' Role-Based Access Control (RBAC) group. ####

module "eks_terraform_admin_iam_assumable_role" {
  source                  = "terraform-aws-modules/iam/aws//modules/iam-assumable-role"
  version                 = "5.22.0"
  role_name               = "eks-terraform-admin"
  create_role             = true
  role_requires_mfa       = false
  custom_role_policy_arns = [module.iam_policy_eks_admin_access.arn]
  trusted_role_arns = [
    "arn:aws:iam::${module.vpc.vpc_owner_id}:root"
  ]
}

### IAM role is ready, create a user IAM user (eks-terraform-user) that gets access to that role ###

module "iam_eks_terraform_user" {
  source                        = "terraform-aws-modules/iam/aws//modules/iam-user"
  version                       = "5.22.0"
  name                          = "eks-terraform-user"
  create_iam_access_key         = false
  create_iam_user_login_profile = false
  force_destroy                 = true
}

##### IAM policy to allow assume eks-terraform-admin IAM role ###

module "iam_policy_assume_eks_admin_access" {
  source  = "terraform-aws-modules/iam/aws//modules/iam-policy"
  version = "5.22.0"

  name          = "allow-assume-role-eks-terraform-admin"
  create_policy = true

  policy = jsonencode({
    Version = "2012-10-17"
    Statement = [
      {
        Action = [
          "sts:AssumeRole",
        ]
        Effect   = "Allow"
        Resource = module.eks_terraform_admin_iam_assumable_role.iam_role_arn
      },
    ]
  })
}

#####Create an IAM group with the previously defined policy and add a user (eks-terraform-user) to this group

module "eks_admins_iam_group" {
  source                            = "terraform-aws-modules/iam/aws//modules/iam-group-with-policies"
  version                           = "5.22.0"
  name                              = "eks-terraform-admin"
  attach_iam_self_management_policy = false
  create_group                      = true
  group_users                       = [module.iam_eks_terraform_user.iam_user_name]
  custom_group_policy_arns          = [module.iam_policy_assume_eks_admin_access.arn]
}
7.1 AWS_AUTH: Add IAM role to EKS cluster, and update the aws-auth configmap in eks.tf. (uncomment the line from eks.tf)
---
  manage_aws_auth_configmap = true
  aws_auth_roles = [
    {
      rolearn  = module.eks_terraform_admin_iam_assumable_role.iam_role_arn
      username = module.eks_terraform_admin_iam_assumable_role.iam_role_name
      groups   = ["system:masters"]
    },
  ]

----
----

data "aws_eks_cluster" "cluster" {
  name = module.eks.cluster_name
}

data "aws_eks_cluster_auth" "cluster" {
  name = module.eks.cluster_name
}

provider "kubernetes" {
  host                   = data.aws_eks_cluster.cluster.endpoint
  cluster_ca_certificate = base64decode(data.aws_eks_cluster.cluster.certificate_authority.0.data)
  token                  = data.aws_eks_cluster_auth.cluster.token
  exec {
    api_version = "client.authentication.k8s.io/v1beta1"
    args        = ["eks", "get-token", "--cluster-name", data.aws_eks_cluster.cluster.id]
    command     = "aws"
  }
}
---
NOTE:
By mapping the eks-terraform-admin role with the Kubernetes system:masters RBAC group, we have granted the eks-terraform-admin role full access to the Kubernetes API. This means that any user or entity assigned to the eks-terraform-admin the role will have privileged permissions and can perform any action within the Kubernetes cluster, including managing resources, creating or deleting objects, and modifying configurations.
Let’s go ahead and apply Terraform to create all IAM entities.
$ terraform init
$ terraform apply -auto-approve
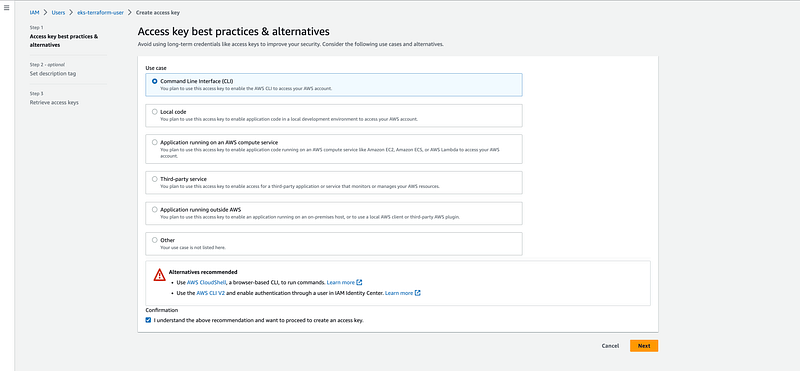
7.2 AWS PROFILE: Before creating an AWS profile, generate new credentials for user “eks-terraform-user”. IAM > USERS > eks-terraform-user > Security Credentials

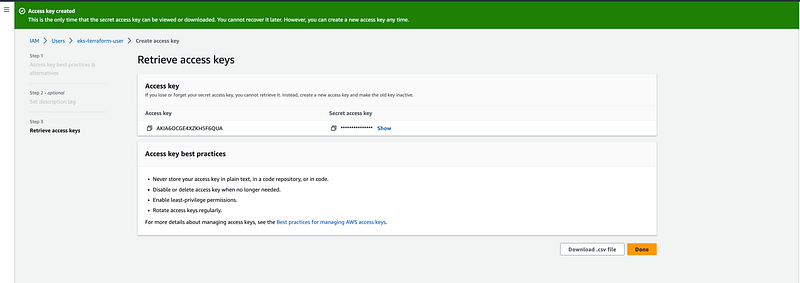
Now, create an AWS profile for users eks-terraform-user local and verify access to AWS services with that profile.
$ aws configure --profile eks-terraform-user
$ aws sts get-caller-identity --profile eks-terraform-user
In order to allow eks-terraform-user us to assume the eks-terraform-admin IAM role, you need to create another AWS profile in your AWS configuration with the same role name. This profile should include the role_arn parameter, which should be replaced with the actual ARN of the eks-terraform-admin IAM role in your AWS account.
$ vim ~/.aws/config

[profile eks-admin]
role_arn = <REPLACE_ARN_OF_EKS_TERRAFORM_ADMIN>
source_profile = eks-terraform-user
$ aws sts get-caller-identity --profile eks-terraform-adminUpdate Kubernetes config to use the eks-terraform-admin IAM role.
$ aws eks update-kubeconfig \
   --name eks-terraform-project \
   --region eu-west-2 \
   --profile eks-terraform-admin
quick check to verify access to EKS.
$ kubectl auth can-i "*" "*"
$ kubectl get nodes
NAME                                       STATUS   ROLES    AGE     VERSION
ip-10-0-1-38.eu-west-2.compute.internal    Ready    <none>   7m6s    v1.27.1-eks-2f008fe
ip-10-0-2-110.eu-west-2.compute.internal   Ready    <none>   7m16s   v1.27.1-eks-2f008fe
NOTE:
If you want to provide read-only access to the cluster (developers), create a custom Kubernetes RBAC group specifically for this purpose. Then, you can map the IAM role to this RBAC group. By doing so, you can assign the appropriate permissions to the RBAC group, allowing members of that group to have read-only access to the Kubernetes cluster. This approach allows you to finely control access levels and provide specific privileges based on the requirements of your developers, ensuring they have the necessary access without granting unnecessary permissions.
8. Destroy: To destroy Terraform-provisioned infrastructure.
$ terraform destroy --auto-approveNote: Will Deploy Cluster Autoscaler In Upcoming Topics.
I trust that you have found this user-friendly.
Please share your thoughts and experiences after following the steps outlined. Your feedback is valuable and helps us improve the quality.
Topics:
Do not forget the 👏✌️❤️ if you like this content! Also, I will be glad if you hit the follow button so you get notified of my new posts. You can also follow me on Linkedin! Thank you!


