
(Part 2) A Step-by-Step Guide to Creating a Smart Study Buddy using OpenAI, LangChain, and Streamlit
What you’ll be building
Have you ever wanted to create an application similar to ChatGPT but felt it was too difficult? Don’t worry, because this tutorial will show you how to do it easily, even with just basic Python knowledge!
Part 1: A Step-by-Step Guide to Creating a Smart Study Buddy using OpenAI, LangChain, and Streamlit (Part 1)
We’ll be building a Smart Study Buddy application using the power of OpenAI’s GPT, harnessed through a user-friendly Python Framework called LangChain. With this Smart Study Buddy, you’ll be able to input your study material and get practice questions and answers as output, all thanks to the advanced AI capabilities of GPT.
If you missed Part 1 of this tutorial, no problem! While it’s beneficial to follow Part 1 for more in-depth insights into LangChain functions, this tutorial will mainly focus on the Streamlit implementation. So, let’s get started and build your very own Smart Study Buddy!
GitHub Repo:
The full code can also be found at the end of this article.
What You’ll Learn
Throughout this tutorial, we will briefly explore LangChain’s functions for smooth integration of large language models into your application. Additionally, we will dive deeper into using Streamlit to create a user-friendly front end for your AI-powered application.
By the end of this tutorial, you’ll have a comprehensive understanding of how to leverage LangChain and Streamlit to build powerful and interactive AI applications with ease.
LangChain (Same as Part 1)
- PDF Loader: We’ll explore how to load study material from PDFs and make it accessible for AI processing.
- Text splitters: You’ll discover how to split text into smaller chunks to efficiently work with large language models.
- Vector Database: Learn to use vector databases, like Chroma, for efficient text retrieval and question answering.
- RetrievalQA Chain: Uncover the magic of the Retrieval Question Answer Chain, which leverages vector databases for answering questions.
- Summarization Chain: Dive into the power of the Summarization Chain, perfect for generating practice questions from study material.
- Bonus: Tracking with LangSmith: Get a glimpse of the LangSmith tool for insightful model performance tracking and analysis.
Streamlit
In this part, we will focus on essential Streamlit functionalities to create a seamless user interface for your AI-powered application:
- Using a File Uploader: Learn how to enable users to upload files, such as study materials, to your application.
- Getting User Input: Explore methods to gather input from users to customize their interactions with the AI application.
- Session States: Discover how to maintain and share variables across user interactions to ensure a smooth and personalized experience.
- Using a Form: Dive into using forms to group and organize user inputs, making interactions more intuitive and structured.
Tutorial Structure:
This tutorial consists of two parts, each building upon the other to create a Smart Study Buddy:
Part 1: Constructing the LangChain Implementation
In this initial segment, we explored the world of LangChain and laid the foundation for our Smart Study Buddy.
Link to Part 1: A Step-by-Step Guide to Creating a Smart Study Buddy using OpenAI, LangChain, and Streamlit (Part 1)
Part 2: Building a Clean Front-End with Streamlit
In the second part, we’ll take the Smart Study Buddy to the next level by implementing a user-friendly front-end with Streamlit. You’ll witness the power of AI come to life as we make the application visually appealing and easy to use.
Let’s get started!

What Is Streamlit?
Streamlit is a user-friendly app framework designed for Python developers, especially those working with data science and machine learning projects. It simplifies the process of creating web applications by providing an intuitive interface.
Key features of Streamlit include:
- Rapid Web App Creation: With Streamlit, developers can quickly turn their Python scripts into fully-functional web apps. This means they can showcase their AI projects and share insights with a broader audience without having to be web development experts.
- Seamless Python Library Integration: Streamlit is compatible with major Python libraries commonly used in data science and machine learning. This makes it a powerful tool for building interactive data-driven applications.
- Built-in Git Integration: One of the standout features of Streamlit is its automatic integration with Git repositories. When connected to a Git repository, Streamlit continuously monitors for updates. Any changes made to the repository will trigger the automatic deployment of the application. This convenient feature simplifies sharing and deploying applications with others.
Streamlit is a fantastic resource for Python developers in the data science and machine learning domains. It empowers them to create interactive web applications and easily present their AI projects and findings to a wider audience, even if they have limited web development knowledge.
What Is LangChain?
LangChain is a framework that helps developers integrate artificial intelligence (AI) into their applications, even if they don’t have extensive coding knowledge. It simplifies the process of working with language models, which are AI systems capable of understanding and generating human-like language.
The main benefits of using LangChain are:
- Components: These are pre-built building blocks that handle the complexities of working with language models. They are designed to be easy to use and can be used independently or together with other LangChain features.
- Off-the-shelf chains: LangChain offers ready-made combinations of components called “chains” that solve specific tasks. These pre-arranged chains make it simple for developers to get started quickly without having to build everything from scratch.
Whether you need basic language model integration or want to create advanced and customized AI applications, LangChain provides the tools to make the process straightforward and efficient. It’s a great resource for anyone interested in harnessing the power of language models in their projects.
LangChain Functions
In this section, we’ll be utilizing LangChain to create essential functions for working with Large Language Models. I’ll provide the implementations of each function along with brief explanations. For a more comprehensive understanding of the inner workings, please refer to Part 1 of the tutorial.
The five functions we’ll create are:
- load_data: This function allows us to extract text from a PDF file, making it accessible for further AI processing.
- split_text: Here, we split the extracted text into smaller documents, enabling efficient handling of large language models.
- initialize_llm: This function is responsible for initializing the Large Language Model (LLM) so that we can work with it effectively.
- generate_questions: Using a LangChain Summarization Chain, this function generates questions based on study material, facilitating interactive learning.
- create_retrieval_qa_chain: Finally, we create a retrieval chain, which serves as a powerful tool to answer a list of questions using vector databases and advanced AI capabilities
Step 0: Prerequisites
Before we start creating our application, we need to install the necessary dependencies for this project.
Do this by running the following command in your terminal:
pip install langchain tiktoken openai pypdf2 chromadb streamlit
For this project, we’ll be using OpenAI’s Large Language Model. In order for you to use this model, you’ll need an OpenAI API Key.
If you don’t have one yet, here’s an article on how to obtain an API key:
How to Get an OpenAI API Key for ChatGPT
Step 1: Load and split your study material
To enable the large language model to generate questions, we need to provide access to the study material. In order for us to do this, we create two functions:
- load_data: Takes an uploaded file as input and returns the extracted text
- split_text: Takes three arguments: the extracted text, chunk size, and chunk overlap.
Function 1.1: Load data
In Part 1 of this tutorial, we used a LangChain Document Loader to load the data from a PDF.
However, since we are using a file uploader in Streamlit, we cannot directly use the LangChain Document Loader. Instead, we will use the PdfReader from the PyPDF2 library.
This function takes an uploaded file as input and returns the extracted text from the PDF file. We will use the PdfReader to read the contents of the PDF and combine the text from all pages.
from PyPDF2 import PdfReader

# Function to load data from PDF
def load_data(uploaded_file):
    pdf_reader = PdfReader(uploaded_file)
    text = ""
    for page in pdf_reader.pages:
        text += page.extract_text()
    return text
Now we’re able to extract the text from a PDF.
Now it’s time to split the text into smaller chunks.
Function 1.2: Split text
To efficiently process text in large language models, we need to split the extracted text into smaller chunks. This function takes three arguments: the extracted text, the chunk size, and the chunk overlap.
Later, we’ll split the data in two different ways:
- Larger chunks for question generation
- Smaller chunks for question answering
from langchain.text_splitter import TokenTextSplitter
from langchain.docstore.document import Document

# Function to split text into chunks
def split_text(text, chunk_size, chunk_overlap):
    # Initialize text splitter
    text_splitter = TokenTextSplitter(model_name="gpt-3.5-turbo-16k", chunk_size=chunk_size, chunk_overlap=chunk_overlap)
    # Split text into chunks
    text_chunks = text_splitter.split_text(text)
    # Convert chunks to documents
    documents = [Document(page_content=t) for t in text_chunks]
    return documents
Chunk size is the maximum number of tokens that can be in one chunk.
Chunk overlap is the amount of overlap that occurs for each chunk.
A helpful rule of thumb is that one token generally corresponds to ~4 characters of text for common English text. This translates to roughly ¾ of a word (so 100 tokens ~= 75 words).
Step 2: Generating questions
Now it’s time to create functions that will generate practice questions based on our study material.
Function 2.1: Initializing Large Language Model
In this step, we’ll set up the Large Language Model (LLM) to generate practice questions. For this project, we’ll use OpenAI’s GPT-3.5-turbo-16k model, which is known for its powerful language processing capabilities.
This function, initialize_llm, takes three arguments as input:
- OpenAI API Key: An API key is required to access OpenAI’s GPT models. You can obtain an API key from OpenAI by following their instructions.
- Model name: This is the name of the language model we want to use. In our case, it’s “gpt-3.5-turbo-16k”.
- Temperature: The temperature parameter influences the creativity of the language model’s responses. A higher temperature (e.g., 1.0) generates more diverse but potentially nonsensical output, while a lower temperature (e.g., 0.2) produces more focused and predictable responses.
from langchain.chat_models import ChatOpenAI

# Function to initialize large language model
def initialize_llm(openai_api_key, model, temperature):
    # Initialize large language model
    llm = ChatOpenAI(openai_api_key=openai_api_key, model=model, temperature=temperature)
    return llm
This function creates and returns an instance of the Large Language Model with the specified API key, model name, and temperature settings, which we’ll use later to generate questions.
Intermediate step: Prompting
Before we dive into generating questions with the Large Language Model (LLM), let’s talk about the concept of “prompting.” A prompt is like an instruction or a guiding question that we provide to the LLM to direct its behavior and guide the output it generates. It plays a critical role in shaping the LLM’s responses, ensuring they are relevant and coherent.
In Part 1 of the tutorial, I explained the importance of using custom prompts for generating questions.
I have designed two custom prompts to achieve our goal effectively.
Prompt 1:
from langchain.prompts import PromptTemplate

prompt_template_questions = """
You are an expert in creating practice questions based on study material.
Your goal is to prepare a student for their exam.
You do this by asking questions about the text below:
------------
{text}
------------
Create questions that will prepare the student for their exam.
Make sure not to lose any important information.
QUESTIONS:
"""
PROMPT_QUESTIONS = PromptTemplate(template=prompt_template_questions, input_variables=["text"])
Prompt 2:
refine_template_questions = ("""
You are an expert in creating practice questions based on study material.
Your goal is to help a student prepare for an exam.
We have received some practice questions to a certain extent: {existing_answer}.
We have the option to refine the existing questions or add new ones.
(only if necessary) with some more context below.
------------
{text}
------------
Given the new context, refine the original questions in English.
If the context is not helpful, please provide the original questions.
QUESTIONS:
"""
)
REFINE_PROMPT_QUESTIONS = PromptTemplate(
    input_variables=["existing_answer", "text"],
    template=refine_template_questions,
)
Function 2.3: Generating questions
In this step, we will use a LangChain summarization chain to generate the practice questions based on the study material. If you want a more detailed understanding of what this chain does, please refer to Part 1 of the tutorial.
The generate_questions function takes three arguments as input:
- The initialized Large Language Model (LLM).
- Chain type (you can specify the type of summarization chain to use).
- Documents (the study material in the form of documents).
Here’s the implementation of the function:
from langchain.chains.summarize import load_summarize_chain

# Function to generate questions
def generate_questions(llm, chain_type, documents):
    # Initialize question chain
    question_chain = load_summarize_chain(llm=llm, chain_type=chain_type, question_prompt=PROMPT_QUESTIONS, refine_prompt=REFINE_PROMPT_QUESTIONS)
    # Generate questions
    questions = question_chain.run(documents)
    return questions
The generated questions will be returned as the output of the function.
Now that we have the questions, the next step is to generate answers to them.
Step 3: Generating answers
Now that we have our practice questions, the next step is to use the Large Language Model (LLM) to answer these questions based on the information in the study material. To achieve this, we’ll use a powerful tool called the ‘Retrieval Question Answer Chain’.
The RetrievalQA Chain makes use of a vector database to efficiently retrieve answers from input questions.
Setting up and using the chain involves three key components:
- Retriever: This component is responsible for retrieving relevant information from the study material based on the input questions.
- Large Language Model (LLM): This is the same language model we initialized earlier, and it will be used to generate the final answers based on the retrieved information.
- List of Questions: We’ll use the generated practice questions as input to the chain.
As you might remember from Part 1, Vector Databases and Retrieval Chains are fascinating concepts that you can explore in more detail to gain a deeper understanding of how they work.
Implementation of the function:
# Function to create Retrieval QA Chain
def create_retrieval_qa_chain(openai_api_key, documents, llm):
    # Set embeddings
    embeddings = OpenAIEmbeddings(openai_api_key=openai_api_key)

    # Create vector database
    vector_database = Chroma.from_documents(documents=documents, embedding=embeddings)

    # Create Retrieval QA Chain
    retrieval_qa_chain = RetrievalQA.from_chain_type(llm=llm, chain_type="stuff", retriever=vector_database.as_retriever())

    return retrieval_qa_chain
All LangChain Functions
Congratulations! We now have all the necessary functions to enable our application to generate and answer questions effectively. Let’s have a quick recap of all five functions:
- load_data: This function extracts the text from a PDF file, making it accessible for further processing.
- split_text: After extracting the text, this function splits it into smaller documents, which helps in efficient processing with large language models.
- initialize_llm: Here, we initialize the Large Language Model (LLM), specifically OpenAI’s GPT-3.5-turbo-16k model, using the provided API key and settings.
- generate_questions: Using the LangChain Summarization Chain, this function generates practice questions from the study material. It takes the initialized LLM, chain type, and documents as input.
- create_retrieval_qa_chain: The retrieval chain takes the list of generated questions, retrieves relevant information from the study material, and passes it to the LLM to generate the final answers.
With these core functions in place, we have a solid foundation. Now, let’s proceed to implement them in Streamlit, which will allow us to create a user-friendly web interface for our AI-powered Smart Study Buddy application.
Streamlit
Streamlit is an amazing open-source app framework for Python that makes it incredibly easy to build web applications.
Now, let’s dive into creating the user interface for our Smart Study Buddy application using Streamlit.
Once that’s done, we’ll seamlessly integrate the functions we’ve created earlier to bring our AI-powered study buddy to life!
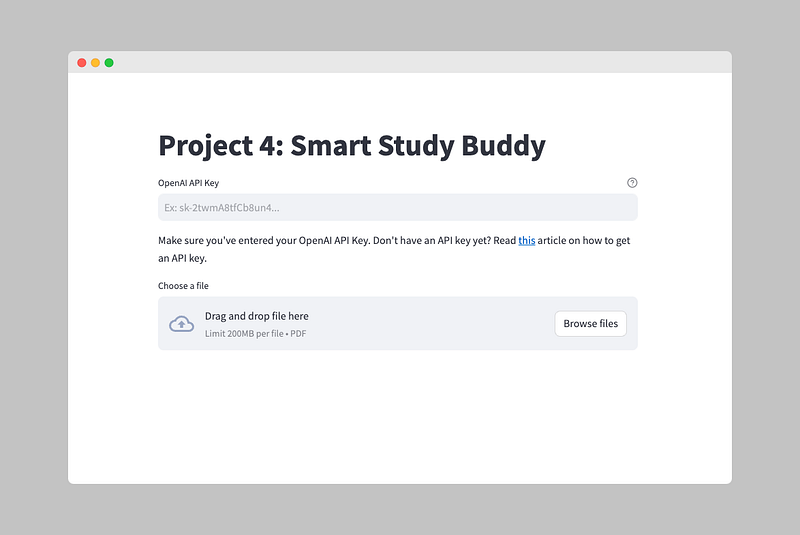
Step 1: Streamlit User Interface
In Step 1, we’ll create the user interface for our Smart Study Buddy application using Streamlit. We want the user to be able to do two things:
- Enter their OpenAI API Key
- Upload a PDF file containing their study material
Streamlit provides a variety of widgets that make it easy to set up the interface quickly.
Once the user enters their API Key and uploads the PDF file, we’ll move on to Step 2 to implement the core functionality of our AI-powered study buddy. Let’s go ahead and create the user interface!
You can run a Streamlit project from your terminal with the following command:
streamlit run projectname.py
Step 1.1: Get OpenAI API Key
We’ll use the st.text_input() function from Streamlit to get the user's OpenAI API Key. This function displays a single-line text input widget where the user can enter their API Key.
Here’s the code to add the text input widget for the OpenAI API Key:
st.text_input() displays a single-line text input widget. It takes three arguments:
- Label: A short label explaining to the user what this input is for.
- Placeholder: The text that is shown when the input field is empty.
- Key: An optional string or integer to use as the unique key for the widget. If this is omitted, a key will be generated for the widget based on its content. Multiple widgets of the same type may not share the same key.
import streamlit as st

openai_api_key = st.text_input(label="OpenAI API Key ",  placeholder="Ex: sk-2twmA8tfCb8un4...", key="openai_api_key_input")
You can do much more with the text input widget, but that’s for another tutorial!
Step 1.2: Upload PDF File
We’ll implement the file upload functionality using Streamlit’s file uploader. This will allow the user to upload a PDF file containing their study material.
The st.file_uploader() function displays a file uploader widget with the label "Upload PDF File".
The type argument is set to ["pdf"] to ensure that only PDF files can be uploaded.
uploaded_file = st.file_uploader("Upload your study material", type=['pdf'])Step 2: Implementing the LangChain Functions
Now for the exciting part!
We are going to put our previously created LangChain functions to work.
Step 2.1: Extracting the text from PDF
To start, we need to extract the text from the uploaded PDF file. The following code snippet accomplishes this:
# Load data from PDF
text_from_pdf = load_data(uploaded_file)
Using the load_data function we developed earlier, we read the content of the uploaded PDF file and extract the text from it.
The extracted text will be stored in the variable text_from_pdf.
Step 2.2: Splitting the Text into Chunks
Now, we need to split the extracted text into chunks, but we’ll do it in two different ways:
- Larger Chunks for Question Generation
For question generation, we want the Large Language Model to have ample context and minimize the number of operations it performs. We achieve this by using larger chunks. With the GPT-3.5-Turbo-16k model, we can make these chunks quite large, up to 16,000 tokens or approximately 12,000 words.
# Split text for question generation
documents_for_question_gen = split_text(text_from_pdf, chunk_size=10000, chunk_overlap=200)
2. Smaller Chunks for Question Answering
On the other hand, for answering the questions, we want smaller chunks. For more insights on why, you can refer to Part 1 of the tutorial.
We’ll use a Retrieval Question Answer Chain to answer the generated questions efficiently. To optimize cost and performance, we split the text into smaller chunks.
# Split text for question answering
documents_for_question_answering = split_text(text_from_pdf, chunk_size=500, chunk_overlap=200)
Using the split_text function we created earlier, we divide the text into appropriate-sized chunks based on our specific needs for question generation and answering.
These chunks will be stored in the variables documents_for_question_gen and documents_for_question_answering.
Step 2.3: Initializing the Large Language Model
Now, it’s time to set up the Large Language Model (LLM) for generating the practice questions. In this project, we’ll use OpenAI’s GPT-3.5-turbo-16k model, which offers impressive capabilities.
However, thanks to the flexibility provided by LangChain, you can easily switch to other language models if you prefer.
We’ll initialize two LLMs for different purposes:
- For Question Generation:
We want our generated questions to be both creative and relevant to the study material. To achieve this balance, we’ll set the temperature to 0.4. Feel free to experiment with different values to find what suits your preferences best.
# Initialize a large language model for question generation
llm_question_gen = initialize_llm(openai_api_key=openai_api_key, model="gpt-3.5-turbo-16k", temperature=0.4)
2. For Question Answering:
For question answering, we need the LLM to provide accurate answers based solely on the given study material. Therefore, we’ll make a slight adjustment to the temperature setting. Setting the temperature to 0.1 reduces the likelihood of the model “hallucinating” and ensures more grounded responses.
# Initialize a large language model for question answering
llm_question_answering = initialize_llm(openai_api_key=openai_api_key, model="gpt-3.5-turbo", temperature=0.1)
By creating two separate Large Language Models with different temperature settings, we optimize their behavior for the specific tasks of question generation and answering, respectively.
Step 2.4: Generating the Questions
You’re now on the verge of generating the questions based on your study material.
However, before we proceed, let’s discuss the concept of “session states.”
Session States
In Streamlit, whenever something on the screen is updated, the entire Python script is rerun from top to bottom.
However, when you’re about to generate answers to the questions, you don’t want the questions to be regenerated each time, as it would lead to unnecessary repetition.
This is where “session states” come into play.
A session state allows you to share variables between reruns for each user session. We’ll be using session states for four specific use cases:
- Generated Questions
- List of Separate Questions
- List of Questions to Answer
- ‘Submitted’ Variable
We’ll explain why we need each of these later on.
Before we can assign anything to session states, we must initialize them as empty states. Add the following code to the top of your file. This ensures that all session states used, later on, are properly initialized:
if 'questions' not in st.session_state:
    st.session_state['questions'] = 'empty'
    st.session_state['separated_question_list'] = 'empty'
    st.session_state['questions_to_answers'] = 'empty'
    st.session_state['submitted'] = 'empty'
With these session states set up, we’re ready to proceed with generating the questions.
Step 2.4: Continued
Now, let’s proceed with the rest of the code.
We will generate the questions and assign them to the ‘questions’ session state.
This way, the questions will be generated only once, and subsequent reruns won’t regenerate them unnecessarily.
# Create questions if they have not yet been generated
if st.session_state['questions'] == 'empty':
    with st.spinner("Generating questions..."):
        # Assign the generated questions to the session state. This way, the questions are only generated once.
        st.session_state['questions'] = generate_questions(llm=llm_question_gen, chain_type="refine", documents=documents_for_question_gen)
The code inside the if statement will only execute when there are no generated questions yet (i.e., the 'questions' session state is 'empty').
This prevents unnecessary regeneration of questions in subsequent reruns.
The generate_questions function requires three arguments:
- The initialized Large Language Model (LLM) for question generation (
llm_question_genin our case). - Chain type: Check out Part 1 for a detailed explanation (We use “refine” here).
- The documents (i.e., study material) to generate questions from (
documents_for_question_gen).
Step 2.5: Show the generated questions on the screen
Now, let’s display the generated questions on the screen so that the user can see all the questions and choose which ones they want answers to.
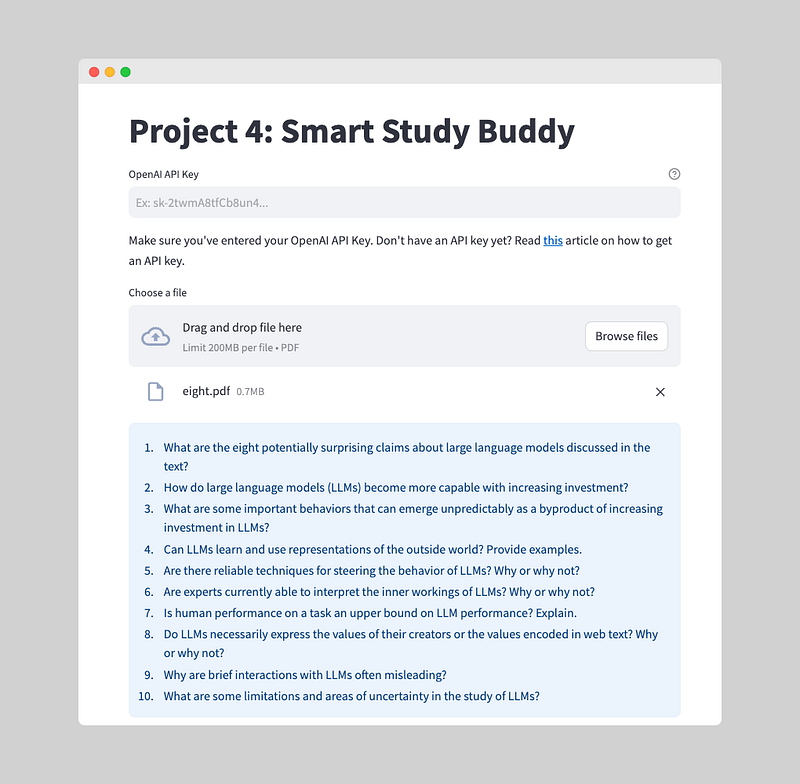
The st.info() function is used to display information in Streamlit. It shows a blue-colored box with the provided content. In this case, we're displaying the generated questions stored in the 'questions' session state. You could also use the st.code() function to easily copy-paste the questions for further use.
Code implementation:
# Show questions on the screen. You could use st.code for easy copy-pasting.
st.info(st.session_state['questions'])
Step 2.6: Let the user choose which questions to answer
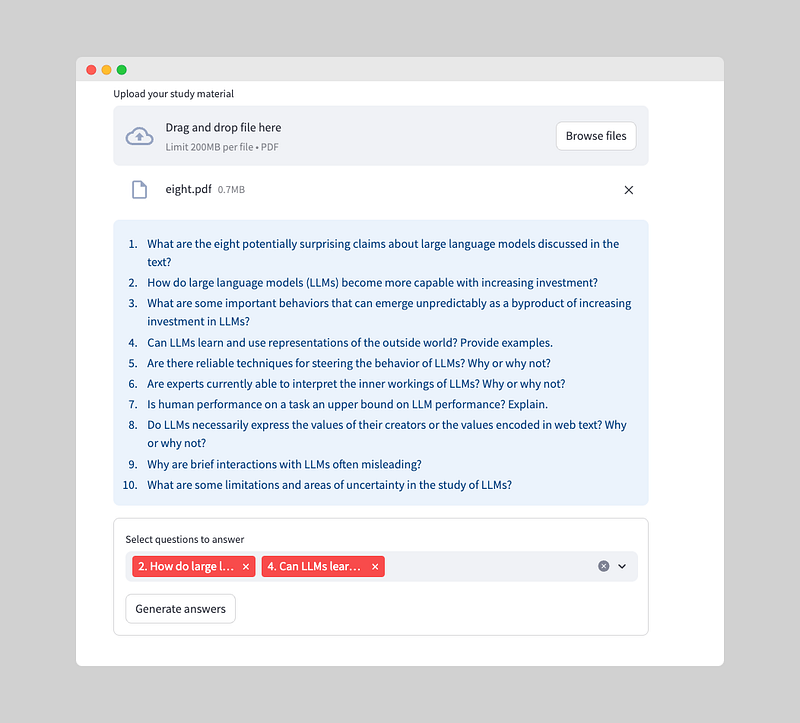
To enable the user to choose questions to answer, we need to perform two tasks:
- Create a list of separate questions.
- Add a widget for the user to select the questions they want to answer.
Let’s start by splitting the questions into a list and storing it in a session state:
# Split questions into a list
st.session_state['questions_list'] = st.session_state['questions'].split('\\n')
Now, we’ll use the Streamlit multi-select widget to create a user-friendly interface for selecting questions:
with st.form(key='my_form'):
    # Create a list of questions that have to be answered
    st.session_state['questions_to_answers'] = st.multiselect(label="Select questions to answer", options=st.session_state['questions_list'])
    submitted = st.form_submit_button('Generate answers')
    if submitted:
        st.session_state['submitted'] = True
The st.multiselect() function displays a widget where the user can choose multiple options from the list of generated questions. We assign the selected questions to the 'questions_to_answers' session state.
To enhance the user experience, we add a submit button labeled ‘Generate answers.’ When the user clicks this button, we set the ‘submitted’ session state to True, which will trigger the final step: generating the answers.
Step 2.7: Generating answers
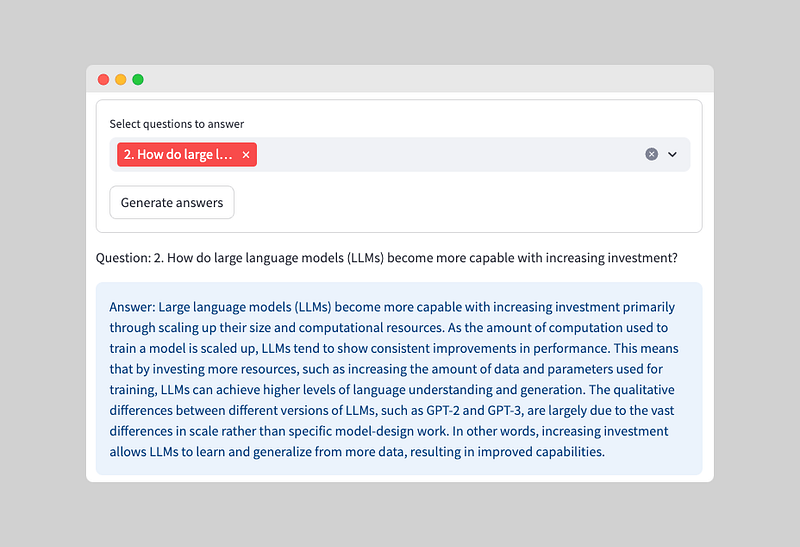
Now that the user has chosen the questions they want to answer, we can use the retrieval chain to generate answers based on the study material.
The retrieval chain uses semantic similarity search with vector databases to find relevant answers. While it may sound complex, it’s actually quite straightforward. For a more detailed explanation, check out Part 1.
Let’s generate the answers for the selected questions:
if st.session_state['submitted']:
# Initialize the Retrieval QA Chain
    with st.spinner("Generating answers..."):
        generate_answer_chain = create_retrieval_qa_chain(openai_api_key=openai_api_key, documents=documents_for_question_answering, llm=llm_question_answering)
        # For each question, generate an answer
        for question in st.session_state['questions_to_answers']:
            # Generate answer
            answer = generate_answer_chain.run(question)
            # Show answer on the screen
            st.write(f"Question: {question}")
            st.info(f"Answer: {answer}")
Here, we iterate through each selected question and generate an answer using the retrieval chain. The answers are then displayed on the screen with the corresponding questions. The answers are shown in an ‘info’ style box to make them stand out.
Bonus Step: Tracking With LangSmith
LangSmith is a platform for building production-grade LLM applications.
It lets you debug, test, evaluate, and monitor chains and intelligent agents built on any LLM framework and seamlessly integrates with LangChain.
LangSmith is developed by LangChain, the company behind the open-source LangChain framework.
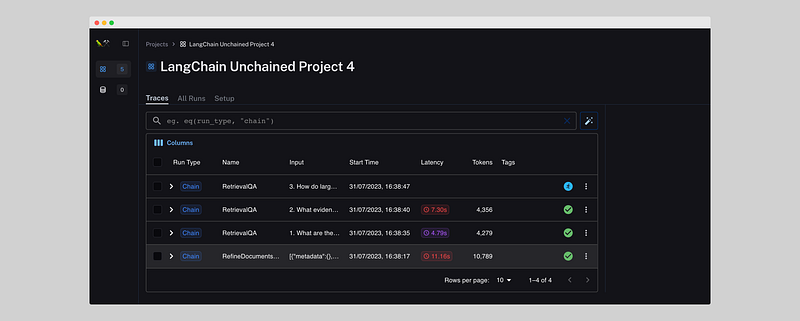
LangSmith is great for tracking the performance of your app and finding bugs.
It shows:
- Latency: Duration of a call to a LLM.
- Tokens: Amount of tokens used for each call
- Input: The data is being used in the call to the LLM.
- Output: Stores the output for all individual calls.
It’s extremely easy to set up. The only thing you need to do is run the following code:
export LANGCHAIN_TRACING_V2=true
export LANGCHAIN_ENDPOINT=https://api.smith.langchain.com
export LANGCHAIN_API_KEY=<your-api-key>
export LANGCHAIN_PROJECT=<your-project>
Next step: Hosting your App on Streamlit
Congratulations! Your Smart Study Buddy application should now be up and running.
The next step is to host your Streamlit application directly on their servers, and the best part is, it’s free! To learn how to deploy your app and share it with others, I’ll guide you through the hosting process in another tutorial.
Remember, this project is just the beginning, and there are plenty of possibilities for further improvements and enhancements. Feel free to explore and experiment to make your Smart Study Buddy even better!
Enjoy building and using your Smart Study Buddy, and if you have any questions or need further assistance, don’t hesitate to reach out. You can easily connect with me on Twitter at https://twitter.com/JorisTechTalk.
Happy learning and studying!
Full code
Streamlit implementation
import streamlit as st
from streamlit_functions import get_api_key
from llm_functions import load_data, split_text, initialize_llm, generate_questions, create_retrieval_qa_chain

# Initialization of session states
# Since Streamlit always reruns the script when a widget changes, we need to initialize the session states
if 'questions' not in st.session_state:
    st.session_state['questions'] = 'empty'
    st.session_state['seperated_question_list'] = 'empty'
    st.session_state['questions_to_answers'] = 'empty'
    st.session_state['submitted'] = 'empty'

with st.container():
    st.markdown("""# Project 4: Smart Study Buddy""")

# Get user's OpenAI API Key
openai_api_key = get_api_key()

# Container for markdown text
with st.container():
    st.markdown("""Make sure you've entered your OpenAI API Key.
                Don't have an API key yet?
                Read [this](https://www.howtogeek.com/885918/how-to-get-an-openai-api-key/) article on how to get an API key.""")

# Let user upload a file
uploaded_file = st.file_uploader("Upload your study material", type=['pdf'])

if uploaded_file is not None:
    # Check whether user entered an API key
    if not openai_api_key:
        st.error("Please enter your OpenAI API Key")
    else:
        # Load data from PDF
        text_from_pdf = load_data(uploaded_file)

        # Split text for question generation
        documents_for_question_gen = split_text(text_from_pdf, chunk_size=10000, chunk_overlap=200)

        # Split text for question answering
        documents_for_question_answering = split_text(text_from_pdf, chunk_size=500, chunk_overlap=200)

        # Initialize large language model for question generation
        llm_question_gen = initialize_llm(openai_api_key=openai_api_key, model="gpt-3.5-turbo-16k", temperature=0.4)

        # Initialize large language model for question answering
        llm_question_answering = initialize_llm(openai_api_key=openai_api_key, model="gpt-3.5-turbo", temperature=0.1)

        # Create questions if they have not yet been generated
        if st.session_state['questions'] == 'empty':
            with st.spinner("Generating questions..."):
                # Assign the generated questions to the session state. This way, the questions are only generated once.
                st.session_state['questions'] = generate_questions(llm=llm_question_gen, chain_type="refine", documents=documents_for_question_gen)

        if st.session_state['questions'] != 'empty':
            # Show questions on screen. You could use st.code for easy copy-pasting.
            st.info(st.session_state['questions'])

            # Split questions into a list
            st.session_state['questions_list'] = st.session_state['questions'].split('\n')

            with st.form(key='my_form'):
                # Create a list of questions that have to be answered
                st.session_state['questions_to_answers'] = st.multiselect(label="Select questions to answer", options=st.session_state['questions_list'])
                submitted = st.form_submit_button('Generate answers')
                if submitted:
                    st.session_state['submitted'] = True

            if st.session_state['submitted']:
            # Initialize the Retrieval QA Chain
                with st.spinner("Generating answers..."):
                    generate_answer_chain = create_retrieval_qa_chain(openai_api_key=openai_api_key, documents=documents_for_question_answering, llm=llm_question_answering)
                    # For each question, generate an answer
                    for question in st.session_state['questions_to_answers']:
                        # Generate answer
                        answer = generate_answer_chain.run(question)
                        # Show answer on screen
                        st.write(f"Question: {question}")
                        st.info(f"Answer: {answer}")
LangChain Functions
from langchain.text_splitter import TokenTextSplitter
from langchain.docstore.document import Document
from langchain.chat_models import ChatOpenAI
from langchain.chains.summarize import load_summarize_chain
from prompts import PROMPT_QUESTIONS, REFINE_PROMPT_QUESTIONS
from langchain.chains import RetrievalQA
from langchain.embeddings.openai import OpenAIEmbeddings
from langchain.vectorstores import Chroma
from PyPDF2 import PdfReader


# Function to load data from PDF
def load_data(uploaded_file):
    pdf_reader = PdfReader(uploaded_file)
    text = ""
    for page in pdf_reader.pages:
        text += page.extract_text()
    return text

# Function to split text into chunks
def split_text(text, chunk_size, chunk_overlap):
    # Initialize text splitter
    text_splitter = TokenTextSplitter(model_name="gpt-3.5-turbo-16k", chunk_size=chunk_size, chunk_overlap=chunk_overlap)

    # Split text into chunks
    text_chunks = text_splitter.split_text(text)

    # Convert chunks to documents
    documents = [Document(page_content=t) for t in text_chunks]

    return documents

# Function to initialize large language model
def initialize_llm(openai_api_key, model, temperature):
    # Initialize large language model
    llm = ChatOpenAI(openai_api_key=openai_api_key,model=model, temperature=temperature)

    return llm

# Function to generate questions
def generate_questions(llm, chain_type, documents):
    # Initialize question chain
    question_chain = load_summarize_chain(llm=llm, chain_type=chain_type, question_prompt=PROMPT_QUESTIONS, refine_prompt=REFINE_PROMPT_QUESTIONS)

    # Generate questions
    questions = question_chain.run(documents)

    return questions

# Function to create Retrieval QA Chain
def create_retrieval_qa_chain(openai_api_key, documents, llm):
    # Set embeddings
    embeddings = OpenAIEmbeddings(openai_api_key=openai_api_key)

    # Create vector database
    vector_database = Chroma.from_documents(documents=documents, embedding=embeddings)

    # Create Retrieval QA Chain
    retrieval_qa_chain = RetrievalQA.from_chain_type(llm=llm, chain_type="stuff", retriever=vector_database.as_retriever())

    return retrieval_qa_chain
Prompts
from langchain.prompts import PromptTemplate

prompt_template_questions = """
You are an expert in creating practice questions based on study material.
Your goal is to prepare a student for their an exam. You do this by asking questions about the text below:

------------
{text}
------------

Create questions that will prepare the student for their exam. Make sure not to lose any important information.

QUESTIONS:
"""
PROMPT_QUESTIONS = PromptTemplate(template=prompt_template_questions, input_variables=["text"])

refine_template_questions = ("""
You are an expert in creating practice questions based on study material.
Your goal is to help a student prepare for an exam.
We have received some practice questions to a certain extent: {existing_answer}.
We have the option to refine the existing questions or add new ones.
(only if necessary) with some more context below.
------------
{text}
------------

Given the new context, refine the original questions in English.
If the context is not helpful, please provide the original questions.
QUESTIONS:
"""
)
REFINE_PROMPT_QUESTIONS = PromptTemplate(
    input_variables=["existing_answer", "text"],
    template=refine_template_questions,
)


