Okta SAML Integration with AWS IAM Step 4: Granting Okta Users Access to AWS Roles
ACM.175 Creating a link between Okta Groups and AWS Okta Roles
~~~~~~~~~~~~~~~~~~~~~~~~~~~~~~~~~~~~~~~~~~~~~~~~~~~~~~~~~~~
⚙️ Check out my series on Automating Cybersecurity Metrics. The Code.
🔒 Related Stories: Cloud Governance | IAM | AWS Security | Okta
💻 Free Content on Jobs in Cybersecurity | ✉️ Sign up for the Email List
~~~~~~~~~~~~~~~~~~~~~~~~~~~~~~~~~~~~~~~~~~~~~~~~~~~~~~~~~~~
In the last post we created a role that we are going to link up with Okta for an AWS billing administrator.
In this post, we’re going to create our billing administrator user and configure Okta to allow the user to login and assume the billing administrator role on AWS.
No AWS keys
As I’ve mentioned before there are a couple of different methods for configuring Okta as an IdP for AWS using SAML. One method involves creating a user on AWS, and then adding credentials into the Okta platform to retrieve roles for use with the IdP functionality. I’m not too keen on that approach as I don’t want the user or keys in my configuration. Giving long-lived credentials to a vendor is not generally an AWS best practice.
Luckily we have another option.
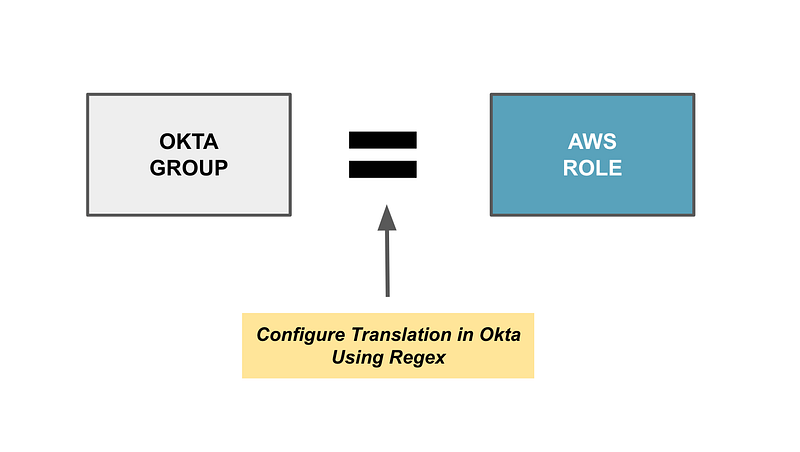
What is the Group Matching option?
Okta’s explanation of the group matching option is overly confusing to me. The guidance as to when you should use it is also confusing. I’m using it to avoid the above problem, but we’ll see how it works out.
Essentially all you’re going to do is name groups in Okta a certain way so they can be translated by Okta to AWS role names. When you assign a person to one of your AWS groups in Okta you are essentially granting them access to assume a particular role in a particular account in AWS.
Steps to Translate Okta Group Names to AWS Role Names
You need to configure the naming convention for your group names in Okta and then the format of the AWS role ARNs. I’m following Step 3 of the Okta group matching option but I opted to change the order.
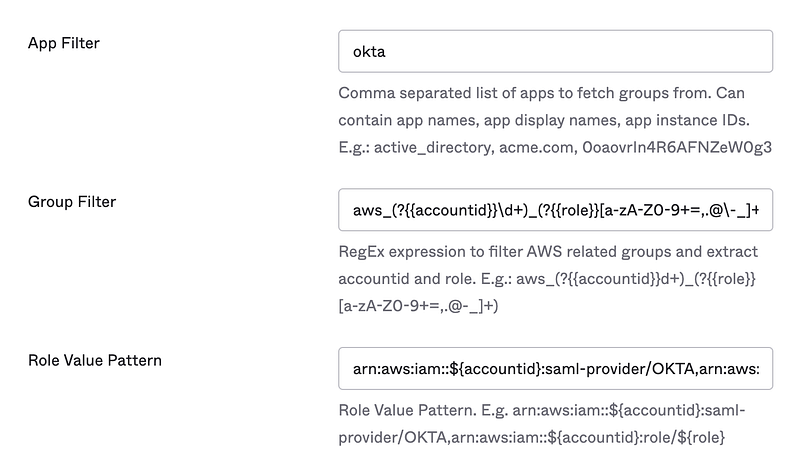
- In the AWS app under the sign in tab we will modify these values: App Filter, Group Filter, and Role Value Pattern fields.
- For app filter we are going to limit group-role mapping to okta groups by entering okta.
- For the Group Filter we are going to enter the following. This pattern aligns with the naming convention we are going to use for our Okta groups (shown below):
^aws\#\S+\#(?{{role}}[\w\-]+)\#(?{{accountid}}\d+)$- For Role Value Pattern we will enter the following value, which takes the group name and translates it to the matching AWS role ARN — except remember to change [SAML Provider Name].
arn:aws:iam::${accountid}:saml-provider/[SAML Provider Name],arn:aws:iam::${accountid}:role/${role}Remember that in the last post, I said you should take a look at the ARN for the role we created. If you review the ARN for that role, it aligns with the above pattern.
In the above instructions I forgot to change the [SAML Provider Name] and the error message from AWS is not that helpful when trying to troubleshoot that as it doesn’t tell you what name was expected and what it got. It only tells you “Specified provider doesn’t exist.” I wrote about that in a bit more detail here:
Also, remember to add your Identity Provider ARN in the field: Identity Provider ARN (Required only for SAML SSO).
Create and Assign Groups in Okta
Now that we’ve mapped group names to role names, we need to create the billing administrator group in Okta with a name in the correct format so it will be aligned with the AWS billing administrator role.
- Create group names matching the following format which aligns with the regex above.
aws#[account alias]#[role name]#[account #]
I explained how to create an account alias for an AWS account in this post:
I’m not sure why Okta needs the alias but they say they do in their documentation. With the alias someone can get to your account login page, but hoping to show you how to lock that down in a later post. So many things to write about!
- Assign the new billing administrator group to the AWS app in Okta.
- Create a new Billing Administrative user in Okta and assign the user to the Billing Administrator Group in Okta.
Note:
My instructions differ from the Okta instructions which are geared at AD groups, not Okta groups.
The Okta instructions are also confusing because there’s some information about provisioning with an AWS key at the bottom of the post. That does not apply to the method we are using.
If you create a new AWS role, you need to create the corresponding Okta group with the correctly formatted name for the user to assume it.
I’m not automating the Okta side here but you might be able to do that with Okta Workflow or by using the Okta APIs. Just be mindful of any credentials and network access in the process as any attacker who could infiltrate that process can potentially grant themselves access. The nice thing here is that they would have to get both access to AWS and to Okta to configure this access via an Okta user.
Configure Access in Your Account for the AWS Billing Admin User
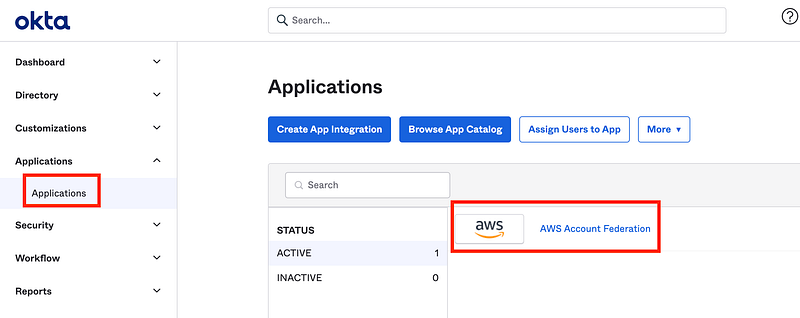
Now let’s go through the above with screen shots.
Login with the Access Admin user.
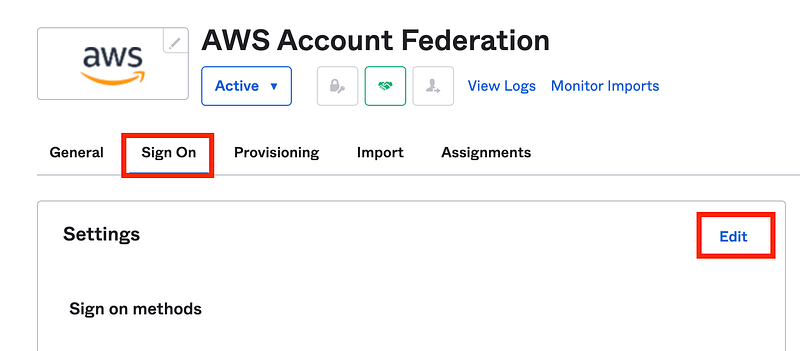
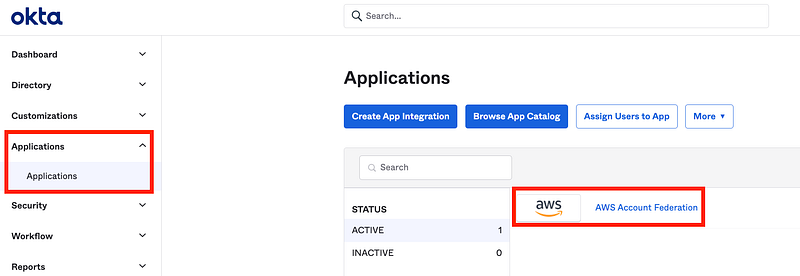
In the left menu click Applications. Then click on the AWS app created in a prior post.
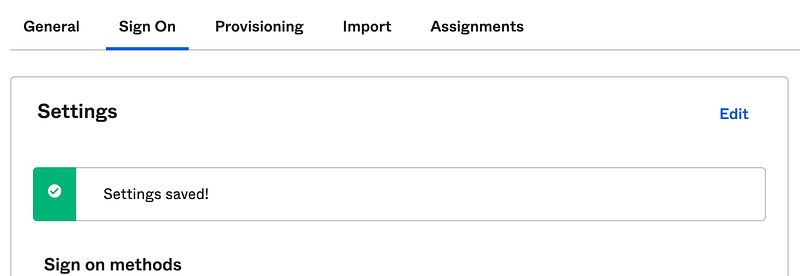
Click Sign On. Click Edit.
Scroll down and check Use Group Mapping.

Some new options will appear above the checkbox on the screen. Which is odd- why do they not show up below the checkbox? Scroll up.
The fields we need edit are the following. They are pre-populated. However, they do not match the options above.
I wonder why Okta is pre-populating these fields with values that do not match the documentation. Is one better than the other? I’ll need to look at this in more detail later but for now we are going follow the guidance in the documentation.
Security Tip: Before we are finished deploying this in a production account, we want to evaluate the regex and make sure it cannot be used to align Okta groups with roles cannot be tricked into aligning with the wrong role somehow.
Copy the values at the top of the post into the fields above and save the settings.
Learn from my mistake: Remember to change the name of the AWS Identity Provider in the Role Value Pattern to match the name of your IDP in AWS!
Now scroll to the very bottom of the page. Why this is not directly in the sign-in options, I don’t know, as it is a very important security setting.
Under User authentication, choose your authentication policy. This is where you can require the user of MFA whenever someone tries to authenticate to this application. I chose “Any two factors” to make sure MFA is enabled.
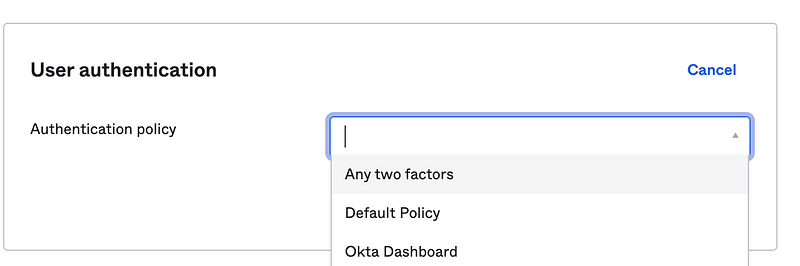
What that does is ensure that if an attacker got access to the Okta dashboard, they can’t just click a link to log in as that user. They also have to enter a second factor.
Security Tip: In other words, access to a user’s computer where they are logged into Okta doesn’t equal access to everything that user has access to just by clicking a link!
Add the Okta Group
As noted in the post where we created our users, we might need to do some additional troubleshooting with the Access Admin.
The reason I didn’t troubleshoot sooner is because I wasn’t ready to use that role as I didn’t know what method I would be using to integrate with Okta. Now that we know we are using groups, I tried to fix the access for the Access Admin to allow it to create the group and assign a user to it. Let’s just say it was a time consuming process that I haven’t yet fixed so we’re going to skip that for now. Sign in as Super Admin for the next steps. If I get this fixed it will be in another post.
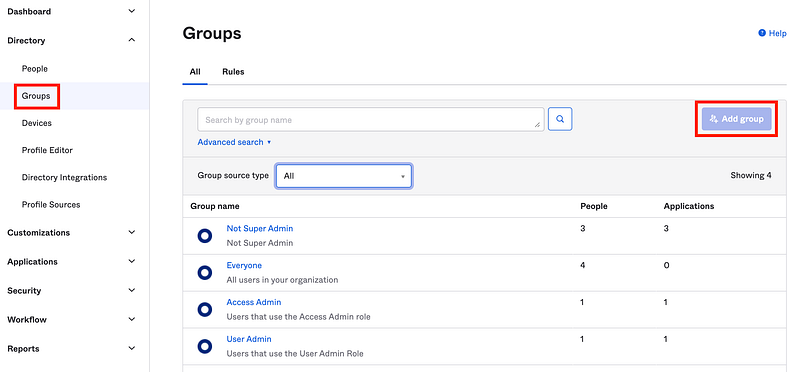
Click Add Group.
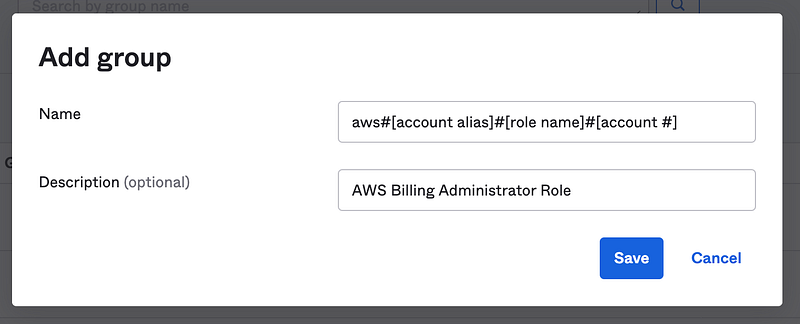
Now as explained above we need to give the group a specific name which aligns with our AWS role.
Replace the following in the group name below with the correct values:
- [account alias] — the alias for your AWS management account since that is where we created the billing administrator role.
- [role name] — the name of the role we created in the last post for the billing administrator.
- [account #] — replace this value with your 12 digit account number for your AWS management account.
This name below will have your own values not what is shown here:
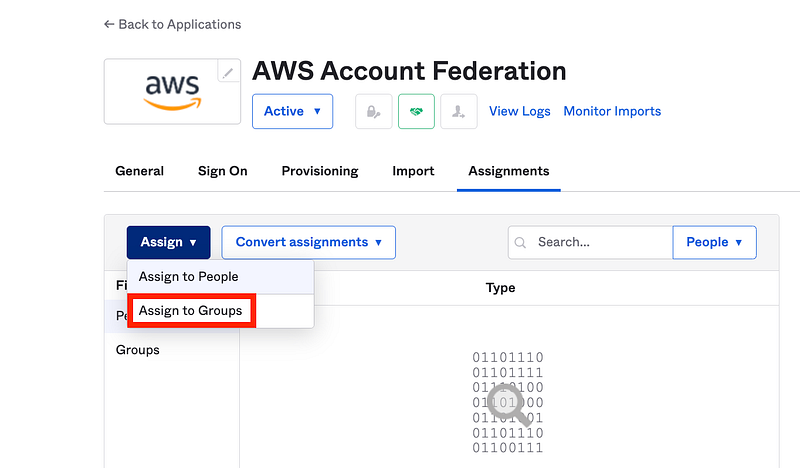
Assign the group to the Okta App. Navigate to applications. Click on AWS.
Click on Assign. Choose Assign to Groups.
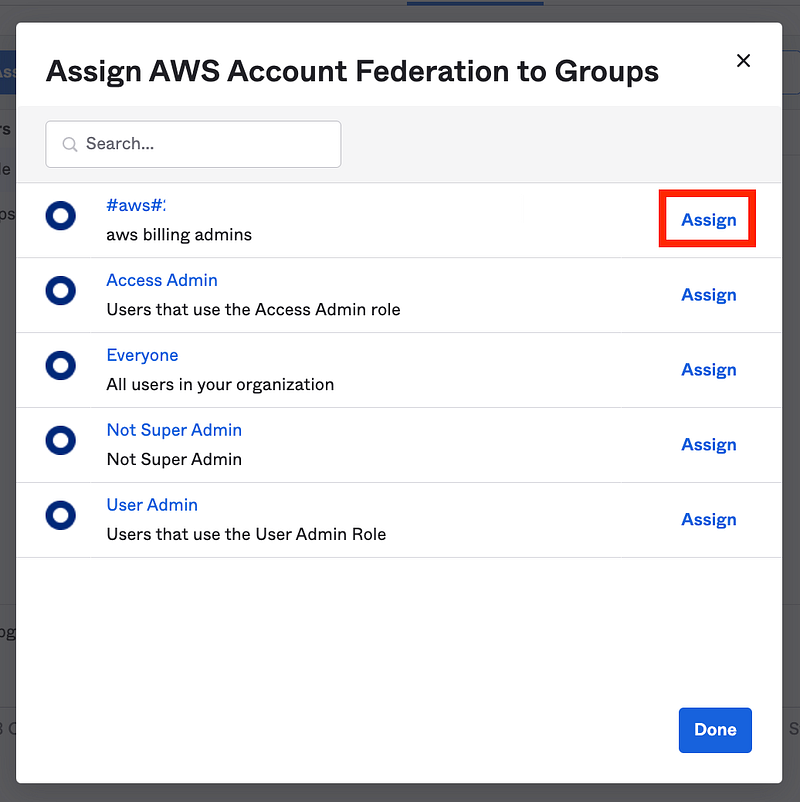
Click Assign next to your new group. Click Done.
Log in as your User Admin.
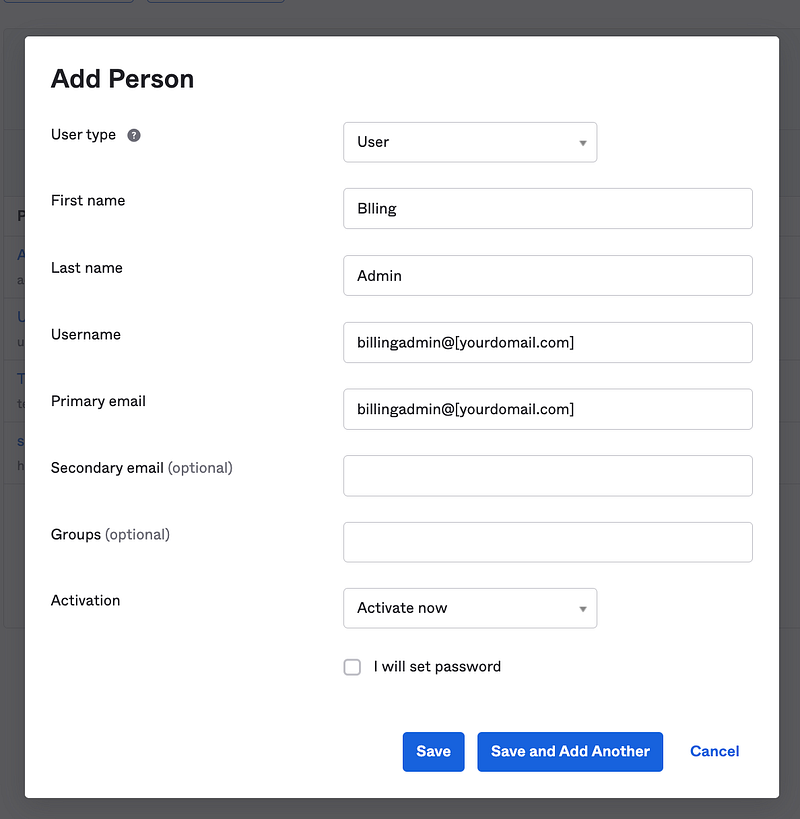
Create a new Billing Admin Okta User.
Remember we opted to not allow the User Admin to set or know the password and we’ve also disallowed access to groups to prevent privilege escalation as explained here:
After creating the user, click on the email sent to the user. Reset the password. Set up MFA.
Then return to the Access Admin. Navigate to Groups and click on your new Group. Then click Assign people.
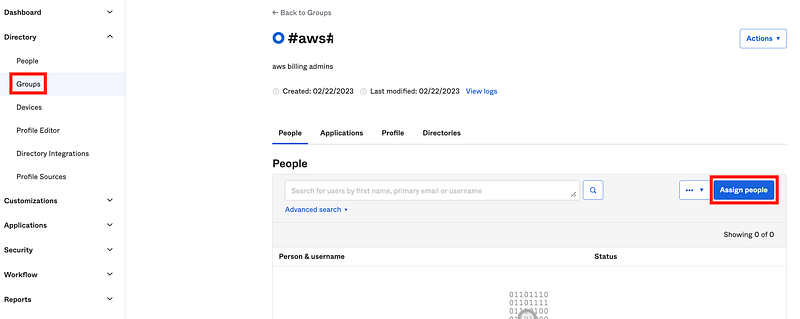
Navigate to the group in the directory and choose assign people as shown above.
Click on the + next to Billing Admin to add that user to the group.
Now when you log back in as your billing administrator you will see the AWS App on the dashboard.
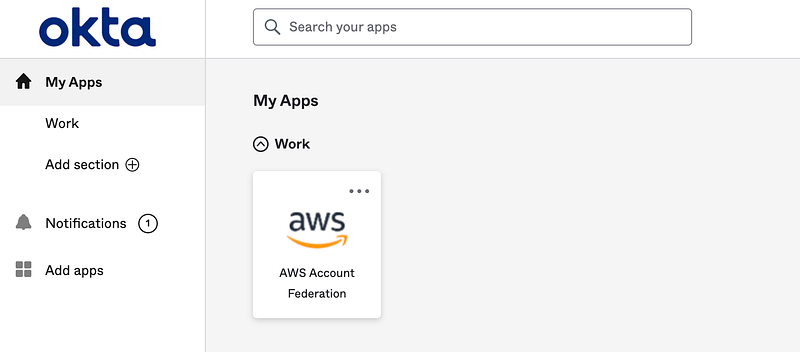
Yay.
However, when if you click on the AWS icon, you may get this error:
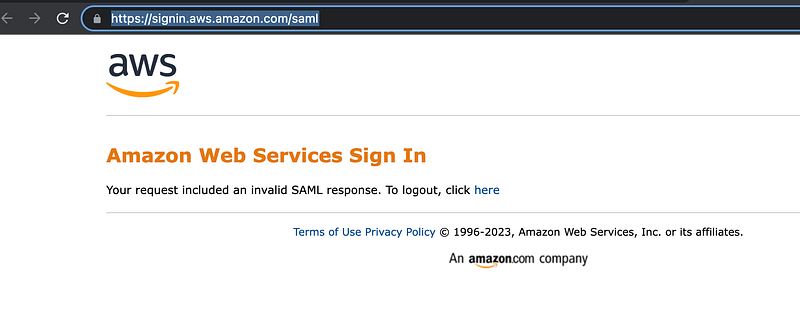
How do we troubleshoot that?
Well, check for typos in your group name and your filters. For example, I initially put a # in front of aws instead of after for some unknown reason. Also make sure you do not have dashes in your AWS account number. Double check the spelling of your alias and your group name. Once you fix any typos it should work.
Unfortunately, it only halfway worked. At this point I got the Specified provider doesn’t exist error which I explained how to fix here.
I had to fix two things. Make sure you have correctly specified the ARN of your identity provider in AWS:

Make sure you have correctly replaced the identity provider name in the Role Value Pattern.

By the way, for the above two settings, Okta could let the customer enter an account number, alias, account name, and generate the values for the customer (but allow the customer to modify them). That would help prevent these mistakes.
Once you have it all configured correctly, try to click the federation app link again.
This time you should be prompted for MFA if you have configured that, and logged into your AWS account!
I have many thoughts after going through this process, such as how support teams may create secruity problems or lose companies business. I might write about that. I also want to now find out if I had multiple roles in AWS for this user how that will show up and if the user will have to re-authenticate with MFA for each role, or only for the first role they assume. I also need to see if I can resolve the issue with the Okta Access Admin.
Follow for updates.
Teri Radichel | © 2nd Sight Lab 2023
About Teri Radichel:
~~~~~~~~~~~~~~~~~~~~
⭐️ Author: Cybersecurity Books
⭐️ Presentations: Presentations by Teri Radichel
⭐️ Recognition: SANS Award, AWS Security Hero, IANS Faculty
⭐️ Certifications: SANS ~ GSE 240
⭐️ Education: BA Business, Master of Software Engineering, Master of Infosec
⭐️ Company: Penetration Tests, Assessments, Phone Consulting ~ 2nd Sight Lab
Need Help With Cybersecurity, Cloud, or Application Security?
~~~~~~~~~~~~~~~~~~~~~~~~~~~~~~~~~~~~~~~~~~~~~~~~~~~~~~~~~~~~~
🔒 Request a penetration test or security assessment
🔒 Schedule a consulting call
🔒 Cybersecurity Speaker for PresentationFollow for more stories like this:
~~~~~~~~~~~~~~~~~~~~~~~~~~~~~~~~~~~~~~~~~~~~~~~~~~~~~~~~~~~~~
❤️ Sign Up my Medium Email List
❤️ Twitter: @teriradichel
❤️ LinkedIn: https://www.linkedin.com/in/teriradichel
❤️ Mastodon: @teriradichel@infosec.exchange
❤️ Facebook: 2nd Sight Lab
❤️ YouTube: @2ndsightlab