
MIT App Inventor 2 Meets Esp8266!!!
Playing With ESP8266–03 #kidSerie
This application demonstrates how to control an LED via the smartphone app using MIT App Inventor 2 and Arduino and ESP8266.
Step 00 — Prepare the software
Go to https://www.arduino.cc/ and download Arduino IDE;
I’m using Arduino 1.6.12 ;)
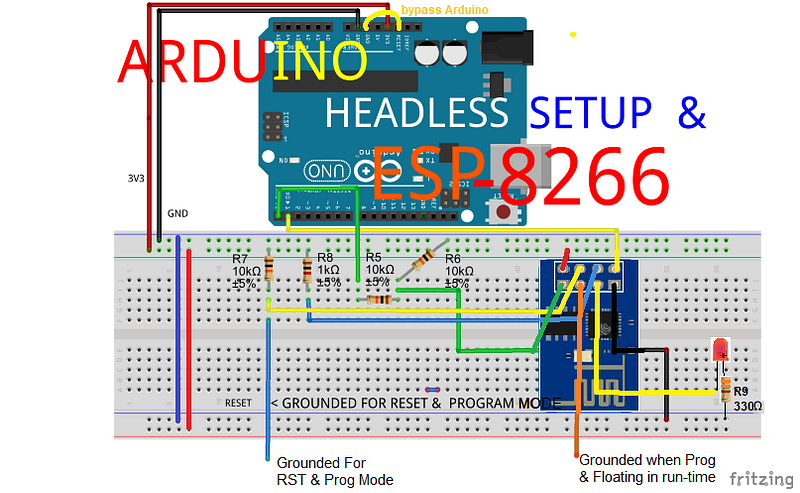
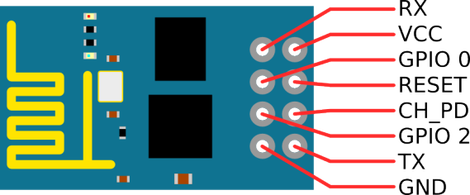
Step 01 — Prepare the hardware
Now take your IoT thing ESP8266 and the following components: 3 x 10k resistors, 1 x 1k resistor, 1 x resistor of 330 ohms, 1 x led 1 x breadboard Some jumpers and, of course, Arduino UNO.
Here is the schematic:
Step 02 — Install ESP8266 Plugin on your Arduino IDE
Go to Arduino IDE, File>Preference and add the address below into the Additional URL Boards Manager:
http://arduino.esp8266.com/stable/package_esp8266com_index.jsonThen go to the Tools menu> Board> Board Manager … Install the ESP8266 Plugin. There you go! Next: (See this post: https://goo.gl/AW4utX)
Step 03 — Then go to Tools menu > Board > Change from Arduino/Genuino Uno to Generic ESP8266 Module

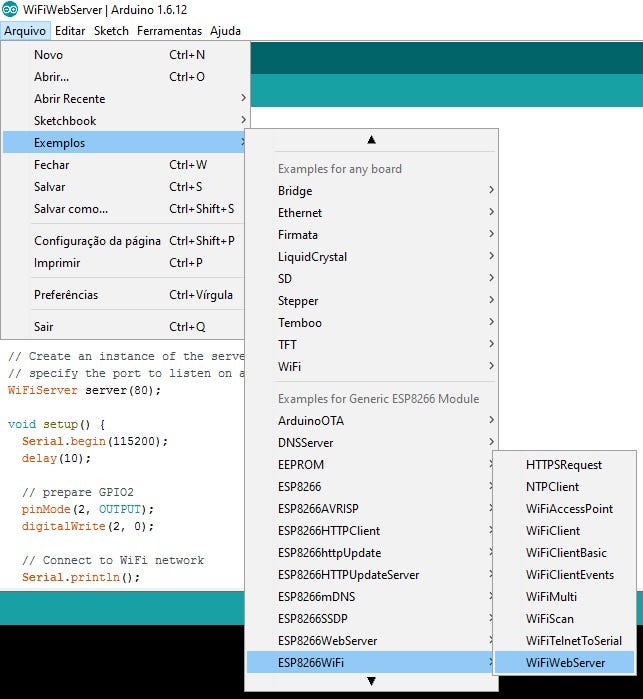
Step 04 — Run Example > ESP8266WiFi > WiFiWebServer code and flash it to the chip
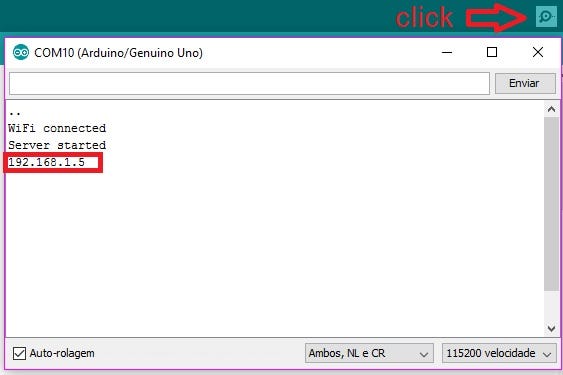
Step 05 — Find out which IP using the serial Arduino
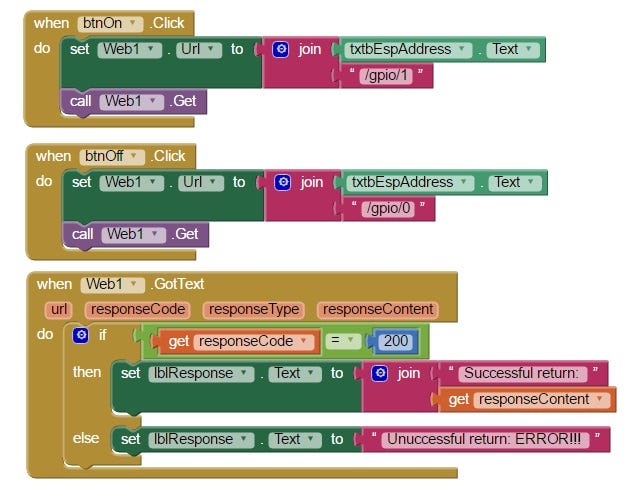
Step 06 — Create MIT App Inventor 2 app using this images as guideline:
Step 07— Run It!!!

Build apps with an Android device and WiFi Connection (preferred): Instructions: If you have a computer, an Android device, and a WiFi connection, this is the easiest way to test your apps.
Here is the video:
BTW, What is MIT App Inventor 2?
MIT App Inventor is an innovative beginner’s introduction to programming and app creation that transforms the complex language of text-based coding into visual, drag-and-drop building blocks. The simple graphical interface grants even an inexperienced an novice the ability to create a basic, fully functional app within an hour or less.
…
There you go!!!
Till the next episode of #kidSerie!!!
Bye!!!
Troubleshooting:
When you press the Upload Button on the Arduino IDE, hold the Blue Wire and give a pulse on the GND; this has to be done seconds before the Arduino indicates Uploading; Make sure the Orange Wire is on the GND. When the Upload finishes, remove the Orange Wire from the GND, let it float and then with the Blue Wire give a pulse on the GND. The Serial Monitor should acknowledge the:
Connecting to <your_wifi_ssid>
……
WiFi connected
Server started
<your_port_number>
Do not forget to edit the code according to your WiFi network;)
References:
Related Posts
Arduino UNO — Quick Intro — A Workshop in BSB with the Kids :) — kidSerie#10
J3 Resistance wheel — The Best Methods to Reading Resistors 4Kids — Tell Me Quickly What The Value Of Resistance! — kidSerie#11
Arduino UNO — Quick Intro — A Workshop in BSB with the Kids :) — kidSerie#10
MIT App Inventor 2 Meets Esp8266!!! — Playing With ESP826 — kidSerie#03
Park Assist I w/ MIT App Inventor 2 — Bluetooth + Arduino + MIT App + HC-SR04 Sonar — kidSerie # 09
More Related Posts
Meet IoT Boards: ESP8266 & ESP32 - Which are the best? ESPs or RPis or Arduinos Boards? IoT — Episode #01
Adafruit-IO Meets ESP8266, Arduino & MIT App Inventor 2 — Hello World for Adafruit-io & MQTT Protocol — 05 #kidSerie
MIT App Inventor 2 Meets Esp8266!!! — Playing With ESP8266–03 #kidSerie
Arduino Headless Setup & ESP8266 (WIFI cheap chip!) — Rather Stunning MCU!!! — #arduSerie 16
Flashing The Official ESPRESSIF Firmware in ESP8266 !!! — Easy ESP8266 Flashing!!! — #arduSerie 17
Get Started Using AT Commands w/ ESP8266 — Multiple Connection as TCP Server — #arduSerie 19
Your First NodeMCU/Lua Script Flash on ESP8266!!! — Let’s get our feet wet with NodeMCU/Lua and sees what happens !!- #arduSerie 20
— Reviewed at 24/04/2017 at 4:17 PM — Added Step 2 —
— Edited at Nov 2018 — Grammar corrections w/ Grammarly — Review Fritz: add Arduino Bypass wire and LED—
— Edited at Dez 2018 —Step 3 added—
-