
Let’s Add Products for Our eCommerce App Using JavaScript
Let’s go back to the basics of web development
Introduction
In this tutorial, we are going to create the product page for the E-Commerce API we created a while back, which you can find here:
Note, however, that you don’t need to go through that tutorial first since we are only going to interface with the API, we won’t be touching any Java source code. We have already created the product page using Vue.js, but it is also useful to step back from all the overly complicated web frameworks and just go back to doing things from scratch. If you prefer to rather stick to doing things in Vue.js then you can find the Vue.js product page tutorial here:
We will cheat a bit, however. I am personally a lot more comfortable with doing backend development so to ensure that I don’t create a horrible monstrosity we will use Bootstrap to help out with the CSS. We will also use jQuery, which isn’t necessary but it does make it a lot easier to interact with HTML but it can all still be done with just Vanilla Javascript. You can find a working demo of the product page on this website:
Requirements
Before we start we need to ensure that we have our development environment set up and ready to go. Luckily we won’t need to have any package managers or runtimes installed, all you will need is:
- A browser like Firefox or Chrome. I am personally quite fond of the Firefox browser but I might be a bit biased towards Mozilla since my favorite programming language, Rust, sort of came from them. Just note that it needs to be a graphical browser.
- A text editor so that you can edit the source code. I am going to use VS Code, a free and open-sourced editor that was made by Microsoft, although feel free to use any text editor or IDE you prefer.
Setting up the file hierarchy
Head on over to your development folder and create a folder called “E-Commerce” or whatever you want, the name has no impact on the tutorial at all. If you want you could even go all out and generate a SHA512 hash as the name of the project just for the hell of it.
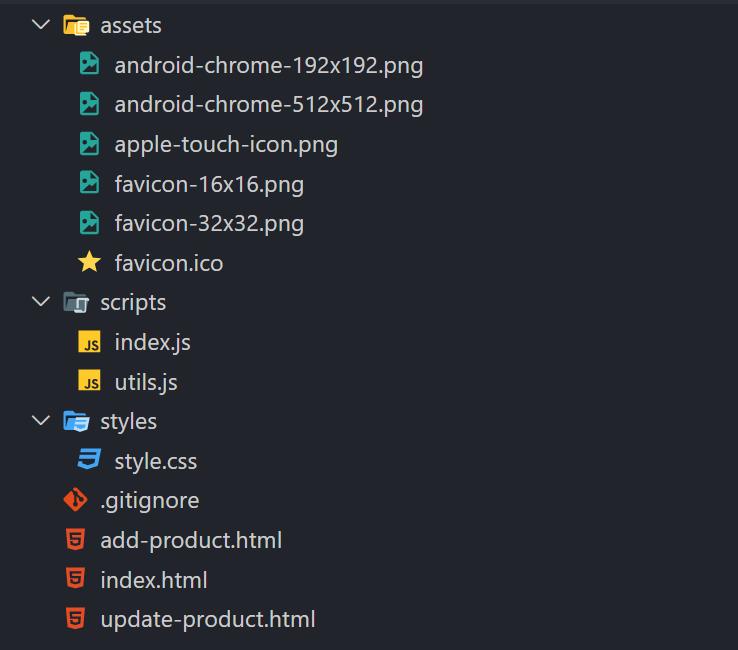
Open the folder in your text editor of choice, you should see a lot of empty void and a lot of cobwebs. Let’s bring some programmer love into this folder to make it feel a bit homier. I find it best to group your scripts so that they will stay organized and easier to manage, so let’s create three folders, namely:
- assets
- scripts
- styles
These will hold, as the names suggest, the assets (such as the favicon for our website and any other images we might want), the scripts (such as our Javascript code for interacting with our HTML), and lastly our styles (such as our CSS code for making our website look all pretty and well designed). Although now we just have more empty folders which means we just have even more cobwebs than we did before… Let’s add some files to each of these folders, including the root folder of our project. We’ll start with the root folder (the project folder that I suggested you call “E-Commerce”), so add the following scripts (don’t worry, we will fill the files with programming and markup syntax momentarily, we just need to create the foundation for our beautiful creation first):
- index.html
- add-product.html
- update-product.html
Next, let’s add the stylesheet to our styles folder:
- style.css
I know what you are thinking, that’s a big folder for just one file all on its own, but the reason we created an entire folder is so that you can keep building onto this project when you are done with the tutorial, that’s why there is so much leftover space so that you can fill it with awesome stylesheets. Next up is the scripts folder:
- index.js
- utils.js
These will be used to interact with both our API and our HTML. Lastly, we need to fill up our assets folder, but to do that we need to head on over to this website I found whilst making this project:
The website is used to create and generate favicons. We will use the website to get an icon for our website so that it will look more professional. Since we are making an E-Commerce product page, I think it would be fitting if we used a coin emoji as our icon. So click on the Emoji tab, scroll down past the flags… I never realized just how many flags there are in this world. It’s just faster to use Ctrl+F to search for “coin”. Once you found the coin, click on it, and then click download. This should download a zip containing all the icons for our website. Extract the file and then move all the coins from inside the file over to our assets folder in our project. Now that’s all you need to do to set up the foundation of your project, and it should look something like this (the .gitignore is just because my project is on bitbucket, it’s not necessary for the tutorial):
A quick note before we start: If you are going to use VS Code I would suggest installing an extension called: Liver Server by Ritwick Dey. It will allow us to host our website on our localhost, some browsers have issues with loading website from your computer’s file system.
index.html
The entry point into any website is always the index.html file. You can think of it as our home page. If you are new to HTML then you just need to know the basic layout of an HTML page. It is always divided between a and a section. The head section is used for importing external packages, setting our title, importing our stylesheet, and so forth, whilst the body section is used for the actual web page view. We start with the top half of our application first:
We start by declaring the doctype as HTML. We open an tag and set the language of our website as English. Inside our tags we add our head section. The first two meta tags are required by Bootstrap to ensure that the website is reactive on both mobile and desktop. We import a minified (compressed) version of the jQuery library as well as the minified version of the Bootstrap CSS library. We link the stylesheet we created, style.css, as well as the favicon we downloaded earlier. Lastly, we set our website’s title as “WebTutsPlus E-Commerce”. Next up is the section of our index.html file:
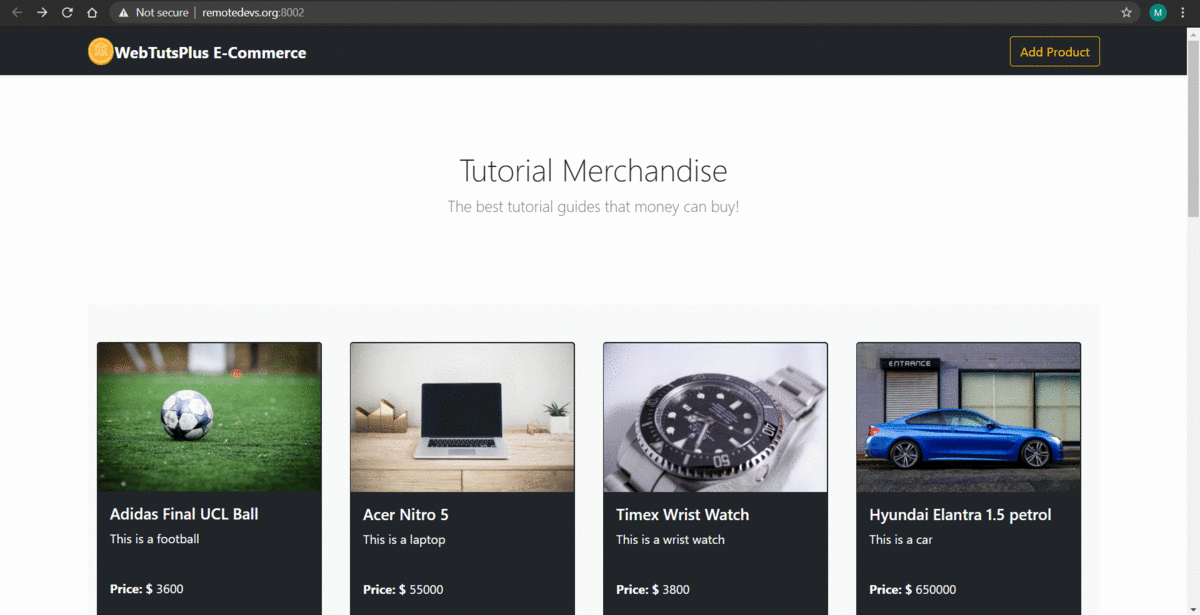
First, we create our website’s navigation bar. This will be at the top of our site. We create a div and add the Bootstrap classes of navbar, navbar-dark, bg-dark, and shadow-sm, this will give us a dark navigation bar. I decided to go with a black-on-white color scheme with a bit of orange/yellow to give it a splash of color. Inside the navbar div, we have a container div to hold our website’s icon, name, and the button we’ll use to navigate to our page for adding a new product. We wrap our icon and name in an tag so that when someone clicks on the tag it will take us back to our index.html file. We wrap our website’s name in tags so that it will be displayed as bold. The final part of our navigation bar is a button with a class of btn and btn-outline-warning, this will give our button a yellow/orange outline, and then it will turn solid if you hover over it. We say it is of type button and we give it an ID of add-product, the ID will be used in our jQuery code, later on, we also give the button a text value of “Add Product” so that the user will know what the button does.
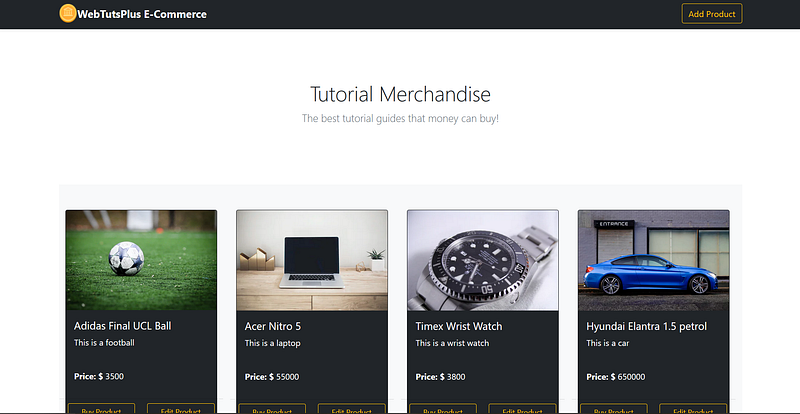
Underneath our navigation bar, we have the main section of our page with a class of container and main. Inside we have a section that has a class of py-5, text-center, and container, This will ensure that the children elements are centered. The next two div’s are to organize our
and
tag, using row and column layout. Inside the div’s we have a heading with a class of fw-light and a text value of “Tutorial Merchandise”, as well as a paragraph with a class of lead and text-muted, with a text value of “The best tutorial guides that money can buy!”. The use of this section was to give a small description of what can be found on this page. Underneath the section we have a div with a class of album, this will be where we save our product cards as we load them dynamically from our server. Note the third div has an ID of “card-container”, we will use this ID to find the object in our Javascript code then automatically append all the cards we find, to it.
Second to last we have the footer of our website, this consists of a tag, a
tag and two paragraph tags. The first paragraph contains a link to the top of the page whilst the second paragraph contains a disclaimer, saying that this tutorial was made by us and it contains a link to our website where you can find more tutorials like this, so you might want to go check that website out when you are done with this tutorial.Lastly, we import our script tags into the file. We import them lastly to ensure that the lest of the website was loaded first, this ensures that everything works as we expect it to. Here is the full code for index.html:
add-product.html
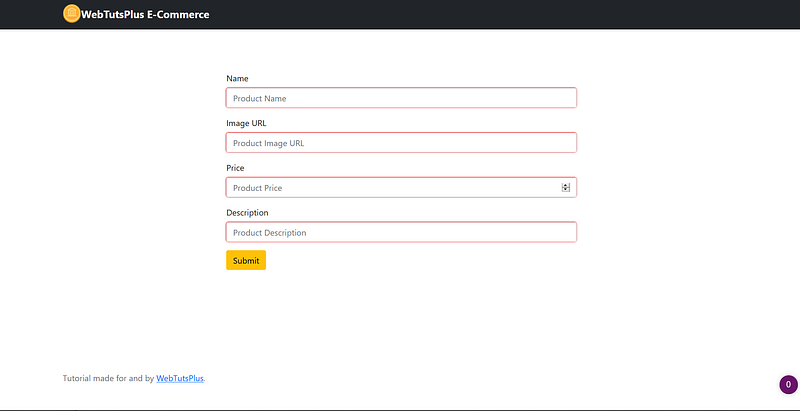
add-product.html is mostly a copy of index.html, the only difference is that we removed the “Add Product” button from the navigation bar and we changed the section to look like this:
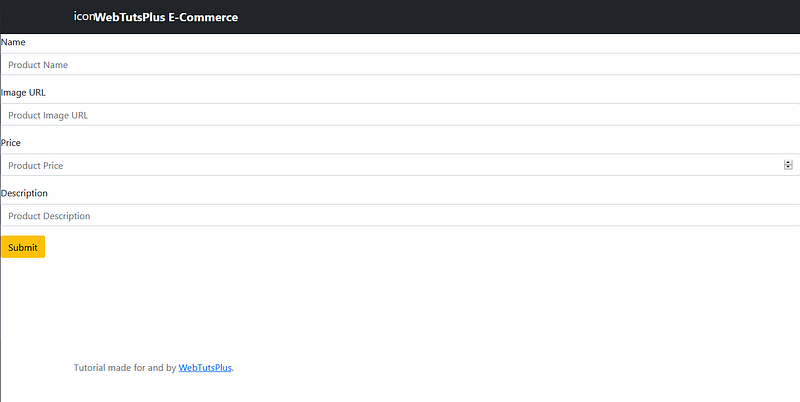
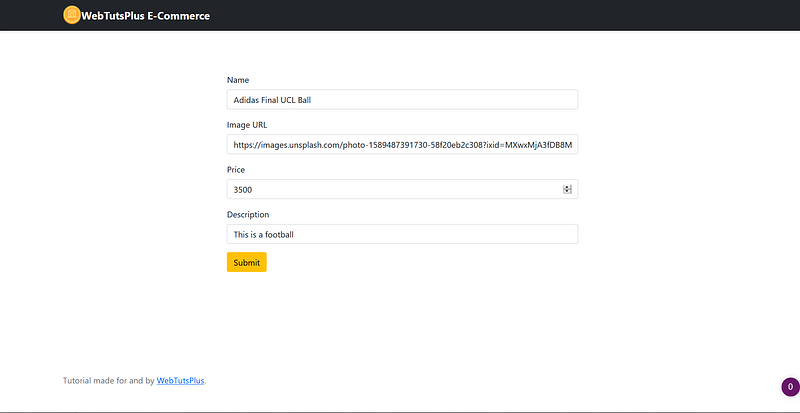
Our section now has a class called form-product, we’ll have to create this later on. Next, we have a form with an ID of “product-form”, this will be used to find it in our Javascript code when we make our website dynamic. Our form has four fields, namely:
- Name
- Image URL
- Price
- Description
Each field contains a label to give it a name so that people will know what we want from them as well as an input field so that people will be able to input the required information. Each input field stipulates the type it wants (like text or number), a class of form-control, and an ID that is linked to the field. Notice also that each field as a “required” tag, this means that we can’t submit the form unless everything has been added. Lastly, we have a button that will trigger the submission of the form when everything has been added. Here is all the code for add-product.html:
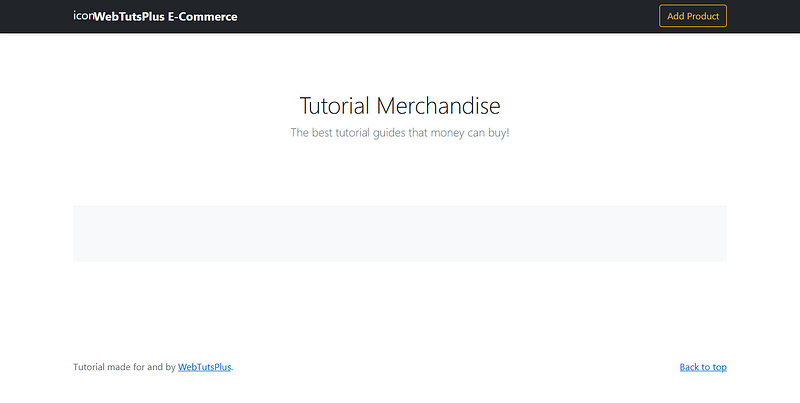
Now I know what you are thinking, this looks kinda… squished at the moment. Don’t worry, once we get to style.css it will look a lot better, just be a little patient.
update-product.html
update-product.html is almost an exact copy of add-product.html, the only difference being that we gave the form an ID of “update-form” rather than “product-form”, but visually they are the same, so here is the full code for update-product.html:
styles/style.css
Before going any further we should probably make our product.html pages look a bit better so let’s add some custom styles to our stylesheet:
These styles are used to give a bit of padding to our forms as well as slightly alter the placeholder image of our cards, which we haven’t created yet so we should get to those next since they come with the benefit of giving our website dynamic functionality. Also, I don’t yet feel experienced enough to quite explain what is going on in the CSS, I am a programmer, not a designer 🙈.
scripts/utils.js
Before we start getting to the main Javascript file I thought we should look into the utility file. This file contains the functions required to interface with the server and send the information to/from our front-end code. The first function is used to get all the products from the server and then create the required cards from those products:
We start by creating some empty array as well as an error message inside some
tags, this will be used to send to our front end if, for some reason, we can’t seem to get any products from the server. We use the fetch function to get the products from the server, we set our products array equal to the array of products that the server sent us. If there is an error we simply just add the error message to our array of cards. If we successfully got some products from the server then we loop through each product and create a card from the values found in the product, and add the card to our array of cards. Finally, we return the array of cards. Next, is the function we’ll use to add a new product to our server:This function receives a Javascript object called “product”. Using the fetch function it sends the product as JSON to the server, if the server receives the new product the function will return a result of true if the function throws an error the function will return a result of false. Our second to last utility function is used to update a product:
This function takes a product ID as well as the product object. Similarly as before this function will send the JSON stringified product to the server, but this time it will use the product’s ID to say which product should be updated. The last utility function will be used to get a single product from our server, this will later be used to update that product:
Similar to the first function, this function retrieves the array of products but this time it tries to find a product with the same ID as the one passed into the function. If it finds the product it will create a new product object to return otherwise it will just return an empty object. I found that I wasn’t able to just return the product object I got from the server so my workaround was to create a new product object. Here is the entire utils.js file:
scripts/index.js
Finally, we get to the brain of our website. These functions, with the help of the utility functions, will be used to add dynamic content to our website. The first function is used to add the cards to the card-container div we created in index.html:
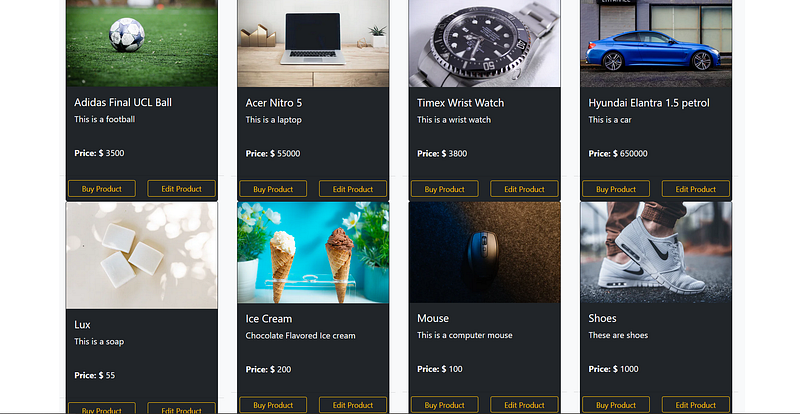
This function uses jQuery to find the div with an ID of “card-container”, once that element is ready it runs the async function. The async function gets all the cards from the server, through the use of the utility function “getAllProducts”. The function then loops over all the cards and appends them to the card container, one-by-one. Each of our cards consists of a photo of our product, a product name, a product description, the product price and, two buttons, one to buy the product and one to edit the product. The next function is run when we press the buy button:
We have one issue though, jQuery can’t easily find dynamically created elements, so to find the button on the card we first have to look at the card container. Once we found the card container we listen to a click event emitted by one of the child elements with an ID of “buy-btn”. If that event is emitted we run a function that will alert the user that they just bought one of our products. Next up is a function that handles page changes to the add-product:
This function listens to click events emitted by the Add Product button we have on our navigation bar on the index.html page. If the click event has been emitted it changes our page to the add-product.html page. The next function handles form submissions from the product form:
Upon submission of the form, we run an async function (because we have to interface with the server). We start by stopping the form from refreshing the page because that would just be annoying and it would be counterproductive for us. We retrieve the values from the form and construct a product object using those values. We send the product object to our utility function and wait for it to return a result. If the result is true then we alert the user that it was successful, when they press the Ok button we’ll send them back to the index.html page. If it was unsuccessful we’ll alert the user that it was unsuccessful but we won’t send them to a new page. When the user clicks on the edit button of a card we want to send them to the update-product.html page, but we also want to load all the current values of the product into the input fields of the form so that it is easier for them to update the product, the next function does that:
When we transition from the index.html page to the update-product.html page we have to send the ID of the product over as well. To do that we added the ID to the href, so when the update form is ready we retrieve the id from the href. We then use that ID to retrieve a product object from our server. We use the product object to fill the form values in so that it is easier for the user to edit. The next function handles the submission of the update form:
The function works almost exactly like the function that handled the form submission for the product form, the only difference being that this function sends the product object to the utility function “updateProduct”. Our last function handles the click event emitted by the edit button:
So this function gets ran when there is a click even emitted from the edit button. I added the product ID to the top-level
tag of the card as the div’s ID, so the function starts by fetching the ID from the tag and sets it equal to the product ID variable. It then encodes the URL with the product ID so that it can be retrieved on the update-product.html page and then lastly it goes to that newly encoded URL. Here is the entire index.js file:That is it, that is our entire front-end product page. Hopefully, this gave you an idea of how difficult it is to create a website from scratch without using any web frameworks like ReactJS, Angular, and VueJS. Here is what our website looks like:
Resources
You can find the source code for this project here:
You can find a working demo of the project here:


