
Leonardo.Ai: Free Alternative to Midjourney — Beginners Tutorial
Create your first AI image, upscale, remove background, and download
AI-generated art is a rapidly growing field that has produced some truly remarkable works. There are different AI art generation tools available, Midjourney is one of the most widely used, but it requires a paid plan that starts at $10 per month. If you are interested in trying out Midjourney, please check out my previous tutorial Create Stunning AI Art in Under 5 Minutes with Midjourney.
Leonardo.ai is a stable diffusion based free alternative to Midjourney. It offers a beginner-friendly platform to create stunning AI-generated art. In this tutorial, we’ll explore the features of Leonardo.ai and guide you through the process of generating your first AI artwork. So, if you’re curious about the world of AI-generated art but don’t know where to start, this guide is the perfect starting point!
Resources for this post:
Let’s get started!
Step 1: Apply for early-bird access to Leonardo.Ai
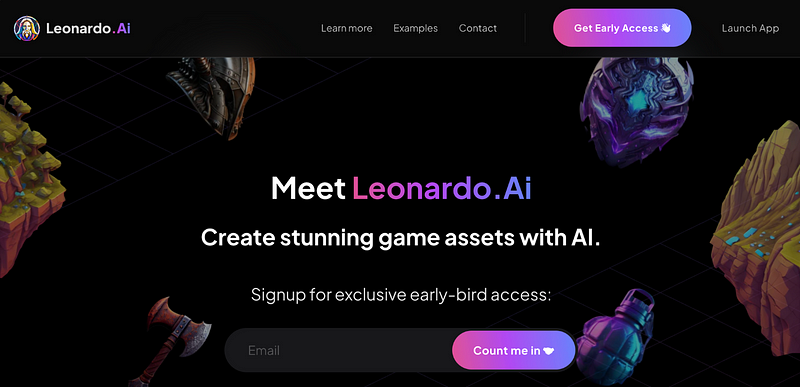
Go to leonardo.ai, enter your email address, and click the purple Count me in button.
Once you click on Count me in, a confirmation page will appear. This page will indicate that a welcome email will be sent to you and will also ask you to join the Leonardo.Ai Discord community. To join the community, simply click on the purple Join Discord button.
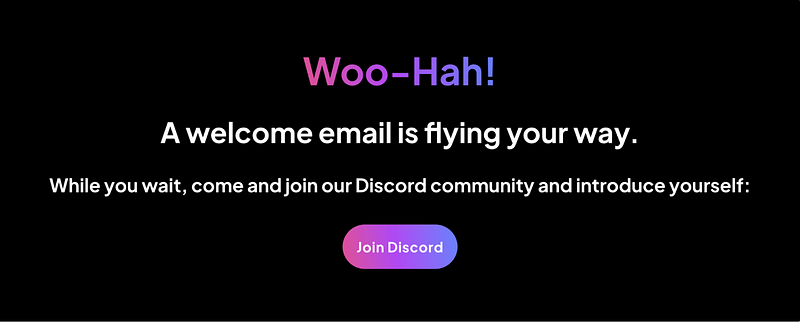
You will receive an email titled “Thanks for your interest in Leonardo.Ai!” which acknowledges your interest in the platform. However, this email does not grant you immediate access. To gain access, you will need to wait for another email with the subject line “You’re In,” which typically takes a few days to arrive.
Step 2: Join Leonardo.Ai Discord server
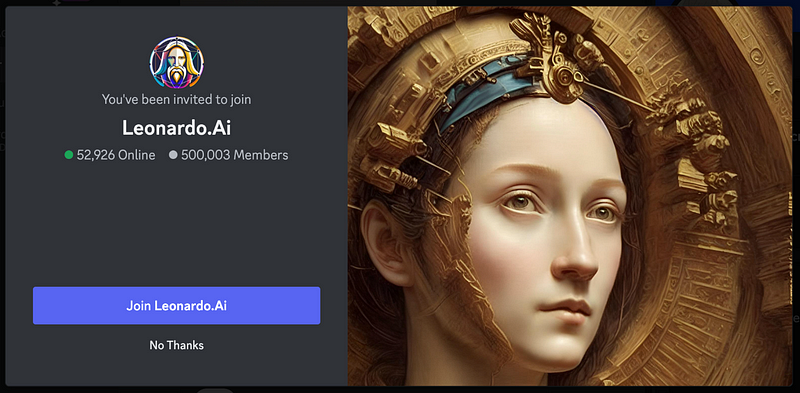
After clicking the Join Discord button, a new window will pop up. Click Join Leonardo.Ai to join the Discord server.
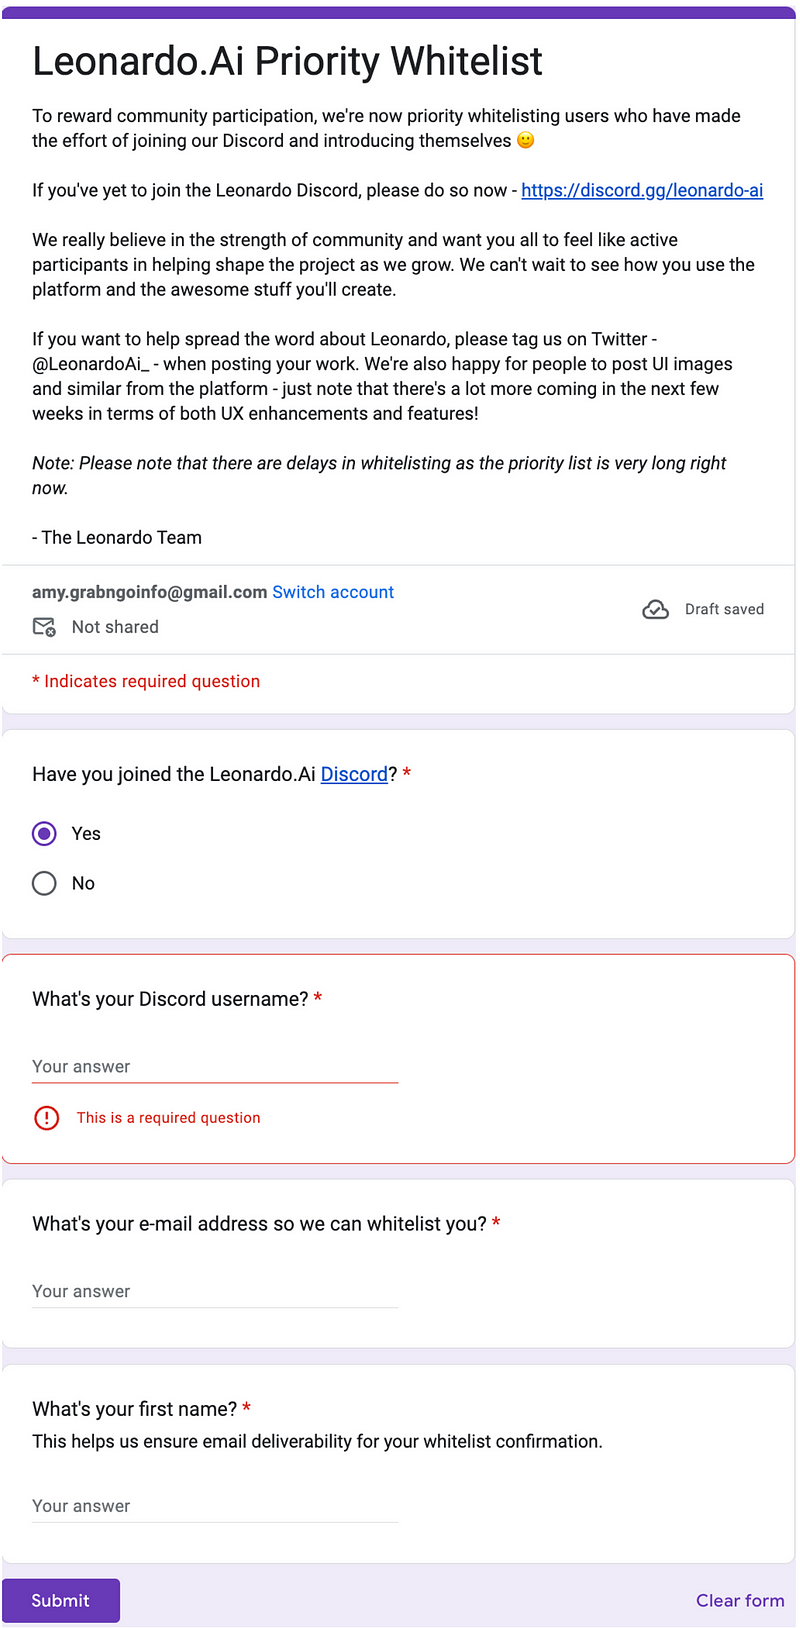
Joining the Discord server is optional but you can expedite the process by completing a form in the #priority-early-access channel.
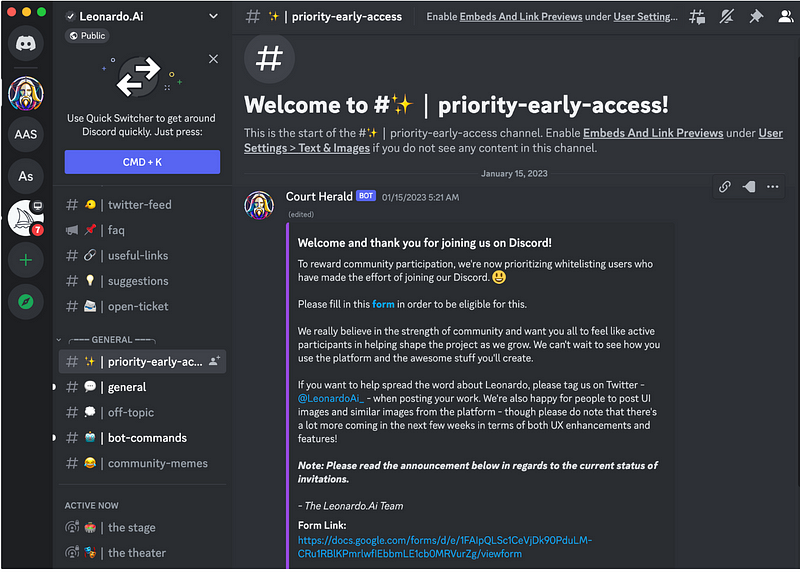
The form only has four questions at the time this tutorial was created in May, 2023. They are:
- Have you joined the Leonardo.Ai Discord?
- What’s your Discord username?
- What’s your e-mail address so we can whitelist you?
- What’s your first name?
After a few days, you will get an email titled “You’re In! Next wave intake for the Leonardo.Ai Platform”, which means you are whitelisted.
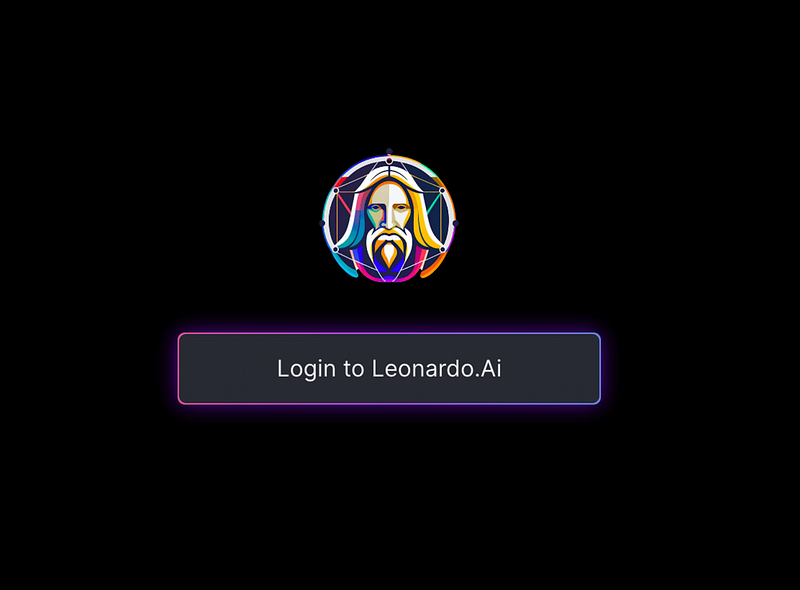
Step 3: Sign up with Leonardo.Ai
Head over to app.leonardo.ai and click the button Login to Leonardo.Ai.
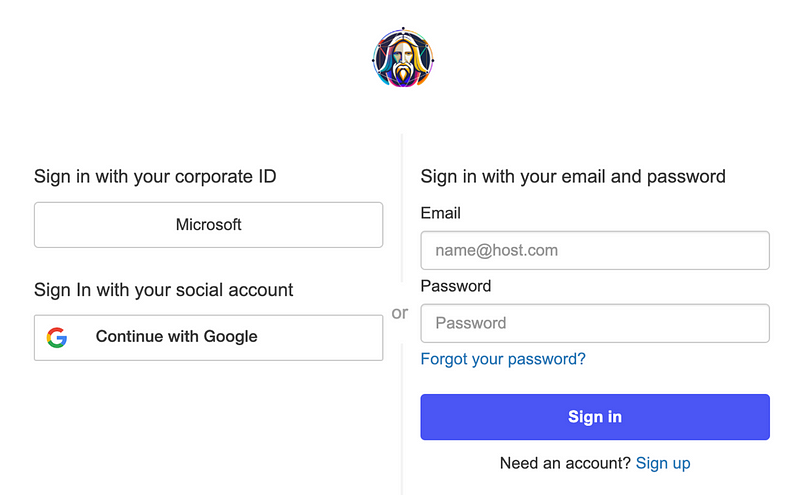
There are different ways to sign up and sign in as shown in the screenshot below. When signing up or signing in, it’s important to keep in mind that the whitelisted email needs to be used.
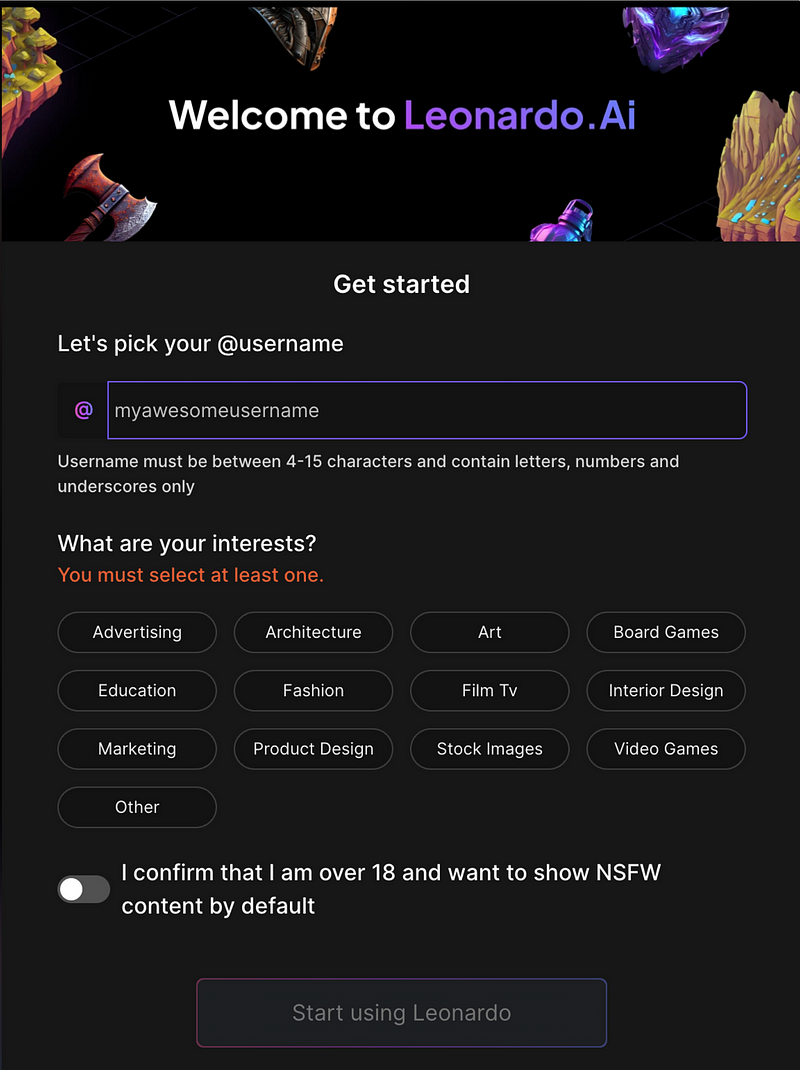
Step 4: Pick your username and get started
Choose a username between 4 and 15 characters and contains letters, numbers and underscores only. Then pick at least one interest from the list of options and click the Start using Leonardo.Ai button.
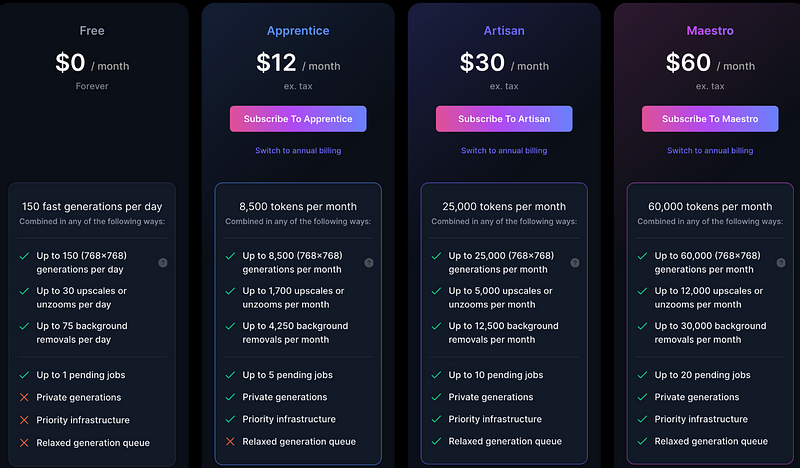
You will see the home screen of Leonardo.Ai with Featured Models and Recent Creations. On the upper left corner, you can see the number of tokens in your account for generating AI images. The free account has 150 tokens per day, up to 30 upscales or unzooms per day, up to 75 background removals per day, and up to 1 pending job per day.
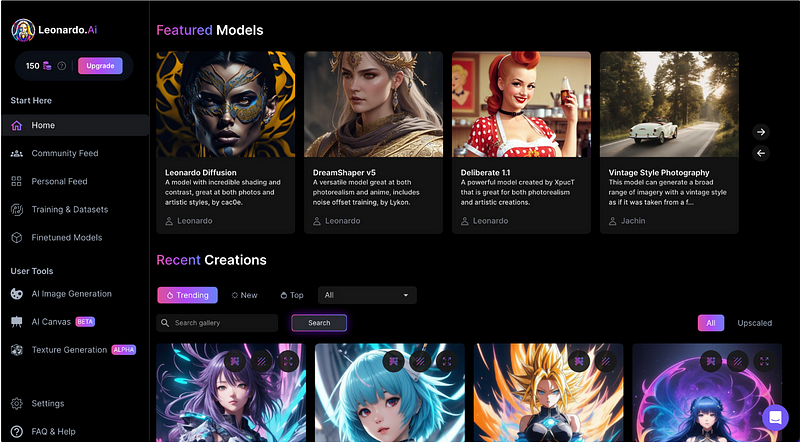
All the images generated by the free account are public. If you are interested in private generations, you can upgrade to a paid plan that starts at $12 per month.
Step 5: Get to know AI Generation Tool on Leonardo.Ai
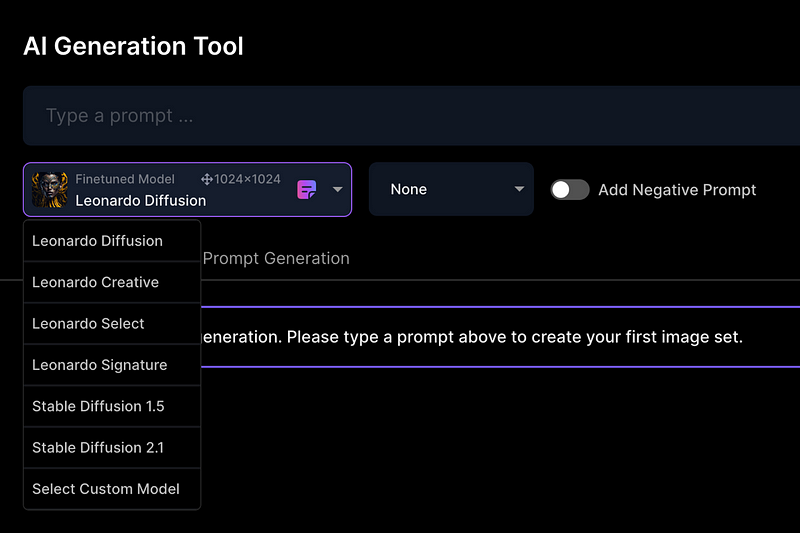
On the left sidebar of the home page, click AI Image Generation under User Tools, you will see a page for image generation prompts and options.
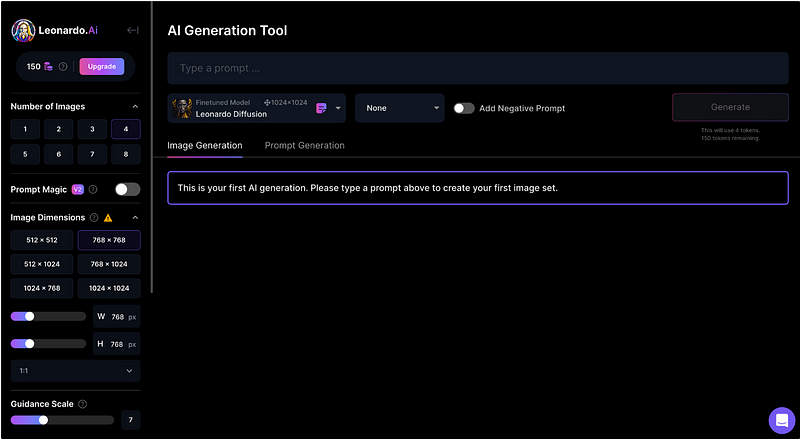
There are different models to select from, and the default model is Leonardo Diffusion.
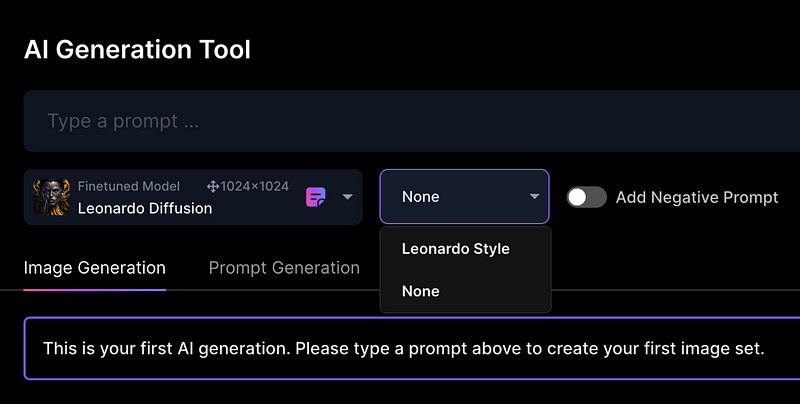
The style can be Leonardo Style or no specific style.
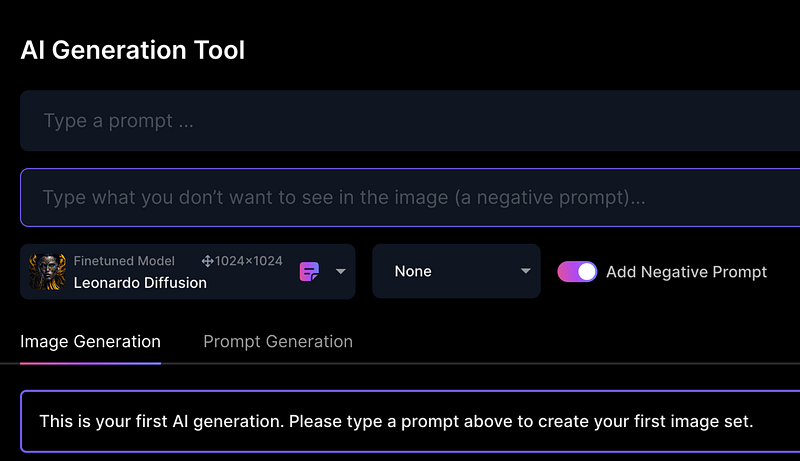
You can also add negative prompts by toggling the Add Negative Prompt option. A new input box will show up where you can type in what you do not want to see in the image.
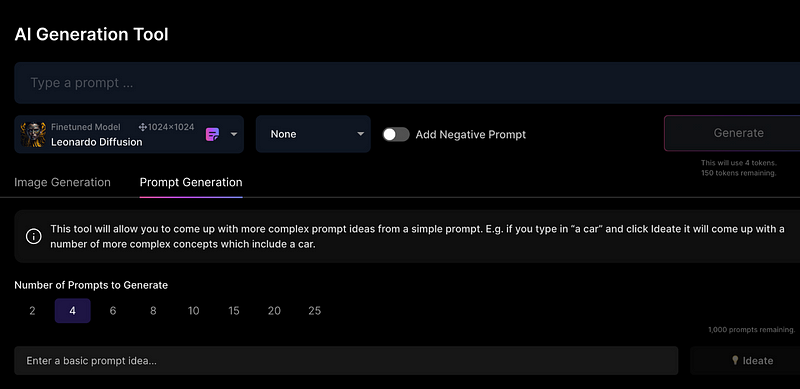
If you would like to get some inspiration on prompts, click Prompt Generation to get more complex prompt ideas.
Step 6: Create your first AI art using Leonardo.Ai
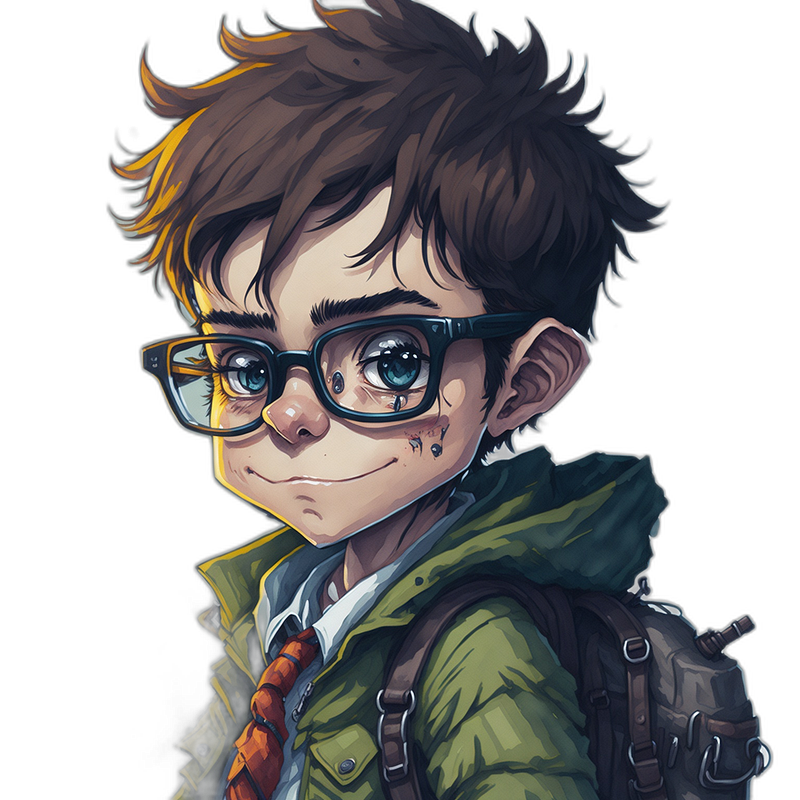
With the prompt “fantasy art, watercolor effect, cartoon, a detailed cute boy wearing glasses with a backpack”, I got the results below. Four images are generated because the default setting for the Number of Images on the left sidebar is 4. After generating four images, we can see that the number of tokens decreased from 150 to 146.

Step 7: Upscale the AI-generated image
The default image dimensions are 768 by 768, but we can change it using the Image Dimensions option on the left sidebar before the image generation.
After image generation, we can increase the image quality by upscaling the image. Out of the four generated images, I like the third one best (because he looks happy 🙂), so I will upscale the third image.
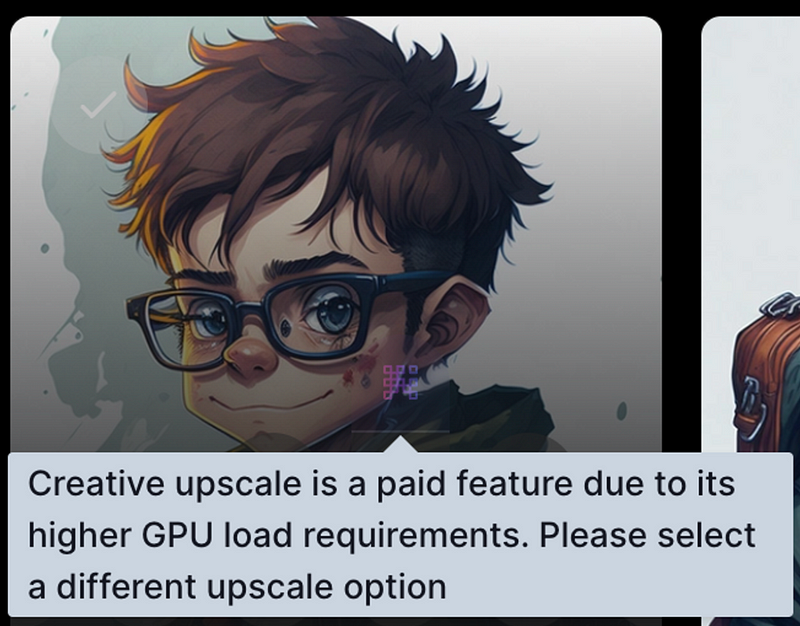
Leonardo.Ai offers different options for upscaling an image. The options show up when your mouse hovers over the image.
- Creative upscale is a paid feature, so you need to get a paid plan to use it.
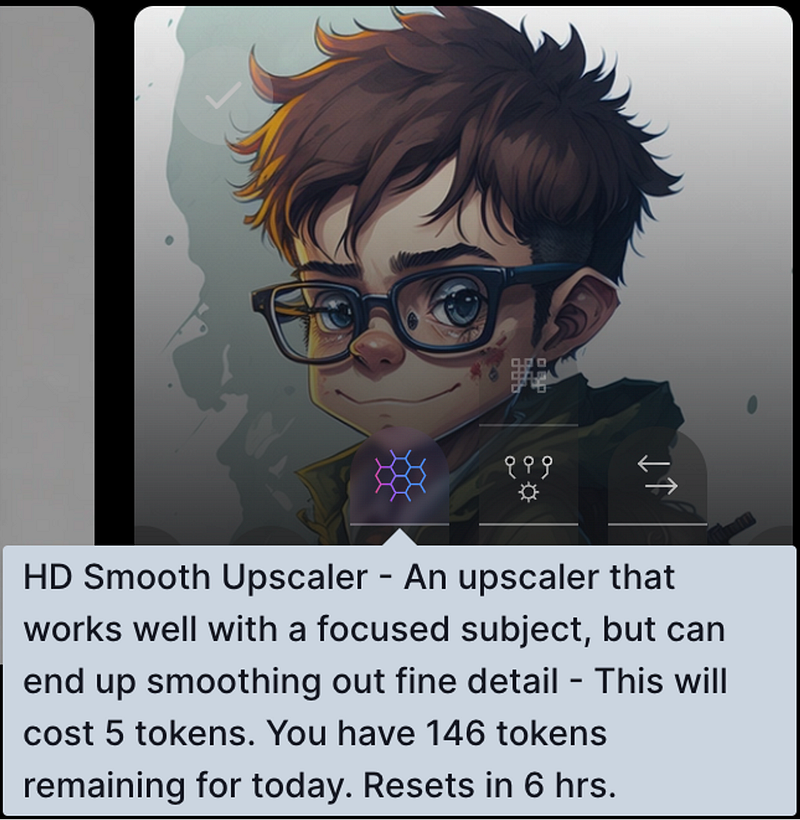
- HD Smooth Upscale works well with a focused subject, but can end up smoothing out fine details. It costs 5 tokens.
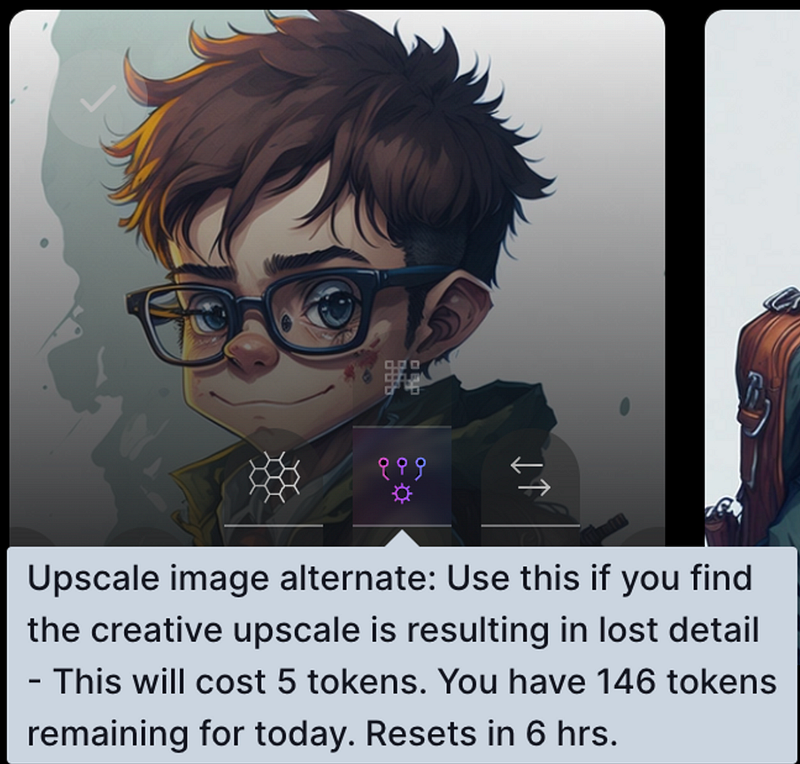
- Upscale image alternate is recommended to use when you find the creative upscale is resulting in lost details. It costs 5 tokens.
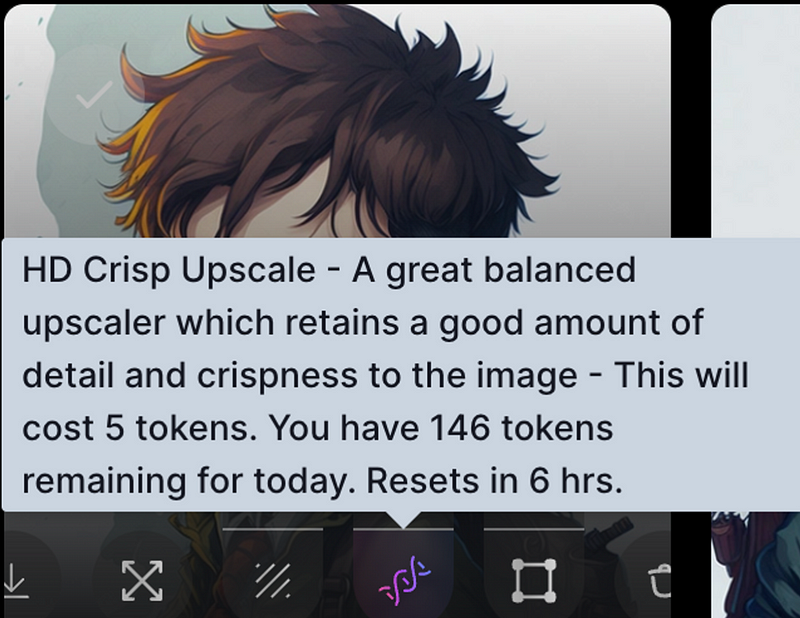
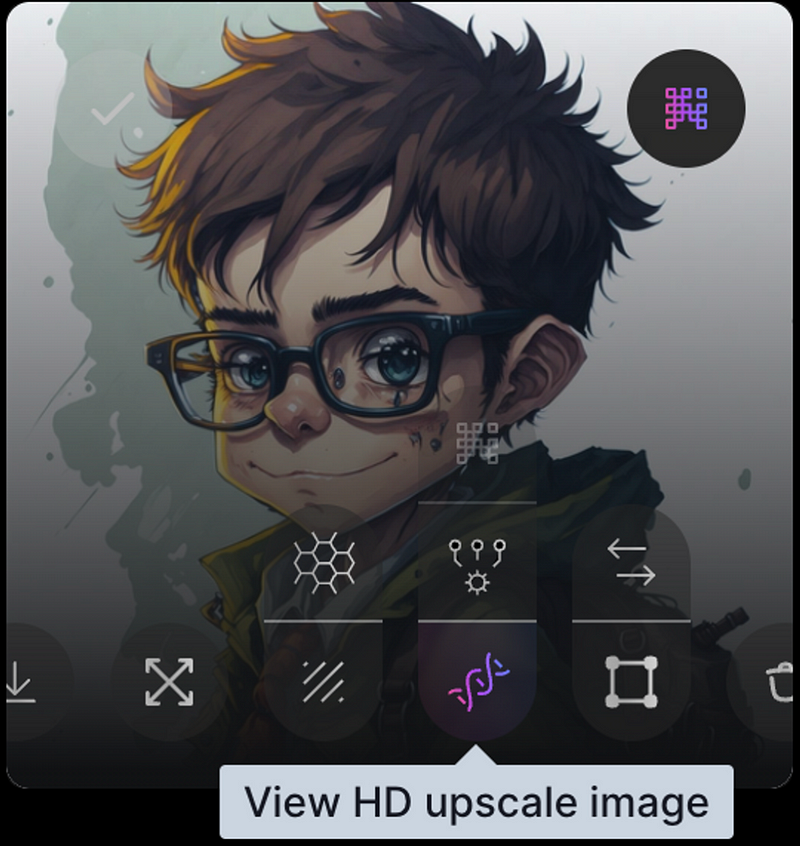
- HD Crisp Upscale is a balanced upscaler that retains a good amount of detail and crispness in the image. It costs 5 tokens. Let’s try this option by clicking the HD Crisp Upscale icon.
After the upscaling is completed we can see an option to View HD upscle image.
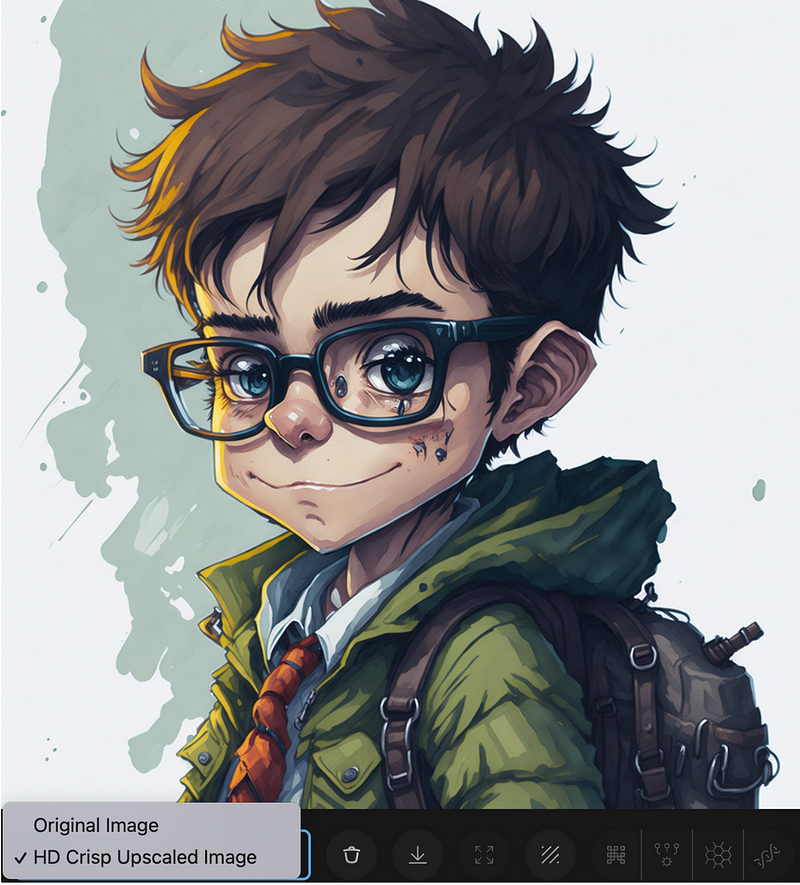
Clicking the HD upscale image icon opens up the image, and there is an option to switch between the original image and the upscaled image. The upscaled image has visibly higher quality than the original image.
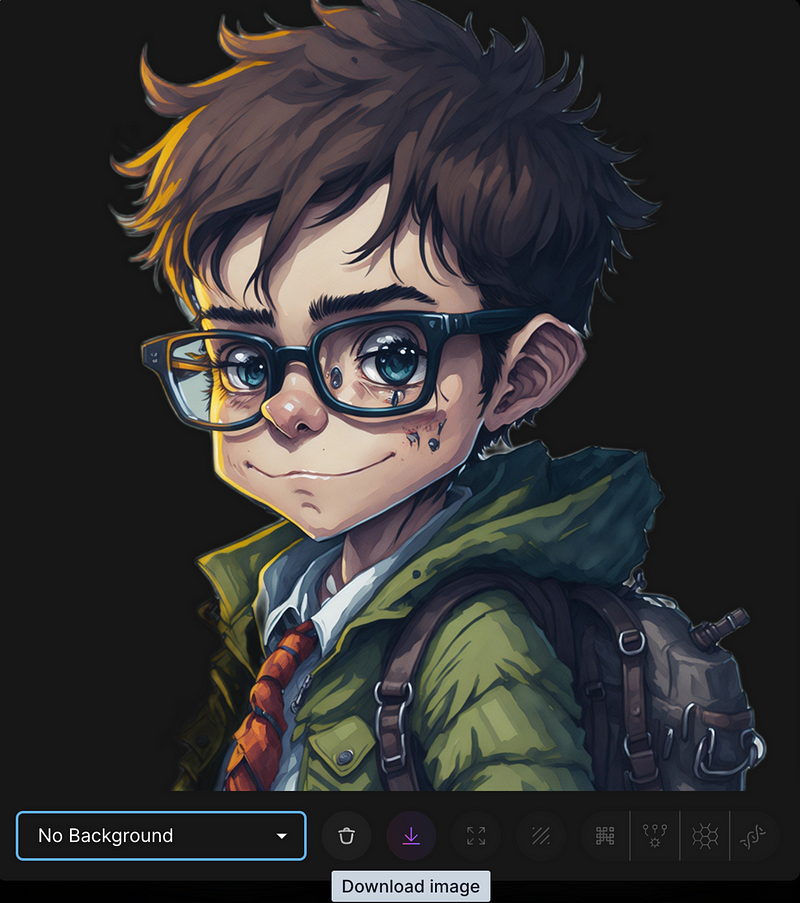
Step 8: Remove the background
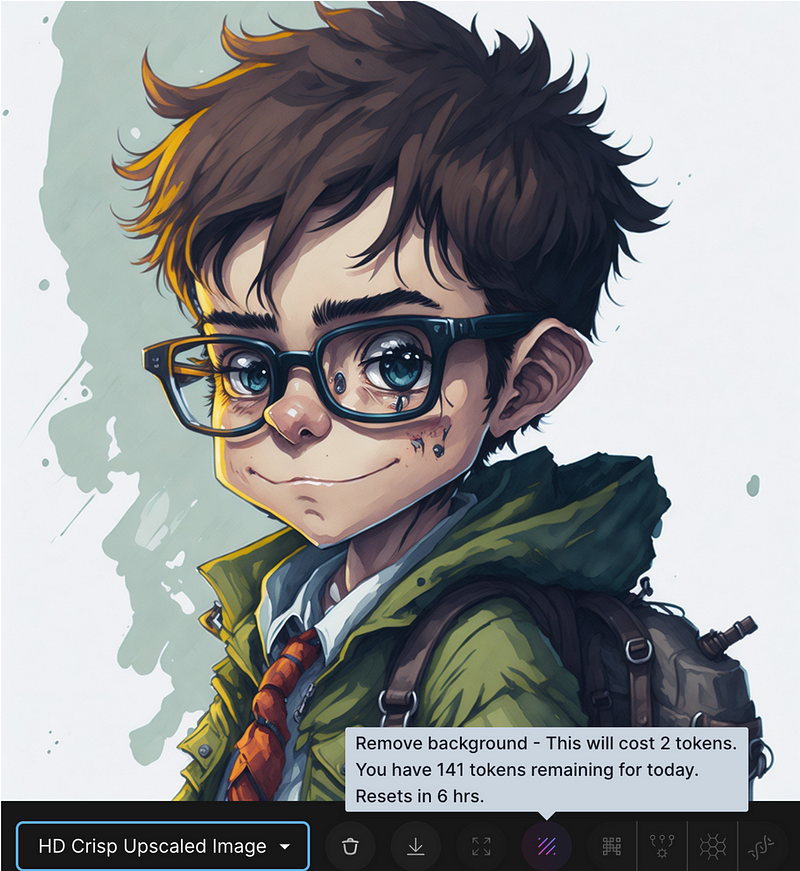
If you would like to remove the background, click the Remove background icon, which costs 2 tokens.
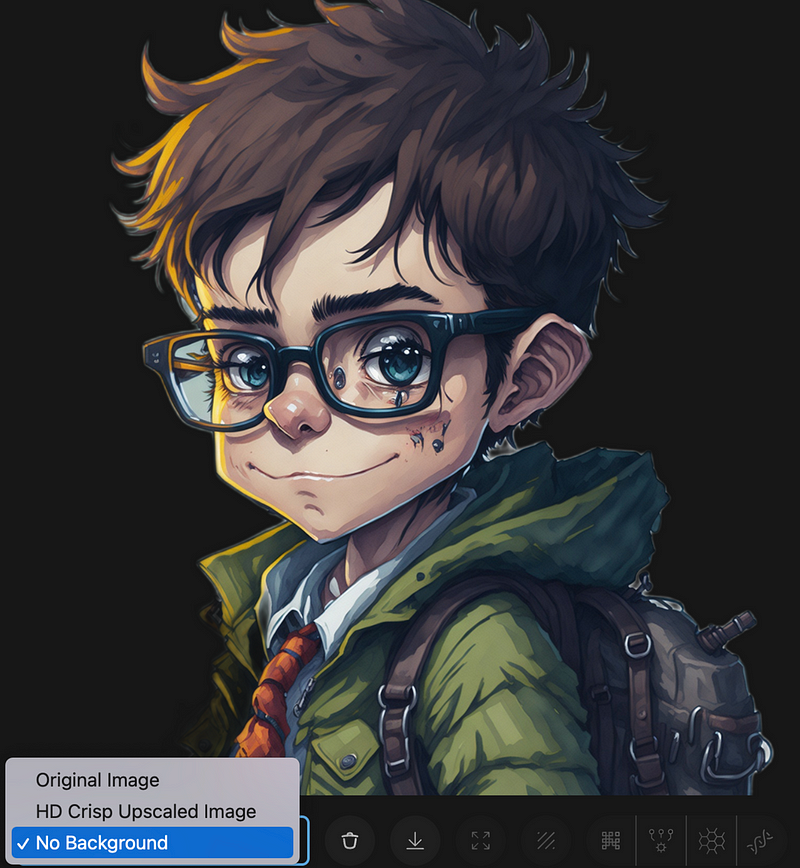
You do not need to do anything for background removal. AI will do all the work and you will be able to see the picture with the removed background by selecting the No Background option from the image list.
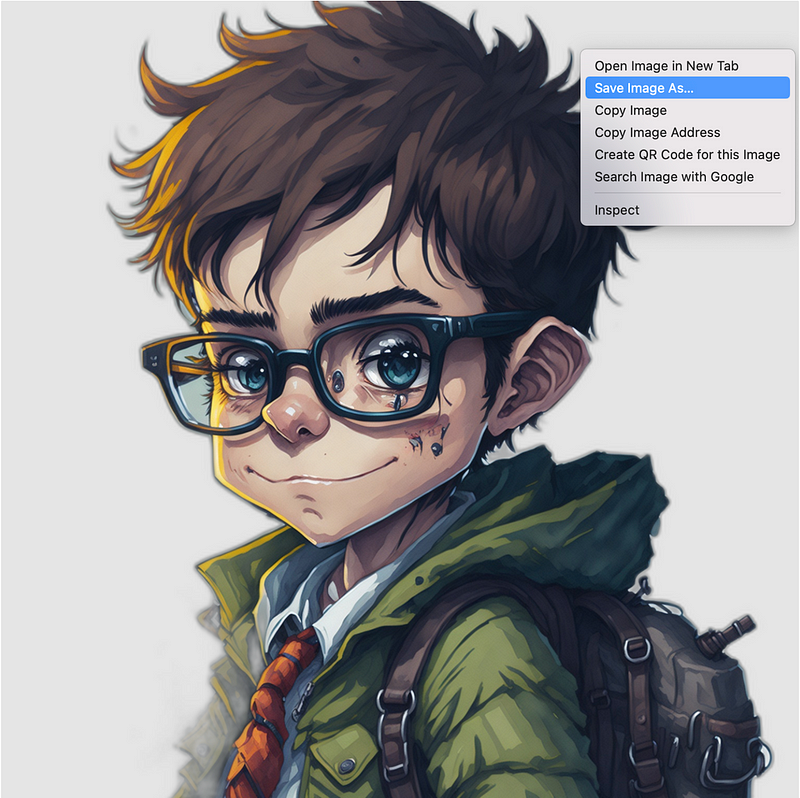
Step 9: Save the image
The image can be saved by clicking the Download image icon.
After clicking the Download image button, the image opens in the browser. Right-click and save the image.
Summary
Do you like the AI image you generated? This tutorial’s intent is to introduce Leonardo.Ai to absolute beginners. We’ll delve into more advanced features in the future, like image-to-image generation and creating your own model. To stay updated with our latest guides and tutorials, don’t forget to subscribe to our YouTube channel or follow us on Medium.com. Embark on this thrilling AI journey and have fun generating your own unique images!
More tutorials are available on GrabNGoInfo YouTube Channel, GrabNGoInfo.com, and LinkedIn.
Recommended Tutorials
- GrabNGoInfo Machine Learning Tutorials Inventory
- Create Stunning AI Art in Under 5 Minutes with Midjourney
- Create Beautiful AI Art Using Python KerasCV StableDiffusion on Google Colab
- Topic Modeling with Deep Learning Using Python BERTopic
- Five Ways To Create Tables In Databricks
- Time Series Anomaly Detection Using Prophet in Python
- Multivariate Time Series Forecasting with Seasonality and Holiday Effect Using Prophet in Python
- Time Series Causal Impact Analysis in Python
- 3 Ways for Multiple Time Series Forecasting Using Prophet in Python


