
Create Beautiful AI Art Using Python KerasCV StableDiffusion on Google Colab
Use text description to generate images in Google Colab and save the images in Google Drive
Stable diffusion is an open source text-to-image deep learning model by stability.ai. In this tutorial, we will talk about how to use the KerasCV’s implementation of stable diffusion to generate beautiful images based on text descriptions. We will talk about:
- How to set up runtime?
- How to generate multiple images using text descriptions?
- How to save the generated images?
Resources for this post:
- Video tutorial for this post on YouTube
- Click here for the Colab notebook
- More video tutorials on Deep Learning
- More blog posts on Deep Learning
Let’s get started!
Step 1: Set GPU as Runtime Type
In the first step, we will set GPU as the runtime type on Google Colab.
If you are not familiar with Google Colab, please check out my previous tutorial Google Colab Tutorial for Beginners.
To change the runtime type, go to Runtime, then click Change Runtime Type.
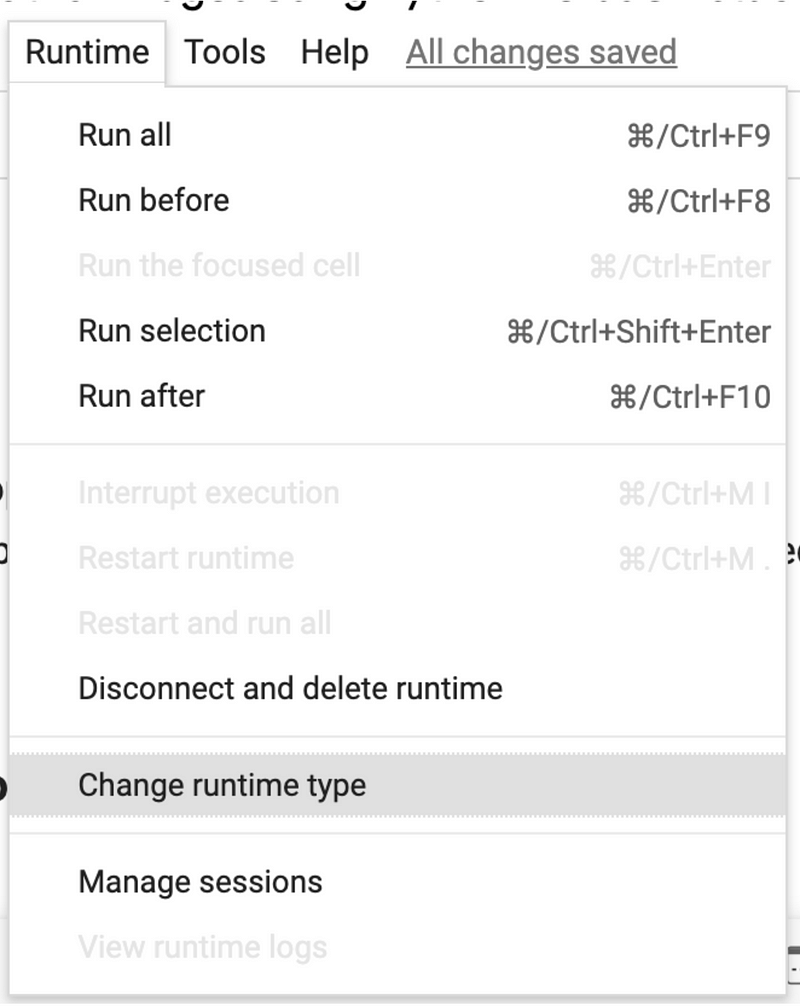
In the popup window, select GPU under Hardware accelerator, then click Save, and GPU is ready for use.

Step 2: Install and Import Libraries
In step 2, we will install and import libraries.
Firstly, let’s install keras-cv.
# Install keras-cv
!pip install --upgrade keras-cv
Then, let’s import keras and keras_cv for the stable diffusion model.
keras.mixed_precision.set_global_policy set the globle dtype policy. mixed_float16 means that every layer uses a 16-bit compute dtype and float32 variable dtype by default.
matplotlib is for displaying the generated images.
Image from Pillow is for saving the images.
# Model
from tensorflow import keras
import  keras_cv
keras.mixed_precision.set_global_policy("mixed_float16")

# Visualization
import matplotlib.pyplot as plt

# Save the image
from PIL import Image
Step 3: Construct Model
In step 3, we will construct a stable diffusion model using keras_cv.models.StableDiffusion.
img_heightandimg_widthare the heights and weights of the output images. We set both to 512, meaning that the output image has 512 by 512 pixels.jit_compileis Just-in-time (JIT) compilation. Settingjit_compile=Trueenables XLA (Accelerated Linear Algebra) compilation, which makes the program run faster.
# Create a model
model = keras_cv.models.StableDiffusion(img_height=512,
                                        img_width=512,
                                        jit_compile=True)
Step 4: Function for Plotting Images
In step 4, we will create a function for printing out the images. The code for this function is from the KerasCV Stable Diffusion documentation.
Stable diffusion can produce more than one image at a time. This plot_images function sets up the subplot and prints all the generated images.
def plot_images(images):
    # Set figure size
    plt.figure(figsize=(20, 20))
    # Loop through each image
    for i in range(len(images)):
        # Subplot setup
        ax = plt.subplot(1, len(images), i + 1)
        # Plot each image
        plt.imshow(images[i])
        # Do not show axis
        plt.axis("off")
Step 5: Generate Images
In step 5, we will generate images using text_to_image.
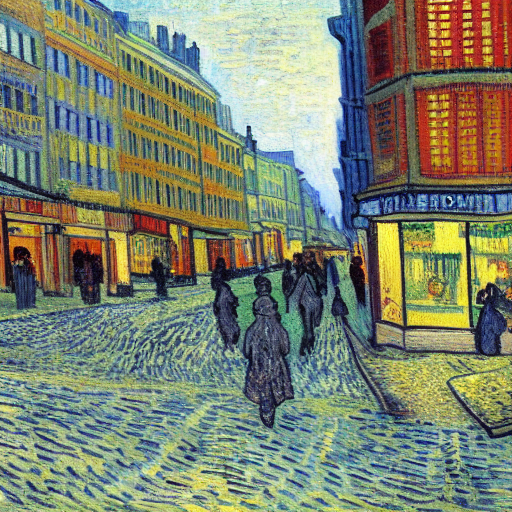
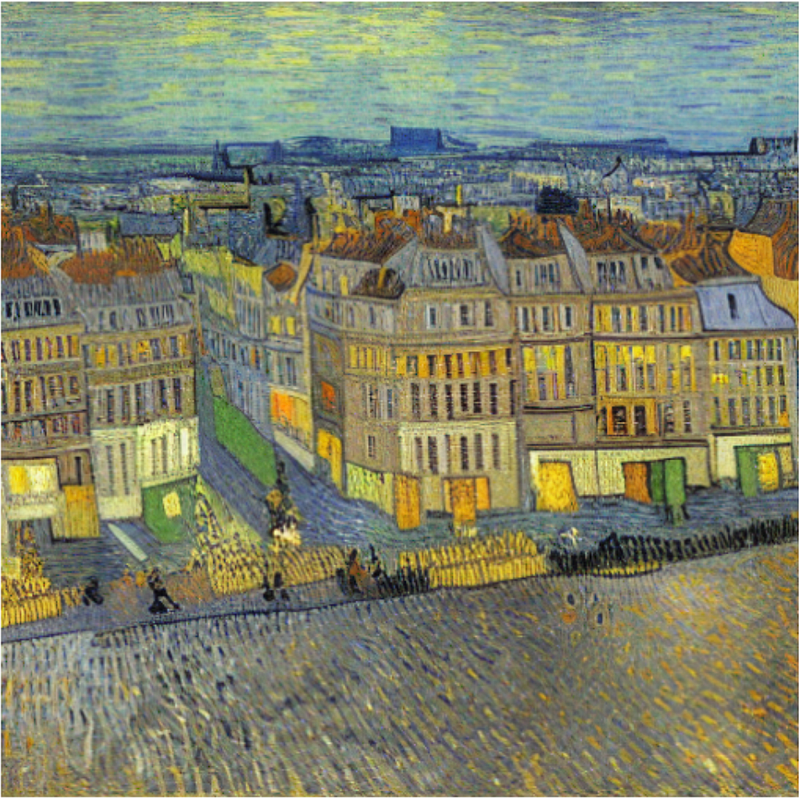
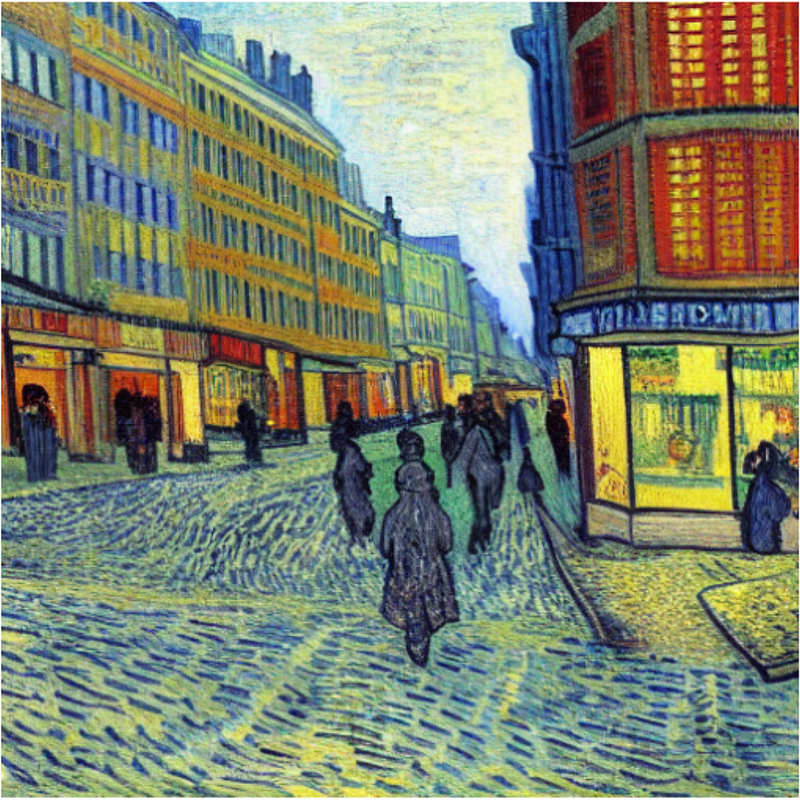
prompttakes the text description for image generation. The text description affects the quality of the image, so be as specific as possible. Explicitly mentioning the name of an artist, the art styles, or art mediums such as acrylic painting and oil painting helps to create the images you are looking for. In my text prompt, I mentioned the artist's namevincent van gogh, the effects of the paintinghighly detailed, sharp focused, the art styleimpressionism, and the mediumoil painting.batch_sizeis the number of images generated.batch_size=2means that two images will be generated.
https://lexica.art/ is a stable diffusion search engine that has different art styles with text prompts created the arts. You can browse it for inspiration and text description examples.
# Create images from text
images = model.text_to_image(prompt="A painting of a city by vincent van gogh, highly detailed, sharp focused, impressionism, oil painting",
                             batch_size=2)

# Plot the images
plot_images(images)
We can see that two beautiful images of cities are created in Van Gogh's style.
Step 6: Save Images
In step 6, we will save the images to Google Drive.
Firstly, let’s connect Google Colab notebook to Google Drive and change the default directly to the project folder. To learn more details, please check out my tutorial Google Colab Tutorial for Beginners.
# Mount Google Drive
from google.colab import drive
drive.mount('/content/drive')

# Change directory
import os
os.chdir("drive/My Drive/contents/cv")
We can use !pwd to check the current directory. The output shows that we are in the correct directory.
# Check the current directory
!pwd
Then, the two images are saved in the Google Drive folder separately as PNG files.
# Save images
Image.fromarray(images[0]).save("van_gogh_city1.png")
Image.fromarray(images[1]).save("van_gogh_city2.png")
More tutorials are available on GrabNGoInfo YouTube Channel and GrabNGoInfo.com.
Recommended Tutorials
- GrabNGoInfo Machine Learning Tutorials Inventory
- Google Colab Tutorial for Beginners
- Topic Modeling with Deep Learning Using Python BERTopic
- Five Ways To Create Tables In Databricks
- Time Series Anomaly Detection Using Prophet in Python
- Multivariate Time Series Forecasting with Seasonality and Holiday Effect Using Prophet in Python
- Time Series Causal Impact Analysis in Python
- 3 Ways for Multiple Time Series Forecasting Using Prophet in Python
- Hierarchical Topic Model for Airbnb Reviews


