
Learning Android Development
Learning Gradle Basic for Android Developer
The missing knowledge for many new Android Developers

The main Development Platform for Android developers today is Android Studio which is engined by IntelliJ IDE. It uses Gradle heavily for its entire project integration.
However, when many new developers started learning Android Development without prior Java or other project experience, the most one touches on Gradle script is to update versions and libraries dependencies. When it comes to more complex needs (e.g. generate a new file during compilation), we’ll have to search high and low for code to copy and help us.
This article aims to educate the basic essentials of Gradle, which will help one explore better in Gradle for any specific need in future Android project setup.
Experiment Gradle without Installation
Gradle is an open-source build automation tool. Like any tool, to use it, one has to install it on the local machine.
Note: When we set up a project in Android Studio, it provide a Gradle wrapper, hence one cannot access the Gradle directly.
But here, instead of installing, we’ll use docker instead, which allow one to explore new tool without need installation. Just type
docker run -it --volume=$(pwd):/<workingfolder> --workdir=/<workingfolder> gradle bashOnce you get into the docker container, you can start using Gradle by typing gradle command.
To understand how to use Docker for the setup, check out the below. It will be very useful to explore other tools as well without installing them.
Additional info, once you have gradle, if you like to start creating a project using gradle, you have use the
gradle --initcommand. To find out what type project you can created, usegradle -q help --task init, and then follow bygradle -q init --type <project type>
Gradle basic task
To start using Gradle, create a build.gradle file, and define the first task.
task hello {
    group 'elye'
    description 'Just say "Hello Gradle"'
println 'Configure Hello Gradle' doFirst {
println 'Hello Gradle First'
}
doLast {
println 'Hello Gradle Last'
} onlyIf {
System.env['SKIP_HELLO'] == null
}
}The group and description is to provide info on the task. They are optional attributes to set. When you run gradle tasks --info to list all the available task, you’ll see your task listed in the Elye group as shown below
Elye tasks
----------
hello - Just say "Hello Gradle"
Task trigger flow
The next one we would like to look at is the execution flow. We see that
println 'Configure Hello Gradle' doFirst {
println 'Hello Gradle First'
}
doLast {
println 'Hello Gradle Last'
}When we run it using gradle Hello, it will shown as below.
> Configure project :
Configure Hello Gradle
> Task :hello
Hello Gradle First
Hello Gradle LastBUILD SUCCESSFUL in 1s
1 actionable task: 1 executedFrom here, we can see that the
- configure step is executed first,
- and follow by the execution
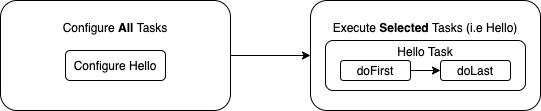
The configure will be applied to all tasks regardless if it is to be executed. i.e. even if Hello is not run, and we run another task, Hello will still be configured.
The execution is only done on the task that is selected i.e. Hello, and other tasks can be omitted.
doFirst vs doLast
From the above simple example, the doFirst and doLast sounds meaningless, as looks like we can just combine together.
Most of the time, this is true, and we can use either one of them (though more often we use doLast, but there are occasions we need them separated, as extensions for a built-in task.
E.g. for copy task, from source to destination
task copyFile(type: Copy) {
    group 'elye'
    description 'Copy Only"'

    def source = projectDir
    def destination = buildDir

    from source
    into destination

    println "Configuring " + projectDir
    doFirst {
        println "Before Copy"
        exec {
         commandLine 'sleep', '10'
        }
    }
    doLast {
        println "After Copy"
    }
}
This task is an extension of the copy task. Before the copy process, it will print Before Copy. After the copy process, it then print After Copy.
Note I put
execto run shell commandsleep 10, so if we wanted, we have 10 seconds to terminate it before the actual copy happens just to see that the copy has yet to happen.
The onlyIf to skip running
There are some occasions, we want to avoid running some task even if it is triggered. To do so, we can use onlyIf as the checking condition.
In the above example, we have
    onlyIf {
        System.env['SKIP_HELLO'] == null
    }
To avoid the task from being executed, we can just set the SKIP_HELLO variable in the environment, then this task will not be executed regardless.
Tasks chaining
In Gradle, as shown above, when we want to run a task, we will state gradle <task name>
If we are lazy to type the task name for a default task always, we can set it in our
build.gradle
defaultTasks 'taskname'However, for all build processes, we usually have more than one task, e.g. setup, compile, test, etc.
Gradle provides us the ability to link related tasks together using. One example command is dependsOn.
E.g.
task hello {
    println 'Configure Hello Gradle'
doFirst {
println 'Hello Gradle First'
}
doLast {
println 'Hello Gradle Last'
}
}task start {
println 'Configure Hello Start' doFirst {
println 'Hello Start First'
}
doLast {
println 'Hello Start Last'
}
}hello.dependsOn startIf we run Hello, it will then run Start first. So executing gradle Hello will result as below
> Configure project :
Configure Hello Gradle
Configure Hello Start
> Task :start
Hello Start First
Hello Start Last> Task :hello
Hello Gradle First
Hello Gradle Last
Linking with Android Tasks
Alright, enough of basic Gradle knowledge. Let’s link them with some real-life Android-related work.
Before we look into some examples, let’s look at the Gradle tasks run when we compile and assemble an apk file. We can run ./gradlew app:assembleDebug to start the assemble task on the Debug build. To show all the task, we use tee out.log.
./gradlew app:assembleDebug | tee out.logThe tasks is then shown on the list and also the out.log file
> Task :app:preBuild
> Task :app:preDebugBuild
> Task :app:compileDebugAidl NO-SOURCE
> Task :app:compileDebugRenderscript NO-SOURCE
> Task :app:generateDebugBuildConfig
> Task :app:checkDebugAarMetadata
> Task :app:generateDebugResValues
> Task :app:generateDebugResources
> Task :app:createDebugCompatibleScreenManifests
> Task :app:extractDeepLinksDebug
> Task :app:processDebugMainManifest
> Task :app:mergeDebugResources
> Task :app:processDebugManifest
> Task :app:mergeDebugNativeDebugMetadata NO-SOURCE
> Task :app:javaPreCompileDebug
> Task :app:mergeDebugShaders
> Task :app:compileDebugShaders NO-SOURCE
> Task :app:generateDebugAssets
> Task :app:mergeDebugAssets
> Task :app:compressDebugAssets
> Task :app:processDebugJavaRes NO-SOURCE
> Task :app:checkDebugDuplicateClasses
> Task :app:desugarDebugFileDependencies
> Task :app:mergeDebugJniLibFolders
> Task :app:validateSigningDebug
> Task :app:processDebugManifestForPackage
> Task :app:mergeDebugNativeLibs
> Task :app:processDebugResources
> Task :app:mergeExtDexDebug
> Task :app:compileDebugKotlin
> Task :app:compileDebugJavaWithJavac
> Task :app:compileDebugSources
> Task :app:mergeDebugJavaResource
> Task :app:dexBuilderDebug
> Task :app:stripDebugDebugSymbols NO-SOURCE
> Task :app:mergeDexDebug
> Task :app:packageDebug
> Task :app:assembleDebug
From the above, you can see that the assembleDebug is triggered last, as all its dependent tasks have to be executed first.
With the above, we now know the sequence of tasks in the compilation flow, and can insert any necessary tasks in between.
Example 1: Setup pre-commit hook.
The blog below shows how one can set up an auto code formatting process when one commit their code into the git repo
It will require a pre-commit hook file copied into the .git folder of the project. In the blog, it states we can set up the task to auto-install the git pre-commit hook
task setupKtlintPreCommitHook() {
    exec {
        workingDir "$rootProject.projectDir"
        commandLine './ktlint', 'installGitPreCommitHook'
    }
}
But this task will need to be executed before anything runs. So the best place to insert is to get it run before app:preBuild
Hence in our build.gradle, we can easily add setupKtlintPreCommitHook before that task by using the dependsOn command as below.
tasks.getByPath(':app:preBuild').dependsOn setupKtlintPreCommitHookExample 2: Setup Properties Files Based on Variant
Sometimes we need to set up new properties files depending on the variant of compilation we are in. One good example is newrelic.properties file that is required when one uses New Relic for the app activity analysis.
In the New Relic document guide, it just states one needs to create newrelic.properties file, but without telling how one can do it.
Fortunately, there’s a forum discussion below show some examples. However, without some Gradle knowledge, it is hard to understand the script and modified to one’s need.
Know we are equipped with the knowledge, we can now understand the script state that. In short, it’s just creating 2 tasks,
- Task that deletes the
newrelic.propertiesfile - Task that creates the
newrelice.propertiesfile.
Their relationship that binds the tasks together is as below.
tasks['clean'].dependsOn taskDeleteNewRelicPropertyFile taskCreateNewRelicPropertyFile.dependsOn taskDeleteNewRelicPropertyFile taskAssembleByVariant.dependsOn taskCreateNewRelicPropertyFile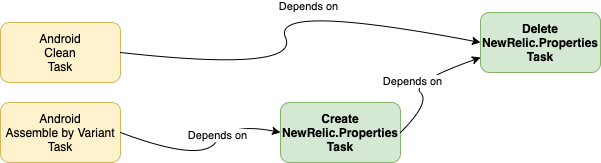
The other nice part of the example is, it also shows how all the tasks can be written in a separate gradle file, and imported into build.gradle using apply from: './newrelic-util.gradle'
Anything more?
The above provided is just basic Gradle understanding helps quick understanding for your Android development work. You can get more extensive info from TutorialsPoint, Vogella, or the Official Gradle Tutorial.
If you like something more on Gradle for Android, explore how to create a Gradle plugin. Below is an example of the Gradle plugin to allow one check for Code Coverage.


