
Instantiate & move random 3D units (Godot 4/C#)
Let’s see how to create and translate 3D scenes :)
One of the key moment of any game dev project is when you start to combine your scenes together, and create some NPCs, mobs or objects at runtime to populate your environments.
And, of course, you usually want to use some randomness to avoid having too similar visuals…
So, in this tutorial, we’ll see how to instantiate some pre-made scenes using C# code, and also how to use Godot’s built-in random utilities to place or move units in a basic scene. We won’t talk collisions or navigation, we’ll just be doing transform-based translations; but we’ll also discuss some quick tricks for getting better randomness in a video game.
As usual, since we’ll be coding our logic in C#, make sure that you have a version of Godot with .NET enabled.
And of course, don’t forget that you can get the demo scene and all the assets from this demo on my Github 🚀 with all my other Godot tutorials.
The tutorial is also available as a video — text version is below:
And now, with all that said, let’s dive in and discover how to make and move units randomly in Godot/C#!
Checking out the demo scene
To start off, let’s have a quick look at the scene and assets I prepared for this tutorial.
Like in previous tutorials from this series, I’m going to use some assets by Kenney for this demo, and more precisely his Space Kit.
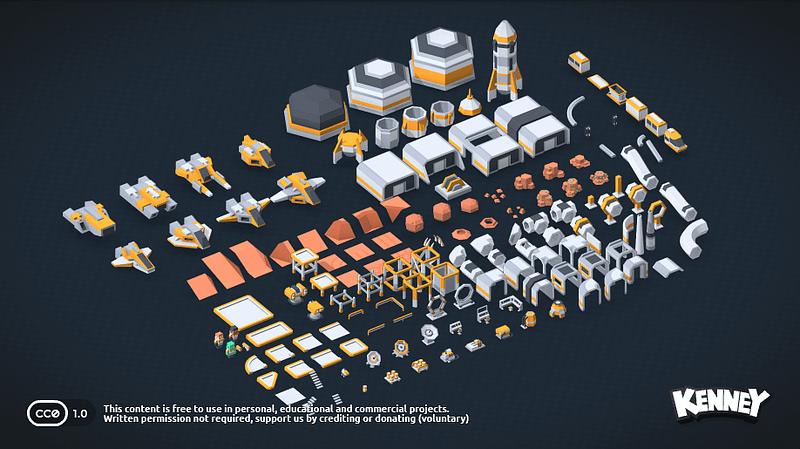
This pack contains a good amount of low-poly cartoony 3D models, with both environment props and little spaceships, so those will be really neat for doing our little units :)
After I imported the GLB spaceship models from Kenney’s pack, I used Godot’s advanced import editor to replace one of their materials, which was a light yellow, with a more vibrant and visible red.
Then, in the 3D scene itself:
- I pre-placed a few rocks, and I added a ground plane with a basic orange material to get my background.
- I added an OmniLight3D node, too, with fairly high range and energy values, to get this point light in the middle and illuminate the entire scene.
- And last but not least, I added a Camera3D to actually render this whole scene. Because I wanted to keep a lo-fi aesthetic, and I wanted the scene to be clear and readable, I decided to go for an orthographic aerial view — so I switched my camera to an Orthogonal projection, and then I simply increased its Size to encompass the entire scene. I also made sure to create an Environment resource in my camera node, so that I could see my final render result inside the editor, instead of using the default debug environment, and also to be able to change the colour profile to ACES and get more interesting colours.
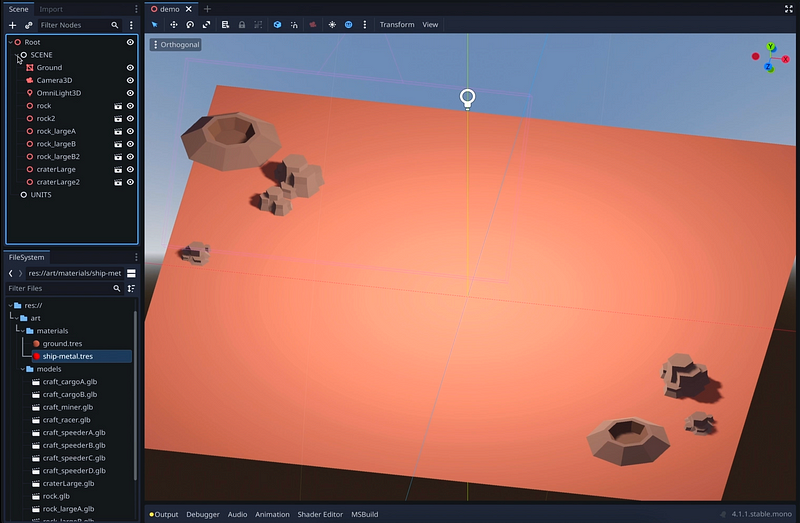
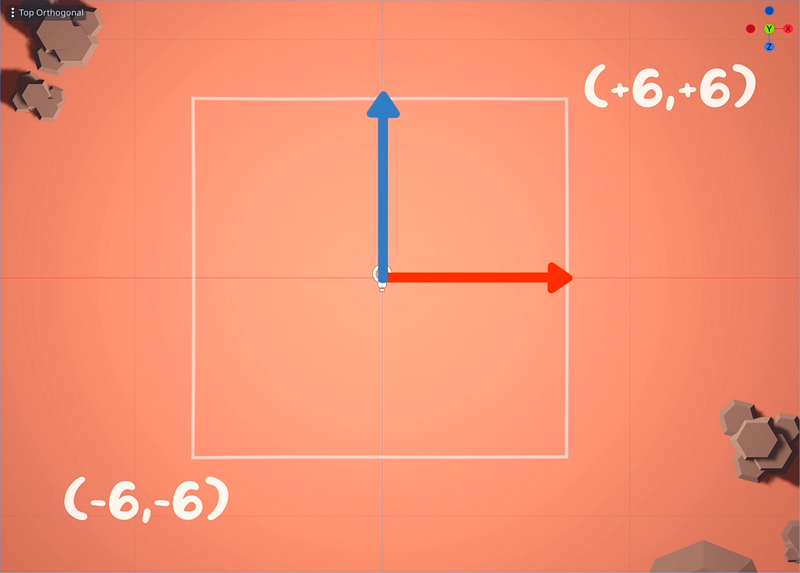
You’ll notice that, in my scene, I’ve left the middle zone empty — because that’s where I want to create and move my units, and we won’t be talking about collisions or navigation so we need to have some “safe area”, to have something that is not too “ridiculous” visually ;)
More precisely, here, this central zone goes from roughly -6 to +6 on both the X and the Z axes:
Finally, a last important note is that, in my hierarchy, all this environment stuff is put under a “SCENE” node, and then I have another basic node underneath called “UNITS”, all in caps, which will be the parent node for all of the unit instances when we create them via our script.
Of course, don’t forget that all of this is available on my Github, and if you want to get this demo scene, just look for the one marked as “TEMPLATE” in the folder 🚀
Ok and now, with this mind, time to prepare our unit prefab!
Setting up our unit scene
So, as we said before, we’re going to use Kenney’s spaceship models for our units. The goal will be to make a list with all of those models and then, pick one at random every time we spawn a new unit.
But even if the model will change, it would still be nicer to have some shared structure between all of our units — typically, if we want to give them some logic to move later on.
So let’s actually create a new scene in our project, with a 3D root node called “Unit”, and save it as a new “unit.tscn” resource.
And just to try it out, let’s drag one of the GLB models from Kenney’s pack in this new hierarchy:
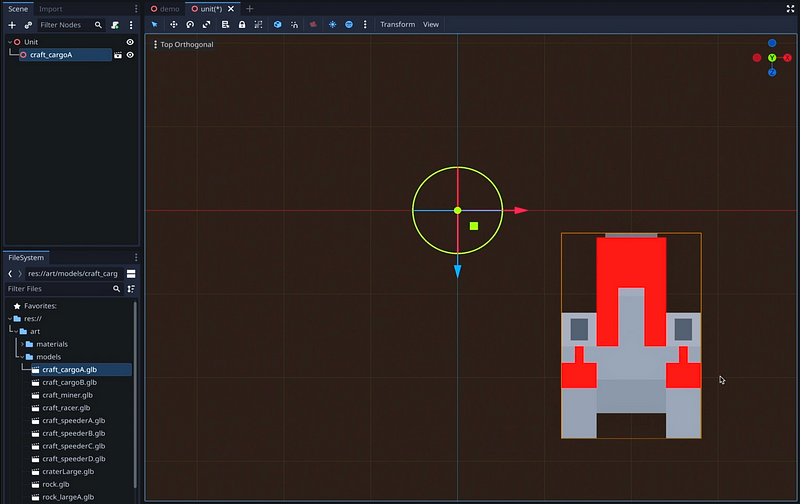
Now, you see that the spaceship is cool… but also, it’s not properly centred on the horizontal plane!
This is something really important to remember whenever you export 3D models to use them in a game engine: a format like GLTF or GLB, or FBX, “remembers” the offset your model had relative to the origin of the scene in the 3D software.
But what if you have some pre-made asset you don’t want to re-edit yourself, but that has some unexpected offset, like here?
Well, a basic solution is to use an intermediate Node3D to counteract this offset. Let’s call it “Mesh”, and put our GLB model instance inside, as a child.
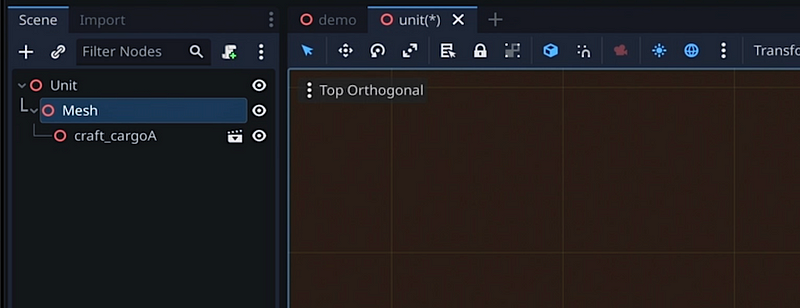
Now, the question is: what exactly is this offset?
Although we could try and eyeball it by looking at the grid in the 3D viewport, a more robust method is to take a look inside the GLB asset itself.
When you click on the direct scene open button in the hierarchy, Godot will tell you that any changes you make in this new scene won’t be saved directly on the asset. That’s because the imported 3D models in a Godot project are read-only, so any changes you make on them won’t be saved in the resource itself.
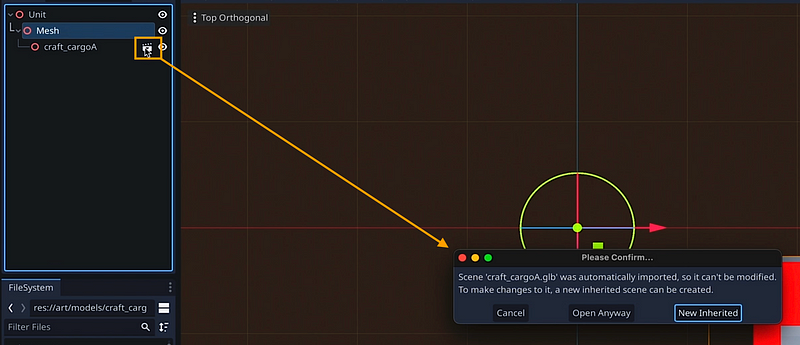
But here, we won’t be modifying anything, so let’s just click “open anyway” ;)
In this scene, we get a nested hierarchy of a few nodes, with some extra Node3D that Godot auto- injected during import:
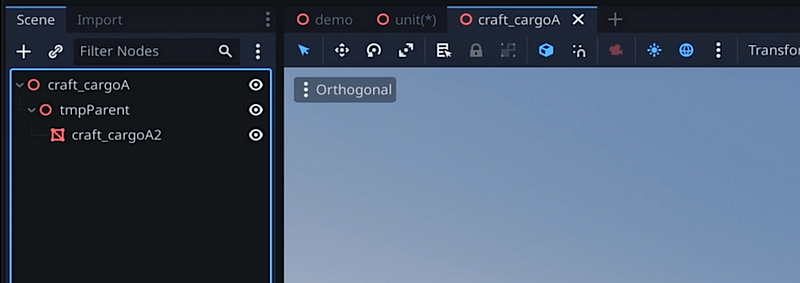
Note: This can actually be configured in the advanced import panel :)
To get the offset, we just need to select the MeshInstance3D node (that contains the actual 3D shape) and check out its Transform position:
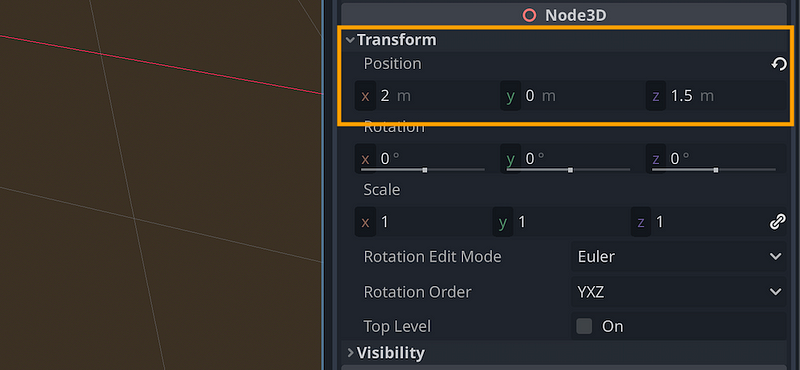
Then, we’ll simply take the opposite of this vector for our new “Mesh” node’s position:
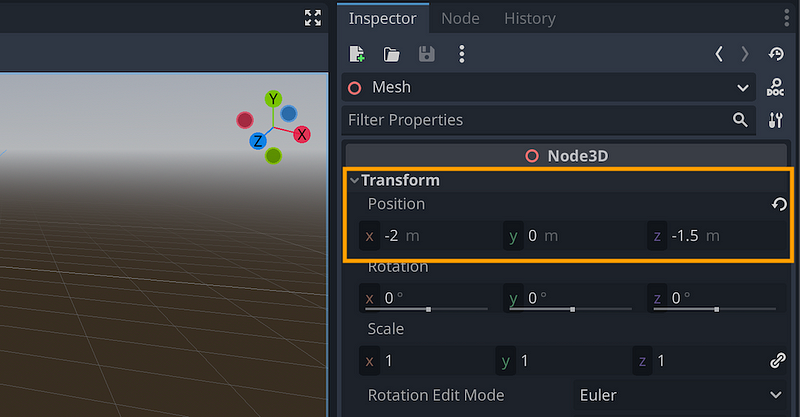
And here we go: the spaceship is now properly centred at the origin!
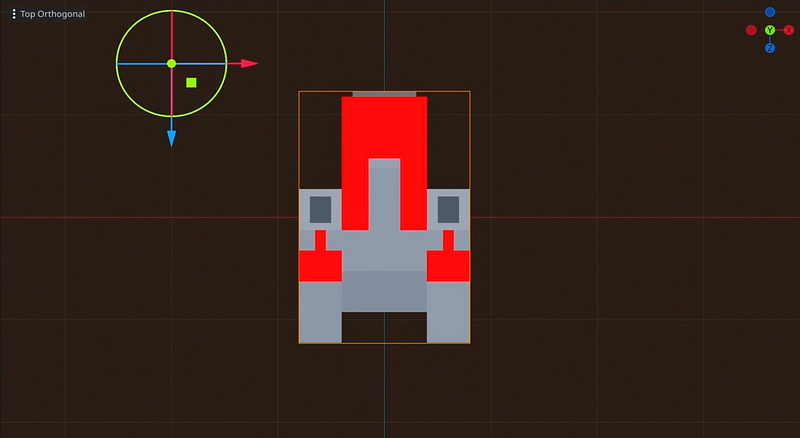
Plus, the good news is that all the GLB spaceship models we imported have this offset so, now, whichever one we instantiate under our “Mesh” node, it will be recorrected to be at the origin of our Unit scene :)
Alright! Now, with this little scene ready, let’s see how to actually use some C# code to instantiate it at runtime and spawn units randomly in our scene…
Creating random units
Because the core of this demo is the random unit generation, let’s just add our logic in a C# script on the root node of the demo scene.
Note: Of course, in a real game, you’d probably have some sub-nodes to organise and separate your logic better, but here — it’s ok cause there is really any other logic, anyway ;)
I’ll rename the script to UnitSpawner.cs, and then open it in my IDE.
using Godot;
using System;

public partial class UnitSpawner : Node3D
{

    public override void _Ready() {}

}
The very first step is to add some variables for the unit generation. More precisely, we want to tell the script what the template unit scene is, what GLB models it can use to fill in this template with specific visuals, and how many units we want to spawn.
In Godot, whenever you want to reference a .tscn file or a 3D model resource in the project, you need to use the PackedScene variable type. And to be able to assign it in the Inspector, as usual, you can expose it using the [Export] attribute:
using Godot;
using System;

public partial class UnitSpawner : Node3D
{

    [Export] private PackedScene _unitPrefab;

    public override void _Ready() {}

}
For the different spaceship GLB model references, we’ll use an array of PackedScenes, because we want to give a list of possibilities to pick from:
using Godot;
using System;

public partial class UnitSpawner : Node3D
{

    [Export] private PackedScene _unitPrefab;
    [Export] private PackedScene[] _units;

    public override void _Ready() {}

}
And finally, for the number of units to spawn, we can just use an integer with a default of 3 or 4, for example:
using Godot;
using System;

public partial class UnitSpawner : Node3D
{

    [Export] private PackedScene _unitPrefab;
    [Export] private PackedScene[] _units;
    [Export] private int _nUnits = 4;

    public override void _Ready() {}

}
While we’re at it, let’s also setup some private constant integer values for the minimum and maximum coordinates on the X and Z axes, that match our central empty area:
using Godot;
using System;

public partial class UnitSpawner : Node3D
{

    [Export] private PackedScene _unitPrefab;
    [Export] private PackedScene[] _units;
    [Export] private int _nUnits = 4;

    private const int _MIN_X = -6;
    private const int _MAX_X =  6;
    private const int _MIN_Z = -6;
    private const int _MAX_Z =  6;

    public override void _Ready() {}

}
Now, let’s come back to the Godot editor and recompile our project in the MSBuild tab so that the engine knows about our new exposed variables. (As a reminder, that’s because we’re using C# and not GDScript, so we need to build the project for our changes to be taken into account!)
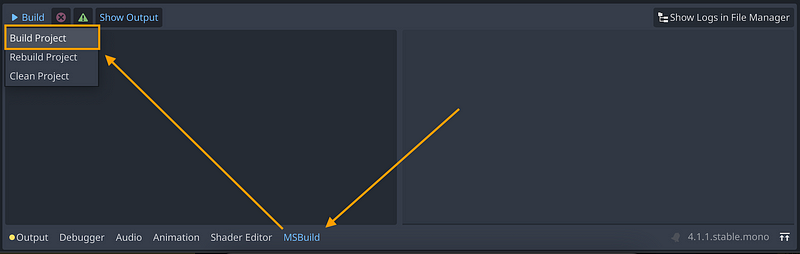
With our new slots available in the Inspector, we simply have to drag the “unit.tscn” scene to the _unitPrefab scene reference, and our GLB models to the _units array:
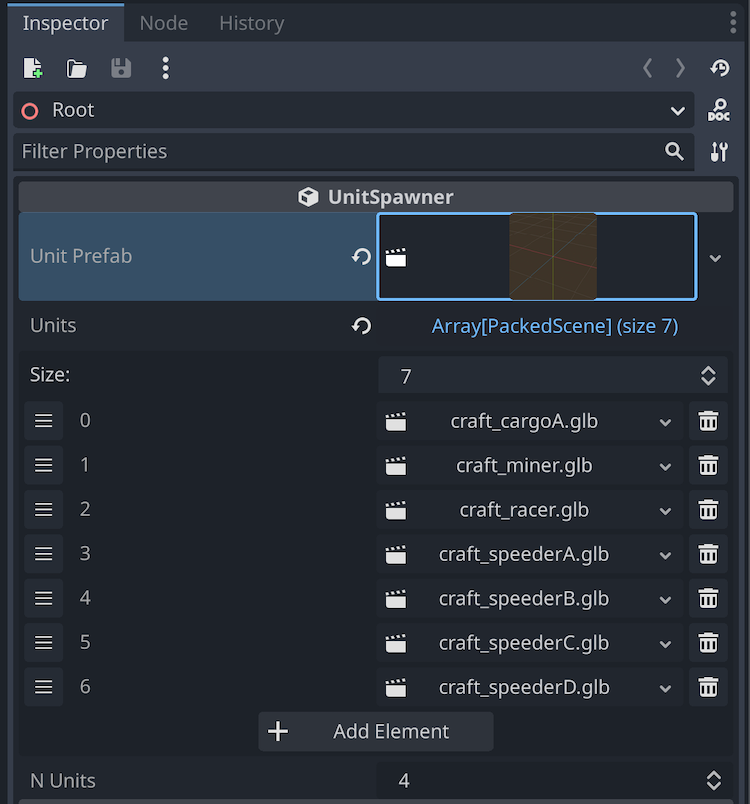
Then, back in our script, it’s time to use all of this to really create units! :)
Since we’re going to generate units when the game starts, but we might also want to regenerate them later on, let’s extract our generation logic to a _GenerateUnits() function, and call it from the _Ready() hook:
using Godot;
using System;

public partial class UnitSpawner : Node3D
{

    // ...

    public override void _Ready() {
        _GenerateUnits();
    }

    private void _GenerateUnits() {}

}
In this _GenerateUnits() function, we’re going to do a for-loop based on our number of units, and in each iteration, spawn a new unit in the scene:
private void _GenerateUnits() {
    for (int i = 0; i < _nUnits; i++) {
        // spawn unit
    }
}
So first, we’ll take our template _unitPrefab scene and call the Instantiate() method on it. We can even use the C# generic type syntax to specify we want to get it as a Node3D object:
private void _GenerateUnits() {
    for (int i = 0; i < _nUnits; i++) {
        // spawn unit
        Node3D u = _unitPrefab.Instantiate<Node3D>();
    }
}
This Instantiate() method is basically a way to turn a PackedScene variable reference into an actual node instance — and by specifying the type, or by casting the result to a specific node type, you can then get a component on your new instance.
Now, we can even set the name of our new node to some custom value, for example:
private void _GenerateUnits() {
    for (int i = 0; i < _nUnits; i++) {
        // spawn unit
        Node3D u = _unitPrefab.Instantiate<Node3D>();
        u.Name = $"Unit_{i}";
    }
}
However, for now, this node isn’t actually added to the scene — meaning that it’s currently just a new node “floating about”, in the air, outside of the scene tree. To truly add it and show it in the scene, we need to call AddChild() on our “UNITS” sub-node:
private void _GenerateUnits() {
    for (int i = 0; i < _nUnits; i++) {
        // spawn unit
        Node3D u = _unitPrefab.Instantiate<Node3D>();
        u.Name = $"Unit_{i}";
        GetNode("UNITS").AddChild(u);
    }
}
(This will put our new instance as a child of the “UNITS” node.)
The next step is where we’re going to apply some randomness. But, because we’re on a computer, not true randomness…
Indeed, something important to remember is that computers can’t really do complete randomness. Instead, they do what we call pseudo-random number generation, where you start from some specific value, and then you just do some crazy calculations to produce new numbers that aren’t too similar at each step.
The trick is that, of course, all the generated numbers taken as a whole do look pretty random — we can’t see any logic that ties one to the other… But, behind the scenes, this is all just a very strange mathematical progression, that starts from one arbitrary point. Which means that if you restart from the same point… you’ll actually get the exact same weird series of numbers every time, which kinda defeats the purpose of randomness!
That’s why it’s called pseudo-randomness: although they appear random, the random numbers generated by a computer actually depend on the origin point, called the seed, and the underlying algorithm that computes the next numbers. And since, most of the time, you can’t change this algorithm, the only solution to really get different results each time is to use a different seed…
This is what Godot’s GD.Randomize() function does. The idea is to call it just once at the beginning of our game, so typically here in our UnitSpawner’s _Ready() function, to set a new starting point — a new seed:
using Godot;
using System;

public partial class UnitSpawner : Node3D
{

    // ...

    public override void _Ready() {
        GD.Randomize();
        _GenerateUnits();
    }

    private void _GenerateUnits() { ... }

}
Note: By the way, if you’re testing your game and you want to get fully deterministic runs, instead of random ones (meaning that you want the “pseudo-random” numbers to be the same each time), you should rather use the GD.Seed() function and pass it some arbitrary constant value :)
Now that our pseudo-random number generator is initialised, we can use it in the _GenerateUnits() function. For the position, for example, we can create a new Vector3 and, in the X and Z coordinates, use GD.RandRange() to generate an integer position in our central zone:
private void _GenerateUnits() {
    for (int i = 0; i < _nUnits; i++) {
        // spawn unit
        Node3D u = _unitPrefab.Instantiate<Node3D>();
        u.Name = $"Unit_{i}";
        GetNode("UNITS").AddChild(u);

        // random placement
        u.GlobalPosition = new Vector3(
            GD.RandRange(_MIN_X, _MAX_X),
            0f,
            GD.RandRange(_MIN_Z, _MAX_Z)
        );
    }
}
Note: The GD.RandRange() returns an integer if you give it to integer range values, or a double if you give it to double range values.
We can of course do something similar to rotate our instances randomly around the vertical axis — but we just need to be careful to convert the random values in degrees to radians:
private void _GenerateUnits() {
    for (int i = 0; i < _nUnits; i++) {
        // spawn unit
        Node3D u = _unitPrefab.Instantiate<Node3D>();
        u.Name = $"Unit_{i}";
        GetNode("UNITS").AddChild(u);

        // random placement
        u.GlobalPosition = new Vector3( ... );
        u.RotateY(Mathf.DegToRad(GD.RandRange(0, 360)));
    }
}
And finally, we can use another random built-in, called GD.Randi() (for “random integer”), and compute its modulo with our total number of ref models:
private void _GenerateUnits() {
    for (int i = 0; i < _nUnits; i++) {
        // spawn unit
        Node3D u = _unitPrefab.Instantiate<Node3D>();
        u.Name = $"Unit_{i}";
        GetNode("UNITS").AddChild(u);

        // random placement
        u.GlobalPosition = new Vector3( ... );
        u.RotateY(Mathf.DegToRad(GD.RandRange(0, 360)));

        // random visual
        int unitType = (int)(GD.Randi() % _units.Length);
    }
}
This last line gives us a random integer between 0 and the number on the right of the modulo — so, here, it gives us a random index of a model to load.
All that’s left to do is to pick this PackedScene model in the list, instantiate it, and add it as a sub-child nested in the “Mesh” node of our new instance of the Unit scene:
private void _GenerateUnits() {
    for (int i = 0; i < _nUnits; i++) {
        // spawn unit
        Node3D u = _unitPrefab.Instantiate<Node3D>();
        u.Name = $"Unit_{i}";
        GetNode("UNITS").AddChild(u);

        // random placement
        u.GlobalPosition = new Vector3( ... );
        u.RotateY(Mathf.DegToRad(GD.RandRange(0, 360)));

        // random visual
        int unitType = (int)(GD.Randi() % _units.Length);
        u.GetNode("Mesh").AddChild(_units[unitType].Instantiate());
    }
}
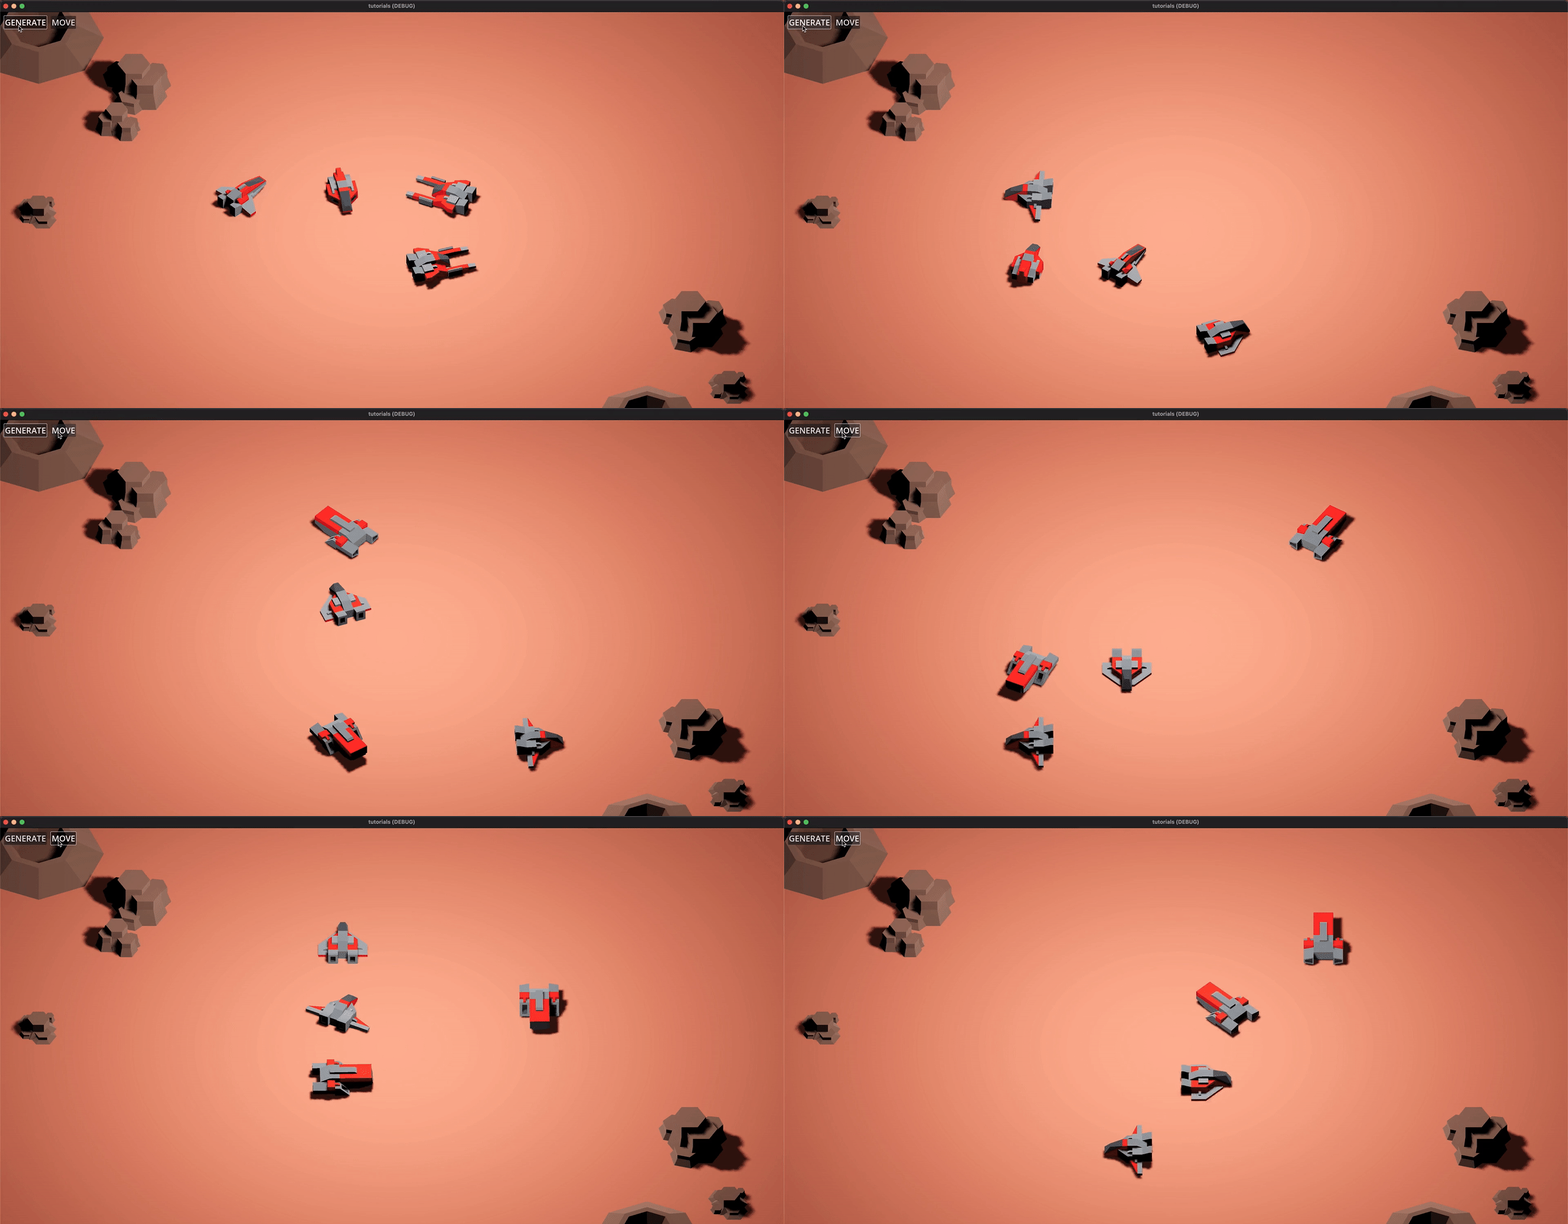
And that’s it! If we run our game from the demo scene, you see that when it starts, we now have a few spaceships that have spawned in the middle of the map!
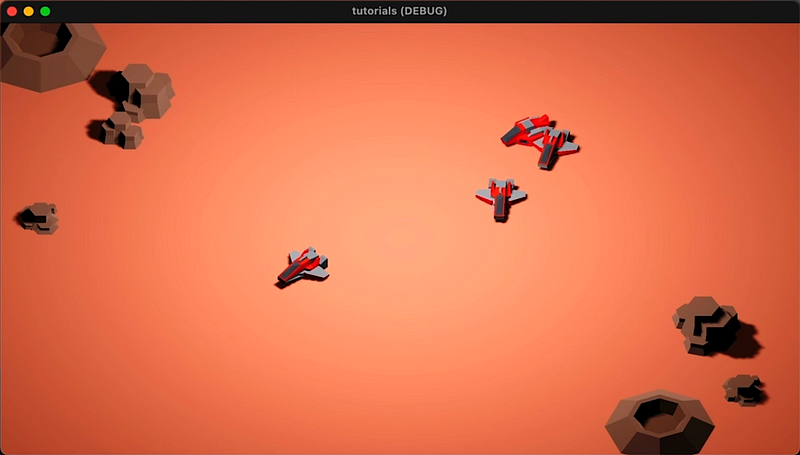
Though, to make it easier to test our logic and see the positions indeed change every time, we should prepare a basic debug system with a button that triggers a re-spawn of our units.
To setup this debug, let’s go ahead and add a _RegenerateUnits() function to our UnitSpawner script, that simply empties all the previous children in the “UNITS” node and calls the _GenerateUnits() function again:
using Godot;
using System;

public partial class UnitSpawner : Node3D
{

    // ...

    public override void _Ready() { ... }
    private void _GenerateUnits() { ... }

    private void _RegenerateUnits()
    {
        foreach (Node n in GetNode("UNITS").GetChildren())
            n.Free();
        _GenerateUnits();
    }

}
Then we’ll rebuild our project and create a very basic UI with a simple button inside. We’ll leave the button options to the defaults, and just change its label to “GENERATE”:
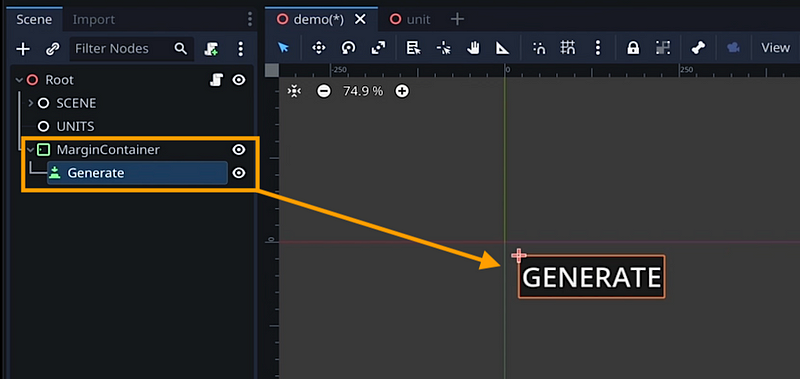
Note: If you’re curious about how to do this, I’ve actually discussed the fundamentals of making UIs in Godot in this previous episode of the series, so be sure to check it out!
Finally, we’ll link its Pressed signal to our new _RegenerateUnits() function:
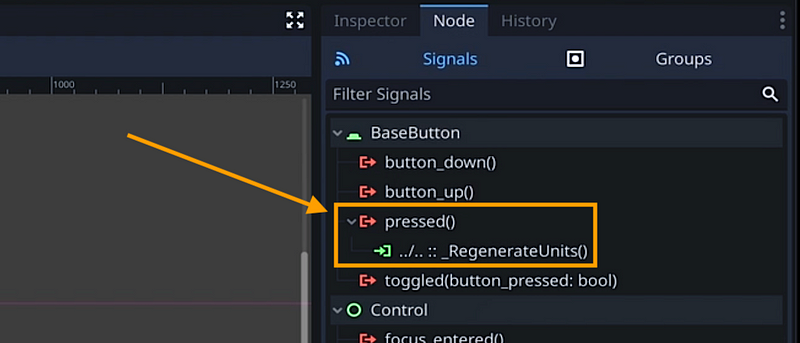
And here we are! If we restart our game, we now get some initial random units, and then we can click our debug button to re-create new ones and see the positions are indeed different each time :)
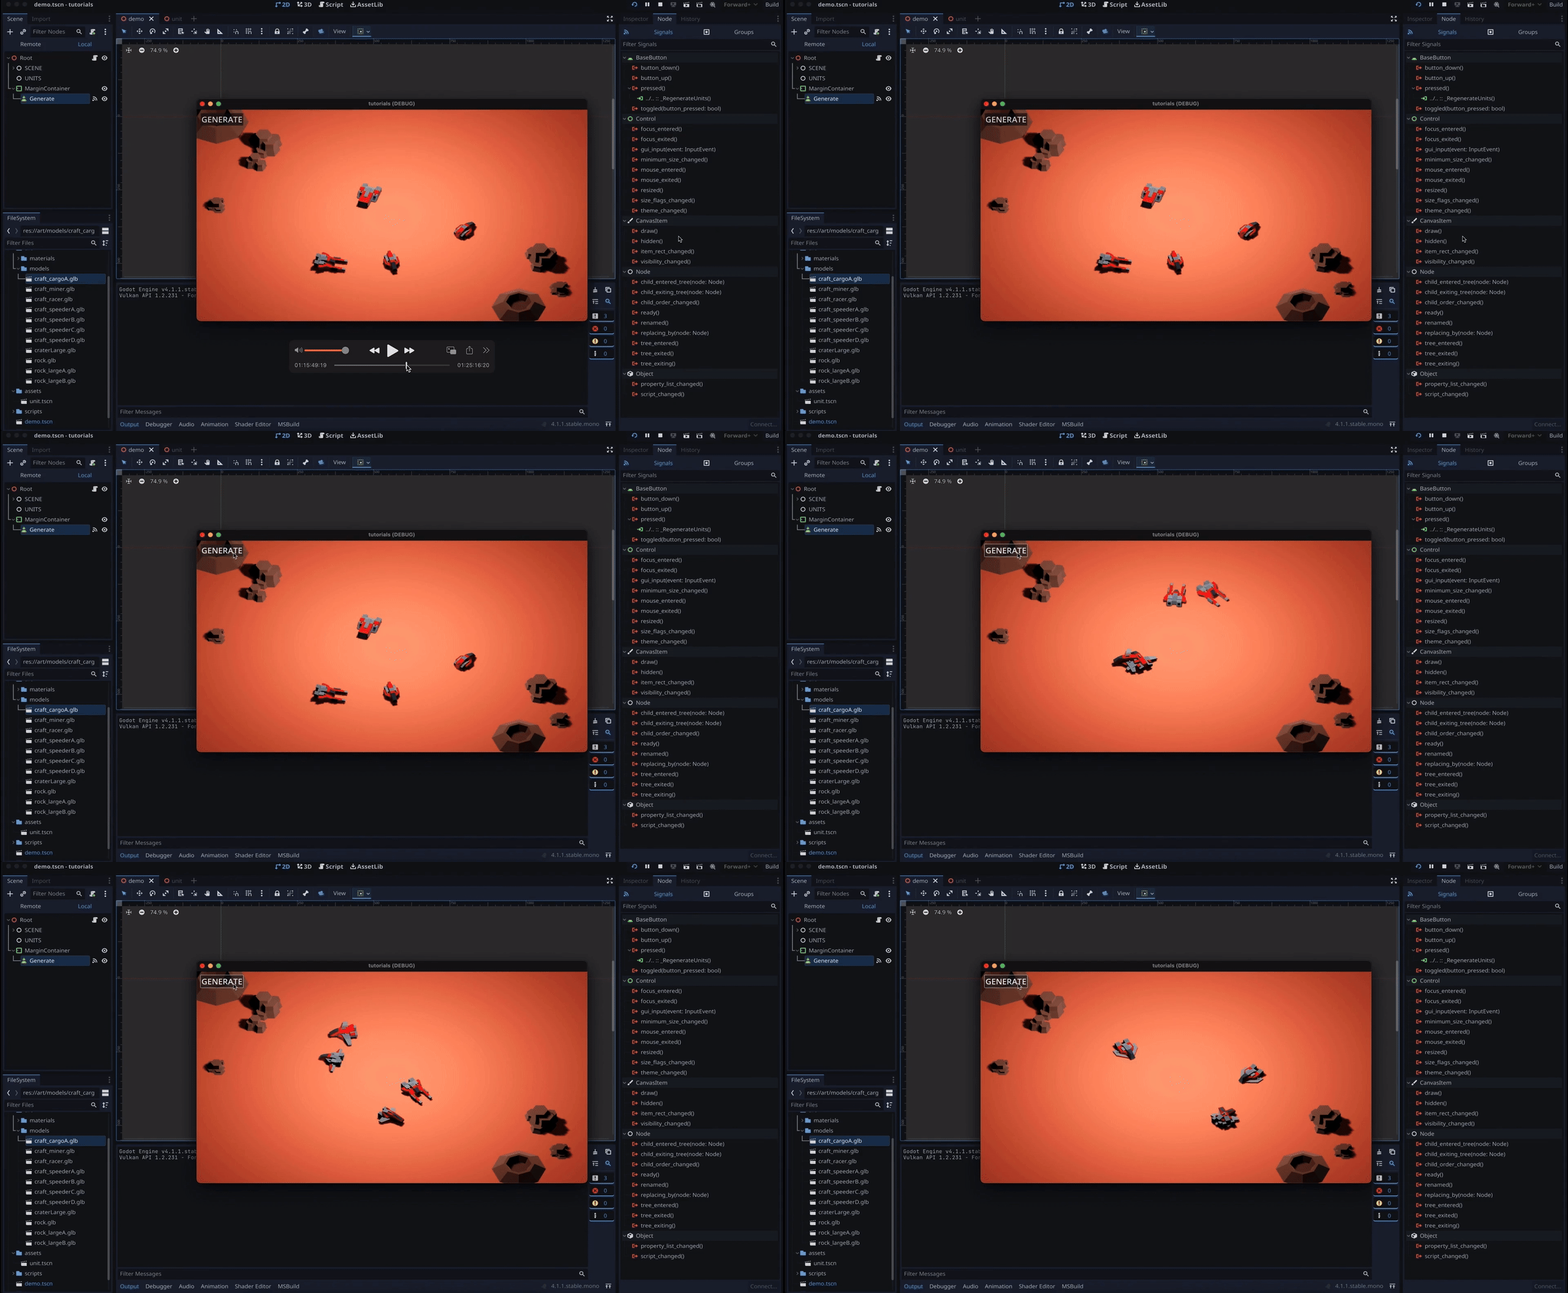
However, you also see that, quite often, our spaceships actually spawn on top of each other. And that’s because, for now, our random position computation is a bit too basic…
Improving the randomness
Ok so — at the moment, we’ve setup a very basic random positioning. We’re simply computing a random X coordinate and a random Z coordinate for each unit. The problem with that technique is that you don’t check if there was another unit in this spot — and here, given how little space we have, the chances of this happening are actually pretty high.
To solve this issue, there are two possible techniques:
- we could store the already-used positions as we compute them, and then use a do-while loop to ensure we don’t re-use them for the next units
- or we could use a list of random unique positions, and pick from this for each unit
I’m personally a fan of the second technique, because I’m always afraid that while loops are gonna run for too long ;)
So, in our case, applying this second technique means pre-computing all the 169 possible positions (since we have 13 possible coordinates on both axes), and then shuffling them in random order:
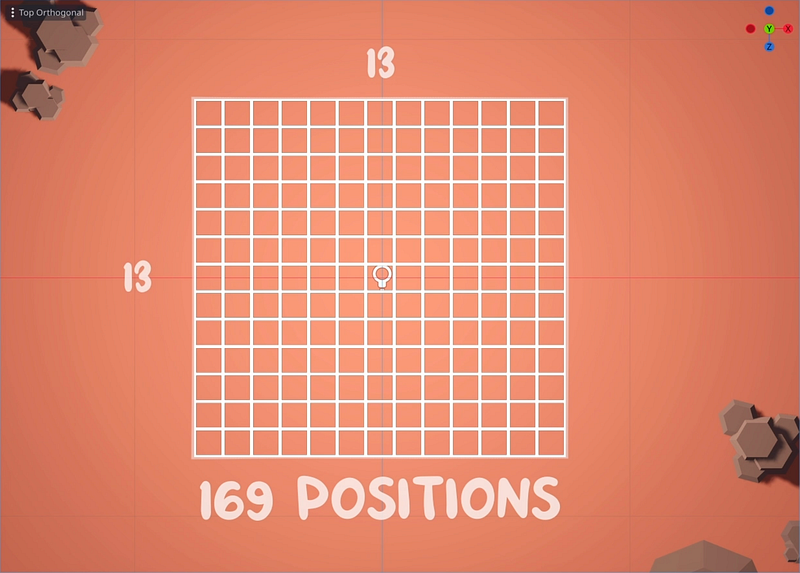
Then, we just need to pick the N first ones, where N if the number of units to place, and we’re absolutely sure that each of those N units will have its own spot!
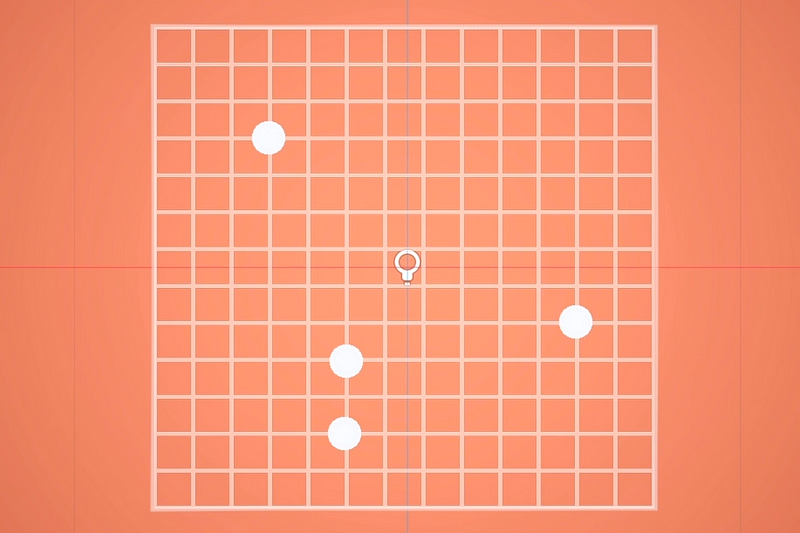
Now, in truth, here, I’m not even going to compute 169 positions — cause to be sure there’s enough space between the units, I’m going to skip some of those points and instead take just one out of four. So I’ll actually have 16 positions in total to shuffle and assign:
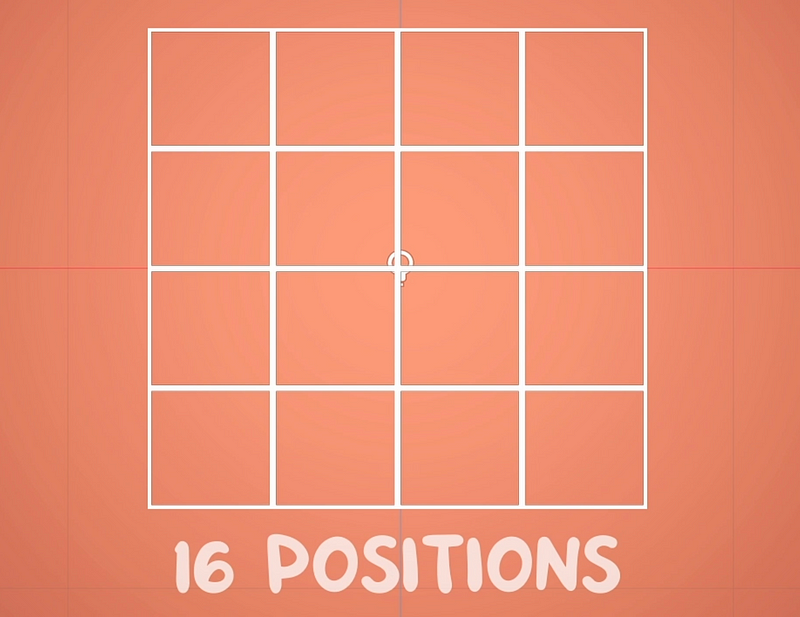
Computing these positions is actually pretty straight-forward!
First, let’s prepare a Godot Array of Vector3I (those are like basic Vector3, except they don’t contain float values with decimals but integer values). Then, in the _Ready() function, we’ll go through the central zone with steps of 4 to prepare all the possible positions:
using Godot;
using System;

public partial class UnitSpawner : Node3D
{

    // ...
    private Godot.Collections.Array<Vector3I> _positions;

    public override void _Ready()
    {
        // prepare positions in grid
        _positions = new Godot.Collections.Array<Vector3I>();
        for (int x = _MIN_X; x <= _MAX_X; x += 4) {
            for (int z = _MIN_Z; z <= _MAX_Z; z += 4) {
                _positions.Add(new Vector3I(x, 0, z));
            }
        }

        GD.Randomize();
        _GenerateUnits();
    }

    private void _GenerateUnits() { ... }
    private void _RegenerateUnits() { ... }

}
So at the end of this double loop, we’ll have the 16 positions in order, from the (-6,-6) point to the (+6, +6) point.
Now, in our _GenerateUnits() function, we can simply use the super cool Shuffle() method on our array to make sure these positions are re-randomised every time we run our function. And finally, in our loop, instead of setting the position with a Vector3 made on-the-fly, we’ll take the position inside our array at the current index:
private void _GenerateUnits() {
    // re-randomise positions
    _positions.Shuffle();

    for (int i = 0; i < _nUnits; i++) {
        // spawn unit
        Node3D u = _unitPrefab.Instantiate<Node3D>();
        u.Name = $"Unit_{i}";
        GetNode("UNITS").AddChild(u);

        // random placement
        u.GlobalPosition = _positions[i];
        u.RotateY(Mathf.DegToRad(GD.RandRange(0, 360)));

        // random visual
        int unitType = (int)(GD.Randi() % _units.Length);
        u.GetNode("Mesh").AddChild(_units[unitType].Instantiate());
    }
}
And that’s it — problem solved! You see that now, no matter how many times we re-generate our units, they’re never in the same spot :)
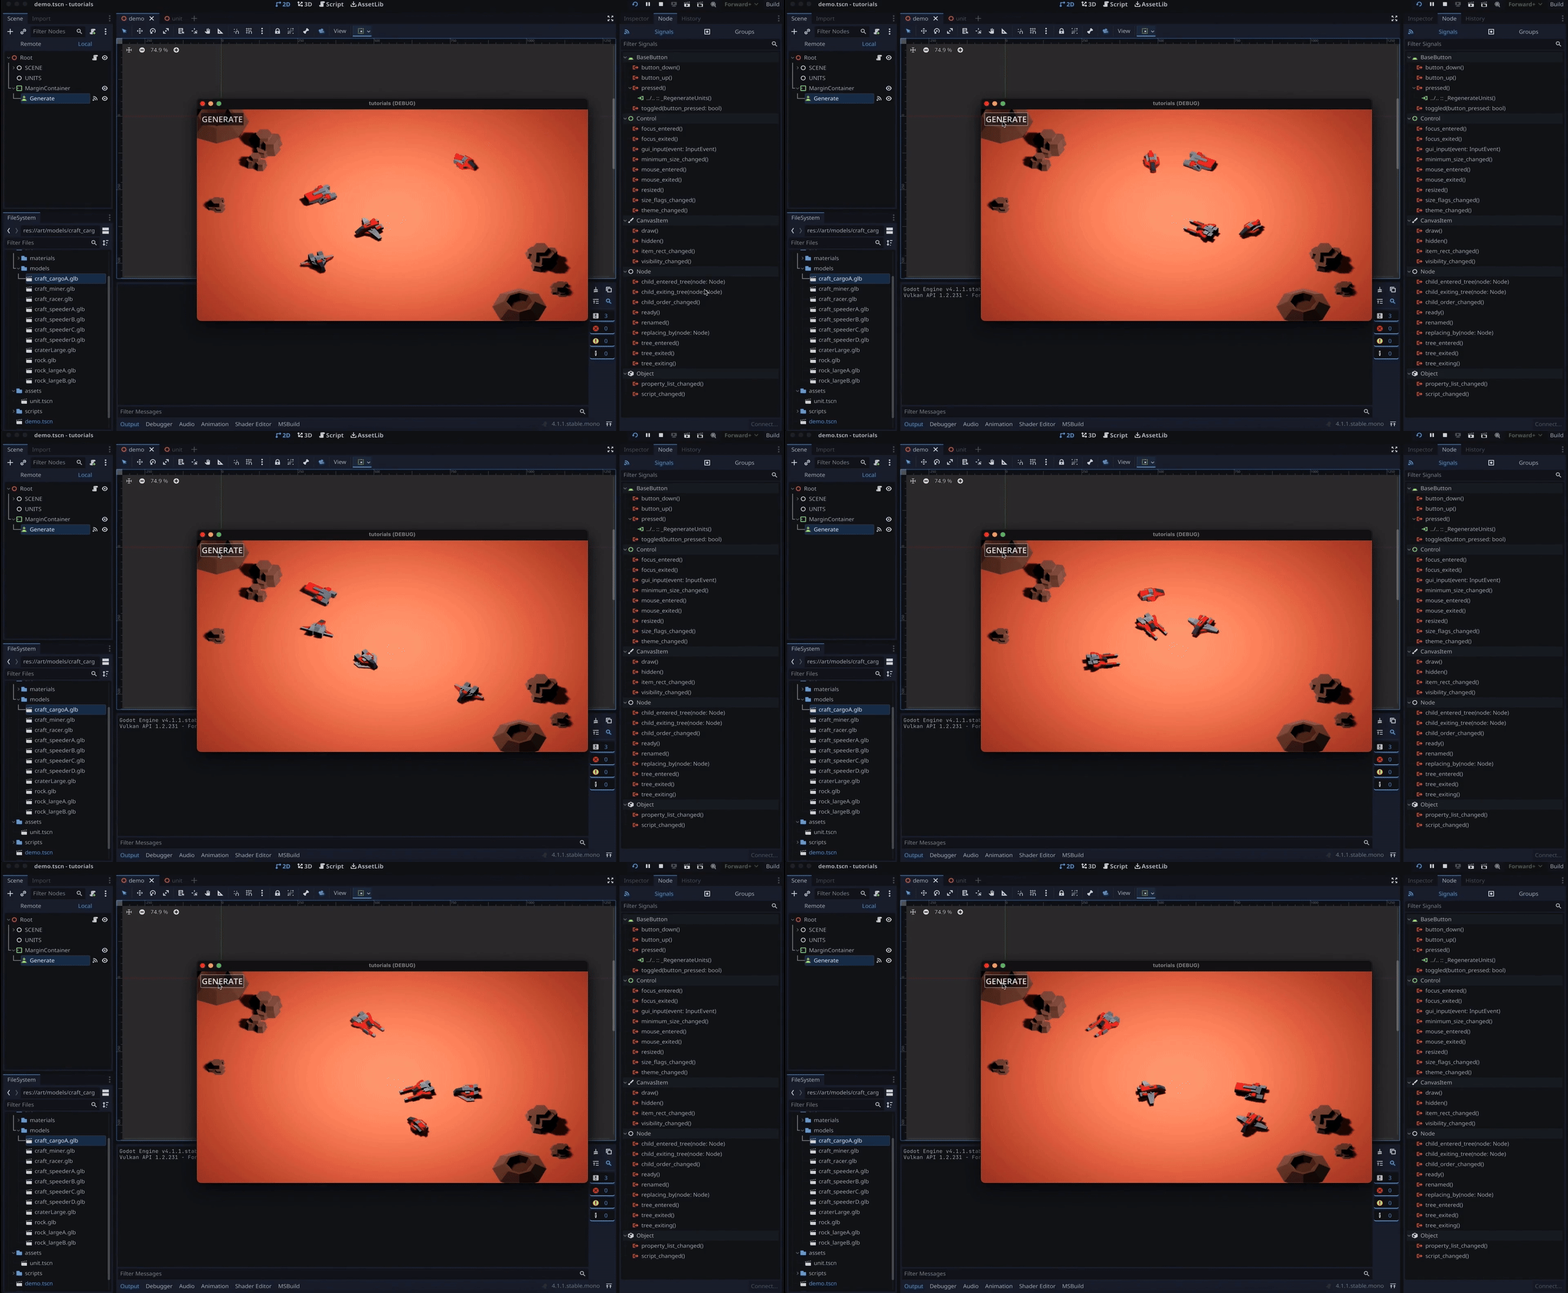
Alright, our unit spawn logic is now finished! To wrap up this tutorial, let’s see how to add a bit more of C# to have our units move to some other random spots in the grid…
Moving the units randomly
In this last section, we’re going to see how to give random target positions to our units, and have them navigate to them with a simple translation-based scheme.
So we won’t talk about phyics-based movement, like in those tutorials, or about navigation. But as usual, if you’re curious and want to learn more about these topics, typically about unit navigation in Godot 4 and C#, don’t hesitate to drop a comment down below :)
Ok, now — the idea will be pretty simple: basically, instead of assigning a random position from our list to our units, we’ll give them a random target position from the list; and then, we’ll have a script on those units that has them move if they’re not currently at their target position.
So let’s start with this unit script. Of course, since we made sure to wrap our GLB models in the Unit scene, and this scene is shared between all of our units instances, this is where we should add our script. We’ll just create a new script on the root node of this Unit scene, called Unit.cs, and open it in the IDE:
public partial class Unit : Node3D
{

}
This logic will be quite simple. First, we’ll declare a constant float value for the speed (for now we’ll just assume all the ships go at the same speed), and we’ll also prepare a Vector3 variable for the target position:
public partial class Unit : Node3D
{
    private const float _SPEED = 5f;
    private Vector3 _targetPosition;
}
Then, to be able to set this _targetPosition from our main UnitSpawner class, let’s create a public function called SetTargetPosition(), that receives a Vector3 value and assigns it as the new target position:
public partial class Unit : Node3D
{
    private const float _SPEED = 5f;
    private Vector3 _targetPosition;

    public void SetTargetPosition(Vector3 p)
    {
        _targetPosition = p;
    }
}
Plus, having this method will also allow us to automatically have the ship face the target position, by using the LookAt() method. This is a built-in function that is available in any class derived from the Node3D class, and that lets us rotate our object instantly so that it looks at a given Vector3 position, with a given up vector (here, we’ll use the global up vector):
public void SetTargetPosition(Vector3 p)
{
    _targetPosition = p;
    LookAt(_targetPosition, Vector3.Up);
}
Now that we have this function, we can go back to our main class and do two things:
- First, in the
_GenerateUnits()method, we need to assign the target position of our units to their current position — otherwise, when the game starts, they’ll move towards the defaultVector3value, which is the origin point:
private void _GenerateUnits() {
    for (int i = 0; i < _nUnits; i++) {
        // spawn unit...

        // random placement
        u.GlobalPosition = _positions[i];
        ((Unit)u).SetTargetPosition(u.GlobalPosition);
        u.RotateY(Mathf.DegToRad(GD.RandRange(0, 360)));

        // random visual...
    }
}
Then, we should create a new function, for example _MoveUnits(), that gives our units new random target positions. It’s very similar to the rest of our logic: first, we’ll re-shuffle our list of positions; then, we’ll iterate through our current list of units and, for each, assign the new target position:
using Godot;
using System;

public partial class UnitSpawner : Node3D
{

    // ...

    public override void _Ready() { ... }
    private void _GenerateUnits() { ... }
    private void _RegenerateUnits() { ... }

    private void _MoveUnits()
    {
        // re-randomise positions
        _positions.Shuffle();

        int i = 0;
        foreach (Unit u in GetNode("UNITS").GetChildren())
            u.SetTargetPosition(_positions[i++]);
    }

}
Of course, if we rebuild our project, we can then also expand our debug tools by adding a second button to the UI, and connecting its pressed signal to our new _MoveUnits() function :)
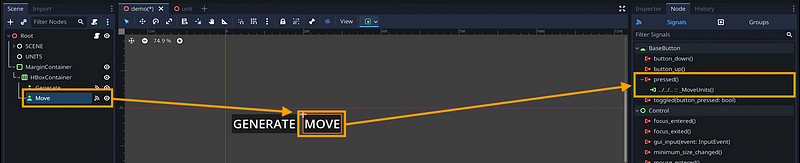
However, for now, our units won’t actually move because they don’t do anything with this target position!
So let’s go back to our Unit script, and handle the movement routine. To do this, we can use the _Process() function, which runs every frame.
In short, we just need to:
- compute the difference between our target position and our current position
- then, if this vector difference has a length above a given arbitrary threshold, translate our unit in the global space along this direction (with
GlobalTranslate()) - meaning multiplying our normalised difference vector by the
_SPEEDvalue, and the time delta
public partial class Unit : Node3D
{
    private const float _SPEED = 5f;
    private Vector3 _targetPosition;

    public void SetTargetPosition(Vector3 p)
    {
        _targetPosition = p;
        LookAt(_targetPosition, Vector3.Up);
    }

    public override void _Process(double delta)
    {
        Vector3 d = _targetPosition - GlobalPosition;
        if (d.Length() > 0.1f) {
            GlobalTranslate(d.Normalized() * _SPEED * (float)delta);
        }
    }
}
Something important here is that we can’t just check if our current and target positions are exactly the same, because with floats, there’s always a little bit of variability — basically, you can have some micro decimal that is a tiny bit different, and then a simple equal check will fail.
So if we were to use a not-equal condition, we’d have some infinite little oscillation around the target point, with the units vibrating a little, never really stopping. By using this threshold, we’re saying that if it’s “close enough”, (i.e. it’s indistinguishable by the human eye), then we just reached the target point and we stop computing new displacements.
And also: multiplying by the time delta is a good way of normalising the speed on various machines with different computing powers. If you’re curious about this notion of time delta, I’d again recommend you have a look at the very first tutorial in this series where I talked about this in more details :)
Ok, now, there’s just one thing left to do — and that’s, in the SetTargetPosition(), before doing the LookAt(), check whether we’re actually supposed to move away from our current position!
Because, with our system, you’ll notice that nothing prevents us from assigning a unit a target position that is its current position… and in that case, obviously, “looking at your own position” doesn’t really make any sense, and Godot won’t like it too much ;)
So let’s just copy our checks from the _Process() function so that we only do this bit of logic if the unit is supposed to move…
public partial class Unit : Node3D
{
    private const float _SPEED = 5f;
    private Vector3 _targetPosition;

    public void SetTargetPosition(Vector3 p)
    {
        _targetPosition = p;
        Vector3 d = _targetPosition - GlobalPosition;
        if (d.Length() > 0.1f) {
            LookAt(_targetPosition, Vector3.Up);
        }
    }

    public override void _Process(double delta)
    {
        Vector3 d = _targetPosition - GlobalPosition;
        if (d.Length() > 0.1f) {
            GlobalTranslate(d.Normalized() * _SPEED * (float)delta);
        }
    }
}
… and here we are!
If we run our game again, you see that we now have our random units that stay still at first, because they’re targeting their current positions, but then as soon as we click on the Move button in our debug UI, they start to move on our grid.
And the nice thing is that, thanks to our improved randomness, we’re sure that no two units will ever aim for the exact same spot :)
Conclusion
But anyway, here you go: you now know the basics of spawning and moving 3D scene instances with some randomness in Godot and C#!
I hope you liked this tutorial and that it helped you understand the basics of spawning 3D objects via code, and improving on naive random. If you did, feel free to clap for the article and follow me to not miss the next ones — and of course, don’t hesitate to drop a comment with ideas of Godot tricks that you’d like to learn!
As always, thanks a lot for reading, and take care :)
To read more of my content, and articles from many other great writers from Medium, consider becoming a member! Your membership fee directly supports the writers you read.


