
Learning the basics of importing assets in Godot 4!
Let’s talk images, audio and 3D models :)
Do you have some old assets on your computer that you’d like to use in a new Godot project? Perhaps even some Unity or Unreal Engine 3D models, that don’t wanna work this time?
In this video, we’re going to have an overview of Godot’s asset import system and learnt the basics. I’ll try to sum up & highlight some interesting particularities from the official docs and, though we won’t talk about more advanced stuff like rigging or animations, it should already give you some clues on what are the best file formats for a Godot game project.
In particular, we’ll discuss why some 3D model formats aren’t compatible with Godot… and how to side-step this problem ;)
By the way, if you like this article, feel free to clap at the end!
And also, don’t forget that if you want to see my other Godot/C# tutorials, check out my Github repository🚀
The tutorial is also available as a video — text version is below:
And with that said, let’s dive in and talk about static assets in Godot!
The fundamentals
Alright — first things first, let’s see how to import an asset in a Godot project.
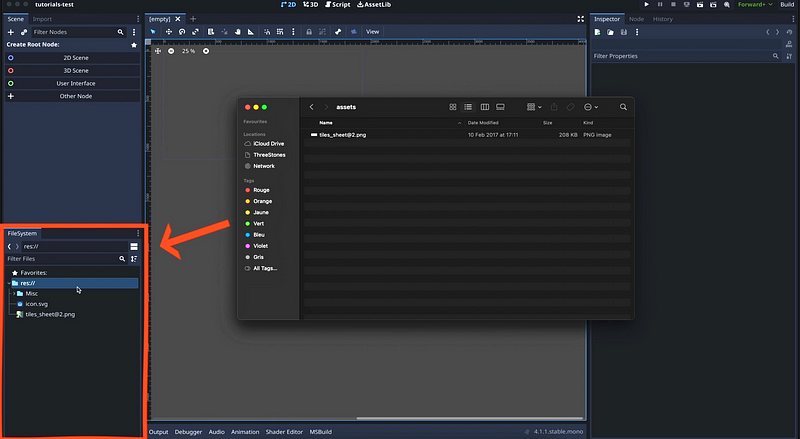
That’s actually quite simple: you just need to drag it from a file explorer, and into the FileSystem dock in the editor’s layout, in the bottom-left corner:
However… sometimes, you might discover that it doesn’t work. When you try to drag in some resources, Godot will just refuse to import them. As explained in the official docs, that’s because this system doesn’t work for all types of assets — it only works for the Godot resource types.
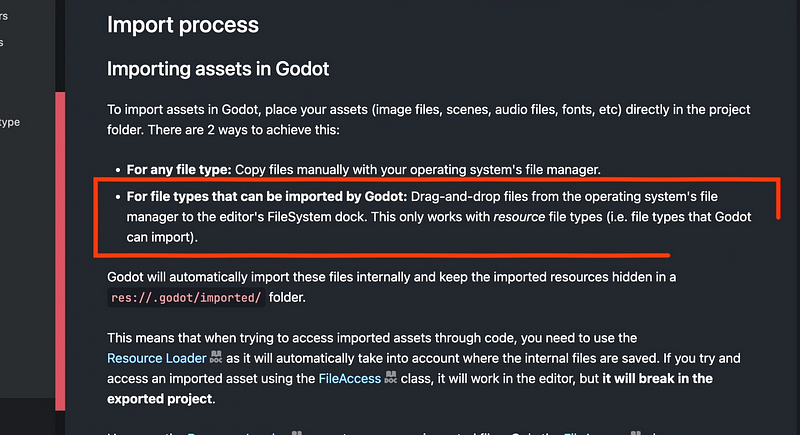
If you can’t import your asset by dragging it directly to the FileSystem dock, no worries! You can simply copy-paste in your file explorer, and Godot will find it next time you come back to the editor :)
Ok, now — let’s say that you have imported your resources in your Godot project and you want to check they’re properly configured. Then you need to take a look at the Import panel, which is this little tab next to the Scene hierarchy panel:
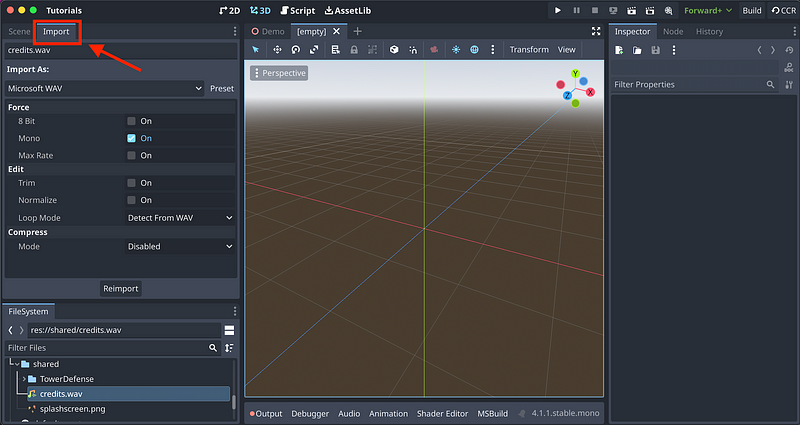
In here, you see various options that you can modify, and that depend on the type of resource you’re importing, and even the file format. For example, an image and an audio clip will obviously not show the same options:
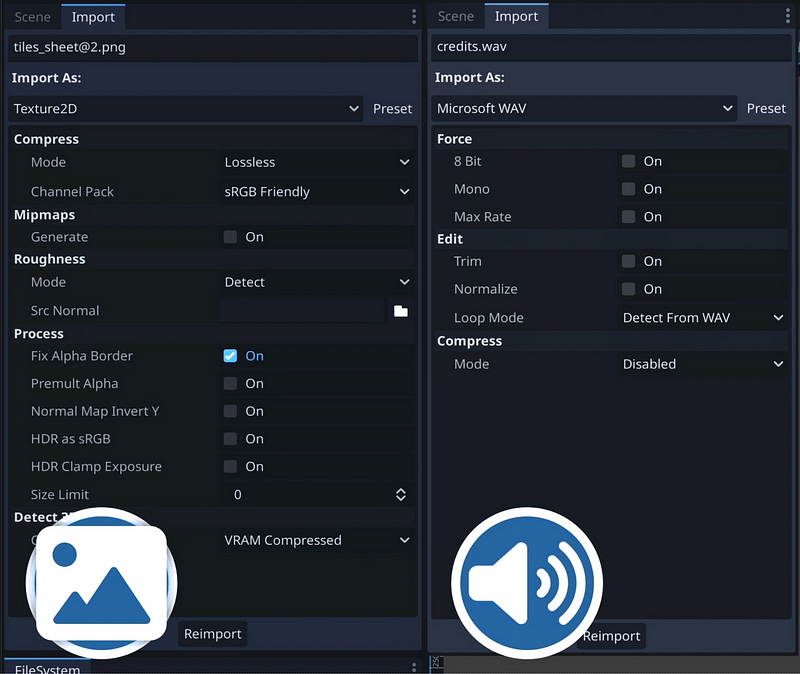
The really essential thing to remember when importing assets in Godot is that, once you’ve changed one or more import settings for your resource, you absolutely need to click the Reimport button at the bottom. If you don’t, then as soon as you select another asset in your project, all your modifications will be lost!
But other than that, you get all the typical options of a game asset importer :)
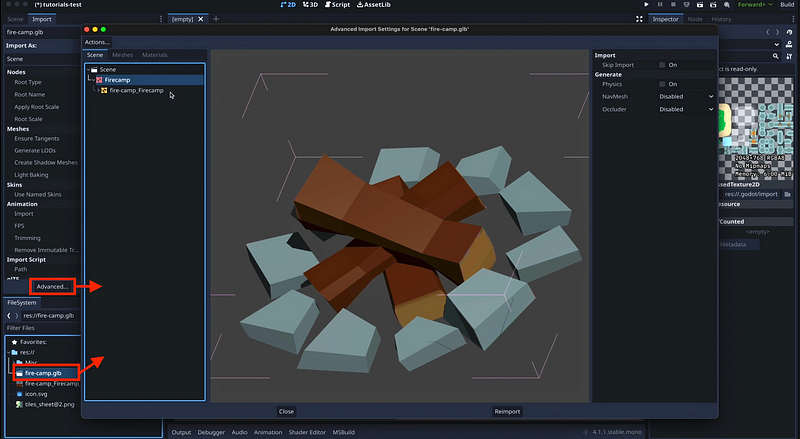
And for some file types like 3D models, you even some advanced import editors that you can access by double-clicking on your resource in the FileSystem dock or by clicking on the Advanced… button in the Import panel. These extra popup panels contain some info on the resource, and some extra configuration options — they can even contain some tools to directly edit your resources to bit and make them better suited to the project at hand:
Of course, Godot supports all the usual game asset types; so it has images, audio and 3D models.
But there’s also something quite cool that I don’t think in other game engines so far, which is a direct built-in game translation system — so basically, you can just import a file containing key:value pairs (either in the .po format or as a multi-columns CSV), and then you can directly use it in your game to add internationalisation to your texts or dialogues!
level.text = tr("LEVEL_5_NAME")
status.text = tr("GAME_STATUS_%d" % status_index)
Alright: now that we have an idea of how imports basically work, let’s discuss some specificities of Godot for each type of resource, so the images, the audio clips and the 3D models…
Importing images
Overall, importing images in Godot is fairly classic: the engine let’s you import a variety of image formats like JPEG, PNGs or BMPs for example. But there are also a few formats that aren’t available in all game engines and that are worth pointing out:
- In Godot, you can import images in the WebP (for “Web Picture”) format, which is a really lightweight format used a lot on the web, and that supports transparency.
- And you can also import basic SVGs, which is an interesting image format where everything is defined in math formulas instead of actual pixels, so you can upscale or downscale them like you want without losing any quality.
Though note tht if you have a complex SVG, it’s better to actually turn it into a “real” pixel-based image like a PNG for example, so that Godot can handle the contents of your image.
Trick: To convert a SVG image to a PNG, you can use the really cool Inkscape software, which is a vector graphics editor that, among other things, can export SVGs to PNGs… and can even do so directly from the command-line!
For example, on Mac:
/Applications/Inkscape.app/Contents/MacOS/inkscape \
  --export-type png \
  --export-filename cube.png \
  -w 512 cube.svg
The idea is basically to run your Inkscape executable from a shell, and directly call its export feature.
For reference, this link explains how to use Inkscape in a terminal, and gives the example of converting an SVG to a PNG :)
- And of course, Godot also has some options for HDR and EXR files, which are HDR-compatible formats; meaning that in addition to the colours, those images also contain a notion of “intensity”, of “energy” — and they can be used for sky or environment textures. Basically, it’s an alternate way of lighting a scene, but based on an image.
The rest of the import options is really just usual stuff, like compression mode, texture type, mipmaps, etc — and honestly, I think it’s probably best that you look at the page from the official Godot doc that gives details on all the import settings.
In particular, it has this really nice table that sums up the advantages and drawbacks of each compression option:
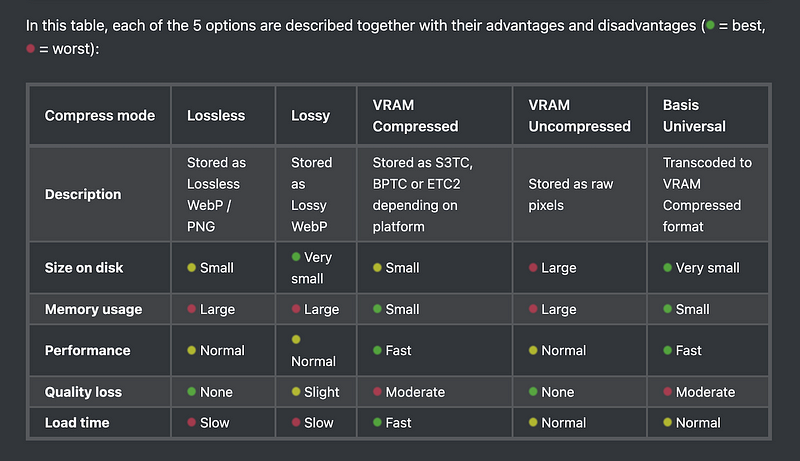
And it explains various caveats for configuring textures for 3D rendering, so it might be worthing checking out if you’ve got some weird rendering issues and you’re working in 3D.
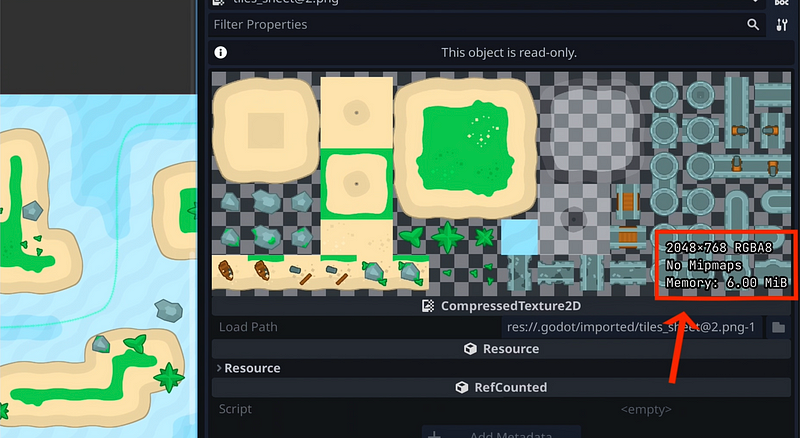
Just a last passing remark, though: if you double-click on a texture in your FileSystem dock and look at its Inspector, you’ll get its size readily available in the bottom-right corner of the thumbnail, which is a cool of quickly eyeballing whether some of your resources are too heavy on the project :)
Importing audio files
Again, Godot’s a pretty good student here. Like many other software, it lets you use MP3, WAV or OGG audio files in your project.
Now, truth is: audio compression is a super complex topic and, when you take into account all the possible codecs, it becomes quite a mouthful to chart which format is the best for what…
But, assuming you’re in a somewhat normal situation, Godot actually gives good tips to choose the right format depending on the type of audio file you’re making:
- WAV format is nice for short sound effects. For example, shooting a weapon, picking up a coin or even having a unit speak when you select it in a strategy game, all of those are short audio files that work well in WAV.
- OGG is better for long audio — like background music or NPC speeches.
- And MP3 is interesting when you have a lower-tier CPU, like on the web or on a mobile, and you need to have a format that light during playback. This way, you’ll be able to stack all your game sounds at the same time without everything just exploding instantly!
Now, all that being said, the best way to understand all this is still to try and produce your resources in a somewhat “reasonable” way, and then benchmark your project to see what’s too heavy on the game :)
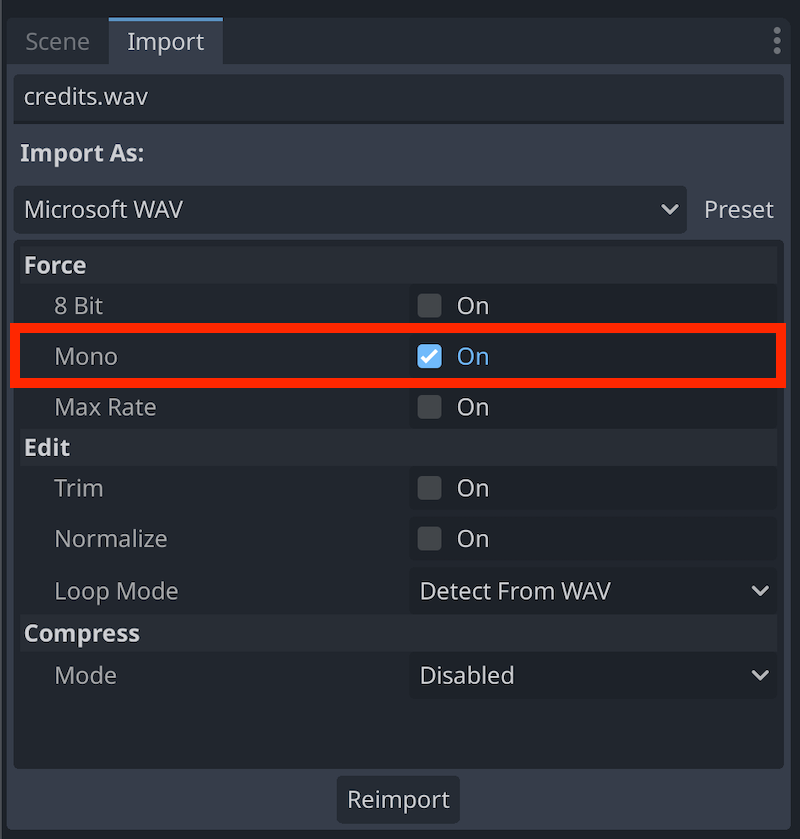
Of course, there are still best practices for keeping your audio resources light and cool on your project early on, such as making as many audios as you can mono (cause a stereo is double the size, because of the second channel).
And actually, if you’re importing a WAV file, you can do this directly in Godot thanks to the Mono import setting, without having to re-edit your file itself!
Note: As a little bonus — Godot also has some neat audio features and, most notably, the audio bus for mixing and adding effects. So you don’t really need to do the reverb or chorus on your sound files beforehand: that will just make them heavier! Rather, you choose see if you can’t use Godot’s real-time sound effects.
It might not have all the required effects, but it’s worth trying if you’re doing something simple :)
Importing 3D models
Alright — time to finally dig into some slightly more complex stuff…
Cause, for 3D models, Godot has some specificities compared to other big game engines like Unity or Unreal Engine for example, in particular in the file formats it supports… or doesn’t support!
If you look at the official doc about “importing 3D scenes” (which is Godot’s way of saying importing a 3D model), you’ll see that it can handle 4 basic formats, and 1 native format:
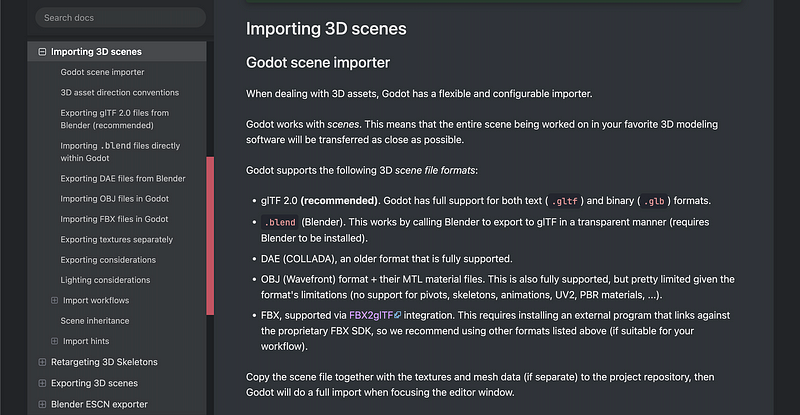
(A Blender scene being a native format of the Blender software.)
Now if you’re a bit familiar with using 3D models in other game engines, you’ll recognise some common formats in this list, like OBJ or DAE.
But there are probably several things that will surprise, too. Most notably, the fact that:
- Blender scenes can be used directly inside of Godot (no intermediate export required!)
- the engine supports GLTF and GLB…
- … and the engine does not support FBX (at least, not directly)!
That last point is, to me, the real big thing here. Because, nowadays, a lot of 3D model packages contain the object in FBX format — sometimes it’s among others, sometimes it’s the only one you have!
In particular, when you get assets from the Unity asset store cause, in my own experience, the FBX format is still the preferred format for sharing assets on this platform:
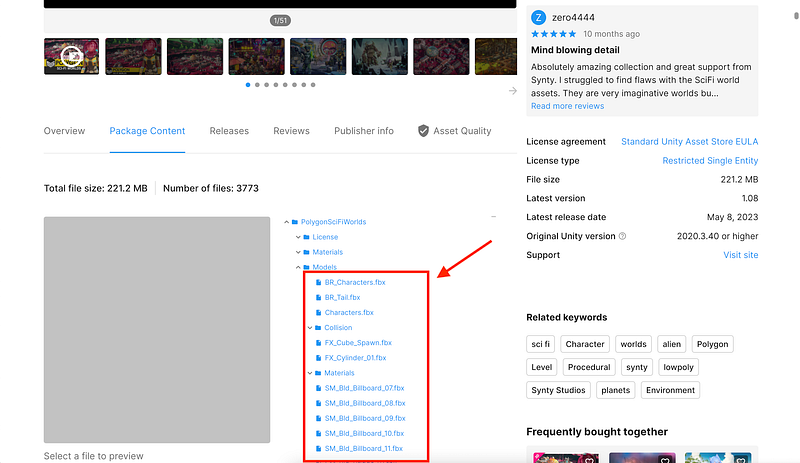
The reason FBX is so used is because it is quite powerful: it can bundle everything together (the mesh, the materials, the textures and even the animations) and it is compatible with a lot of common game creation software — from 3D digital creation tools like Autodesk Maya or Blender to game engines like Unity or Unreal Engine.
So, then — why does Godot frown upon this great format?
Well… as explained in this post, it’s basically because of the philosophy and the legality of the FBX format. To put it simply, FBX is a proprietary format from Autodesk, which therefore requires relying on a proprietary SDK to properly integrate it in your engine. And Godot’s not fond of this proprietary mentality — which is why they preferred to turn to GLTF, an open 3D exchange format that is way more aligned with their free & open-source mentality.
Note: I’m talking about Godot 4 here; because, in truth, in Godot 3, there was some attempt at reverse-engineering a FBX SDK to support this format directly in the engine. But the Godot team kind of thinks it’s not very reliable, and decided to rather say right of the bat they won’t support FBX directly anymore.
Of course, Godot can’t just say that they’re banning all FBX models from the projects, cause it’s still one of the go-to formats for 3D data exchange today. So they’ve implemented a workaround using the FBX2gltf plugin (to auto-convert the FBX to GLTF in the engine, without the creators having to worry about it).
That’s why if you open a project that contains some FBX files, or you try to import new ones in Godot 4, the software will prompt you to install and / or reference the path of this SDK on your computer:
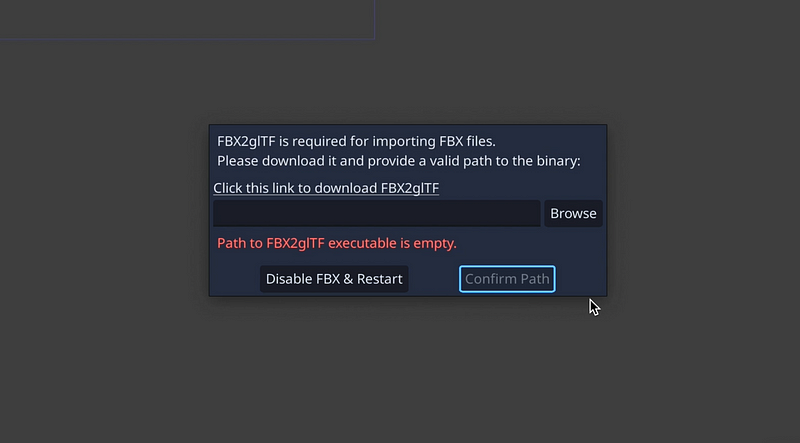
Now, honestly, if you already have hundreds of packs with FBX models inside, I think this will probably be the better solution.
But if you’re still a bit new to all this, or if you want to start fresh, you should definitely have a look at GLTF cause it’s actually quite a good format that works well with other open-source tools like Blender, and it will avoid you and your teammates having to install an external tool in your Godot project!
Conclusion
But anyway, here you go: you now know the basics of importing static assets in Godot! Of course we didn’t talk about more advanced notions like importing rigged and animated 3D models — but don’t hesitate to drop a comment if you’d be interested in a follow-up episode on that :)
And in the meantime, I hope you liked this tutorial and that it helped you navigate the Godot file formats, or perhaps even convert some of your old FBX assets into brand new GLTF resources.
If you did, feel free to clap for the article and follow me to not miss the next ones — and of course, don’t hesitate to drop a comment with ideas of Godot concepts that you’d like to learn!
As always, thanks a lot for reading, and take care :)
To read more of my content, and articles from many other great writers from Medium, consider becoming a member! Your membership fee directly supports the writers you read.


