
How to Stream Data from Multiple Movella DOTs with a Mac and Python
Track your body movements with Movella wearable sensors, Python, and a MacBook.

Movella DOTs (formerly known as “Xsens” DOTs) are wearable devices that you can wear on a wrist, arm, or ankle to track your movement.

Movella makes SDKs, so that you can write Python code for them on Windows or Linux. However, there is no such SDK for Mac OS computers. Therefor, we’ll write our own to stream data from some DOTs using Python 3 and Bleak.
This code will be much like our code for streaming data from a single Movella DOT, except that we’ll use AsyncIO’s gather() function to talk to multiple DOTs at once.
The full script is available at the end of this article.
Prerequisite Knowledge
We’ll be using Movella’s DOT BLE Services Specifications documentation to know how to interact with the DOTs.
You should know:
- Python
- Bluetooth LE
- the basics of Movella DOT
But if you don’t, the full script is available at the end of this article anyway.
Check out our other articles if you want to start simple:
- How to Connect to a Bluetooth Device with a MacBook and Python
- How to Stream Data from a Single Movella DOT with a Mac and Python
Requirements
- a Mac computer (Windows/Linux might work)
- Python 3
- Bleak (a Python Bluetooth LE library)
- NumPy (a Python math library)
- 2+ Movella DOT sensors
Steps
In this tutorial, we will:
0. Install the Bleak and NumPy Python libraries
- “Scan” for the DOTs Bluetooth addresses
- Connect to the Movella DOTs in Python
- “Subscribe” to measurement data notifications
- Set and Turn on the measurement mode
- “Listen” for data and print it
- Format the data with NumPy
- Tag the data with its device’s address
The final script is at the bottom of this article.
Let’s get started.
Step 0: Download and Install Bleak and Numpy

Bleak is the most popular Bluetooth LE library for Python, and it works on Mac, Windows, and Linux.
NumPy helps with math operations on big data in Python. It will make reading the data from the DOTs easy.
To install Bleak and Numpy, run these in Terminal:
pip install bleak

pip install numpy
For more assistance, check out Bleak and NumPy’s installation help pages.
If you’re new to Pip, it’s the most popular package manager for Python and makes installing libraries for any project easy. Pip comes included with most Python installs. If you don’t have it, install Pip here.
Step 1: Scan for the DOTs’ Addresses
Just like every website has a URL and every house has a street address, Bluetooth devices have wireless addresses.

There are some quirks to how these addresses work on Mac computers, but in short, each Bluetooth device will get a UUID, kind of like:
12345678-e89b-12d3-a456-426614174000
OR
ABCDEFG1-2222-3333-4444-56789AAABBBC
This is how your Mac differentiates the DOTs from every other Bluetooth device near you.
Note: For Windows and Linux, your device’s address will be a MAC address, which looks like ab:cd:ef:11:22:33, but functions the same as a UUID.
We’ll use the Bluetooth scanner from our previous tutorial on How to Write a Simple Bluetooth Scanner with a MacBook and Python (Windows version here).
Scanner code:
# scanner.py

import asyncio
from bleak import BleakScanner

async def main():
    devices = await BleakScanner.discover()
    for device in devices:
        print(device)

asyncio.run(main())
Put this in a file called scanner.py. Before you run it, make sure your computer’s Bluetooth is on and the DOT is on and blinking.
Run the scanner. It will run silently for 10 seconds, then a bunch of UUID addresses will show up on the screen. Your DOTs will come up on screen Xsens DOT or Movella DOT.
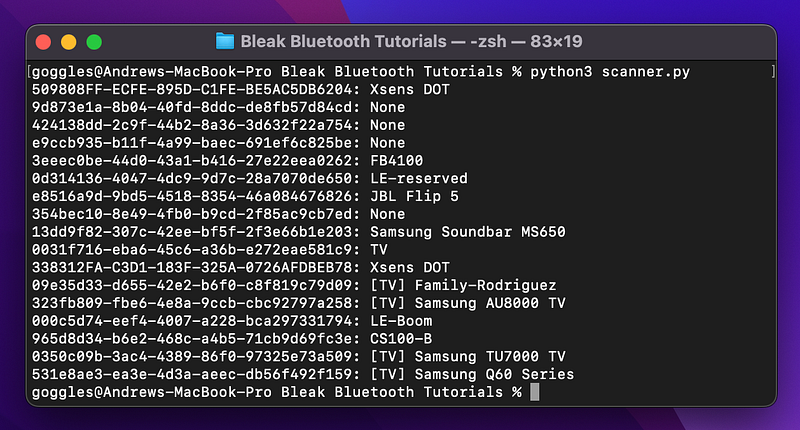
We have two DOTs at our office, so this gives us 2 UUID addresses:
509808FF-ECFE-895D-C1FE-BE5AC5DB6204338312FA-C3D1–183F-325A-0726AFDBEB78
We’ll plug these into a different Python file in the next steps, which will connect to and stream data from the DOTs.
For more info on Bluetooth LE, asyncio, and how device connection works, check out our article, How to Connect to a Bluetooth Device with a MacBook and Python.
Step 2: Connect to the DOTs
Start a new Python file called stream.py. The rest of the code will go in this file. We don’t need scanner.py anymore, since we only needed it to get our DOTs’ Bluetooth addresses.
Like our tutorial on connecting to a single Movella DOT, we’ll use Bleak and asyncio. The difference is that we’ll tell asyncio to kick off multiple, separate asynchronous functions at once for all of our devices by using asyncio.gather().
While the code for connecting to a single DOT looks like this:
# Connects to a single Movella DOT

import asyncio
from bleak import BleakClient

async def main():
    address = "338312FA-C3D1-183F-325A-0726AFDBEB78" # Movella DOT UUID

    async with BleakClient(address) as client:
        # prints True if connection was successful
        print(f"Client connection to `{client.address}: {client.is_connected}")

if __name__ == "__main__":
    asyncio.run(main())
We add gather() to connect to multiple DOTs like this:
# Connects to multiple Movella DOTs
import asyncio
from bleak import BleakClient
addresses = [
"509808FF-ECFE-895D-C1FE-BE5AC5DB6204",
"338312FA-C3D1-183F-325A-0726AFDBEB78"
]
async def connect(address):
async with BleakClient(address) as client:
# prints True if connection was successful
print(f"Client connection to `{client.address}: {client.is_connected}")
async def main():
await asyncio.gather(*(connect(addr) for addr in addresses))
if __name__ == "__main__":
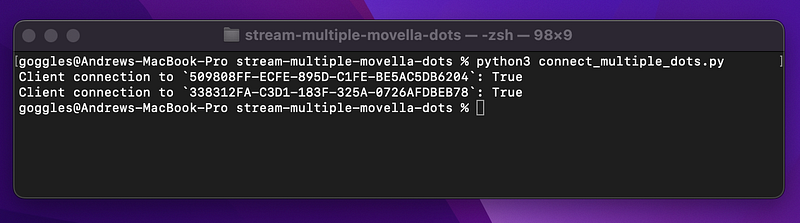
asyncio.run(main())We moved all the stuff we need a single DOT to do from main() into a new function, connect(). Now, we’ll give a bunch of instances of connect(), each with a different DOT UUID address, to asyncio.gather() and asyncio will run them all at the same time.
Without the * notation, we could also write gather() as:
await asyncio.gather(connect(addresses[0]), connect(addresses[1]))If we test the above connection code, we get this:
Step 3: “Subscribe” to Data Notifications
In this step, we’ll tell the DOT that we’re going to be listening for movement data. Our computer has to “subscribe” to the message that the DOTs send out (AKA “notifications”) in order to be ready to hear the messages. Then in Step 4, we’ll “listen” for the data.
This is counterintuitive, since our code/laptop is not “asking” the device for its data. Instead, we’re listening for the data. Asking for the data 30–60 times a second would be a waste of energy. It’s faster and less energy intensive to tell the DOT to send data once at the beginning.
To subscribe to notifications, we’ll use Bleak’s start_notify().
To use start_notify(), we give it 2 arguments:
- The “characteristic” we want it to listen for data from
- The function to use whenever our computer “hears” a Bluetooth notification message (i.e. gets the measurement data). This is known as a “callback function.”
Like so:
def our_callback_function(sender, data):
    # Print the measurement data or whatever we want here
...
characteristic_uuid = "15172004-4947-11e9-8646-d663bd873d93"
...
await client.start_notify(characteristic_uuid, our_callback_function)
A characteristic is basically a thing that a Bluetooth device can do. A device can have:
- a battery percentage characteristic
- a heart rate characteristic
- an accelerometer measuring characteristic
And more. We interact with characteristics by reading them, writing them, or subscribing to them (in the case of live data streaming).
Above, the characteristic_uuid is the UUID of the Short Payload Characteristic, which is the characteristic that we have to subscribe to. We got this UUID from the Movella DOT BLE Services Specifications documentation.
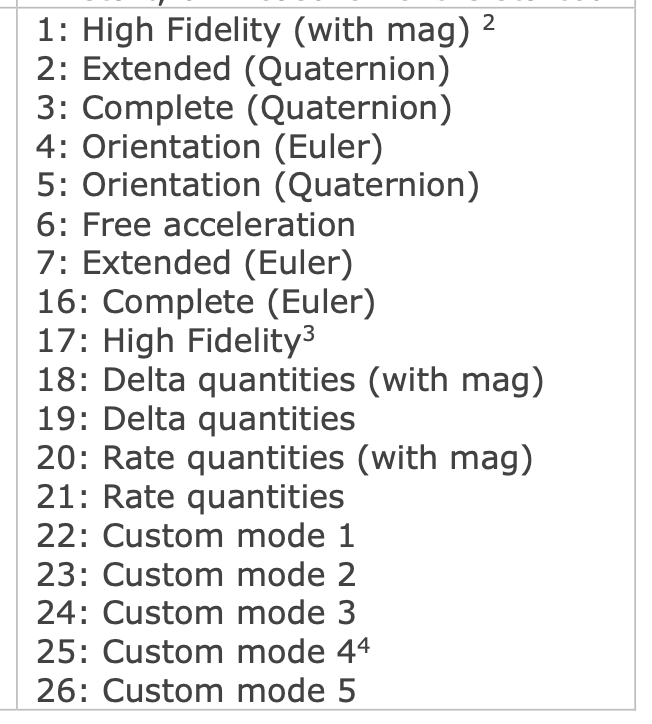
For whichever measurement mode we pick (the DOT has 18 modes), we’ll need to both:
- turn on the measurement mode (which we do in the next step)
- subscribe to the corresponding Short/Medium/Long Payload Characteristic
It’s counterintuitive, but this is how Bluetooth LE works.
The Callback Function
We can put whatever we want in our callback() function. We’ll have it print the characteristic that it got data from (sender) as well as the data itself.
def callback(sender, data):
    print(f"{sender} -- {data}")
Note: We use f-strings (f”{sender}”) to format our output. They allow the use of {variables} directly inside of strings.
The Full Script at This Point
Our code, stream.py, will now look like this:
# Connect to and subscribe to notification for multiple Movella DOTs

import asyncio
from bleak import BleakClient


short_payload_char_uuid = "15172004-4947-11e9-8646-d663bd873d93"
addresses = [
    "509808FF-ECFE-895D-C1FE-BE5AC5DB6204",
    "338312FA-C3D1-183F-325A-0726AFDBEB78"
]

def callback(sender, data):
    print(f"{sender} -- {data}")

async def connect(address):
    async with BleakClient(address) as client:
        print(f"Client connection to `{client.address}: {client.is_connected}")

        await client.start_notify(short_payload_char_uuid, callback)


async def main():
    await asyncio.gather(*(connect(addr) for addr in addresses))


if __name__ == "__main__":
    asyncio.run(main())
Now, for every address in addresses , there is a connect() function running, which connects to the DOT and then subscribes to notifications. We have 2 devices for this example, so 2 connects are running. If we had 5 addresses, gather would kick off 5 connect functions.
We don’t have any data yet though, because we need to turn on measurement in Step 4 and “listen” for data in Step 5.
Step 4: Set and Turn on Measurement Mode
We’ll do these in one step, since they’re both done with a single function from Bleak, write_gatt_char().
All we have to do is send a short string of numbers to the Measurement Characteristic. This string will tell the DOT which of the 18 measurement modes we want it to use and tell it to turn on.
For this tutorial, we’ll use mode #6 below: Free Acceleration.
And the string we send will look something like:
binary_message = b"\x01\x01\x06"The binary_message has 3 hex numbers that specify:
\x01— A default value that the DOT BLE docs say is required\x01— whether measurement is on or not.01= on.00= off.\x06— specifies that we want Free Acceleration (option6from the measurement modes list)
For this step, we only have to add 3 lines to our script. The following 2:
binary_message = b"\x01\x01\x06"
await client.write_gatt_char(measurement_characteristic_uuid, binary_message)
And add this near the top of the file:
measurement_char_uuid = "15172001-4947-11e9-8646-d663bd873d93"Now, the full script is:
# Turn on Free Acceleration mode for multiple Movella DOTs

import asyncio
from bleak import BleakClient

measurement_char_uuid = "15172001-4947-11e9-8646-d663bd873d93"
short_payload_char_uuid = "15172004-4947-11e9-8646-d663bd873d93"
addresses = [
    "509808FF-ECFE-895D-C1FE-BE5AC5DB6204",
    "338312FA-C3D1-183F-325A-0726AFDBEB78"
]

def callback(sender, data):
    print(f"{sender} -- {data}")

async def connect(address):
    # Connect to the DOT and stream data
    async with BleakClient(address) as client:
        print(f"Client connection to `{client.address}: {client.is_connected}")

        # Subscribe to data notifications
        await client.start_notify(short_payload_char_uuid, callback)

        # Set and turn on measurement mode
        binary_message = b"\x01\x01\x06"
        await client.write_gatt_char(measurement_char_uuid, binary_message)


async def main():
    await asyncio.gather(*(connect(addr) for addr in addresses))


if __name__ == "__main__":
    asyncio.run(main())
Measurement mode is now on. Now, we only need one more line of code in the next step to get data.
Step 5: “Listen” for Data
When we run the script from the last step, it quits without giving us any data.
To fix this, we need to tell our script to wait, by using asyncio.sleep():
await asyncio.sleep(10.0) # Stream data for 10.0 seconds.This will tell our code to wait for Bluetooth messages to come in from the DOT, which have our accelerometer data.
Add this below write_gatt_char() as:
# Set and turn on measurement mode
binary_message = b"\x01\x01\x06"
await client.write_gatt_char(measurement_char_uuid, binary_message)

# Stream data for 10 seconds
await asyncio.sleep(10.0)
The full script that can get raw data is:
# Stream Free Acceleration data from multiple Movella DOTs
import asyncio
from bleak import BleakClient
measurement_char_uuid = "15172001-4947-11e9-8646-d663bd873d93"
short_payload_char_uuid = "15172004-4947-11e9-8646-d663bd873d93"
addresses = [
"509808FF-ECFE-895D-C1FE-BE5AC5DB6204",
"338312FA-C3D1-183F-325A-0726AFDBEB78"
]
def callback(sender, data):
print(f"{sender} -- {data}")
async def connect(address):
# Connect to the DOT and stream data
async with BleakClient(address) as client:
print(f"Client connection to `{client.address}: {client.is_connected}")
# Subscribe to data notifications
await client.start_notify(short_payload_char_uuid, callback)
# Set and turn on measurement mode
binary_message = b"\x01\x01\x06"
await client.write_gatt_char(measurement_char_uuid, binary_message, response=True)
# Stream data for 10 seconds
await asyncio.sleep(10.0)
async def main():
await asyncio.gather(*(connect(addr) for addr in addresses))
if __name__ == "__main__":
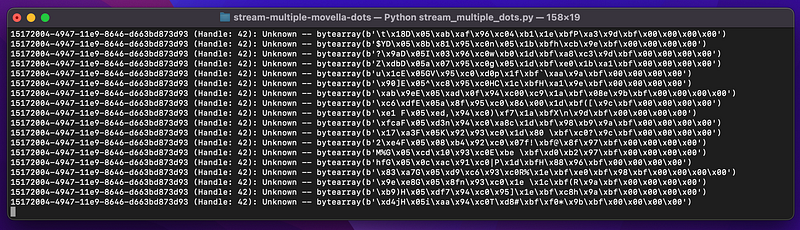
asyncio.run(main())If we run this, now we get data:
Troubleshooting: if you don’t see any sensor data like above, add response=True as a 3rd argument to write_gatt_char():
await client.write_gatt_char(measurement_char_uuid, binary_message, response=True)However, the data above is in a bytearray , which is just a bunch of hex numbers like \x8d\x00. We need to convert it to real numbers.
Step 6: Convert the Data to Real Numbers with NumPy
To convert the bytearrays to real numbers, we’ll use NumPy. NumPy is the master of working with math, bits, and bytes in Python.
According to the Measurement Service section (Section 3) of the DOT BLE Specification documentation, each Bluetooth notification for “Free Acceleration” is 20 bytes. It has 16 bytes of actual data , made up of a timestamp and X, Y, Z free acceleration data, and 4 bytes of zeros for padding.
Section 3.5 Measurement Data also shows that the actual numbers (X, Y, Z) in free acceleration data are 12 bytes total, meaning that the data is:
- a 4-byte timestamp
- a 4-byte X accelerometer value
- a 4-byte Y accelerometer value
- a 4-byte Z accelerometer value
- 4-bytes of zeroes
We’ll use this function to convert the bytearrays to real numbers:
import numpy as np
...
def encode_free_acceleration(bytes_):
    data_segments = np.dtype([
        ('timestamp', np.uint32),
        ('x', np.float32),
        ('y', np.float32),
        ('z', np.float32),
        ('zero_padding', np.uint32)
        ])
    formatted_data = np.frombuffer(bytes_, dtype=data_segments)
    return formatted_data
You don’t have to understand it yet to use it in your code. Just know that it’s using data_segments as a template to slice up the bytes into neat chunks and converting them to real numbers.
Let’s make sure we use this new function in our callback function, so that we print real numbers:
def callback(sender, data):
    print(encode_free_acceleration(data))
Note that the data has to be chopped up differently for each of the DOT’s 18 measurement modes.
If we run the full code:
# Stream Free Acceleration data from multiple Movella DOTs

import numpy as np
import asyncio
from bleak import BleakClient

measurement_char_uuid = "15172001-4947-11e9-8646-d663bd873d93"
short_payload_char_uuid = "15172004-4947-11e9-8646-d663bd873d93"
addresses = [
    "509808FF-ECFE-895D-C1FE-BE5AC5DB6204",
    "338312FA-C3D1-183F-325A-0726AFDBEB78"
]

def callback(sender, data):
    print(encode_free_acceleration(data))

def encode_free_acceleration(bytes_):
    data_segments = np.dtype([
        ('timestamp', np.uint32),
        ('x', np.float32),
        ('y', np.float32),
        ('z', np.float32),
        ('zero_padding', np.uint32)
        ])
    formatted_data = np.frombuffer(bytes_, dtype=data_segments)
    return formatted_data

async def connect(address):
    # Connect to the DOT and stream data
    async with BleakClient(address) as client:
        print(f"Client connection to `{client.address}: {client.is_connected}")

        # Subscribe to data notifications
        await client.start_notify(short_payload_char_uuid, callback)

        # Set and turn on measurement mode
        binary_message = b"\x01\x01\x06"
        await client.write_gatt_char(measurement_char_uuid, binary_message, response=True)

        # Stream data for 10 seconds
        await asyncio.sleep(10.0)


async def main():
    await asyncio.gather(*(connect(addr) for addr in addresses))


if __name__ == "__main__":
    asyncio.run(main())
We’ll get real data!
The only problem is that we don’t know which DOT each line came from. We’ll fix that by writing a short class that print’s the device’s address.
Step 7: Tag Each Data Line with Its Device’s Address
We can’t give the callback function an argument directly, since the (sender, data) arguments are fixed (unless we use functools and partials). Instead, we’ll move our callback() into a class that holds the device address.
class NotificationHandler:
    '''This class allows us to add the DOT's UUID address to the data that gets printed'''
    def __init__(self, device_address):
        self.device_address = device_address

    def callback(self, sender, data):
        print(f"{self.device_address} -- {encode_free_acceleration(data)}")
This way, we can create an instance of the class for each DOT device with the device’s UUID address, then we can incorporate that address into the printed data via the class’s self.device_address variable.
We’ll instantiate the class for each DOT device with nh = NotificationHandler(address) , then give nh.callback() as the new callback function:
...
async def stream(address):
    nh = NotificationHandler(address)
    async with BleakClient(address, timeout=10.0) as client:
        # Check if connection was successful
        print(f"Client connection: {client.is_connected}") # prints True or False

        # Subscribe to notifications from the Short Payload Characteristic
        await client.start_notify(short_payload_characteristic_uuid, nh.callback)
...
Now, start_notify()‘s callback can access the “self” variables from NotificationHandler, which includes the DOT’s address.
The full script that prints accelerometer data with UUID addresses:
# Stream Free Acceleration data from multiple Movella DOTs

import numpy as np
import asyncio
from bleak import BleakClient


measurement_char_uuid = "15172001-4947-11e9-8646-d663bd873d93"
short_payload_char_uuid = "15172004-4947-11e9-8646-d663bd873d93"
addresses = [
    "509808FF-ECFE-895D-C1FE-BE5AC5DB6204",
    "338312FA-C3D1-183F-325A-0726AFDBEB78"
]

class NotificationHandler:
    '''This class allows us to add the DOT's UUID address to the data that gets printed'''
    def __init__(self, device_address):
        self.device_address = device_address

    def callback(self, sender, data):
        print(f"{self.device_address} -- {encode_free_acceleration(data)}")

def encode_free_acceleration(bytes_):
    data_segments = np.dtype([
        ('timestamp', np.uint32),
        ('x', np.float32),
        ('y', np.float32),
        ('z', np.float32),
        ('zero_padding', np.uint32)
        ])
    formatted_data = np.frombuffer(bytes_, dtype=data_segments)
    return formatted_data

async def connect(address):
    nh = NotificationHandler(address)
    # Connect to the DOT and stream data
    async with BleakClient(address) as client:
        print(f"Client connection to `{client.address}: {client.is_connected}")

        # Subscribe to data notifications
        await client.start_notify(short_payload_char_uuid, nh.callback)

        # Set and turn on measurement mode
        binary_message = b"\x01\x01\x06"
        await client.write_gatt_char(measurement_char_uuid, binary_message, response=True)

        # Stream data for 10 seconds
        await asyncio.sleep(10.0)


async def main():
    await asyncio.gather(*(connect(addr) for addr in addresses))


if __name__ == "__main__":
    asyncio.run(main())
Step 8: Extra Formatting (Optional)
We can get rid of the [(brackets)] around the data by changing the callback to:
def callback(self, sender, data):
free_acceleration = encode_free_acceleration(data)[0]
free_acceleration = str(free_acceleration)[1:-1]
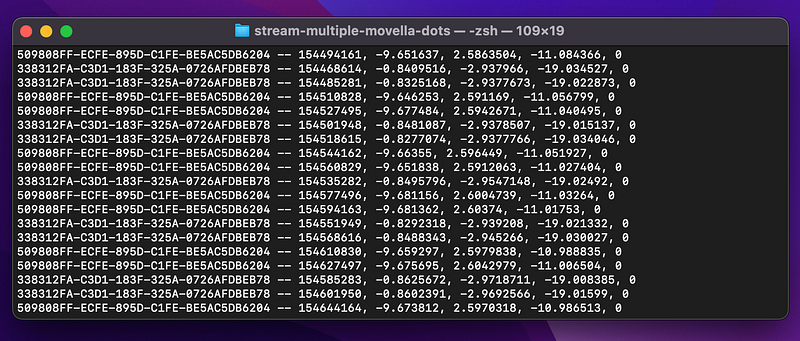
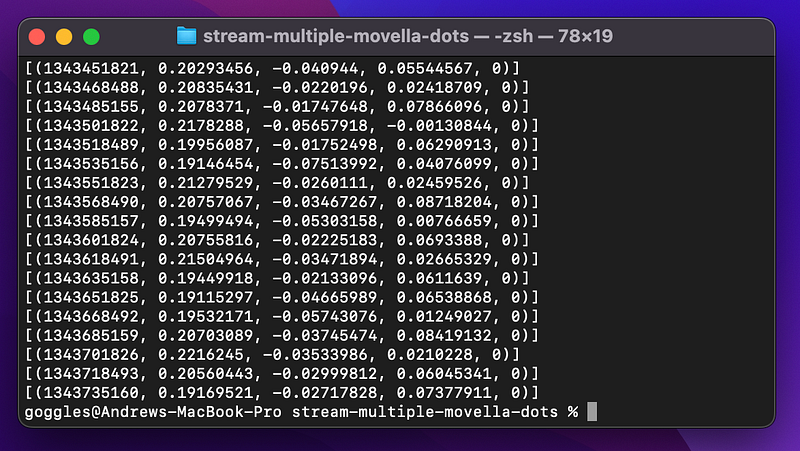
print(f"{self.device_address} -- {free_acceleration}")Then the data will look like:
Above is the DOT’s address, the timestamp, and the X, Y, and Z of the accelerometer (and a zero 0 for padding).
You now have real data from your Movella DOTs. Check out our next article on how to save this data to a SQLite database.
Troubleshooting on Linux and Windows
If you are on a Linux system or any other system that has trouble connecting to Bluetooth devices in quick succession, try this workaround code on our GitHub. This code separates the device-finding and device-connecting parts to avoid errors like bleak.exc.BleakDBusError: Operation already in progress.
The Full Script
This is all the code we need to get Free Acceleration data from two Movella DOTs:
# Stream Free Acceleration data from multiple Movella DOTs

import numpy as np
import asyncio
from bleak import BleakClient

measurement_char_uuid = "15172001-4947-11e9-8646-d663bd873d93"
short_payload_char_uuid = "15172004-4947-11e9-8646-d663bd873d93"

# Replace this with a list of your DOT's UUID addresses
# (or "MAC addresses" for Windows and Linux users)
addresses = [
    "509808FF-ECFE-895D-C1FE-BE5AC5DB6204",
    "338312FA-C3D1-183F-325A-0726AFDBEB78"
]

class NotificationHandler:
    '''This class allows us to add the DOT's UUID address to the data that gets printed'''
    def __init__(self, device_address):
        self.device_address = device_address

    def callback(self, sender, data):
        free_acceleration = encode_free_acceleration(data)[0]
        free_acceleration = str(free_acceleration)[1:-1]
        print(f"{self.device_address} -- {free_acceleration}")

def encode_free_acceleration(bytes_):
    data_segments = np.dtype([
        ('timestamp', np.uint32),
        ('x', np.float32),
        ('y', np.float32),
        ('z', np.float32),
        ('zero_padding', np.uint32)
        ])
    formatted_data = np.frombuffer(bytes_, dtype=data_segments)
    return formatted_data

async def connect(address):
    nh = NotificationHandler(address)
    # Connect to the DOT and stream data
    async with BleakClient(address) as client:
        print(f"Client connection to `{client.address}: {client.is_connected}")

        # Subscribe to data notifications
        await client.start_notify(short_payload_char_uuid, nh.callback)

        # Set and turn on measurement mode
        binary_message = b"\x01\x01\x06"
        await client.write_gatt_char(measurement_char_uuid, binary_message, response=True)

        # Stream data for 10 seconds
        await asyncio.sleep(10.0)

async def main():
    await asyncio.gather(*(connect(addr) for addr in addresses))

if __name__ == "__main__":
    asyncio.run(main())
If you’re getting errors (like BleakDBusError), try this version of the script from our GitHub.
Output:
0 for padding).Questions and Feedback
If you have questions or feedback, email us at [email protected] or message us on Instagram (@protobioengineering).
If you liked this article, consider supporting us by donating a coffee.
Related Resources
- Movella Support and Knowledge Base
- Movella SDKs and Bluetooth Documentation
- AsyncIO in Python: A Complete Walkthrough