
How to create a REST API with Express.js and Node.js
In this tutorial, we’ll be learning how to build a Rest API in Node.js and Express.js by building a simple crud user app API. The source code for the final project can be found here
Before we start please find below important technologies definitions
- Node — Node.js® is a JavaScript runtime built on Chrome’s V8 JavaScript engine. As an asynchronous event-driven JavaScript runtime, Node.js is designed to build scalable network applications. It compiles the JavaScript directly into the native machine code. It is a lightweight framework used for creating server-side web applications and extends JavaScript API to offer usual server-side functionalities. Features — It is fast, Asynchronous, Scalable, Open Source and no buffering (Node.js applications simply output the data in chunks and never buffer any data)
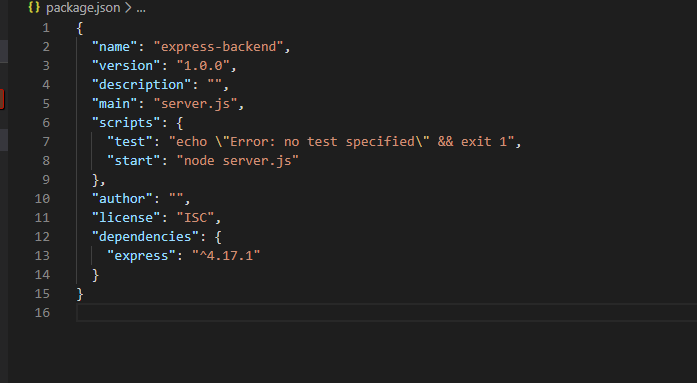
- Package.json — The package.json file in Node.js is the heart of the entire application. It is basically the manifest file that contains the metadata of the project where we define the properties of a package.
- Express js — Express 3.x is a light-weight web application framework to help organize your web application into an MVC architecture on the server side.Express.js is not a model-view-controller framework by itself. You need to bring your own object-relational mapping libraries such as Mongoose for MongoDB, Sequelize (http://sequelizejs.com) for SQL databases, Waterline (https://github.com/balderdashy/waterline) for many databases into the stack.
- Postman — Postman is a software development tool. It enables people to test calls to APIs. Postman users enter data. The data is sent to a special web server address. Postman is an API(application programming interface) development tool that helps to build, test, and modify APIs.
- HTTP — HTTP means HyperText Transfer Protocol. HTTP is the underlying protocol used by the World Wide Web and this protocol defines how messages are formatted and transmitted, and what actions Web servers and browsers should take in response to various commands.
- RESTful API — A RESTful API is an application program interface (API) that uses HTTP requests to GET, PUT, POST, and DELETE data.
- Body-parser: You will use this dependency to convert the body of incoming requests into JavaScript objects.
Prerequisites :
Download links
2. Chrome — https://www.google.com/chrome/
4. Postman -
Getting Started
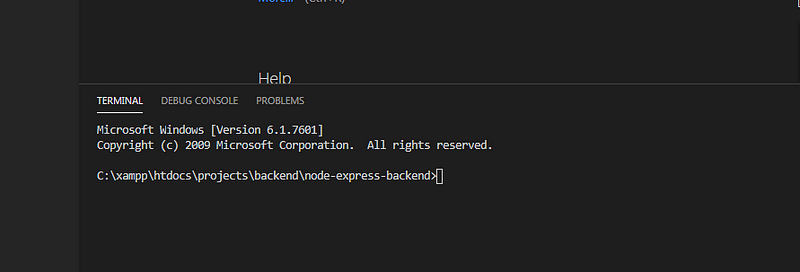
- Open Terminal (on Windows, open the command line utility)
- Create the folder where you want to save the program for example, node-express-backend
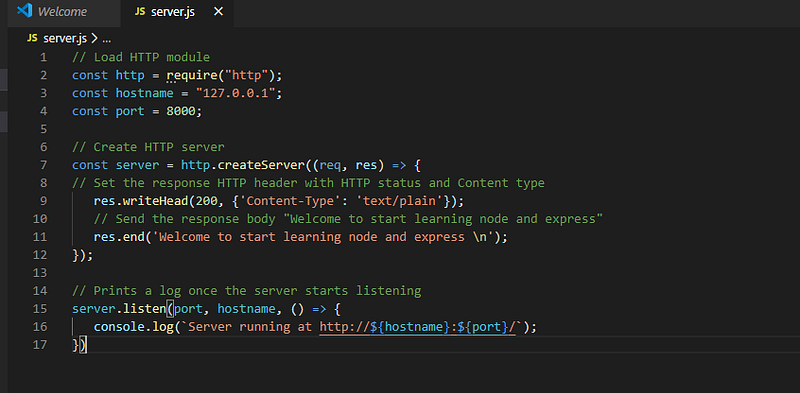
3. create a file called server.js and paste the below code and then save
4. Run terminal with below command
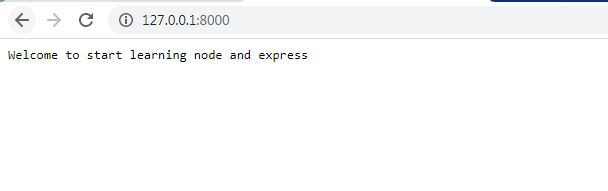
node server.js5. Open the browser with http://127.0.0.1:8000/
6. Now again open the terminal and run below command to setup project with the express
Initialize The App
npm init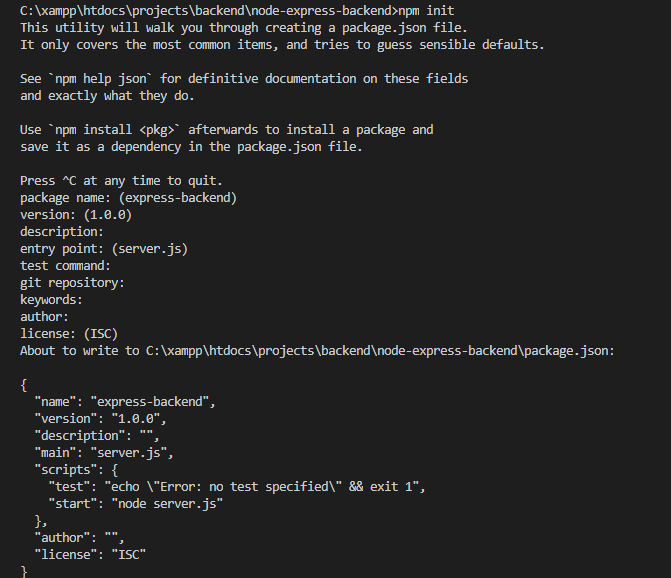
7. Now install Express in the directory and save it in the dependencies list of your package.json file
Install Dependencies
npm install express --saveIf you open the package.json, Express will now appear at the end of the package.json file.
8. Open the server.js and replace the code with below
const express = require('express')const app = express();app.get('/', (req, res) => {res.send('Welcome to learn backend with express!')});app.listen(8000, () => {console.log('Example app listening on port 8000!')});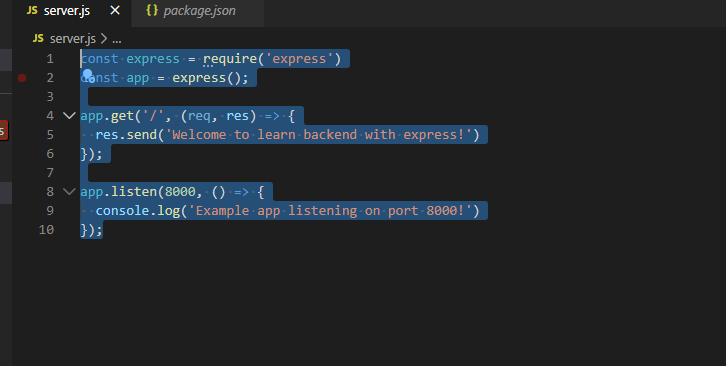
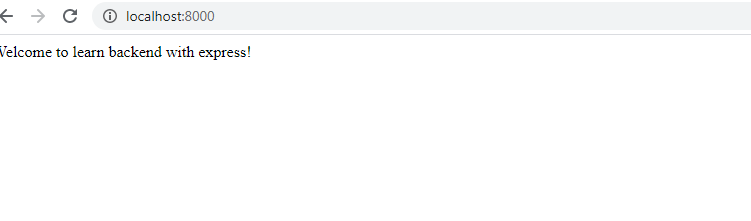
9. Run terminal with below command
node server.jsor npm run start10 .and open the browser http://localhost:8000/
11. Setup is complete now with Node and Express.
12. Next, we will learn how to create the RestFul API with Node and Express
CRUD (Create, Read, Update, and Delete).
Before we start we need to install below package
Nodemon is a tool that helps develop node.js based applications by automatically restarting the node application when file changes in the directory are detected.
Babel Setup Firstly, we need to install two main packages to setup babel in the project.
a) babel-core — babel-core is the main package to run any babel setup or configuration b) babel-node — babel-node is the package used to transpile from ES(Any Standard) to plain javascript. c) babel-preset-env — this package is used to make use of upcoming features that node.js couldn’t understand. like, some features will be new and take time to implement in the node.js by default.
body-parser: You will use this dependency to convert the body of incoming requests into JavaScript objects.
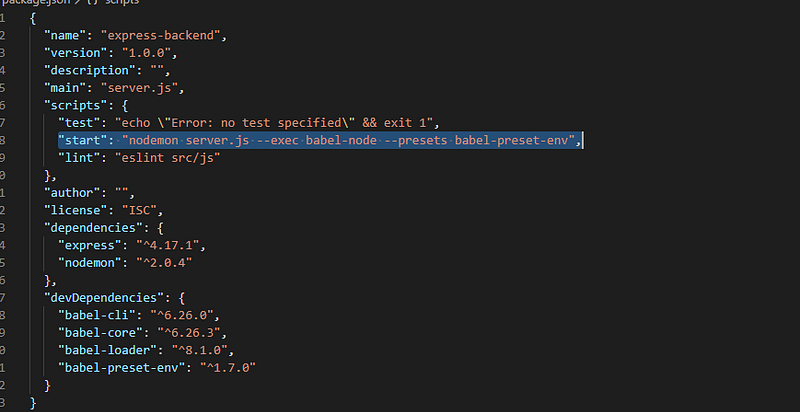
Install Dependencies And Set Up Babel
npm install nodemon --save
npm install babel-cli babel-preset-env babel-loader babel-core --save-dev
npm install body-parser --save
Update package.json scripts tag with below code
"scripts": {"test": "echo \"Error: no test specified\" && exit 1","start": "nodemon server.js --exec babel-node --presets babel-preset-env","lint": "eslint src/js"},
Run terminal with below command
npm run startLet’s start
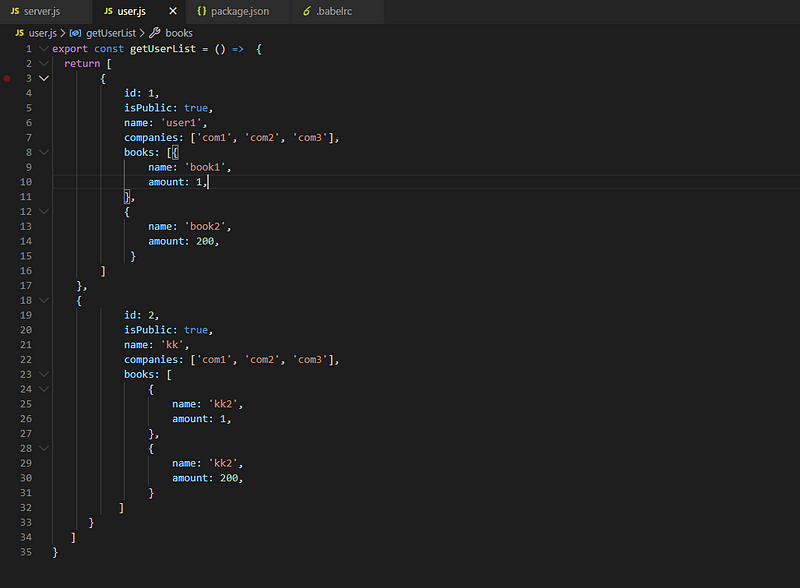
- Create new file user.js (consider it as dummy database). In user.js create a javascript object to create a dummy database
const userList = getUserList();function getUserList() {return [{id: 1,isPublic: true,name: 'user1',companies: ['com1', 'com2', 'com3'],books: [{name: 'book1',amount: 1,},
{name: 'book2',amount: 200,}
]
},
{id: 2,isPublic: true,name: 'KK',companies: ['com1', 'com2', 'com3'],books: [{name: 'kk1',amount: 1,},
{name: 'kk2',amount: 200,}
]
}
]
}
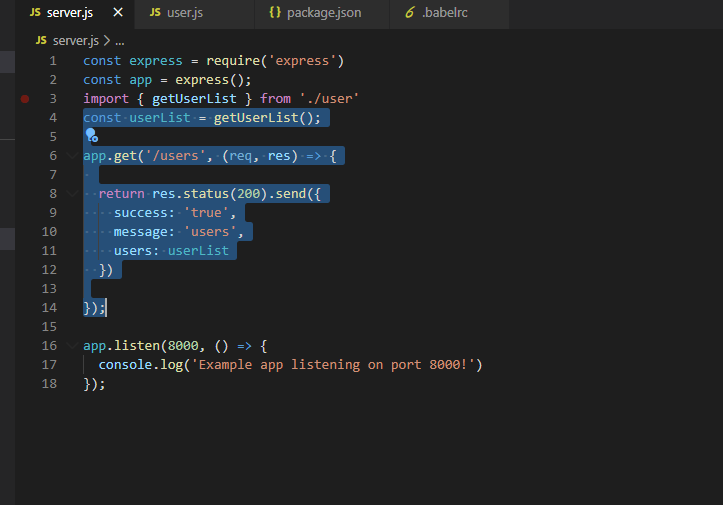
2. update the server.js file
Setup The App Create Our First Endpoint
GET —It is used to get all records from dummy database .
Open the server.js ad add below-highlighted code for GET Route
open the browser http://localhost:8000/
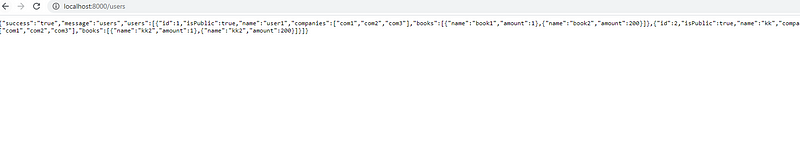
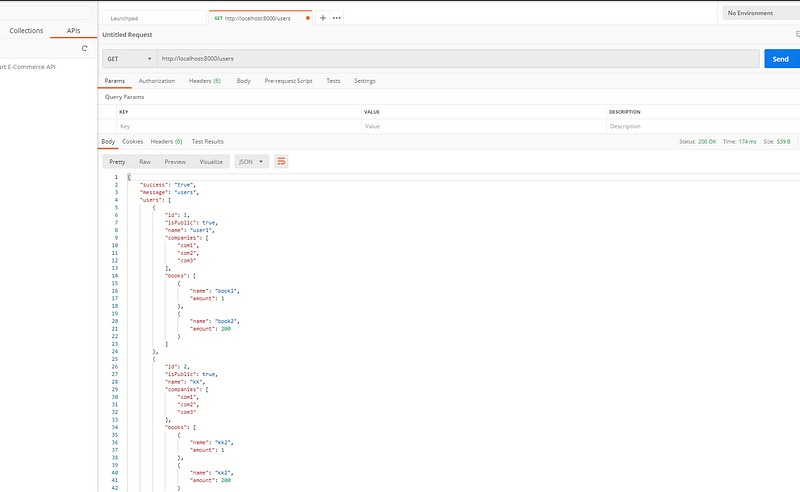
Open the postman — we can go to the postman and test our endpoint To test the endpoint we’ll go to localhost:8000/users
on the postman, kindly select GET and then send
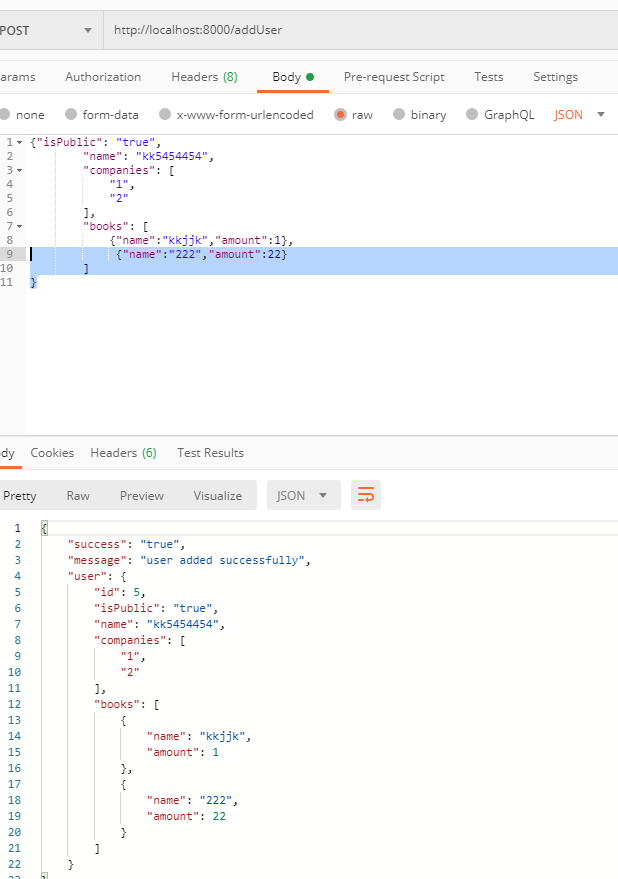
2) POST — It is used to add a new record to a dummy database
Open the server.js file and add a new route for POST as below
app.post(“/addUser”, (req, res) => { if (!req.body.name) { return res.status(400).send({ success: “false”, message: “name is required”, }); } else if (!req.body.companies) { return res.status(400).send({ success: “false”, message: “companies is required”, }); } const user = { id: userList.length + 1, isPublic: req.body.isPublic, name: req.body.name, companies: req.body.companies, books: req.body.books }; userList.push(user); return res.status(201).send({ success: “true”, message: “user added successfully”, user, });});Open the postman — we can go to the postman and test our endpoint To test the endpoint we’ll go to localhost:8000/addUser
on the postman, kindly select POST and then click on the body before Headers and pass in your values in the field.
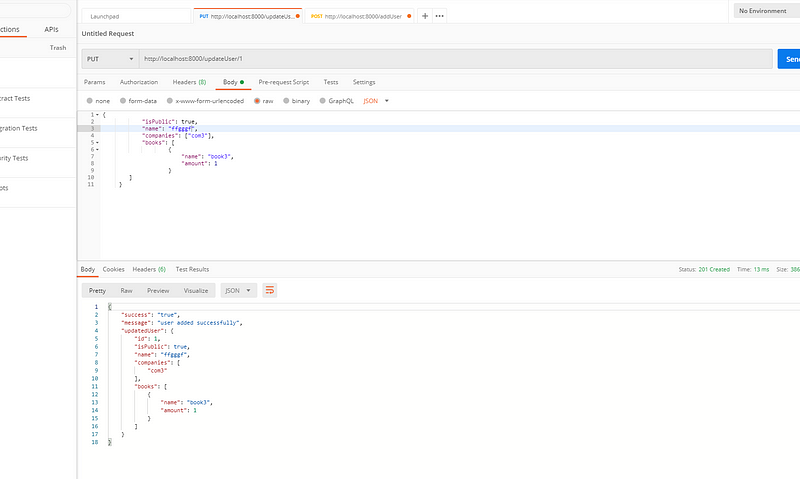
3. Update — It is used to update a new record to a dummy database
Open the server.js file and add a new route for POST as below
app.put(“/updateUser/:id”, (req, res) => {const id = parseInt(req.params.id, 10);const updatedUser= {id: id,isPublic: req.body.isPublic,name:req.body.name,companies: req.body.companies,books: req.body.books};for (let i = 0; i < userList.length; i++) {if (userList[i].id === id) {userList[i] = updatedUser;return res.status(201).send({success: ‘true’,message: ‘user added successfully’,updatedUser});}
}
return res.status(404).send({success: ‘true’,message: ‘error in update’});})
Open the postman — we can go to the postman and test our endpoint To test the endpoint we’ll go to localhost:8000/updateUser/1 (1is the id of the record i.e dynamic).
On the postman, kindly select PUT and then click on the body before Headers and pass below values in the field and click send.

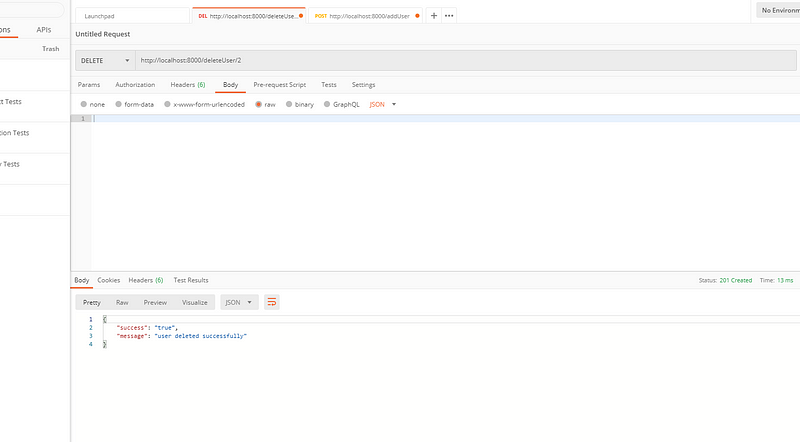
4. Delete — It is used to add a delete record to a dummy database
Open the server.js file and add a new route for POST as below
app.delete(“/deleteUser/:id”, (req, res) => {const id = parseInt(req.params.id, 10);for(let i = 0; i < userList.length; i++){if(userList[i].id === id){userList.splice(i,1);return res.status(201).send({success: ‘true’,message: ‘user deleted successfully’});}
}
return res.status(404).send({success: ‘true’,message: ‘error in delete’});})
Open the postman — we can go to the postman and test our endpoint To test the endpoint we’ll go to localhost:8000/deleteUser/1 (1is the id of the record i.e dynamic).
On the postman, kindly select DELETE and click send.
Conclusion:
This is the explanatory medium story of how to create REST APIs with Express.js and Node.js if you have any doubts, please mail me on [email protected]
Next Part 2 — How to add Swagger UI to existing Node js and Express.js project
How to add swagger to existing node js and express.js project
Happy Learning :)


