
How To Create A Medium Publication Part Two
Questions and Answers about creating or starting a Medium Publication and How To Manage Writers for a Medium Publication
Part One available here was about why you would have your own publication, and how to add Editors and Writers.
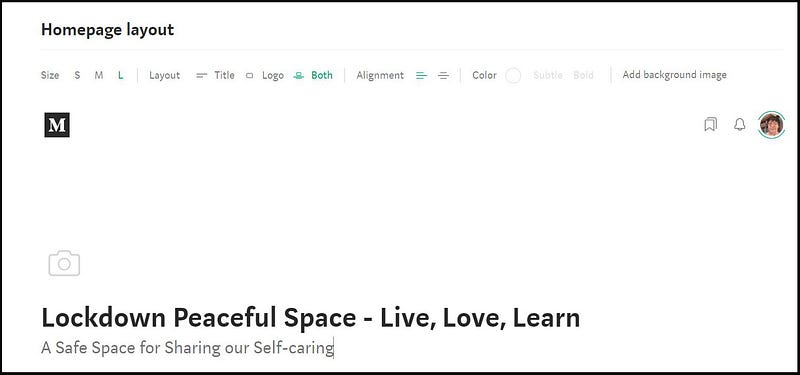
This part, Part 2, is about your Publication’s header image, Logos, and your Publication’s lay-out and the types of stories to be shown on your Publication homepage.
It also covers how to set up Pages on your homepage, including Feature Pages, and how to set up a Promo on your Publication homepage! 😄
AND it covers how to add your own Story to your own Publication, and if you have writers for your Publication, how to accept or not accept (i.e. reject) other writers’ stories submitted to your Publication. To quickly access this information, scroll down the page until you see: How Do You Add a Story and Arrange the Layout of Stories in Your Publication?
What is a Publication Logo?
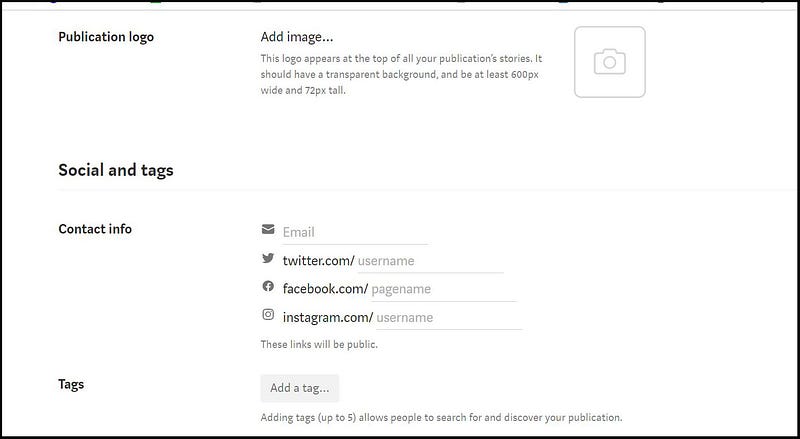
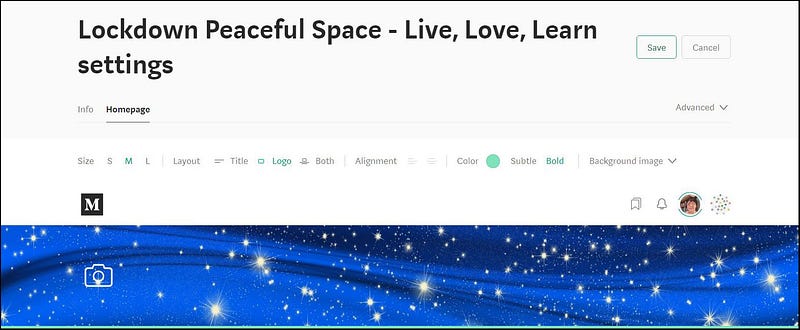
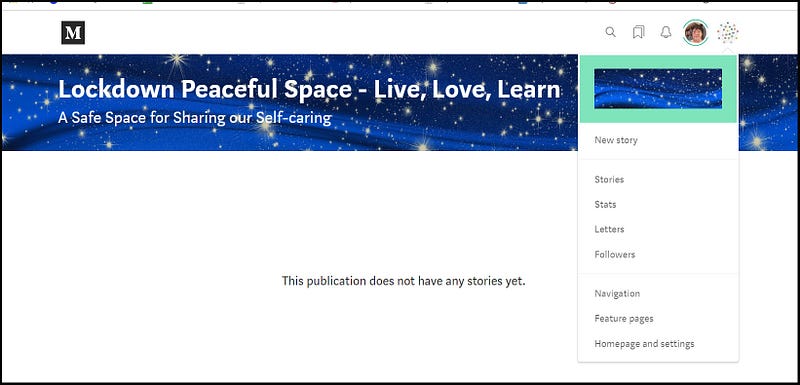
Your “New Publication” page at Step 1 (or on the Info page) has an area to add a Publication Logo image, as shown above.
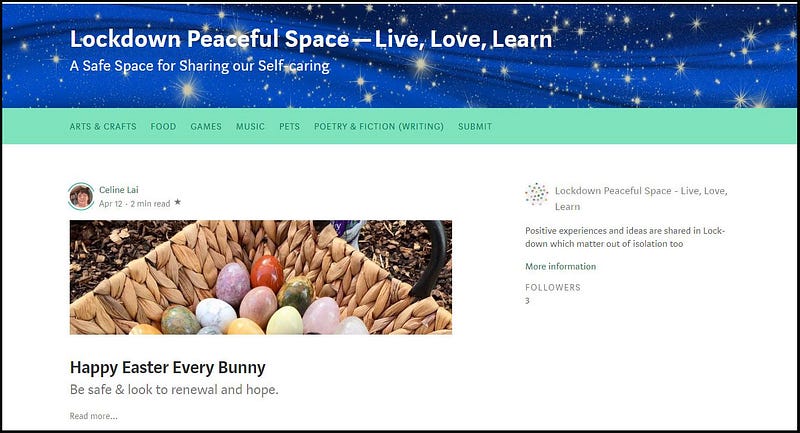
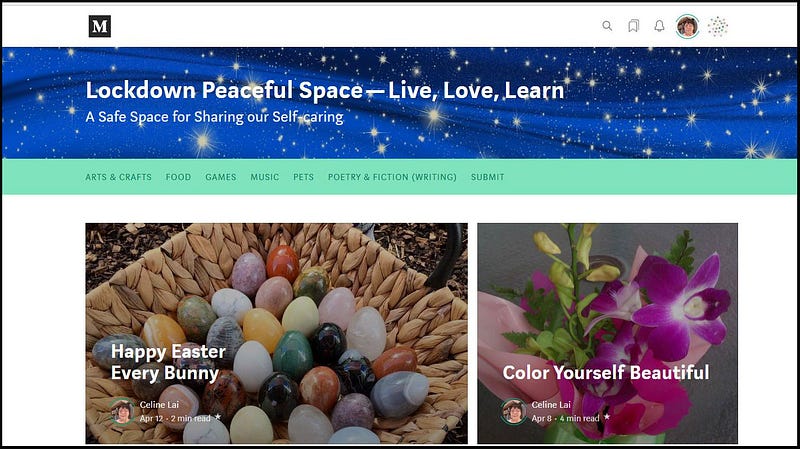
Your Publication Logo is a small picture that appears on the left at the top of each story on your Publication and is used on your web-site to “brand” your unique content. Readers click on it to take them back to the home page. In my example, the dark blue starry sky is the Publication Logo for my Medium Publication titled “Lockdown Peaceful Space — Live, Love, Learn.”
I used a “dark blue starry sky” image for both the background image of my Publication's homepage (see information later in this article), and for my Publication Logo, for “Lockdown Peaceful Space”.
You can search the web for an appropriate sized Logo or save and resize a suitable picture, OR create your own. Canva is a free software programme that you could try using to create a nice suitable image for your Publication Logo.
Resizing your Logo using the free Paint programme
If you want to use a picture saved to your computer for your Publication Logo, you can use Paint for Windows Operating Systems to resize it.
Download the free Paint programme if you don’t have it. https://support.microsoft.com/en-au/help/4027344/windows-10-get-microsoft-paint
Open or run Paint, then click on the arrow in the top left corner then on Open.
Find your picture, click Open to open and insert the picture into Paint.
Then click on Resize under the Home tab, select Pixels, change the pixels to 600 (for Horizontal) and 72 (for Vertical) then click OK.
Then use Save As or Save to save.
Click on “Add image” next to Publication Logo (see screenshot 1) to add your picture to your Medium Publication. Select your image and click Open (for Windows Operating Systems) to add the image to your Publication.
You won’t see the Publication Logo until you have at least one story added to your Publication, as it appears at the top left of Stories.
What is a Background Image?
.
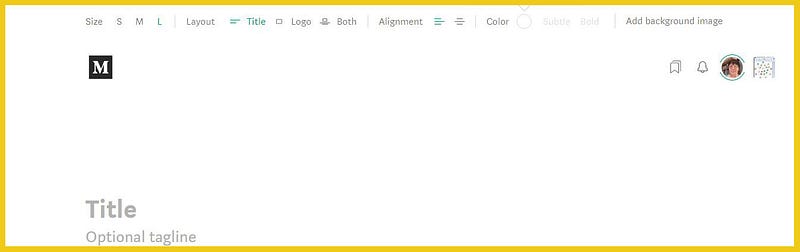
Go to the Homepage layout screen, shown above (screenshot 3) by clicking on Next at the bottom right f you are on Step 1 of setting up your new Publication.
If you are not on Step 1 (i.e. the first screen when starting a new Publication), click on your Publication Avatar at top-right then click on “Homepage and settings.” Then click on Homepage as shown below.
You can add a Background Image, also called a Header Image or a Banner Image, to your Medium Publication. It will appear at the top of your Publication homepage.
It is the picture that appears in a strip or a banner, with the Publication title in white text, at the top of your Publication home page.
You should choose or create an image without much detail or “busyness” and with only one or two colours.
This is because the Title will always appear in white on the image and it can get “lost” if you have a complex or very colourful background/banner image.
I went to Pixabay and searched upon “header” and found a starry background for the home page of my Publication “Lockdown Peaceful Space-Live, Love, Learn.”
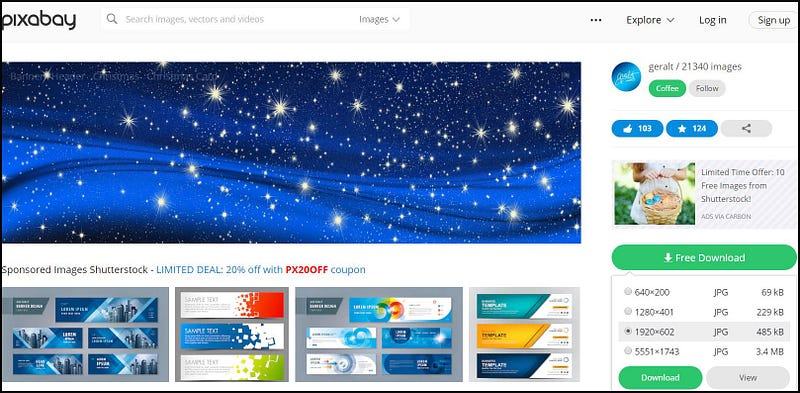
Download your chosen image at 1920 x 602 in this case. Medium recommends the background image be as close to 1500 x 750 pixels as can be. You can always download a Pixabay image, open it in Paint and resize it.
For my starry image I didn’t resize it because making it shrink wouldn’t take away any detail as it is “homogeneous” or alike, i.e. full of stars on the same coloured background.
If you are able to create your own background image using Canva or another image editing programme, go ahead. You may even want to add your Publication title to your background image if you create your own background image.
How Do I Add a Background Image?
.
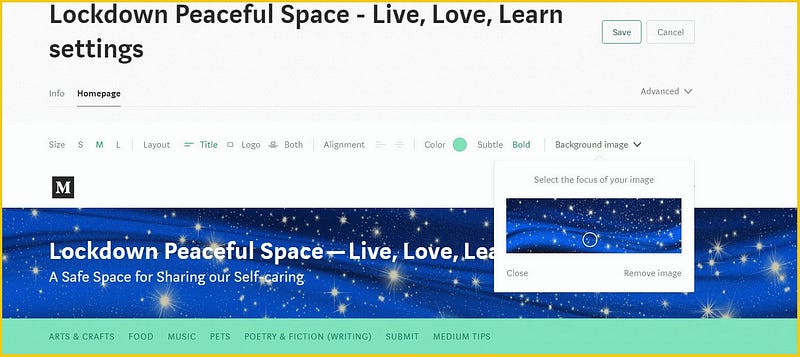
Click on “Add background image” at the top right of the Homepage layout screen. You may need to click on the M or the L (which mean Medium or Large banner size) to see “Add background image.”
Find and select your header image on your computer and click Open (for Windows Operating Systems) to insert the image.
You can move the background image around either horizontally or vertically or both (depending upon the size of the image uploaded to your Publication).
To move around the background image, after uploading your image, click on the little downward pointing arrow next to “Background image” and a snapshot of your image pops up, with a small white circle.
Hover your mouse over the pop-up picture and move your mouse around, which will move the image around. Left-mouse click to set the focus (white circle) for your image. This can come in handy in order to get the Publication Title aligned where you want it to be.
If your background image contains a discrete element, you can move the image around so that the title aligns with the element to your liking. For example, for my other Publication, “Thirty over Fifty” I moved around the background image to align the title “Thirty over Fifty” just under the eyes of the lady in the image!
If you want to change or remove the image, click on “Background image” then on “Remove” image. You can see “Remove image” in the screenshot above.
To add a different image, remove the existing image, then click on “Add background image” to add the new image.
A Logo or a Homepage Logo is a picture that, if you want to, you can add to the background image of your Medium Publication’s homepage.
Screenshot 6 shows the word “Logo” next to the words “Title” and “Both”. A picture (icon) of a camera appears above the title, which is used to upload or add a Homepage Logo.
If your Publication Title is short and you have incorporated it into Logo image, you might want to use it centred at the top of your Publication homepage.
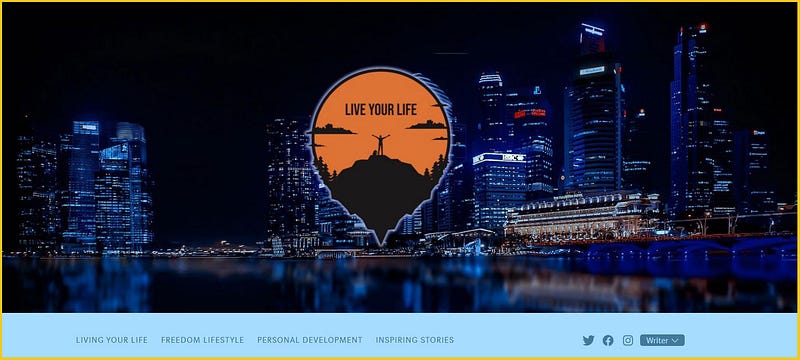
An example of a Publication on Medium that has a Homepage Logo and a Background Image is the Medium Publication “Live Your Life Network.”
Click on the link given above for the Publication, and then for a Windows OS (operating system), right-click on the orange image then left-click on “Open image in new tab.” The result is the oval-shaped orange/black image with the Publication title. The fact that you can use “Open image in a new tab” indicates that it is a Logo.
If you go to the Publication’s homepage, using the Mozilla Firefox browser, you can try right-clicking then clicking on “View background image”. In the case of “Live Your Life Network” if you do this, the background image below (so without the orange Logo) would appear.
Adding a Background image will add interest and will draw attention to your Publication. You can also choose whether to have:
(1) A background image, a Homepage Logo, and the Publication Title, or
(2) A background image and a Homepage Logo and no Publication Title, or
(3) A background image and the Publication Title, and no Homepage Logo (as for this publication, “Lockdown Peaceful Space: Live, Love, Learn), or
(4) A Homepage Logo only (which will appear against the white default background)
(5) A Publication Title only
If you have a Logo with your Publication title in the Logo (as for the Medium Publication “Live Your Life Network” shown above) you may want to use the Logo and a background image, with no Publication Title (option 2 above).
If you have a Logo with your Publication title in the Logo, you may want to use just the Homepage Logo only (option 4 above), without a background image.
The Medium Publication “The Startup” has a Homepage Logo ONLY (option 4) on its homepage. You can verify this for yourself by going to the Publication’s homepage (link below), using the Mozilla Firefox browser.
Then right-click anywhere except on the picture of some hands at a computer keyboard. So DON’T click on the picture but click outside of the picture, to see if there is a Background image.
The option for “View Background Image” will be greyed out. But you will be able to left-click on “Open image in new tab”.
This is because the Startup Publication HAS NO BACKGROUND IMAGE (and instead just uses the default white background) and has a Logo only which contains or includes the Publication’s name.
https://medium.com/swlh ←- click here to go The Startup Publication
Your Publication can have two logos, the logo described above (which ONLY displays at the top left of the Publication homepage, which I call the Homepage Logo) and a Publication Logo which appears at the top left of all stories in your Publication.
Both Logo types are optional, i.e. are not required or compulsory. Remember that the Homepage Logo appears on the homepage only and NOT at the top of Stories in your Publication. The Logo that Medium calls the “Publication Logo” appears at the top of Stories only and not at the top of the homepage.
For option 3, f you only want the Publication Title and a Background image to show at the top of your Publication homepage, and you are not bothered about a Logo on your Publication homepage, add your Background image, then click on the word Title. Enter the Title of your Publication.
See Screenshot 6
If you only want a Logo and a Background image to appear on the Homepage and no Publication Title (see Option 2 above), add your Background image, then click on Logo. See below for steps on uploading your Homepage Logo.
It’s important to note that the size of your header (the area or strip for a background image) needs to be M or L that is Medium or Large, in order to have a Logo and a Background image.
To have a Logo and a Title and a Background image appear at the top of the Publication Homepage (see Option 1 above), add your Background image, and click on Both. See below for steps on uploading your Homepage Logo.
To have just a Publication Title (option 5), don’t add a Background image. If you need to, type your Publication Title into the area labelled “Title.” You may wish to type in a sub-title into the Tagline field.
You cannot have just a Background image, but must have a Title or a Logo with a Background Image.
For option 4, Homepage Logo only, click on the word “Logo” between Title and Both next to “Layout”, then click on the picture of the camera and upload your image for your logo.
The Homepage Logo on the Layout page along with the Background Image for your Publication homepage will display only on the Homepage.
Clicking on the picture of the camera will let you upload a picture, which can be different to the Publication Logo which appears at the top of Stories in your Publication, as your Homepage Logo. My Publication “Lockdown Peaceful Space” has a blue starry sky background image/header at the top of the homepage, and NO “Logo” (specifically, no Homepage Logo).
To remove a Homepage Logo left-click on it and press the Delete key on your keyboard. Change the Logo by removing the unwanted one then adding a new Logo.
Medium gives information on different layouts for color schemes and for combinations of Publication Title and Logo and banner sizes at the link below. 😃
Experiment until you are happy with your Background image, Homepage Logo, and Publication title. The S and M and L refer to sizes of the banner area which is where the Background image goes.
For example, with a large size banner, the text can be either left-aligned or centred, but for that you would probably want a light-coloured simple banner image, so that the text for the Publication Title doesn’t get “lost.”
A Homepage Logo can only be centred if your banner is made M or L in size. You can centre the Logo by clicking on the 2nd lot of little lines next to Alignment — see Screenshot 9 showing the 1st lot highlighted in green for left alignment.
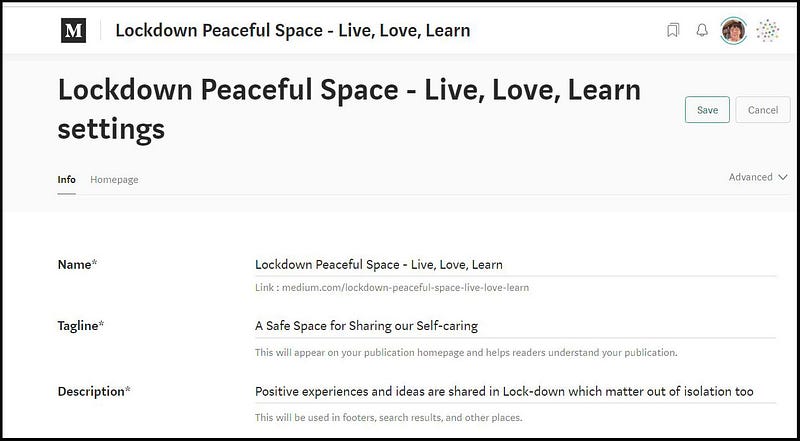
The Tagline (or sub-title-see Part one of this series) from Step 1, e.g. for this Publication that you are reading now, “A Safe Space for Sharing our Self-caring” does not carry over to this Step.
So if you want a sub-title, you have to type or copy and paste it into the “Optional tagline” field under the Title.
What are Pages?
Pages are separate pages or tabs of your Publication which either link to:
- Tagged stories in your Publication (i.e. to Stories with a particular Tag)
- An individual specific story
- A feature page
- An external web-page
You can see the titles of the 7 pages of my Publication, Lockdown Peaceful Space- Live, Love, Learn below.
Please go to Part Three of this Series for instructions on how to set up pages.
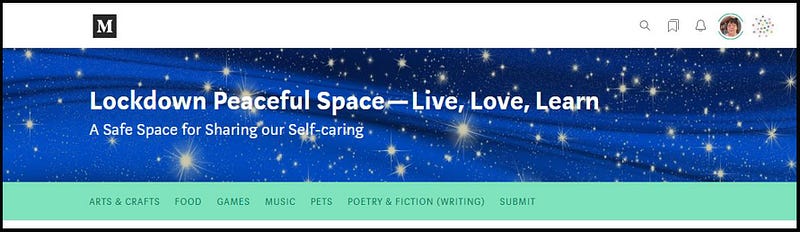
Select a colour for the strip where the titles of your Publication Pages will appear by clicking on the circle next to Color (see screenshot 9) and typing in a Hex code for your desired color. Hex codes are made up of a hash # followed by 6 numbers.
For my Publication I used a mint green. You can have this color too by typing or copying and pasting 7FE4BD into the Color code area, after the # 😃 but you may have to persevere or keep typing in or pasting in until it works. I had trouble “coloring” but don’t know if that was because of using Chrome or was just the Medium platform being “glitchy” at the time! Patience is a virtue.
Choose a colour from a web-site such as: https://htmlcolorcodes.com and type in or copy and paste the 6 numbers after the # into the field shown below with #6-digit hex value in it.
Note: this color will only show on your Publication homepage if you have a Background image.
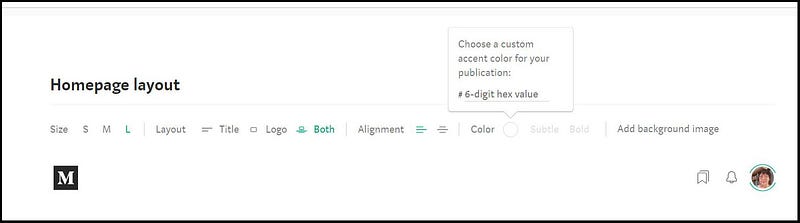
If you choose “Subtle” for your color scheme, your color won’t appear on your Publication homepage, but will show up at the top of the Stories in your Publication.
You can go to Medium’s Help page here to read about the differences between Subtle and Bold colors.
How Do You Add a Story and Arrange the Layout of Stories in Your Publication?
Now that you have formatted your Publication’s header image, title and color scheme, you can design the layout or display of the Stories in your Publication.
Adding a Story or a few will help you decide upon the best layouts.
The Layouts or arrangements for the stories on your homepage are:
Grid / Stream / Mixed / List
At this point or stage you can just go with the default Layout (Stream) and click on Create at the bottom. ( If you have returned to your Publication after creating it, you will see Save at the bottom right rather than Create )
When you go to your Publication homepage after first creating your Publication, you will see “This Publication does not have any stories yet.”
If you are going to allow writers to write for your Publication, decide upon the type of stories you want in your Medium Publication, and take TIME to craft very clear Submission Guidelines for it.
Add Your own Story to your Publication
Go to your Publication’s homepage. Clicking on the Publication Avatar for your Publication (next to your personal avatar) will make a menu drop-down.
You can click on “New story” to write and add a Story directly to your own Publication as a draft first, then when your story has been completed, you can click on Publish or Schedule.
If you have already written a Story for your new Publication, add it as you would add a draft to any Publication.
Open your Story, click on the 3 little dots at the top right and click on “Add to Publication” and choose your own Publication, then publish or schedule your Story.
Once you navigate away from your Publication (say at this point you have saved it then had to go away before adding a story) you can get to your Publication by clicking on the 3 little dots next to your personal avatar on your Medium homepage, then clicking on Publications.
If you haven’t already written a Story with Guidelines for writers of your Publication, now is the time to do so.
The Guidelines for my Publication “Lockdown Peaceful Space-Live, Love, Learn” (click on the link below) have a long list of prohibited content, BUT that is my choice and Publishers have the right to state what they will accept and won’t accept.
After writing your Guidelines in a Story and publishing it in your Publication, you then need to draw readers’ attention to them. You do this by adding a Page or a Tab at the top of the Publication homepage, which links to the Guidelines.
Part 3 of this series gives instructions on creating Pages or Tabs.
Add Someone else’s Story to your Publication
Part one of this series described how to add Writers to your Publication.
Once a writer has submitted a story to your Publication, upon clicking on Stories (see screenshot 13) in the drop-down menu under your Publication avatar, you will see a page or screen with Drafts and submissions / Scheduled / Published / Unlisted as shown below. 😃
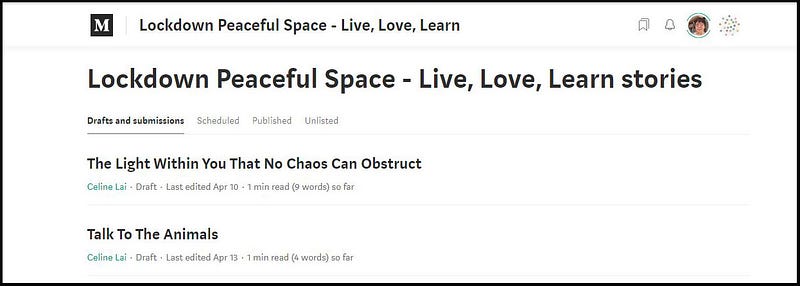
Drafts by writers for your Publication will appear under the default title or category “Drafts and submissions” which is highlighted in black in the screenshot above. Click on a Story title to read a story and make minor spelling and grammar changes if needed.
As an Editor, if I want the writer to change a Tag or to make a major correction, I will highlight a sentence of their Story then write them a Private Note.
Once you have decided whether to accept or decline the story, click on the 3 little dots at the top right, and then on “Manage submissions” shown in an example below.
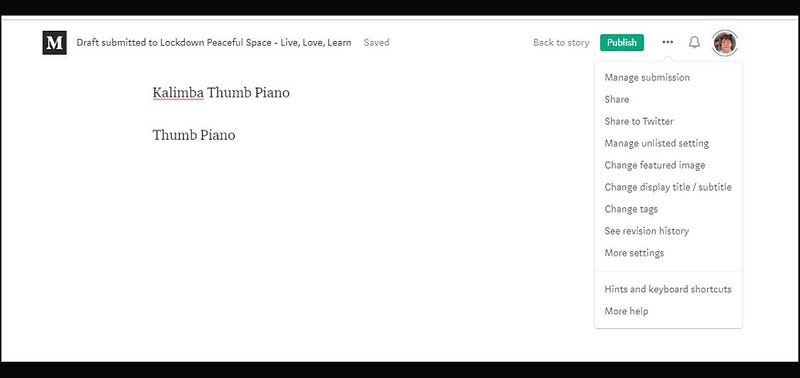
You will then see choices for Accept or Don’t Accept.

If you click on “Don’t accept” you will be presented with another screen asking you to confirm that you really don’t want to accept the Story.
If you click on “Accept” the writer will receive an email that their Story has been accepted into the Publication (as long as she has got receiving emails turned on under her Medium Profile settings). Click on Publish.
If you click on Publish rather than on Accept, the writer will just get one email stating that her story was published (rather than get 2 emails, one saying the story was accepted and one saying the story was published).
If you don’t accept the story, you should also REMOVE it from your publication by clicking on the 3 little dots and selecting that option. This is a courtesy thing, saving the rejected writer from having to remove it from your Publication (and will show that you really don’t want their story).
Remember that you can add your own Story by clicking on the Publication Avatar at the top right once you have navigated to your Publication, then clicking on New Story.
If you have created a new Story “outside of your Publication”, after you have published it, just add it to your Publication via “Add to publication” by choosing this option after clicking on the 3 little dots at the top-right.
.
Arranging the Layout or appearance of a section of stories
If you have created your Publication, then left it to finish it off later, you can drop down the Publication menu from the Publication avatar and click on “Homepage and settings” and then on Homepage in order to arrange your stories’ layouts.
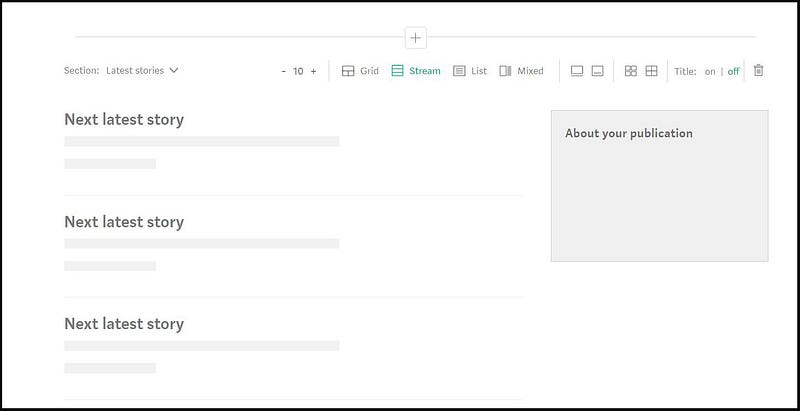
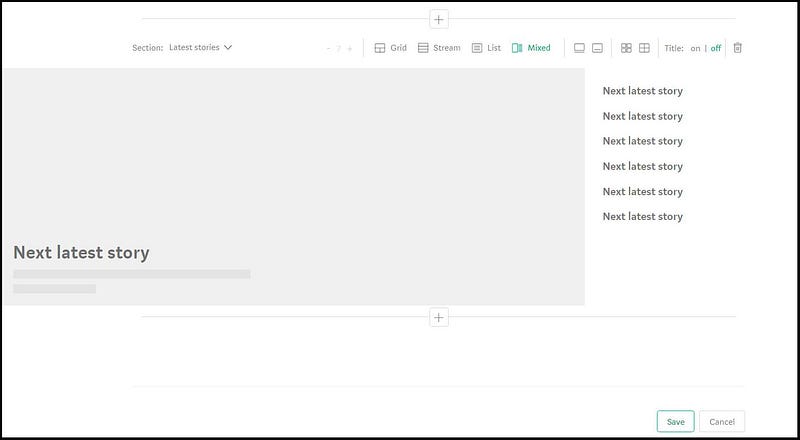
Stream Layout
The Default Layout, shown above, has a “Stream” of up to 10 stories in a list with images, and with an Information block about the publication on the right.
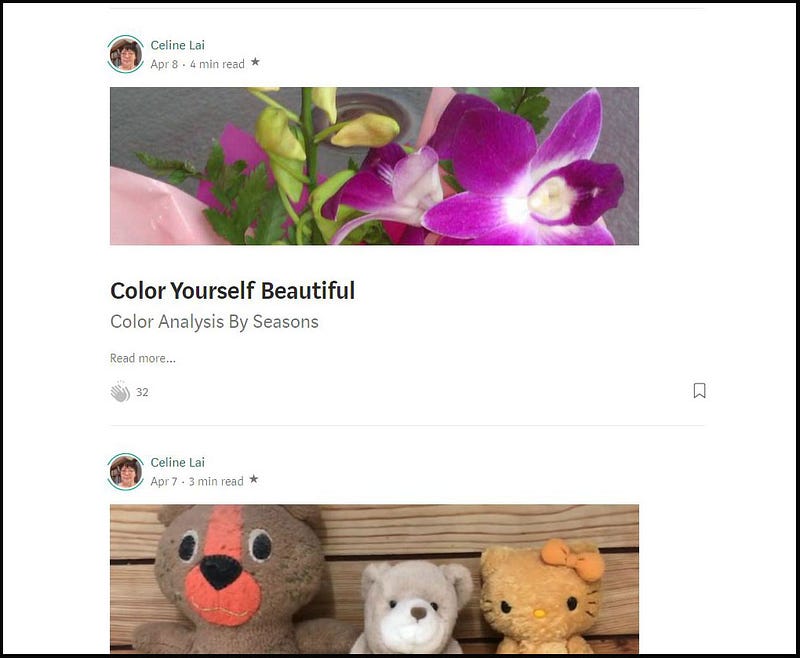
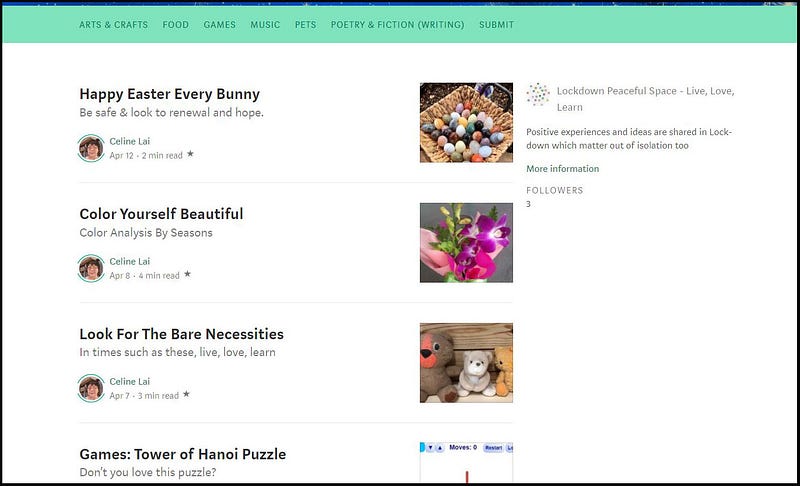
The screenshots below show 3 stories in a stream for “Lockdown Peaceful Space”.
The “Stream” layout may not be “economical” because it shows all Stories listed in single file, so a Grid layout would probably be a lot more useful and pleasing to the readers’ eyes to display many stories on your Publication.
Recall that the “About” information can be accessed by readers scrolling to the bottom of the Publication page and clicking on “About …[name of Publication].
Don’t think that, unless you have the Stream layout, the Info statement and number of followers (which appear in the “About your publication”block) will be unavailable, because they are accessible by clicking on the About [ publication name ] link at the bottom right of any Publication homepage.
List Layout
The “List” layout makes the homepage look pretty, with the images beside the Story Titles, but also lists them in a single file.
Mixed Layout
The Mixed layout uses a large image with story title for the latest published Story with just the Titles of 6 stories to the right. Please see “Live Your Life On Purpose” for this layout in action. 😺
Grid Layout
The Grid layout as its name implies, shows the Stories in a grid or in rows. The number of rows and number of stories per row depends upon the total number of stories in the Section.
For example you may configure a section to show the latest 12 stories published in your Publication. If there are 11 stories to date, they will appear as 3 stories at the bottom, then another 3, another 3, and 2 stories in the top row.
Changing the white-space (margins) between stories in a Grid
The default for story titles in a Grid is for margins or white space between the story titles. Hover your mouse over the picture of the squares on the left of the word Title and you will see a description of the function or option, being “No margins between stories.”
If you click on the picture of the little squares next to the word Title (see screenshot 15) this will make the margins disappear, which in my opinion can make the screen/page look cluttered.
An example of no margins between story titles is shown below. Things can easily look confusing or not pleasant to look at when different sized and/or clashing colours are used for images in the stories!

Choosing whether to display Story titles and Aligning text
Once you have several stories published in your new Publication, you can experiment with having the Title On or Off for the stories in a Section.
Personally I would always expect to see a Story Title “on” or to be shown, unless the images for the Stories have the titles in the images!
Next to the word Mixed in the layout options are two text alignment options.
See screenshot 19.
The default text alignment for stories in any Layout (Stream / List / Grid) is for a Story Title to appear below the story image. Hover your mouse over the Text Alignment option next to the option that is selected by default and “Show story info over the image” will appear.
If you click on this, the Story Titles will cover the image (which can look messy for some Story images). An example of this option is shown below.
You can click on the minus or plus next to: Section: [ latest stories ](see Screenshot 14 with -10 + next to the layout options) to increase or decrease the number of Stories displayed in a Section.
I aimed to quickly publish 9 stories for my new Publication and used the Grid layout so that they would appear as 3 rows of 3 stories.
Designing different Sections for your Medium Publication homepage
.
A Medium Publication can have a set number of stories to be displayed and can have two or more Sections with different layouts and different numbers of story titles displayed. 😃
You can click on the plus sign either above or below a “section” to add a Section with a different Layout above or below an existing Section!
What Are The Types of Stories that Can Be Shown on The Homepage?
.
You can choose Latest / Trending / Featured / Tagged stories for one Section of your Medium Publication homepage. You can have a Promo if you wish to.
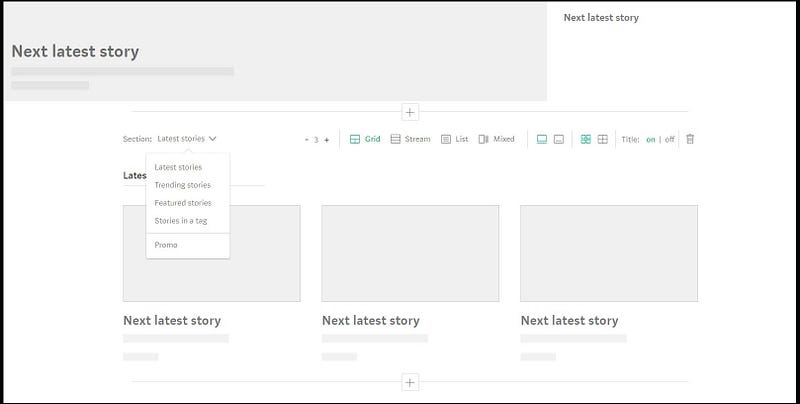
Latest stories
This is a list of the latest stories, appearing in date order, with the most recent Story published in your Medium Publication at the top or first.
Trending stories
This refers to top stories with the most views/reads. Larger Publications tend to use “Trending stories” for one of their homepage sections.
Did you know that if you click on “Latest stories” at the bottom of any Medium Publication, you will see a Tab for “Trending?” Click on the Tab which will take you to a page showing trending stories (other than those that appear on the Homepage under “Trending stories” IF the Publication has that section).
Featured stories
You can showcase or feature one or more Stories! See later in this part (Part 2) for instructions.
Stories in a tag
You can showcase stories which have a specific Tag. See later in this part (Part 2) for instructions.
How Do I Re-order (re-arrange) Sections?
You cannot just move sections around, but if you want Sections in a different order on your homepage, you will have to change the settings of some Sections.
If it’s easier, you could add a new Section and set it up, and delete the Section that you don’t want.
This is why it’s really important to PLAN the order of your Sections before setting them up!
You can “move” Sections around by using the + to add a section above or below another section and re-creating a section, and clicking on the picture (icon) of the “rubbish bin” (shown in the screenshot above next to On / Off) to delete a section in an unwanted spot.
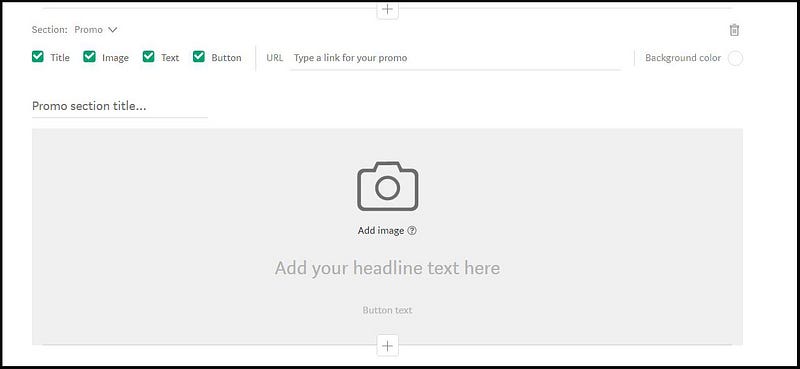
What is a Promo?
A Promo section lets you feature a promotion or an email list to join, by uploading an image, which you can caption with a headline text, and which you can use with or without a section title. You can customise the Background Color also.
You will need to paste or type in an URL (web-address) which readers will be taken to when they click on the image. This can be an external page, i.e. a web-page outside of your Publication and external to Medium.
You can have headline text in large font (by replacing “Add your headline text here”) and/or small text which appears inside a “button” (Button text).
Clicking on the image or on the “button” will take the reader to the web-page whose URL you have typed in. Please see the homepage of the Medium Publication, “Publishous” (link below) to see the Promo section in action.
You can click on the image “Wednesday nights Pub Chat 8pm Central” to go to another web-page. Publishous has used headline text but no Promo section title and no “button text.”
The image will have a white background, to blend in with the white of your Publication homepage. If you want a different color background, click the circle next to “Background colour” and type the code in for the color of your choice. Go for a light or pastel colour:
https://www.w3schools.com/colors/colors_picker.asp
The text “Follow Publishous on Twitter each Wednesday night to have Q&A with our spotlight author” is what they typed in as “headline text”.
In a hypothetical case of a Promo, on the Promo page I typed in “Fishes” into the “Promo section title” field.
See Screenshot below and screenshot 23
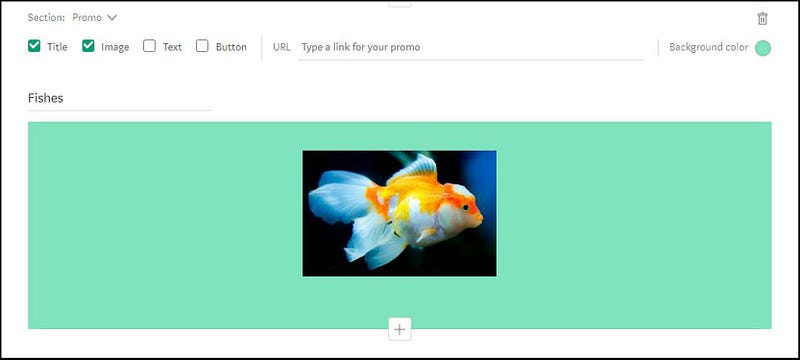
I ignored or left the “Add your headline text here” area, which is optional, as I wanted a picture only, and uploaded or added a picture of a Gold-fish.
Note: don’t forget to type or paste in a web-address (URL) into the field captioned “Type a link for your promo” of which Field, you will see when you upload an image.
When a reader clicks on the image in your Promo she/he will be taken to the page that your Promo links to.
It is essential to have an image for your Promo. It can be an image just made up of text (e.g. you’ve typed something out and screen-shot it and produced an image, as Publishous has done).
Below shows the result on my Publication homepage, as an example only. 😃

You can create a Button for your Promo by simply typing over the words “Button text” under the icon of the camera.
See Screenshot 23
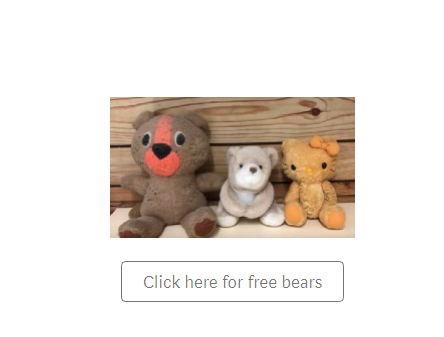
Below is shown a fun Promo image and a “Button” to press (click on) for free teddy bears (one is really a Hello Kitty) just to show you how the button text appears on the Publication homepage. This is not on my homepage now (it is just an example I set up and then deleted by clicking on the “rubbish bin” at the end of the line where it says “Section: Promo”). I set this up for you to see a fun Promo in action. 😃
Make sure you have typed a web-address into the URL field for readers to be taken to when they click on the image or on the button.
How Do I Feature A Story or Stories?
.
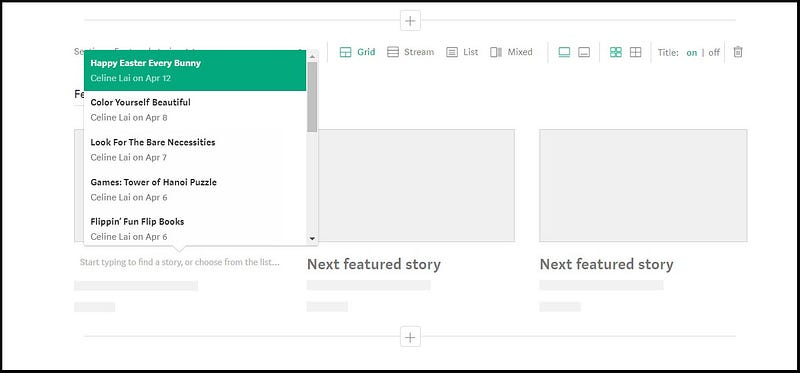
To feature one or more Stories, create a new Section if you need to and select “Featured stories” next to Section, choose the number of stories to feature by clicking on the minus or plus; and type Featured Stories into the Section title field, to caption this section.
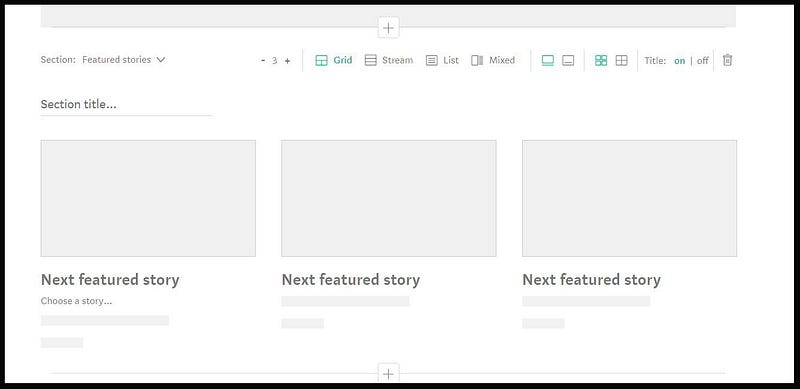
Click anywhere in “Choose a story….” under the first or only featured story block. A list of existing stories will pop-up. Click on the chosen story to add it as a featured story. Then click on Save.
At the time of writing this, I have 2 featured stories at the top of my Publication, “Thirty Over Fifty”.
Once you have a lot of Stories in your Publication, you may wish to REVIEW your Publication Layout.
If you go to “Thirty Over Fifty” you will see a mix of “sections” with different Layouts, including a section half-way down the homepage titled “Medium Matters”.
For this section I chose a “Stream” layout. This Layout lists the stories in single file and has the Publication Info Block next to it.
You can have different Layouts for different Sections.
Why Create Sections for Tagged Stories?
.
If you go to my Medium Publication, Thirty Over Fifty (click on the link below) you can scroll down the homepage and you will see Headings for “Medium Matters”, “Pets” and “Poetry” etc.
You can create Sections on your Publication homepage to display Stories published in your Publication which have a particular TAG.
Click on any story in “Thirty Over Fifty” under PETS and you will see the tag “Pets” has been used.
This use of displaying stories with one tag is very beneficial for your Publication, because sections or groups of related Stories will appear on your Publication homepage.
Consider the TAGS for Stories that you think or have found are the most popular and consider creating sections for stories with those tags.
If you have Pages for your Publication which link to Tagged stories, you can choose TAGS which you have not used for your Page stories, thus you can cover many categories or different Tags, via the Pages and Sections.
Create a new Section by clicking on the + sign below or above another Section where you want to place the section of tagged stories under one Tag.
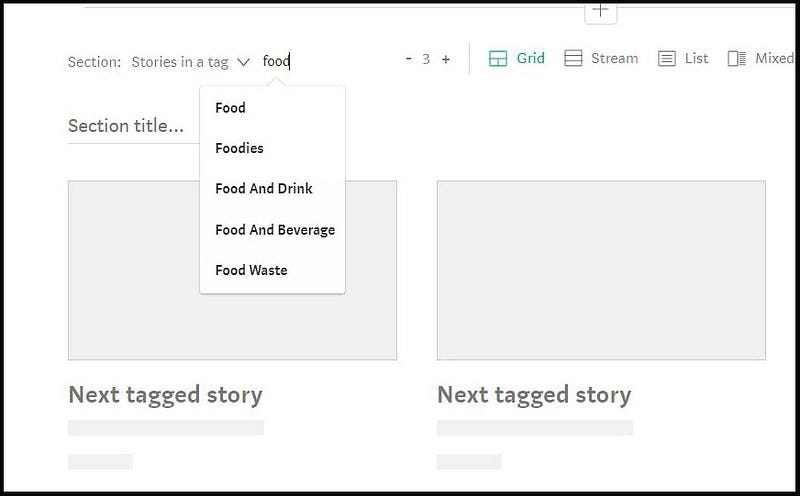
Click on “Stories in a tag”.
See screenshot 22
In the example below 3 stories have been selected to display and “Stories in a tag” have been selected.
Remember you can click on the + to increase the number of stories that will appear. 😸
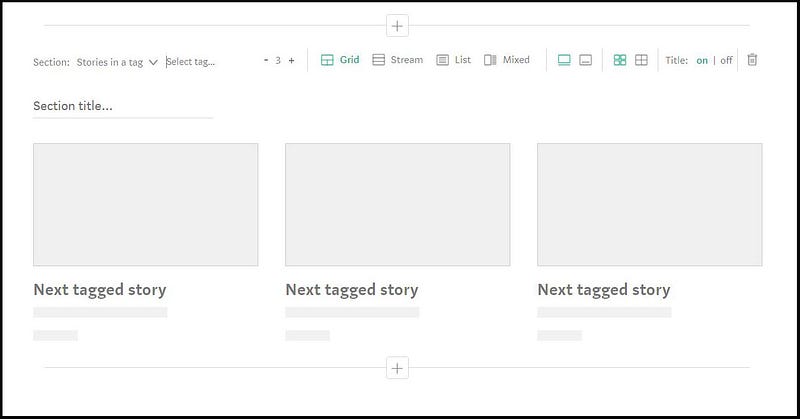
Type a category or section name for your section into the field where it has “Section title”, e.g. type in Food. This is to caption the section and draw readers’ attentions to this section.
Start typing in a Tag name such as FOOD in the field titled “Select a tag.” Recommendations for Tag names will pop-up.
Select the TAG that your writers will hopefully use (or which you have asked them to use) so that these tagged stories appear on the homepage.
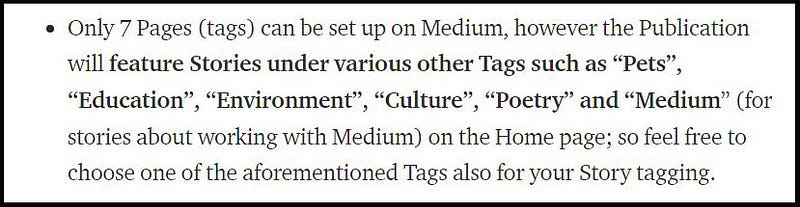
On the Submission Guidelines for “Thirty Over Fifty” I let would-be writers know that they should consider using a particular tag so that their recent Story will show up on the Publication homepage in a category for that Tag.
The image below is a snapshot that I took from the “Thirty Over Fifty” guidelines. You can include text similar to below in your Publication Guidelines if you like! 😃
Once you have arranged the Layout for your Publication to your satisfaction (and you can change it later but please don’t keep changing it as constancy is what Readers like), click on Create (or on Save if you have returned to your Publication after working with it beforehand).
What’s Coming Up Next…in this Series?
.
But you haven’t finished yet, because you can set up Pages for your Publication (Navigation) and you can create and email out regular Letters, and view Stats of all stories in your Publication (which can help you decide what story content or topics are more popular).
How do I delete a Medium Publication that I created?
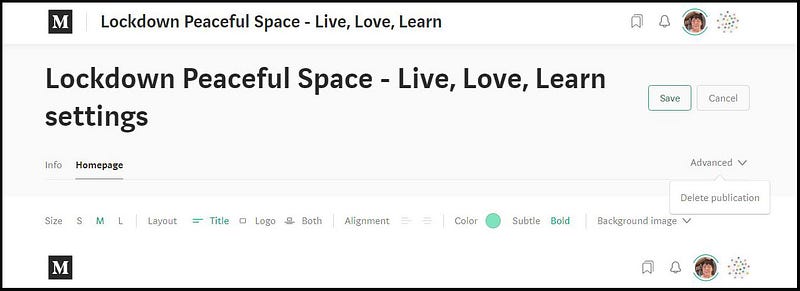
If you really really don’t want your own Medium Publication at all, then just go to Homepage and Settings via clicking on your Publication Avatar. Click on Advanced at the top right of either the Info or Homepage screens, then click on Delete publication. 😢
Remember:
To go to your Publication from the Medium homepage, click on your personal Avatar at top-right, then click on Publications.
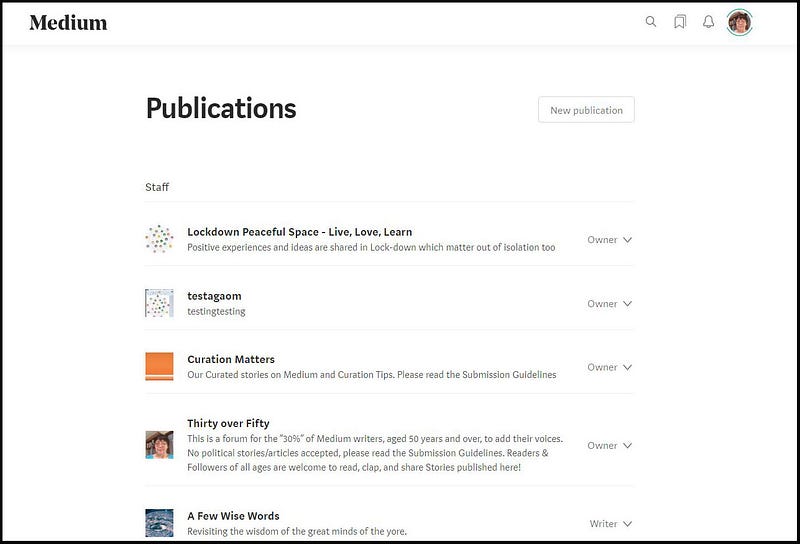
The Publications which you are the creator or founder of will appear first at the top of the list. At the time of writing this article, in addition to running 3 Medium Publications, as shown above, I am a writer for 19 other Medium Publications. 😲
Click on the name of any Publication to go to that publication.
Please go to Part Three for the final part in this Series, which will look at Pages (set up under the Navigation function), Letters and Stats!
Click on the link below to go to the final part in this series.
Connect with me at: https://writewithceline.square.site