
How to build a Scraping Tool for Indeed in 9 minutes
Leveraging Python and Selenium for Job Data Mining on Indeed
As an analytics engineer, I am really interested in finding out what languages, cloud platforms, and tools are in demand for any data-related job.
However, I find it quite annoying — and boring — to look through all the key information on different websites such as Indeed.
Thus, I had an idea: Why don’t I try web-scraping Indeed job lists to get all the key information directly in a database?
⚠️ A disclaimer that many websites restrict or ban scraping data from their pages. Be sure to read their terms, conditions, and restrictions before scraping their website.
Let’s learn together how to create such a tool! 👇🏻
#1. Setting up our environment.
To develop such project, there is one main required library:
- Selenium is used for automating web applications. It allows you to open a browser and perform tasks as a human being would, such as clicking buttons and searching for specific information on websites.
Additionally, we need a Driver to interact with our browser. To set up our environment, we first need to:
- Install Selenium: Run the following command in your command prompt or terminal
pip install selenium - Download the Driver. We need a driver so
Seleniumcan interact with the browser. Check your Google Chrome version and download the right Chromedriver here. You need to unzip the driver and place it into a path you remember — we will need this path later on! ;)
⚠️ As I am a Google Chrome regular user, I am going to use it as my default browser. ️Just make sure to find the correct driver for your browser type and version!
To understand the basics of Selenium and HTML, I recommend the following article! :D
#2. Loading Libraries
Once we have all the required libraries installed in our environment, we start our code by loading all of them. Apart from selenium , we will need pandas andtime libaries among others.
#3. Understanding Indeed URLs and defining our job and location of interest.
If we go to Indeed’s website, one can easily observe there are two inputs to define what job are we looking for and what location.
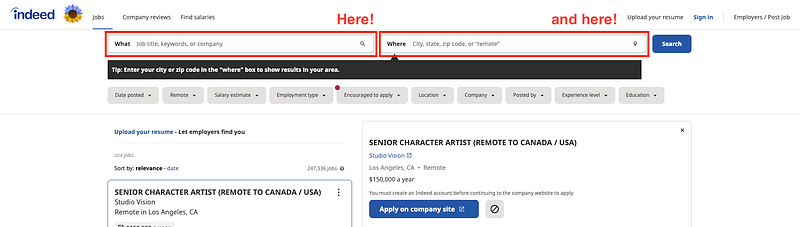
In this case, I will start looking for jobs as Data Analyst in the USA.

If we search for such a job and location, we can observe that both keywords are reflected in the corresponding URL.
We have keywords=Data+Scientist&l=USA.
That’s why, we can simply modify the URL directly to choose whatever job and location we want — which makes our life way easier! ;)
Are we sure about this…?
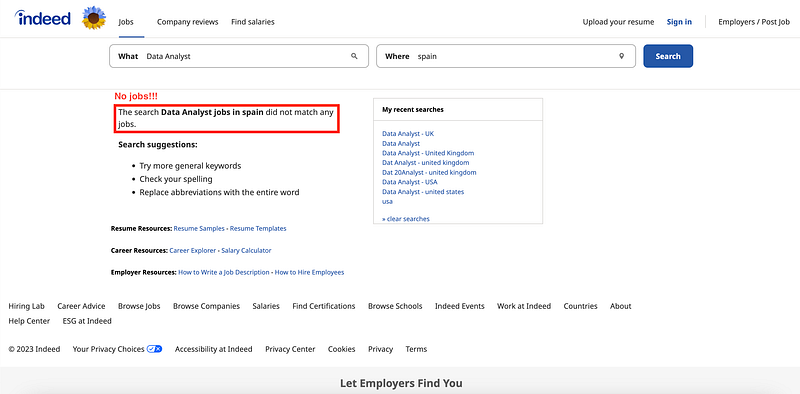
Indeed works with national pages — which means it presents a website with all job offers specifically for each country. So if you try to check Spanish jobs in the USA website, the result will be None, as you can observe below.
As we want to be able to switch countries if required, we need to assess this. The fastest and easiest way to do it?
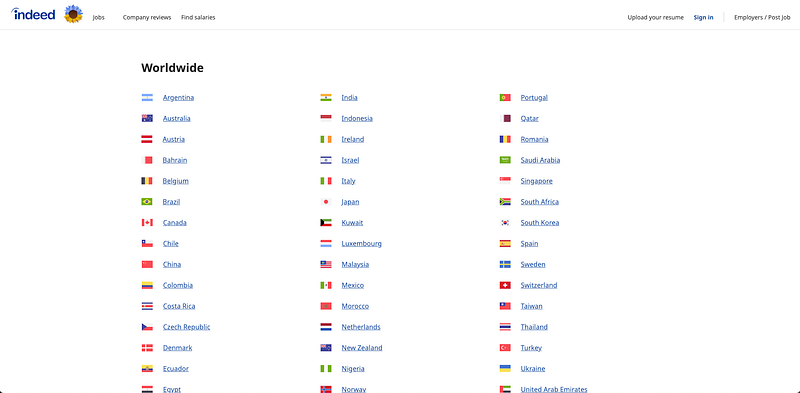
Creating a dictionary with all countries and URLs, so our personalized URL depends directly on the country we want to look for. Indeed presents a website with all their available countries and their corresponding URLs.
Before starting to scrape, we still need to consider one last thing! Whenever we use more than one word, the corresponding search URL will separate each of the words using “+”.
Thus, we can easily generate the URL we desire as follows:
- Defining a function that splits the input and adds a “+” between all different words.
- Defining what job and location we want to search for.
- Defining the corresponding URL
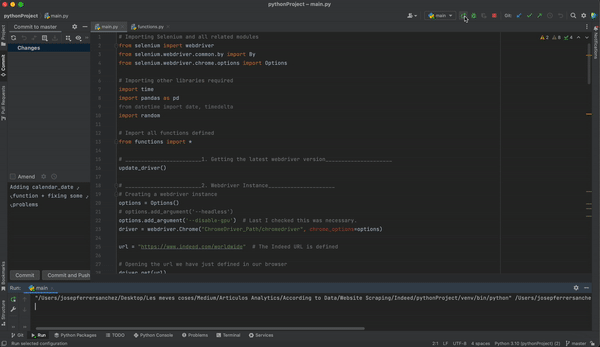
#4. Loading the driver and creating an instance
The basic idea here is to control a web browser with our Python code. To do so, we need to create a bridge between Python and our browser. That’s why we generated an instance of our web driver using the file we downloaded in step 1 — Remember the path!
Once we have the instance, it is as easy as opening the job list URL using the driver.get() command. The previous code will open up a Chrome window with our Indeed webpage.
⚠️ In case you want to use this code for a long time, your browser may get some update, and thus you should update the driver as well. To avoid this, we can easily update the ChromeDriver directly from python using the following code.
#5. Creating a countries and URL dictionary
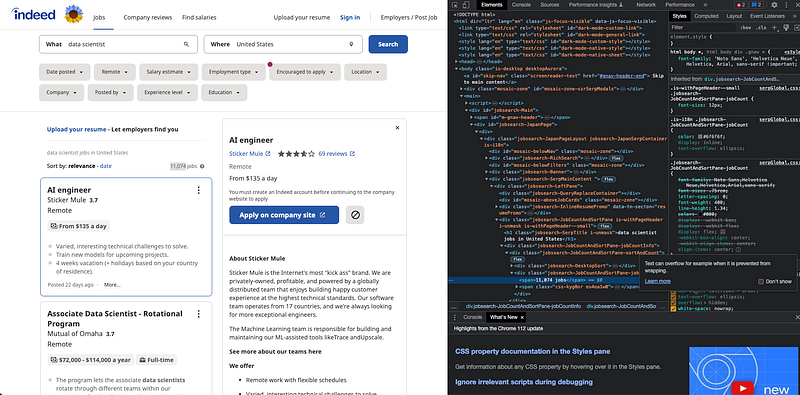
If you are not familiar with web scraping, you can right-click your mouse, select inspect, or press F12. The following popup should appear:
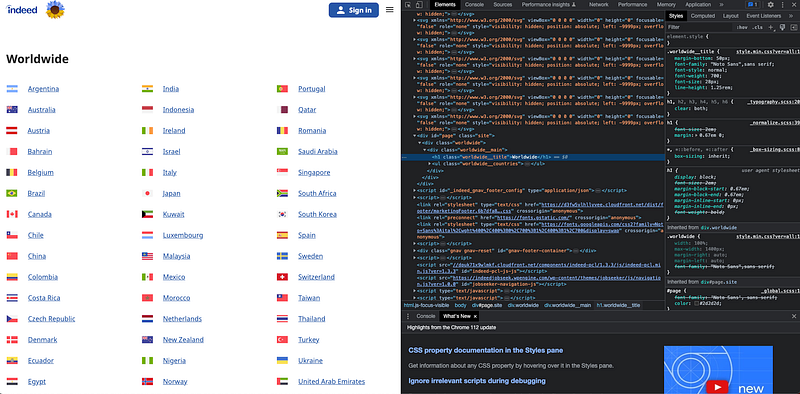
If we inspect the elements, we can easily observe that all countries are contained within an element called a page. Every country entry is contained within an
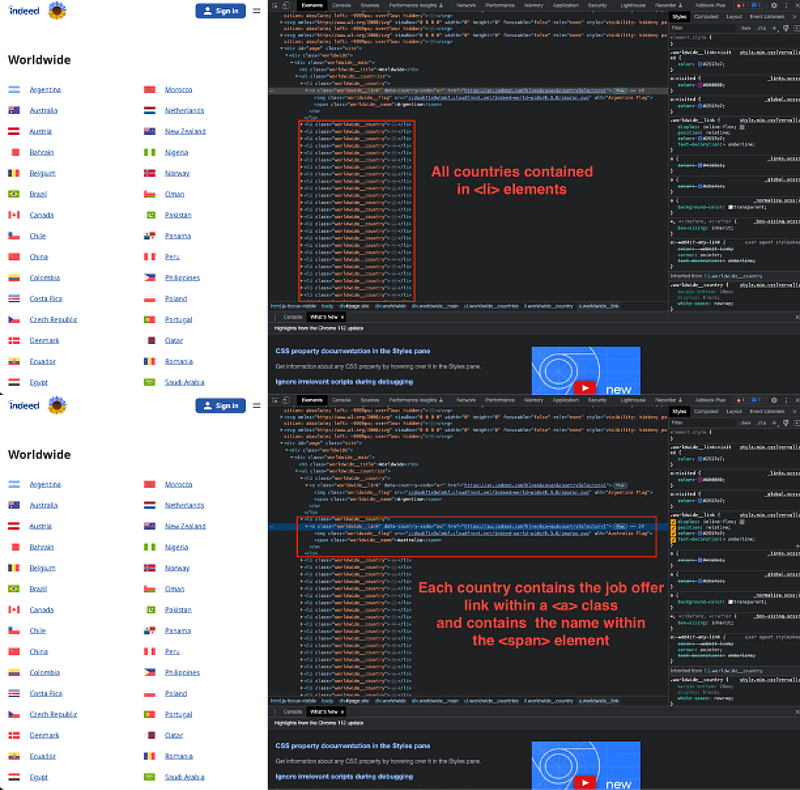
To obtain both elements, it is as easy as getting all elements a contained within the page element.
- The country name can be found with the command
.text— we could use as well the.get_attribute("text") - The link can be found with the command
.get_attribute("href")
#6. Detecting how many jobs are available.
Next, we need to know how many jobs we have found through this search. To do so, we use the Selenium library to get the number that appears in the upper-left corner.
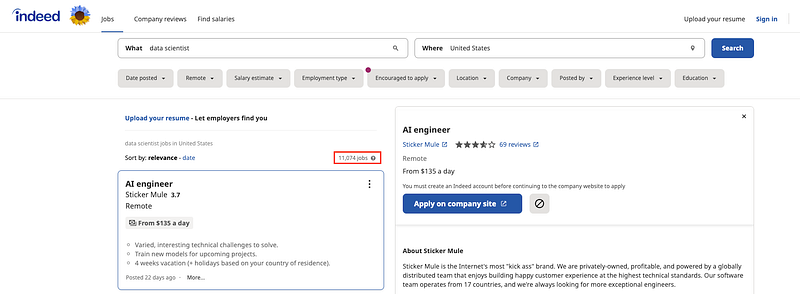
To do so, we can easily find the element by its class using the following command: driver.find_element(By.CLASS_NAME,"jobsearch-JobCountAndSortPane-jobCount").get_attribute("Text).
Once we have the string, we need to make sure it is converted to an integer. And that’s it! :)
#7. Browsing jobs
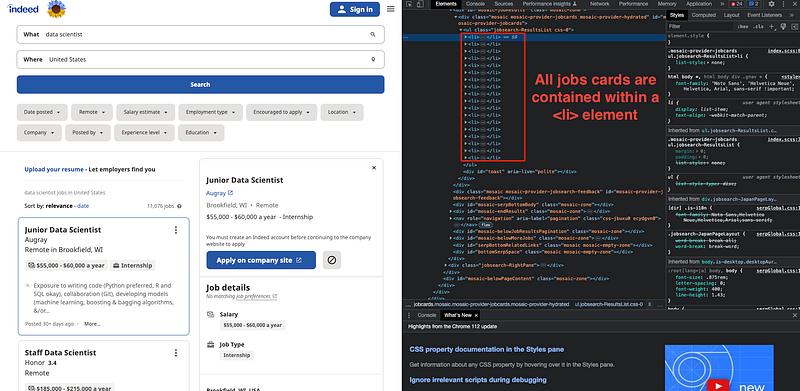
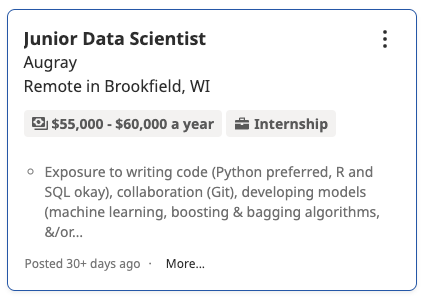
Indeed’s search results typically have 15 results per page displayed on the left-hand side. Each job meta-data is displayed on a job card.
While it’s great that the job card contains most of the data we’re looking for — job title, company, and location — it only has an abbreviated version of the job description. This is why we will have to click on the job card to get the full job data.
To load more job offers, it is important to consider that the way Indeed job postings work is by having a pagination number at the end of the page.
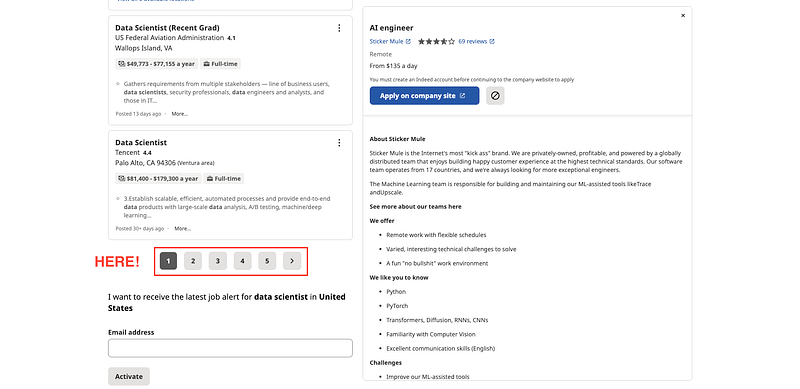
It is as easy as clicking the next page button… right?
Well… there’s another important thing to consider. The first time we open Indeed, there will be 6 pagination buttons, being the 6th the one to go to the next page. However, starting on the second page, there will appear an additional button for going back, making our button of interest the 7th.
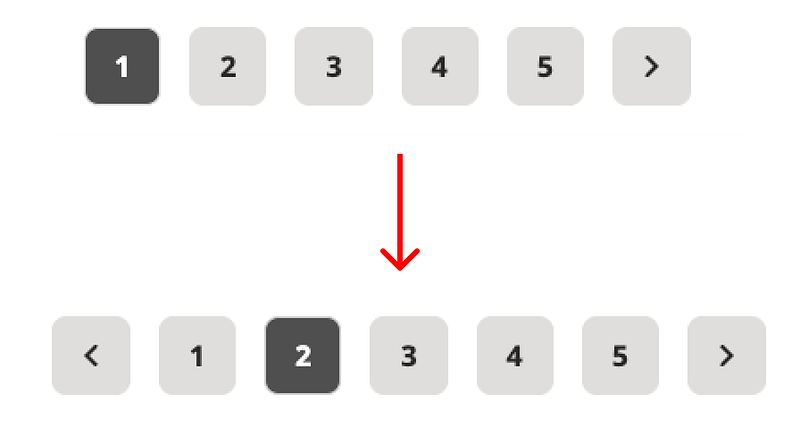
To accommodate both of the scenarios, we add a ‘try — except’ procedure. In order to locate the button, we will use the Xpath to locate it.
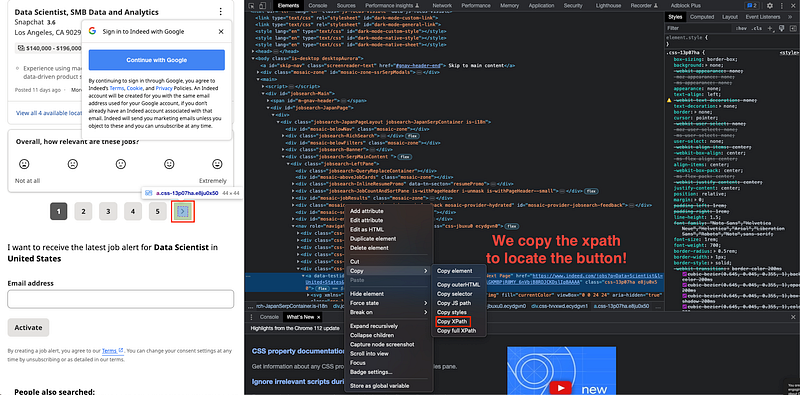
So we can easily click on the next page button using the following command!
.find_element(By.XPATH,"next_page_button_xpath").click()
#8. Detecting all elements.
If we inspect the website again, we can easily observe that every job card is held within an
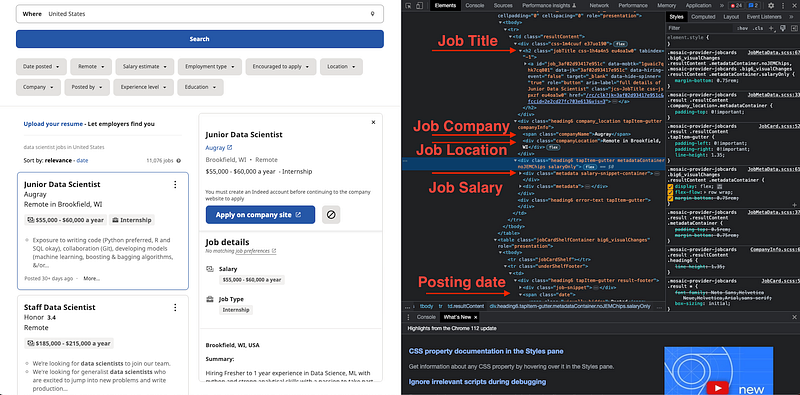
Within each job card, we can find an <div> element with class=cardOutline that contains all the abbreviated info we want to store:
- Job Title is stored in a
heading with the class ‘jobTitle’.
- Company Name is in the tag container with the class of ‘companyName’’.
- Company location is in a section with the class of ‘company location’.
- Job salary is in a section with the class of ‘salary-snippet-container’.
- The posting date range is in a
section with the class ‘date’.
⚠️ It is important to know that the structure of the webpage can change at any time. This is why, you should try to understand how it works by inspecting the elements yourself.
To store all this data, we first get the list with all obtained jobs on the previous step using the driver.find_element.(By.ID,"mosaic-jobResults") . This element will contain all 15 job cards.
As all elements have different class name, we can easily use the driver.find_element(By.CLASS_NAME,"element") to find our element and then using the command .text
- Job Title:
.find_element(By.CLASS_NAME,"jobTitle").text - Company Name
.find_element(By.CLASS_NAME,"companyName").text - Location
.find_element(By.CLASS_NAME,"companyLocation").text - Posting date
.find_element(By.CLASS_NAME,"date").text
We will get some additional values.
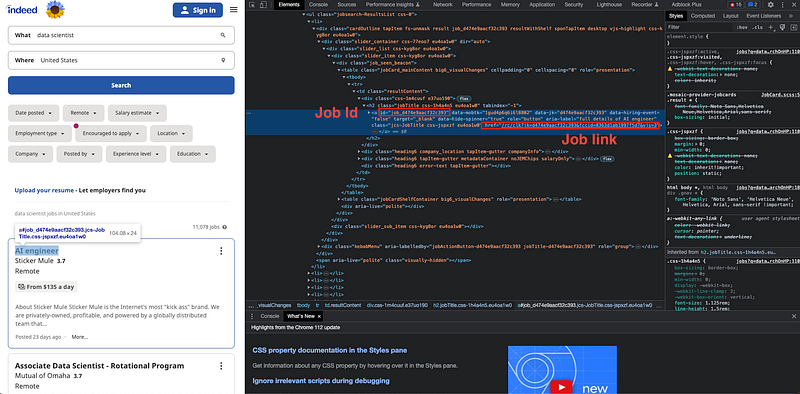
- JobLink:
.find_element(By.CLASS_NAME,"jobTitle").find_element(BY.CSS_SELECTOR,"a").get_attribute("href") - JobId:
.find_element(By.CLASS_NAME,"jobTitle").find_element(BY.CSS_SELECTOR,"a").get_attribute("id")
For the JobSalary, I found a problem. Many job offers did not have a salary at all, and many others had another element called estimated salary.
As it can happen that we try to find the element and it doesn’t exist at all, the code might raise an error and stop our scraping. This is why I decided to use a try-except again.
        try:
            job_salary_list.append(ii.find_element(By.CLASS_NAME,"salary-snippet-container").text)

        except:
            try:
                job_salary_list.append(ii.find_element(By.CLASS_NAME,"estimated-salary").text)
            except:
                job_salary_list.append(None)
Finally, we need to get the full job description. This will require two actions:
- Clicking on the JobTitle element to open the full job description.
- We need to use the time.sleep() command to make sure the new page is completely loaded. ⚠️ I usually wait for a random number of seconds, to “imitate” a human behavior.
- Finding the description element using the following command:
driver.find_element/By.ID, "jobDescriptionText") - Just in case there is not enough time for the description to be loaded, I add a try-except procedure to return a null description when the element is not found.
All code for step #7 and #8 can be found in the following gist:
Now our browser will scroll down all available jobs while clicking on them.
#9. Creating our pandas dataframe and saving it up.
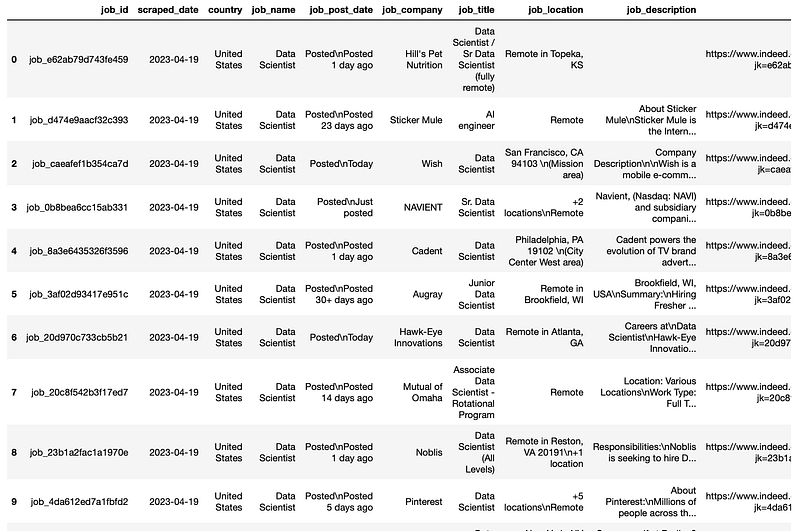
Once we already have all the data stored in different lists, we just need to create our pandas data frame that will contain all the data we have just scraped.
Once this is done, we should obtain a dataframe that looks as follows:
The last step would be saving up our dataframe as a CSV file.
Now, we have all scraped data just saved up on our laptops! :)
You can find my code on my GitHub repository webscraping. You can find both a JupyterNotebook and a Python project. You can use any of them. Hope you find this story useful to understand how to scrape Indeed info!
Feel free to ask me any further questions! :D
Do not hesitate to revert to me should there be any missing instructions in my tutorial!
You can subscribe to my Medium Newsletter to stay tuned and receive my content. I promise it will be unique!
If you are not a full Medium member yet, just check it out here to support me and many other writers. It really helps :D
You can find me on Twitter and LinkedIn as well!
Some other nice medium related articles you should go check out! :D


