
How to Automate Cleaning up Your Trash and Downloads Directory
Set a cleanup schedule on macOS with a single line of code

Introduction
How many files do you have in your Downloads directory? Find it out with this command on your terminal:
ls ~/Downloads | wc -lHow about your Trash directory?
ls ~/.Trash | wc -lNow let’s find out how many files are older than 7 days in your Downloads and Trash directory.
find ~/Downloads -mtime +7 | wc -l | xargs
find ~/.Trash -mtime +7 | wc -l | xargs
Do you have a lot of files? If you haven’t used them for a long time, you won’t need them. Let’s clean it up.
Cleanit makes it easy to clean up these directories depending on the date when files were created. You can also schedule cleaning up your Downloads and Trash directory on macOS.
I have introduced Cleanit before. The new version can set a cronjob and you can install it using Homebrew.
Are you interested? Read on!
Installation
Homebrew
brew tap shinokada/cleanit && brew install cleanitAwesome package manager
The awesome script package manager creates the ~/awesome directory and the ~/bin directory if they don’t exist. When you install a script package, it clones a package to the ~/awesome directory and creates a symlink in the ~/bin directory.
Let’s install awesome:
curl -s https://raw.githubusercontent.com/shinokada/awesome/main/install | bash -s installNow you can install cleanit:
awesome install shinokada/cleanit
You can uninstall a package:
awesome rm cleanitManual installation
If you don’t use Homebrew, you can still install Cleanit on your Mac.
Let’s create a directory called awesome and keep cleanit in the ~/awesome directory:
mkdir ~/awesome
cd ~/awesome
git clone https://github.com/shinokada/cleanit.git
Create the ~/bin directory if you don’t have it:
mkdir ~/binCheck if /Users/your-username/bin is in the PATH variable:
echo $PATH
/Users/your-username/bin:/usr/local/sbin:/usr/local/bin:/usr/sbin:/usr/bin:/sbin:/bin:/usr/games:/usr/local/games:/snap/bin
If it doesn’t have it, add the /Users/your-username/bin directory to your terminal configuration file such as the ~/.zshrc file.
export PATH="/Users/your-username/bin:$PATH"Source the ~/.zshrc file and check it again:
source ~/.zshrc
echo $PATH
Add a symlink using ln -s sorce target:
ln -s ~/awesome/cleanit/cleanit ~/bin/cleanitCheck if the symlink is working:
cleanit -v
0.1.2
How to use Cleanit
Run cleanit on your terminal. It will move files older than 20 days in the Downloads (~/Downloads) directory to Trash (~/.Trash):
cleanitIf you want to move files older than 10 days in the Downloads directory to Trash (~/.Trash), set the -D 10
cleanit -D 10You can set a directory where you want to move files from using -f direcotry-name.
cleanit -D 10 -f ~/MydirThis will move files older than 10 days from ~/Mydir to the Trash directory.
You can set a directory where you want to move files to, using -t directory-name.
cleanit -D 10 -f ~/Mydir -t ~/AnotherdirThis will move files older than 10 days from ~/Mydir to ~/Anotherdir.
You can clean up the Trash directory using -f trash.
cleanit -D 10 -f trashUpdate
You can clean the downloads directory by:
cleanit downloadsClean the Trash directory:
cleanit trashBoth commands can take the -D option:
cleanit -D 5 downloadsSet up auto clean using a Crontab
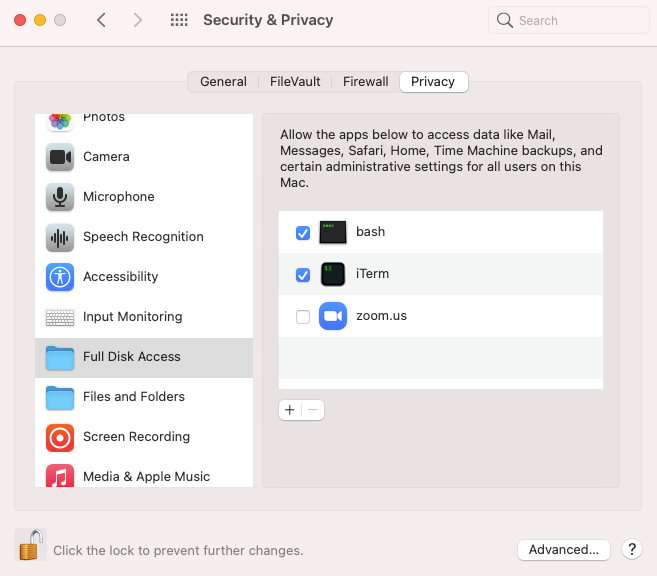
Full Disk permissions
You need to all your terminal and your bash path for the full disk access.
You can check your bash path:
which bash
/bin/bash
# you may have
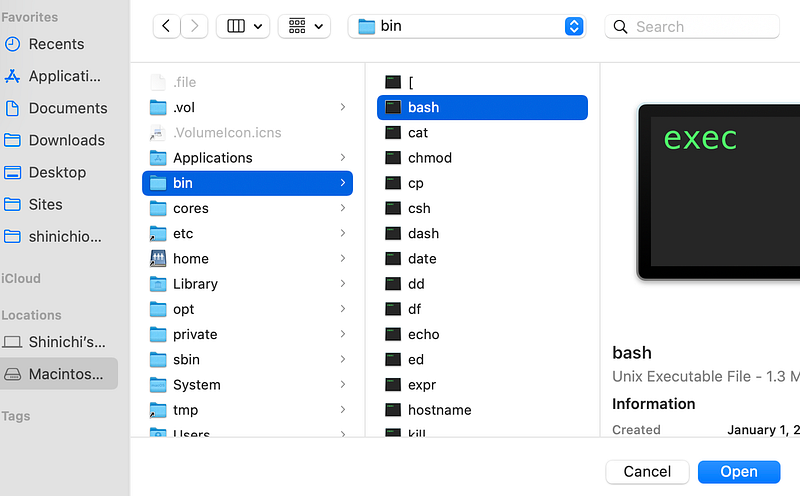
/opt/homebrew/bin/bashGo to the System Preference > Security & Privacy, click Full Disk Access on the left menu. Press “Click the lock to make changes”, and press the “+” button. Select your terminal and the bash path. You need to press SHIFT+CMD+. to see hidden files. After this, you may need to restart your computer.

Let’s set up a Cleanit cron job. cron is a Linux utility that schedules a command or script on your server/computer to run automatically at a specified time and date.
cleanit cron -H 10 -M 0 -D 30This line of code sets up a cron job to clean up the Downloads and Trash directory every day at 10:00 AM. The cron job cleans up files older than 20 days (which is the default) in the Downloads directory and 30 days in the Trash directory.
You can change the days to 10 days:
cleanit cron -H 10 -M 0 -D 10This cron job cleans up files older than 20 days (which is the default) in the Downloads directory and 10 days in the Trash directory.
You can remove the cron job:
cleanit -rConclusion
Once the cleanup schedule is set up, you don’t need to worry about clogging your Downloads and Trash directories with unnecessary files. Even if you don’t want to set a cron job, you can use the cleanit command to clean up your Downloads directory from time to time.
If you want to learn more about Bash scripting, Uday Hiwarale wrote an excellent introduction article, Bash Scripting: Everything you need to know about Bash-shell programming.
You can read more about scheduling jobs in this article.
Happy coding!
Get full access to every story on Medium by becoming a member.


