
Here’s The Content Creation Workflow That Made Me Over $6500 In Side Income For Q1
How I Streamline My Blog Content Creation With Notion

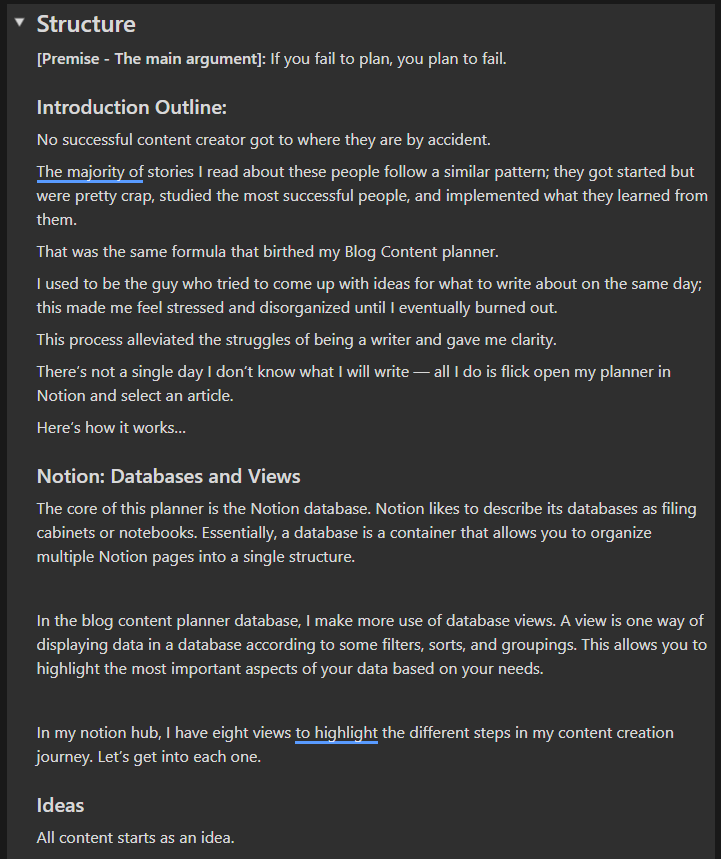
No successful content creator got to where they are by accident.
Most stories about these people follow a similar pattern; they got started but were pretty crap, studied the most successful people, and then implemented what they learned.
That was the same formula that birthed my Medium Content Streamliner System.
I used to be the guy who tried to come up with ideas for what to write about on the same day, but this made me feel stressed and disorganized. I also lacked consistency until I eventually burned out.
Formulating a workflow alleviated the struggles of being a writer and clarified what was required of me. There’s not a single day I don’t know what I will write; all I do is flick open my planner and select an article I’ve already fleshed out.
Here’s how it works…
Notion: databases and views
Notion is one of the free tools I’ve used to build a successful online business. It’s a freemium productivity and note-taking web application. My use of it is to dump my brain.
At the core of Notion is the database feature. Notion likes to describe its databases as filing cabinets or notebooks; essentially, a database is a container that allows you to organize multiple Notion pages into a single structure.
In my Medium Content Streamliner System database, I make use of database views. A view is one way of displaying data in a database according to some filters, sorts, and groupings; this allows you to highlight the most important aspects of your data based on your needs.

The Streamliner System consists of eight views — each to highlight the different steps in my content creation journey.
Let’s get into each one.
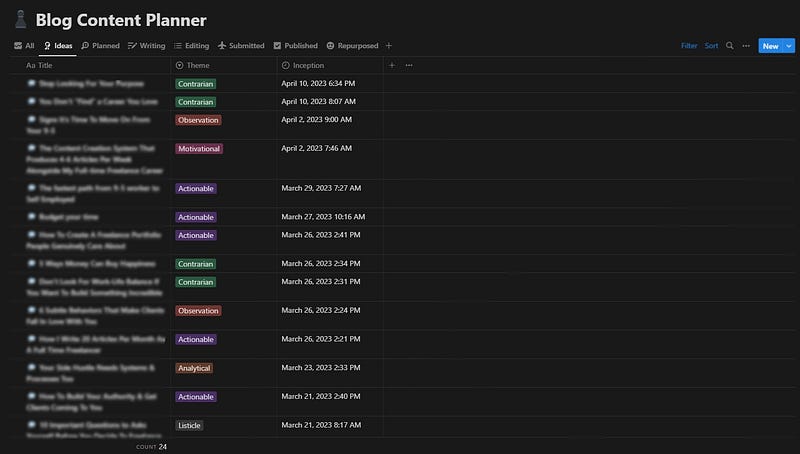
Ideas
All content starts as an idea.
Ideas without execution are useless, but the more you generate, the less time you waste wondering what to execute on.
Well, that’s the idea in theory…
Execution appears much further down the line of the content creation workflow. For now, the most important thing is to plant the seedlings of greatness so you have something to pull from.
At the time of writing, I’ve got 24 ideas waiting to be converted into articles.
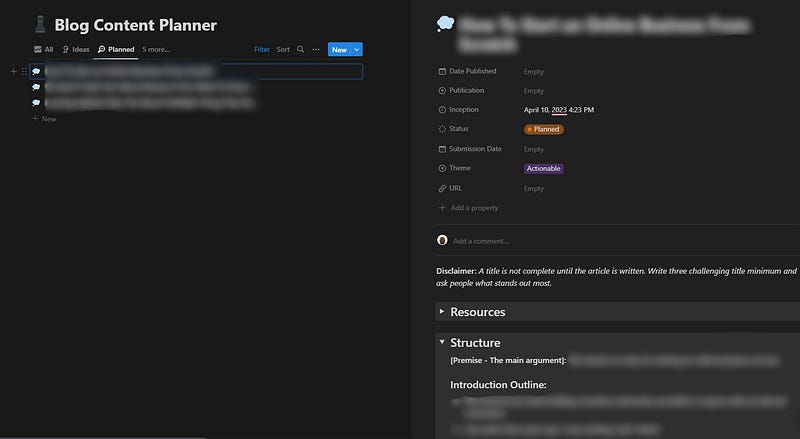
Planned
The most horrific site for a writer is a blank screen.
Let me just be honest with you —
If you’re not planning you’re articles, you’re seriously selling yourself short and hampering your productivity.
When I used to write from scratch, it would take me 4 hours — more than a 100% increase in duration compared to how long it currently takes me.
The secret formula to drastically reduce this turnaround was to spend more time detailing…
- The premise of the article
- The main points I want to drive home
- How I want the article to help my readers
When it’s time to write, I already know what to say and where.
All I have to do is fill in the gaps to make it engaging.
Note: I use the basic blog structure Zulie Rane shared in this video.
Writing
I had to retake my English GCSE when I was at school.
My first grade was a D; the second was a B+.
The only thing I changed was my approach.
As a D-grade student: The goal was to write the best-ever essay in one pass. This meant spending most of my time writing what I thought flowed like the river Nile.
As a B+ student: The goal was to get something down fast and iterate. I knew whatever I did first would suck, but if I got some junk down on a piece of paper, I could fix it to make it beautiful.
Moral of the story —
Dump your brain on a piece of paper and fix it later.
Quality doesn’t come from being perfect.
I should highlight here that I write the first draft of my articles in Notion; there’s a solid reason for this…
Medium removed the feature that enabled writers to write from their smartphones in March 2022.
This was stupid since it assumes writers are always by their computer screens, which is wrong; many writers I know (including myself) find time to write during slow periods, like while waiting in line and on the toilet.
Editing
My process for editing is extremely simple —
- Read the article out loud: I want every article to read like a typical chin wag at the local Starbucks.
- Write at least three possible titles: Your title will make people click on your article. Without a good one, no one will read all your interesting insights. Even though there’s a provisional title, you might find it no longer aligns with the message you’ve written in the article — and that’s okay. Send these titles to a friend or relative to see what resonates with them most — this article was initially titled “How I streamlined my content creation workflow using Notion.”
- Add images: Images add an essential aesthetic to your blog. It makes it more appealing and helps you drive the message you’re trying to convey home. I try not to use too many images in my articles unless I have to; this is because I like to format my writing in a way that’s easy to read — short sentences broken up into several lines.
- Links: When you link to trustworthy sources, it improves the credibility of your blog. Finding similar articles you’ve written to keep readers on your page is always a great idea.
- Reread: all you’re trying to do here is catch any sloppy grammatical errors you’ve made and amend them.
This step is also when the article is copied into Medium.
Submitted
The best way to share content on Medium is through publications.
Publications can be thought of as online magazines containing stories based on a common theme written by one or more authors.
As things stand, distributing content through publications — especially the big ones — is the easiest way to quickly get your writing in front of many eyes.
The only downsides are:
- You have to wait for approval from a publication editor
- Editors can take ages to get back to you
- You have no power over the scheduling process
… and, of course, your article can be rejected if it doesn't meet the publication guidelines.
Published & Repurposed
I have two separate views for content that’s published and repurposed.
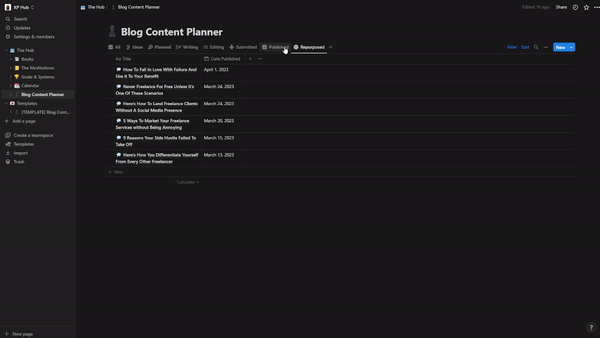
I lumped them together because one (published) is a buffer for the other (repurposed).
Here’s how it works:
Once an article has been published on Medium, I change its status to published and add a date to keep track of how many articles I’ve published in a week/month/year.
The next step from here is to generate around 10–15 posts from the article for social media.
I’d also extract the key points from the article to create a newsletter for my mailing list.
All of these posts are scheduled in advance using OneUpApp — one of the 6 tools under $15 I’ve used to build a successful online business; this means all I have to do is come online at the scheduled time and engage with users until
Final thoughts
An article is only complete once it’s been repurposed.
From this point, I monitor the metrics of each post across to the different platforms to get a better idea of what resonates with my audience the most.
Following this workflow has reduced my content creation process by 67% without hampering my goal of writing 4–6 articles per week.
This leaves me with an extra 10 hours to invest in other interesting activities.
If you like this workflow, grab my Medium Content Streamliner System — The first 100 people get 50% off with this discount code FIRST100.
Thanks for reading!
Join 500+ digital freelancers for a weekly dose of wisdom on a Wednesday.
Connect with me:
If you enjoy reading stories like this and wish to support my writing, consider becoming a Medium member. With a $5 a month commitment, you unlock unlimited access to stories on Medium. If you use my sign-up link, I’ll receive a small commission.
Already a member? Subscribe to be notified when I publish.


