
This is Your Most Awaited AI Generation Hack — Part 2
Generate high quality AI images even without a GPU this time for cheaper, well, not cheap — 100% free — no strings attached

In Part 1 of this series, we explored how to set up and use Fooocus on your local machine to generate high-quality AI images comparable to those produced by Midjourney — all without any subscription fees. However, not everyone has access to a powerful GPU or the necessary hardware to run resource-intensive AI models locally. This is where Google Colab comes into play. And I still think fooocus needs more attention as it feels highly underrated. because I have used well over dozen image generation platforms both open-source and paid. But still fooocus is doing a reasonable job among all of them.
Hello non-member, do not worry. You can keep reading the article here.
In this second installment, we’ll delve into how you can leverage Google Colab, a free cloud-based platform, to run Fooocus without the need for expensive hardware. We’ll provide a quick introduction to Google Colab, guide you through setting up Fooocus in this environment using the provided code, and explain how to use Fooocus with its basic features.
Introduction to Google Colab
Google Colaboratory, commonly known as Google Colab, is a free cloud service offered by Google Research. It allows you to write and execute Python code through your browser, utilizing Google’s computing resources, including GPUs and TPUs.
Key Features of Google Colab
- Cloud-Based Environment: No installation required; everything runs in the cloud.
- Free GPU Access: Utilize NVIDIA Tesla GPUs for computational tasks.
- Ease of Use: Interface similar to Jupyter Notebooks.
- Integration with Google Drive: Save and manage your projects easily.
Whether you’re a data scientist, a machine learning enthusiast, or someone interested in AI art generation, Google Colab provides a convenient and powerful platform to run your code without hardware limitations.
Why Use Google Colab for Fooocus
Running Fooocus locally requires a capable GPU and sufficient VRAM, which might not be accessible to everyone. I have RTX 4060 and 32GB Ram which is enough according to fooocus doc. But believe me when you really work that might not be enough. Google Colab bridges this gap by providing free access to high-performance GPUs, making it an ideal environment for running resource-intensive applications like Fooocus.
Benefits of Using Google Colab for Fooocus
- No Hardware Investment: Run GPU-intensive tasks without owning a GPU.
- Accessibility: Work from any device with internet access.
- Scalability: Leverage powerful GPUs for faster image generation.
By running Fooocus in Google Colab, you can generate Midjourney-quality AI images without the constraints of your local machine’s hardware.
Setting Up Fooocus in Google Colab
To get started with Fooocus in Google Colab, you’ll need a Google account. Here’s how to set up your environment using the provided code.
Prerequisites
- Google Account: Sign up for free if you don’t have one.
- Internet Connection: A stable connection to access Colab and download necessary files.
Step-by-Step Guide
Step 1: Access Google Colab
- Open your web browser and navigate to Google Colab.
- Sign in with your Google account.
Step 2: Create a New Notebook
- Click on “File” > “New Notebook”.
- Rename your notebook to something descriptive like “Fooocus_AI_Image_Generation”.
Step 3: Set Up the Runtime Environment
- Click on “Runtime” > “Change runtime type”.
- Under “Hardware accelerator”, select “GPU”.
- Click “Save”.
Step 4: Install Dependencies and Clone Fooocus
In the first cell of your notebook, paste the following code:
!pip install pygit2==1.15.1
%cd /content
!git clone https://github.com/lllyasviel/Fooocus.git
%cd /content/FooocusExplanation:
!pip install pygit2==1.15.1: Installs a specific version ofpygit2needed by Fooocus.%cd /content: Changes the directory to the root content folder in Colab.!git clone https://github.com/lllyasviel/Fooocus.git: Clones the Fooocus repository from GitHub.%cd /content/Fooocus: Navigates into the Fooocus directory.
Press Shift + Enter to execute the cell.
Step 5: Launch Fooocus
In the next cell, run the following command:
!python entry_with_update.py --share --always-high-vramExplanation:
entry_with_update.py: The entry point script for Fooocus.--share: Generates a public URL to access the web interface.--always-high-vram: Ensures that Fooocus runs in high VRAM mode.
Executing this cell will start Fooocus and provide you with a public URL.
Step 6: Access the Fooocus Web Interface
After running the previous cell, you’ll see output similar to:
Running on public URL: https://xxxx.gradio.app- Click on the URL or copy and paste it into a new browser tab to access the Fooocus interface.
Using Fooocus: Basic Features and Guide
Now that Fooocus is up and running, let’s explore its basic features and how to use them effectively.
The Fooocus Interface
Upon accessing the web interface, you’ll find a user-friendly layout with the following key components:
- Prompt Input Field: Where you enter the text prompt describing the image you want to generate.
- Negative Prompt Field: Specify elements you want to exclude from the image.
- Generation Parameters: Adjust settings like sampling steps, guidance scale, and image resolution.
- Generate Button: Starts the image generation process.
- Result Display Area: Shows the generated images.
Step-by-Step Usage Guide
Step 1: Enter Your Prompt
In the Prompt Input Field, type a descriptive sentence of the image you wish to generate. For example:
"A serene landscape with mountains during sunset, digital art"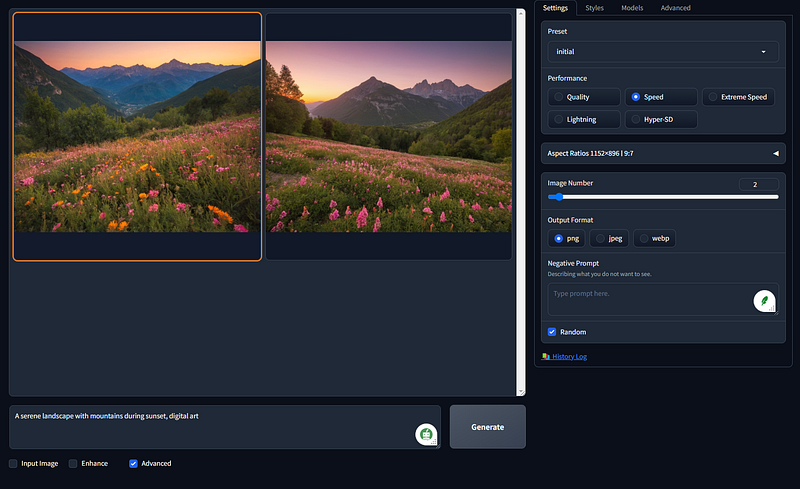
Step 2: Use Negative Prompts (Optional)
In the Negative Prompt Field, specify any elements you want to avoid. Tick the advance checkbox in the bottom to see all these additional settings.
For example:
"trees, flowers"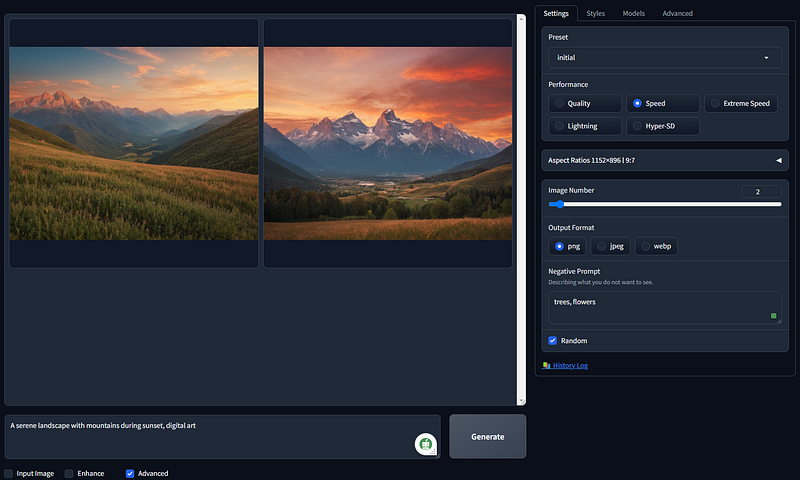
Step 3: Adjust Generation Parameters
- Performance selection: Controls the number of iterations during image generation.
Recommendation: Start with 30(speed option) for a balance between quality and speed.
- Style: Determines which style the image need to be generated.
Recommendation: Default with fooocus. But depends on the desired art style.
- Aspect ratio: Select the desired output resolution.
Note: Higher resolutions may require more VRAM and take longer to generate.
And you can go through play around and see. To be honest there are plenty of configs.
Step 4: Generate the Image
Click the “Generate” button to start the image creation process.
Step 5: Review and Save the Image
- Once the generation is complete, the image will appear in the Result Display Area.
- You can save the image by right-clicking and selecting “Save image as…” or use the download icon in top right.
Exploring Basic Features
Prompt Engineering
Crafting effective prompts is key to getting the desired output.
- Be Descriptive: Include details about the scene, style, and elements.
- Specify Styles: Mention artistic styles or specific artists for stylistic influence.
Negative Prompts
Use negative prompts to filter out unwanted elements.
- Common Negative Prompts:
- “blurry”
- “grainy”
- “distorted”
- “text”
- “bad hands” (as usually AI image generation still struggles at generating hands.)
Seed Management
- Random Seed: Generates a new image each time.
- Fixed Seed: Reproduces the same image if the prompt and settings are unchanged. (not 100% same but you mostly would not notice a difference as seed is controlling the randomness of the generation process)
Usage: Useful for tweaking parameters while keeping the base image consistent.
Batch Generation
- Batch Size: Number of images to generate per prompt.
Note: Higher batch sizes consume more resources.
- Batch Count: Number of batches to process.
Tips for Optimizing Fooocus in Colab
While Google Colab provides free GPU access, there are some limitations and best practices to consider.
Managing Resources
- VRAM Constraints: Colab GPUs have limited VRAM.
Solution: Reduce image resolution or batch size if you encounter memory errors.
- Session Duration: Colab sessions can disconnect after periods of inactivity.
Tip: Stay active or consider Colab Pro for longer sessions.
Saving Outputs
- Local Downloads: Save images directly to your local machine.
- Google Drive Integration:
- Mount your Google Drive to save outputs persistently.
- Add the following code in a new cell:
from google.colab import drive drive.mount('/content/drive')- Modify the save path in Fooocus to point to your Google Drive.
Monitoring Performance
- System Metrics: Use Colab’s built-in tools to monitor GPU usage.
- Avoid Overloading: Running multiple heavy processes can slow down or crash the session.
Conclusion and Next Steps
By harnessing the power of Google Colab, you can run Fooocus and generate stunning AI images without worrying about hardware constraints. This cloud-based approach makes AI art generation accessible to a broader audience, opening up new possibilities for creativity and innovation.
What’s Next?
In future articles, we’ll delve deeper into:
- Advanced Features of Fooocus: Exploring prompt engineering, style mixing, and more.
- Optimizing Performance: Tips and tricks to get the most out of Fooocus.
- Custom Models and Extensions: Enhancing Fooocus with additional models and plugins.
Stay tuned for more insights and tutorials that will help you become a Fooocus pro and elevate your AI-generated art to the next level.
Kudos to the Fooocus team for making AI art generation accessible to all. Fooocus GitHub Repository
Follow me to stay updated on the latest tutorials and articles on AI image generation, Fooocus, and more. Happy creating!


