avatarJ3

Free AI web copilot to create summaries, insights and extended knowledge, download it at here

3033

Abstract

<div id="f6c3" class="link-block">
      <a href="https://code.visualstudio.com/download">
        <div>
          <div>
            <h2>Download Visual Studio Code - Mac, Linux, Windows</h2>
            <div><h3>Visual Studio Code is free and available on your favorite platform - Linux, macOS, and Windows. Download Visual Studio…</h3></div>
            <div><p>code.visualstudio.com</p></div>
          </div>
          <div>
            <div style="background-image: url(https://miro.readmedium.com/v2/resize:fit:320/0*mqoSwSyVTD0GaKF5)"></div>
          </div>
        </div>
      </a>
    </div><p id="8811"><b>Step 2: Flash your Pi Pico or Pico W with the latest MicroPython firmware</b></p><p id="4f4e">Head to the official download page of MicroPython’s UF2 file:</p><div id="4994" class="link-block">
      <a href="https://micropython.org/download/RPI_PICO/">
        <div>
          <div>
            <h2>MicroPython - Python for microcontrollers</h2>
            <div><h3>MicroPython is a lean and efficient implementation of the Python 3 programming language that includes a small subset of…</h3></div>
            <div><p>micropython.org</p></div>
          </div>
          <div>
            <div style="background-image: url(https://miro.readmedium.com/v2/resize:fit:320/)"></div>
          </div>
        </div>
      </a>
    </div><p id="a896">Then download the latest version you see on the page.</p><p id="b851">The specific instructions on how to use this file to flash MicroPython on your Pi Pico or Pico W are found on the official Raspberry Pi page:</p><div id="7797" class="link-block">
      <a href="https://www.raspberrypi.com/documentation/microcontrollers/micropython.html">
        <div>
          <div>
            <h2>Raspberry Pi Documentation - MicroPython</h2>
            <div><h3>The official documentation for Raspberry Pi computers and microcontrollers</h3></div>
            <div><p>www.raspberrypi.com</p></div>
          </div>
          <div>
            <div style="background-image: url(https://miro.readmedium.com/v2/resize:fit:320/0*4ekTw6kncOzJUnkj)"></div>
          </div>
        </div>
      </a>
    </div><p id="7add"><b>Step 3: Install the MicroPico extension in VS Code</b></p><p id="6adf">Now open VS Code and switch to the ‘Extensions’ tab like so:</p><figure id="74be"><img src="https://cdn-images-1.readmedium.com/v2/resize:fit:800/1*Vd06nbtJTaW_rHWMuXAHFQ.png"><figcaption></figcaption></figure><p id="374d">Now type “Micropico” in the search field. You should then see the following extension:</p><figure id="eb95"><img src="https://cdn-images-1.readmedium.com/v2/resize:fit:800/1*RQvJfKROFaqn-T0yOqDrpA.png"><figcaption></figcaption></figure><p id="a65a">Go ahead and install this extension.</p><p id="d5bd"><b>Step 4: Start a project by configuring your directory</b></p><p id="1cd7">Set up your desired folde

Options

r/workspace for your project, and open it in VS Code. Once it is opened, open up the Command Palette in VS Code like so:</p><p id="c759">For Windows:</p><p id="d9a2"><b><i>Ctrl + Shift + P</i></b></p><p id="bdb1">For Mac:</p><p id="8440"><b><i>Cmd + Shift + P</i></b></p><p id="22ef">By doing so, we would see an option as “Configure project” in a drop-down list like so:</p><figure id="6853"><img src="https://cdn-images-1.readmedium.com/v2/resize:fit:800/1*hEsmbSGjO4W6qXAaV_iBkg.png"><figcaption></figcaption></figure><p id="9df1">Click on “Configure project”</p><p id="d2d9"><b>Step 6: Test by uploading example project</b></p><p id="e691">Let’s make sure we have set everything up correctly by running a test project. We will blink the onboard LED on the Pi Pico / Pico W.</p><p id="3e22">Make a new file and name it “main.py”. We will write code onto this file and upload it.</p><p id="c653">If you have the Pi Pico, copy and paste the following code:</p><div id="dbb5"><pre><span class="hljs-keyword">from</span> machine <span class="hljs-keyword">import</span> Pin <span class="hljs-keyword">import</span> utime

led_onboard = Pin(<span class="hljs-number">25</span>, Pin.OUT)

<span class="hljs-keyword">while</span> <span class="hljs-literal">True</span>:

led_onboard.toggle() utime.sleep(<span class="hljs-number">1</span>)</pre></div><p id="59f5">If you instead have the Pico W, copy and paste the following code:</p><div id="e3cc"><pre><span class="hljs-keyword">from</span> machine <span class="hljs-keyword">import</span> Pin <span class="hljs-keyword">import</span> utime

led_onboard = Pin(<span class="hljs-string">"LED"</span>, Pin.OUT)

<span class="hljs-keyword">while</span> <span class="hljs-literal">True</span>:

led_onboard.toggle() utime.sleep(<span class="hljs-number">1</span>)</pre></div><p id="7cd5">Now open up the command palette again (Ctrl/Cmd + Shift + P) and select “Upload project to Pico”. Then click the “Run” button on the bottom of VS Code like so:</p><figure id="197a"><img src="https://cdn-images-1.readmedium.com/v2/resize:fit:800/1*PWqElxT-TlDM4tGSQhQ4Iw.png"><figcaption></figcaption></figure><p id="3376">And that’s it! You will now see the onboard LED blink with a 1 second interval on your Raspberry Pi Pico or Pico W.</p><p id="d57a">Once you hit “Run”, a terminal in VS Code will pop up and act as a space to print outputs or take inputs, just like how you see one in Thonny IDE.</p><p id="9066">Additionally, you have the option to view the pinouts of the Pi Pico with the “Show Pico Pin Map” command. After clicking on it and selecting either “Pico (H)” or “Pico W (H)”, you would see the following (Pico (H)):</p><figure id="513c"><img src="https://cdn-images-1.readmedium.com/v2/resize:fit:800/1*WYfHtQSKpO8IaKpArBtPuA.png"><figcaption></figcaption></figure><p id="85f3">If you follow all these steps correctly, there should not be any errors or problems. In case you face issues, please comment down below and I will help you out as soon as I can.</p></article></body>

FreeRTOS-Why To Use It?

IoT Projects? What is it? — IoT — Episode #02

For IoT projects!

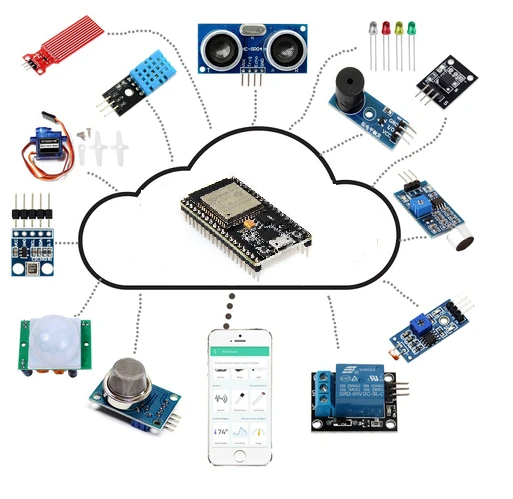
IoT or the internet of things is an upcoming technology that makes use of the internet to control/monitor electronic/mechanical devices, automobiles, and other physical devices connected to the internet.

Fig 1. Example of an IoT Project 😮

Is Arduino IoT Compatible?

Yes, It is!

In IoT projects, all the physical objects (things) are connected together using internet infrastructure. Arduino board is one of the most important devices that enables us to prototype projects.

Good, so this is the Hardware that I have to use in my IoT project, right?

Well…no!

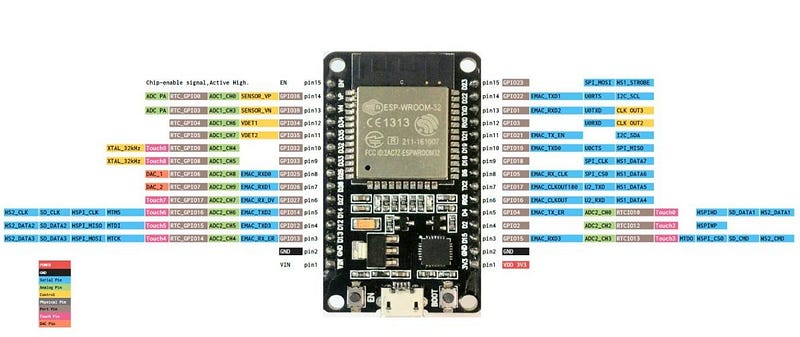
Just consider this board for now…ESP-32!

Fig 2. This one: ESP-32!

And here is why?

Look just these two points…and I hope you’d get the idea (:

First, Core: ESP-32 is dual-core.

Secondly, ADC: ESP-32 has 18 GPIO’S Analog-to-digital-Converter. Remember Peter Kinget? The World is Analogue!

Just these points will be sufficient to draw our attention to this awesome, low-cost, low-power system on a chip (SoC) microcontroller. But there is more…MUCH MORE…

Wi-Fi and Bluetooth (classic & BLE 😮)!

Meet the king of all IoT’s boards: ESP-32!

Fig 3. Look how many ESP-32 embedded board options are available out there in the IoT market!

So, I will program it like this, right?

void main()
{ 
 InitSys();
 While(TRUE)
   {  
      currentSensor();
      termopar();
      humidity();
      motionSensor();  
      sendoToUART();
      updateLCD();
   }
}

Well, again: No!

Then by using the state machine, maybe?

Ups…no…but wait…What state machines mean?

State machines are useful tools that in the right application can simplify designing microcontroller firmware. They allow you to create an event-driven system that can change its response to inputs based on its internal state. … Also, our system must turn off the LED after a period of inactivity (yeah! Green Product).

Good, but there is a better solution!

Let me try to convey the main idea…

while(true)
{  
  task_1();   // 60us
  task_2();   // 2us
}             // 62us

These two tasks code takes 62us, right?

How to get a better code?

The answer: Finite State Machines — The better way to code!

Using Finite State Machines (FSM) is a common industrial practice in coding, but their use extends beyond everyday software. They can easily be used in projects, to help prevent bugs, to stop infinite loops hogging the processor, and to ease debugging.

Let’s use it just now, by using the state machine switch-case structure:

{ 
  switch(task_1_state)
   {
    case a: 
            task_1_state_a();
             break;  //20 us
    case b:
             task_1_state_b();
             break;  //20 us    
    case c:
             task_1_state_c();
             break;  //20 us
}
   task_2();//2us
}                    //22us

Much better: 22 us!

But maybe this is not enough…

Let’s think about UART communication. First, consider this table:

Table 2. Theoretical transfer rate/controller comparations table. Can you see Serial Port? (Mb/s or Mbps stands for megabits per second, and by extension Gb/s or Gbps, gigabits per second;)

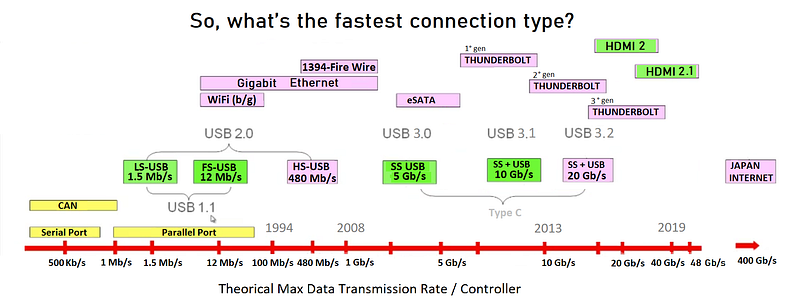
Yes, UART is a very, very … but a very slow communication protocol. What may result?

The dreaded infinite loop! a terrorist for all of us hobbyists and engineers alike”/

How to get rid of this?

Real-time operating system!

What is meant by the real-time operating system?

A real-time operating system (RTOS) is an operating system (OS) intended to serve real-time applications that process data as it comes in, typically without buffer delays. Processing time requirements (including any OS delay) are measured in tenths of seconds or shorter increments of time.

And there is more…but this is an issue for the next IoT episode (FreeRTOS more specifically… to be honest :)

See you there!

Bye:)

IoT Episodes Posts:

1° Episode — IoT — Meet IoT Boards: ESP8266 & ESP32 — Which are the best? ESPs or RPis or Arduinos Boards?

2° Episode — IoT — FreeRTOS Why To Use It? — IoT Projects? What is it? (this one:)

3º Episode — IoT — FreeRTOS — We are all Preemptive Scheduler! — Some Important Concept for Real-Time Operating System (RTOS)

4° Episode — IoT — FreeRTOS — More About it! — The Essence of FreeRTOS

5° Episode — IoT — FreeRTOS A Real Real-Time TV Transmissions Fundamental Understanding of FreeRTOS Apps

More Related Posts

Adafruit-IO Meets ESP8266, Arduino & MIT App Inventor 2 — Hello World for Adafruit-io & MQTT Protocol — 05 #kidSerie

MIT App Inventor 2 Meets Esp8266!!! — Playing With ESP8266–03 #kidSerie

Arduino Headless Setup & ESP8266 (WIFI cheap chip!) — Rather Stunning MCU!!! — #arduSerie 16

Flashing The Official ESPRESSIF Firmware in ESP8266 !!! — Easy ESP8266 Flashing!!! — #arduSerie 17

Get Started Using AT Commands w/ ESP8266 — Multiple Connection as TCP Server — #arduSerie 19

Your First NodeMCU/Lua Script Flash on ESP8266!!! — Let’s get our feet wet with NodeMCU/Lua and sees what happens !!- #arduSerie 20

References & credits

Microgênios — Treinamento em Sistemas Embarcados — Microchip Regional Partner Certified Training Courses a Simplício-owned enterprise

https://www.freertos.org/RTOS.html

ESP32 V2.0 TTGO & para Arduino OLED

Esp32

Finite State Machines & Microcontrollers by AllAboutCircuit.com

Notes:
 
FreeRTOS 
FreeRTOS was developed (and is constantly improved) in partnership with the largest chip manufacturers, a development that lasts more than 15 years, following strict software quality standards (it follows almost all MISRA standards). 
The popularity is so great that, in 2017, Amazon acquired FreeRTOS and launched interesting customizations for using its IoT-targeted services (read more here and here). So yes, FreeRTOS is 'owned' by Amazon, and that gives you an idea of the proportion of this project.
MISRA
MISRA-C is a software development standard in C language developed by the company that gives its name, the Motor Industry Software Reliability Association. 
This standard focuses on automotive embedded systems, but its practices can also be extended to other areas, such as medical and aerospace equipment.
FreeRTOS uses MISRA standards.

edited @ Dez/2020 — Adding note:)

IoT
Freertos
Rtos Training
Microcontrollers
State Machine
Recommended from ReadMedium