dium.com/v2/resize:fit:800/1*sOFj7bZFeDe8odQDyhjAZg.gif"><figcaption></figcaption></figure><h2 id="3985">3 | Explanation</h2><p id="c458">In the above example, we have two screens, first screen is <i>Hero Widget</i> and the second screen is <i>Hero 2 Widget </i>and we are transitioning from first screen to the second screen when we click on the circular yellow Container widget at the bottom of the first screen. As you may have observed in the Gif above, there is an animation when this transition happens.</p><p id="de7c">Let’s see how that works out.</p><p id="2f65">First, we need to wrap common widgets (Container widget containing a ClipRRect widget with different borderRadius) on both the screens with <b>Hero</b> widget. Next, we provide a common tag (here “hero”) to both the widgets to help flutter know which widgets to animate. That’s all, the animations will work as expected.</p><p id="982a">In the example above you might have observed two new things:</p><ol><li>WillPopScope: This widget will help you perform tasks on the press of the back button (when the screen is dismissed). It’s <b>onWillPop</b> method is triggered when the screen is dismissed. Return <i>Future.value(true)</i> for it to work as expected.</li><li>timeDilation: This is a global property that lets you slow things down. You can increase or decrease its value as per your requirements. I have used it in this example to show you the animation in slow motion. We reset this property to its default value of 1.0 when user exits the Hero screen. Don’t forget to <b><i>import ‘package:flutter/scheduler.dart’ show timeDilation</i></b> in your dart class to access this property.</li></ol><div id="0676" class="link-block">
<a href="https://readmedium.com/flutter-widget-guide-inheritedmodel-widget-in-5-mins-or-less-a2b0dd8beb43">
<div>
<div>
<h2>Flutter Widget Guide — InheritedModel Widget in 5 mins or less.</h2>
<div><h3>This is Part 16 in the series where I’ll cover all the Flutter widgets that are in this YouTube playlist. I have…</h3></div>
<div><p>medium.com</p></div>
</div>
<div>
<div style="background-image: url(https://miro.readmedium.com/v2/resize:fit:320/1*hF79XBmccA9KRDOVas-J6Q.png)"></div>
</div>
</div>
</a>
</div><p id="36c3"><b>Previous </b>👆</p><p id="a7ac"><b>Next </b>👇</p><div id="cbb7" class="link-block">
<a href="https://readmedium.com/flutter-widget-guide
Options
-listwheelscrollview-widget-in-5-mins-or-less-c1da452355d2">
<div>
<div>
<h2>Flutter Widget Guide — ListWheelScrollView Widget in 5 mins or less</h2>
<div><h3>This is Part 18 in the series where I’ll cover all the Flutter widgets that are in this YouTube playlist. I have…</h3></div>
<div><p>medium.com</p></div>
</div>
<div>
<div style="background-image: url(https://miro.readmedium.com/v2/resize:fit:320/1*896aOmL9-up_HAp7MRzLQA.png)"></div>
</div>
</div>
</a>
</div><h2 id="167e">How many claps does this article deserve?</h2><p id="1554"><i>If you find this article useful, please <b>click the </b></i>👏<b><i> button</i></b><i> <b>and share </b>to help others find it! Feel free to clap many times (10</i>💥<i>, 20</i>💥<i> or maybe 50</i>💥<i> ?) It fuels my focus to write more of it.</i></p><p id="6ac8">Connect with me on <a href="https://www.linkedin.com/in/annsh/">LinkedIn</a> or say hi on <a href="https://mobile.twitter.com/annsh2013">Twitter</a>, mentioning this article. You can drop an e-mail at [email protected] as well.</p><p id="6551">See more in the series -</p><div id="9d85" class="link-block">
<a href="https://readmedium.com/flutter-widget-guide-index-f03141793b09">
<div>
<div>
<h2>Flutter Widget Guide — Index</h2>
<div><h3>Hey. I created this series for flutter developers out there who wish to explore a widget with an example. All the…</h3></div>
<div><p>medium.com</p></div>
</div>
<div>
<div style="background-image: url(https://miro.readmedium.com/v2/resize:fit:320/0*OcqcC1Bh78wle2NG)"></div>
</div>
</div>
</a>
</div><p id="24a8">Have a wonderful day 🙂</p><div id="0683" class="link-block">
<a href="https://www.twitter.com/FlutterComm">
<div>
<div>
<h2>Flutter Community</h2>
<div><h3>The latest Tweets from Flutter Community (@FlutterComm). Follow to get notifications of new articles and packages from…</h3></div>
<div><p>www.twitter.com</p></div>
</div>
<div>
<div style="background-image: url(https://miro.readmedium.com/v2/resize:fit:320/0*u0_nGHSqeriPkKKC)"></div>
</div>
</div>
</a>
</div></article></body>
Flutter Widget Guide — Hero Widget in 5 mins or less
This is Part 17 in the series where I’ll cover all the Flutter widgets that are in this YouTube playlist. I have created my own widget guide which I believe will help people who are new in this space. Please have a look at this GitHub project to explore all the amazing widgets.
Click here to ⏬ the App available on Google Play Store. 📱
My main motive behind this series is to keep things to the point. Your time is precious, let’s not waste it and get started.
Animations and transitions are a great way to enhance your application’s user experience. Normally, when you create a transition from one screen inside your app to another, the change in the screens is rather abrupt. Wouldn’t it be great to show this transition between the screens with a nice and smooth animation? How can we achieve this? One option is to show a change with the help of a common widget on both the screens, be it an image, a widget or anything for that matter and flutter has a ready made solution for this.
Hero Widget
1 | What?
Hero transition is very common in modern day applications which let the user know that they moved from one screen to another. Flutter has Hero widget for this, which automatically creates a Hero transition between two navigator routes. It detects the common widget between the two routes and animates the change.
2 | Wondering how it works?
Have a look at the Code snippet below.
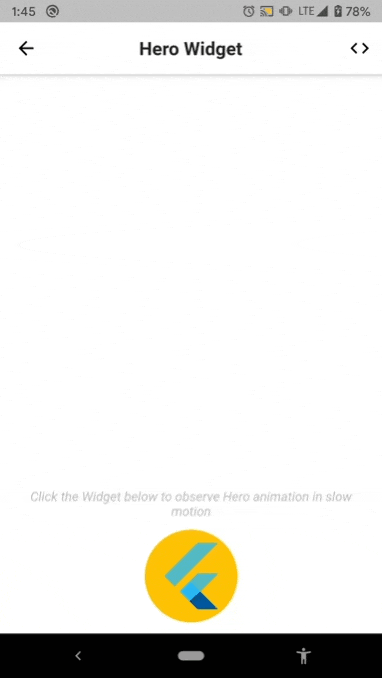
Below is the visual representation of the code above.
3 | Explanation
In the above example, we have two screens, first screen is Hero Widget and the second screen is Hero 2 Widget and we are transitioning from first screen to the second screen when we click on the circular yellow Container widget at the bottom of the first screen. As you may have observed in the Gif above, there is an animation when this transition happens.
Let’s see how that works out.
First, we need to wrap common widgets (Container widget containing a ClipRRect widget with different borderRadius) on both the screens with Hero widget. Next, we provide a common tag (here “hero”) to both the widgets to help flutter know which widgets to animate. That’s all, the animations will work as expected.
In the example above you might have observed two new things:
WillPopScope: This widget will help you perform tasks on the press of the back button (when the screen is dismissed). It’s onWillPop method is triggered when the screen is dismissed. Return Future.value(true) for it to work as expected.
timeDilation: This is a global property that lets you slow things down. You can increase or decrease its value as per your requirements. I have used it in this example to show you the animation in slow motion. We reset this property to its default value of 1.0 when user exits the Hero screen. Don’t forget to import ‘package:flutter/scheduler.dart’ show timeDilation in your dart class to access this property.
If you find this article useful, please click the 👏 buttonand share to help others find it! Feel free to clap many times (10💥, 20💥 or maybe 50💥 ?) It fuels my focus to write more of it.