
Configuring a Spring Boot Application with H2 Database
This article will explore how to connect a Spring Boot application to an H2 database. If you want to learn how to configure Spring Boot with other databases like SQL or MongoDB, I have covered them in previous articles, which you can refer to for further knowledge.
- Let’s create a simple CRUD application using Spring Boot with MongoDB.
- Creating a Simple CRUD Application with Spring Boot and MySQL — Part 2

First, we have to get a brief idea about the spring boot framework and the h2 database.
What is Spring boot?
Before we dive into Spring Boot, let’s take a step back and understand its evolution. Java SE (Java Standard Edition) was initially used to build standalone applications. While it was suitable for basic projects, it could not efficiently handle complex enterprise applications.
To address this, Java EE (Java Enterprise Edition) was introduced, which provided a framework for developing robust enterprise-level applications. However, its extensive and often complicated configuration made it challenging to work with. This led to the Spring Framework, which simplified Java EE development by offering a more lightweight and modular approach.
Spring Boot was then introduced as an extension of the Spring Framework to make building web and microservice applications even faster and easier. It minimizes the need for boilerplate code and complex configuration, enabling developers to create production-ready applications swiftly. In summary, Spring Boot combines the power of the Spring Framework with an intuitive, opinionated approach to modern application development.
A microservice is an architectural style that structures an application as a collection of small, independent, and loosely coupled services, each responsible for a specific business capability. Microservices are designed to be modular, which allows each service to be developed, deployed, and scaled independently of the others.
What is H2 database?
H2 is an open-source, in-memory relational database management system written in Java. It is lightweight, fast, and ideal for development, testing, and prototyping. H2 can be embedded within your application, making it an excellent choice for quick development cycles where a full-fledged database server may not be necessary.
Now that we understand what the Spring Boot framework and the H2 database are, I will guide you step-by-step on how to connect your Spring Boot application to an H2 database. First, we need to create a new project. For this tutorial, I will be using IntelliJ IDEA.
Step 1: Create the Project
- Open IntelliJ IDEA and click on the new project
- Then select Spring Boot from the generators section.
- Give a name, then location, select Java as language, select Maven as type (I am using Java 17 and jar packaging here), and then click next.

4. The as dependencies add Spring web, Lombok, Spring Data JPA and H2 Database.
Let me explain these dependencies here,
- Spring Web — Provides the necessary components for building web applications, including RESTful services.
- Lombok — A Java library that automatically generates boilerplate code such as getters, setters, and constructors to simplify development.
- Spring Data JPA — Simplifies the implementation of data access layers by providing an abstraction over JPA and handling common database operations.
- H2 Database — A lightweight, in-memory database that is ideal for development and testing environments.

5. Then click on Create. It will take a little time to download the dependencies.
6. Then check your pom.xml file.

Done! We have completed the project creation. Now, let’s move on to connecting the database.
Step 2: Connect H2 Database
- Navigate to the
application.propertiesfile and set the necessary configurations.
spring.application.name=SpringBootWithH2DB

# Enable H2 console
spring.h2.console.enabled=true
spring.h2.console.path=/h2-console

# H2 database configuration
spring.datasource.url=jdbc:h2:mem:testdb
spring.datasource.driver-class-name=org.h2.Driver
spring.jpa.database-platform=org.hibernate.dialect.H2Dialect
spring.datasource.username=user
spring.datasource.password=password
spring.jpa.hibernate.ddl-auto=updatespring.application.name=SpringBootWithH2DB: Sets the name of the Spring Boot application. This is useful for identifying your application in logs or monitoring tools.spring.h2.console.enabled=true: Enables the H2 database web console, allowing you to interact with the in-memory database through a web-based interface.spring.h2.console.path=/h2-console: Specifies the URL path to access the H2 console. You can visithttp://localhost:8080/h2-consoleto access it when your application is running.spring.datasource.url=jdbc:h2:mem:testdb: Configures the JDBC URL for the H2 database, specifying that it should be an in-memory database namedtestdb.spring.datasource.driver-class-name=org.h2.Driver: Specifies the driver class for the H2 database. This tells Spring Boot which database driver to use for the connection.spring.jpa.database-platform=org.hibernate.dialect.H2Dialect: Sets the Hibernate dialect toH2Dialect, which is required for Hibernate to generate SQL optimized for the H2 database.spring.datasource.username=user: Configures the username for the H2 database connection. The default user for H2 is typicallysa, but it can be customized.spring.datasource.password=password: Sets the password for the H2 database connection. By default, H2 does not require a password, but you can set one for security.spring.jpa.hibernate.ddl-auto=update: Configures how Hibernate should handle database schema changes. The valueupdatemeans that Hibernate will automatically update the database schema to match the entities. Other possible values includecreate,create-drop, andvalidate.
2. Then, run the project and type the URL in your web browser.

3. Then this DB window will be displayed on your screen.
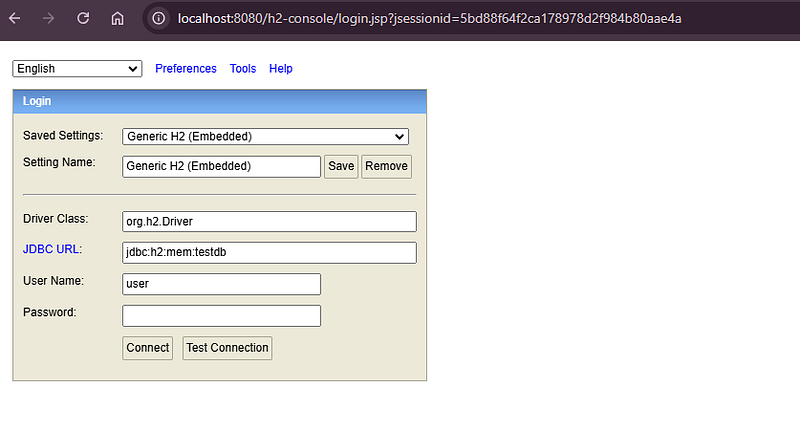
4. Then type the password that you provide in the application.properties file and then click connect.

5. After successfully logging in to the DB, you can see the database like this.
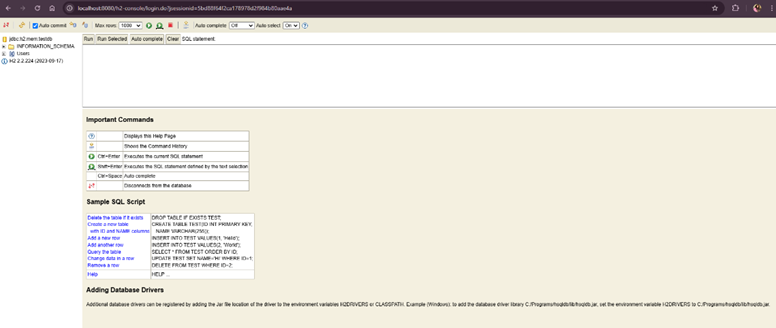
Done! We have successfully connected the H2 database to the application. Now, let’s write CRUD operations and see how the database works.
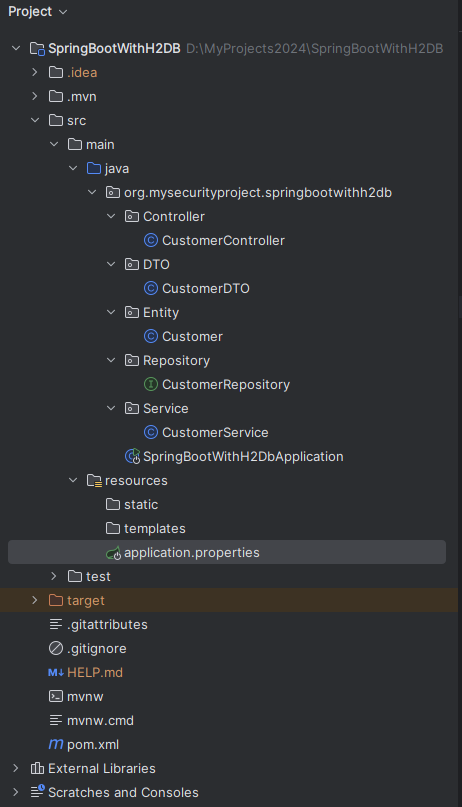
Step 3: Create the folder structure
In this project, I am using Controller, Entity, Repository, DTO, and Service classes. We already know what Controller, Entity, Repository, and Service classes are, but what is a DTO, and why do we use it?
A DTO (Data Transfer Object) is a simple Java object used to transfer data between different layers of an application. We use DTOs to encapsulate data and streamline communication between components, improving security by preventing direct exposure of internal entities and enhancing code maintainability by separating the data structure used for communication from the domain model.
In this article, I am not going to explain the annotations we will be using. I have already covered them in my articles on Spring Boot with SQL and MongoDB. You can refer to those articles to get an understanding of the annotations.
Step 4: Implement the Crud operations
Create the Entity Class
In this step, you’ll create an entity class that maps to a database table. This class will represent your application's data model and interact with the database through JPA (Java Persistence API).
@Entity
@Data
@NoArgsConstructor
@AllArgsConstructor
public class Customer {
@Id
@GeneratedValue(strategy = GenerationType.IDENTITY)
private long id;
private String firstName;
private String lastName;
private String email;
private String phone;
private String address;
private int age;
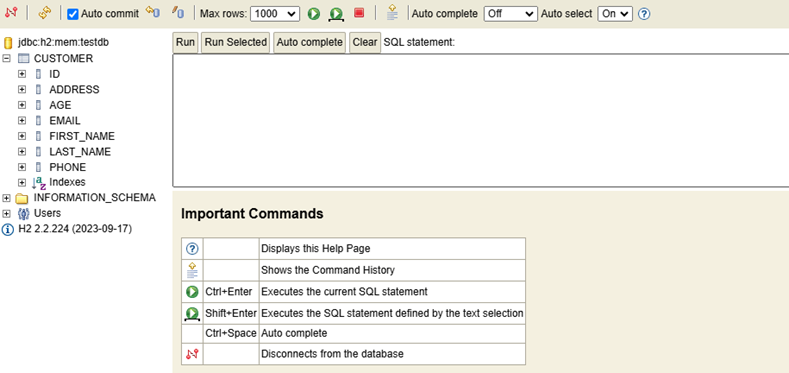
}After creating the Entity class, run the project and check the database to see how the data table is created.
Register the model mapper bean.
- Add the ModelMapper dependency to your `pom.xml` file and load the Maven dependencies.
        <!-- https://mvnrepository.com/artifact/org.modelmapper/modelmapper -->
        <dependency>
            <groupId>org.modelmapper</groupId>
            <artifactId>modelmapper</artifactId>
            <version>3.2.1</version>
        </dependency>
You can download the latest version using this link — https://mvnrepository.com/artifact/org.modelmapper/modelmapper
- Then, register the ModelMapper bean in your main application class using the
@Beanannotation.
@SpringBootApplication
public class SpringBootWithH2DbApplication {

    public static void main(String[] args) {
        SpringApplication.run(SpringBootWithH2DbApplication.class, args);
    }

    @Bean
    public ModelMapper modelMapper() {
        return new ModelMapper();
    }

}
The @Bean annotation in Spring defines a method that creates and returns a bean to be managed by the Spring container. It allows developers to explicitly declare and configure objects for dependency injection within the application context. For example, if you annotate a method with @Bean, the object returned from that method is registered as a Spring bean and can be injected into other components.
Create the DTO Class
In this step, you will create a Data Transfer Object (DTO) class that will be used to transfer data between layers of your application, particularly between the service and the controller. DTOs help in shaping the data sent to and received from the client, keeping the entity model separate from the representation layer.
@NoArgsConstructor
@AllArgsConstructor
@Data
public class CustomerDTO {
    private long id;
    private String firstName;
    private String lastName;
    private String email;
    private String phone;
    private String address;
    private int age;
}
Create the Repository
In this step, you’ll create a repository interface to manage the data access layer of your application. The repository will provide methods to perform CRUD (Create, Read, Update, Delete) operations on your entity. This interface will extend JpaRepository or another appropriate Spring Data interface.
public interface CustomerRepository extends JpaRepository<Customer,Long> {
}
Create the Service Layer
The service layer in a Spring Boot application is responsible for containing the business logic and coordinating data access through the repository layer.
@Service
@Transactional
public class CustomerService {

    @Autowired
    private CustomerRepository customerRepository;

    @Autowired
    private ModelMapper modelMapper;

    public CustomerDTO saveCustomer(CustomerDTO customerDTO){
        customerRepository.save(modelMapper.map(customerDTO, Customer.class));
        return customerDTO;
    }

    public Page<CustomerDTO> getAllCustomers(Pageable pageable){
        return customerRepository.findAll(pageable).map(customer -> modelMapper.map(customer, CustomerDTO.class));
    }

    public Optional<CustomerDTO> getCustomerById(Long id){
        return customerRepository.findById(id).map((customer -> modelMapper.map(customer, CustomerDTO.class)));
    }

    public void deleteCustomer(Long id){
        if(customerRepository.existsById(id)){
            customerRepository.deleteById(id);
        }else {
            throw new RuntimeException("Invalid Customer ID");
        }
    }

    public CustomerDTO updateCustomer(Long id, CustomerDTO customerDTO){
        Optional<Customer> customer = customerRepository.findById(id);
        if(customer.isPresent()){
            Customer customerEntity = customer.get();
            customerEntity.setFirstName(customerDTO.getFirstName());
            customerEntity.setLastName(customerDTO.getLastName());
            customerEntity.setEmail(customerDTO.getEmail());
            customerEntity.setPhone(customerDTO.getPhone());
            customerEntity.setAddress(customerDTO.getAddress());
            Customer updatedCustomer = customerRepository.save(customerEntity);
            return modelMapper.map(updatedCustomer, CustomerDTO.class);
        }else {
            throw new RuntimeException("Invalid Customer ID");
        }
    }
}
Create the Controller
The controller layer in a Spring Boot application handles HTTP requests and responses, bridging the gap between the client and the service layer.
@RestController
@RequestMapping(value = "api/v1/customer")
public class CustomerController {

    @Autowired
    private CustomerService customerService;

    @PostMapping(value = "/save")
    public CustomerDTO saveCustomer(@RequestBody CustomerDTO customerDTO){
        return customerService.saveCustomer(customerDTO);
    }

    @GetMapping(value = "/get-all-customers")
    public Page<CustomerDTO> getAllCustomers(Pageable pageable){
        return customerService.getAllCustomers(pageable);
    }

    @GetMapping(value = "/get-by-id/{id}")
    public Object getCustomerById(@PathVariable Long id){
        Optional<CustomerDTO> customer = customerService.getCustomerById(id);
        if (customer.isPresent()){
            return customer.get();
        }else {
            return "Customer not found";
        }
    }

    @DeleteMapping(value = "/delete/{id}")
    public String deleteCustomer(@PathVariable Long id){
        Optional<CustomerDTO> customer = customerService.getCustomerById(id);
       if (customer.isPresent()){
            customerService.deleteCustomer(id);
            return "Customer deleted";
       }else {
           return "Customer not found";
       }
    }

    @PutMapping(value = "/update/{id}")
    public Object updateCustomer(@PathVariable Long id, @RequestBody CustomerDTO customerDTO) {
        Optional<CustomerDTO> existingCustomer = customerService.getCustomerById(id);

        if (existingCustomer.isPresent()) {
            return customerService.updateCustomer(id, customerDTO);
        } else {
            return "Customer not found";
        }
    }

}
Here, you can see that I am using Pageable to view all customer details. Let’s take a look at what Pageable is.
Pageable in Spring Boot is an interface used for pagination and data sorting. It allows you to fetch specific subsets of data from a database, which is helpful for handling large datasets by displaying them in smaller, manageable chunks.
Let’s see how Pageable works using the Postman tool.

Here, you can see that I have added one record of data. This demonstrates how Pageable works, as it includes details such as the page number, page size, and total pages.
Step 5: Test the application
- You can use Postman to make other requests as well.
- Post Request
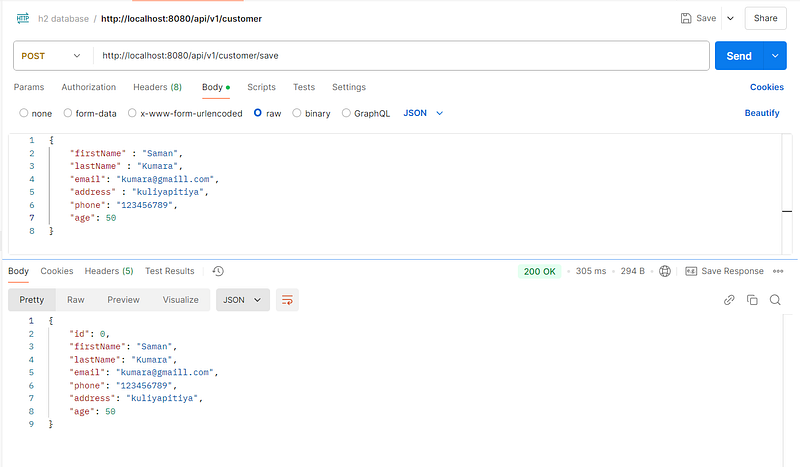
This is how the DB displays after saving a customer to the database.

- Get Request

- Delete Request

- Put Request

Ok all Done….. we’ve covered how to connect an H2 database with a Spring Boot application, configure necessary settings, and implement CRUD operations effectively. Spring Boot offers powerful tools and configurations to simplify application development, and integrating H2 database is just one of the many great features.
Stay tuned for more insightful and in-depth tech articles, where I’ll continue to explore the latest trends, tips, and best practices in the world of programming. Thank you for reading, and I look forward to sharing more with you soon!
Goodbye, and best wishes on your coding adventures! 👋💻
Sample Code : https://github.com/KMaleesha/Springboot-H2-database.git


