
Let’s create a simple CRUD application using Spring Boot with MongoDB
In a previous article, I described what Spring Boot is and how to connect it with an SQL database. For a detailed introduction to Spring Boot, you can refer to my earlier article.
What is Spring Boot, and Why MongoDB?
Spring Boot is a project built on the Spring Framework, designed to simplify application development by eliminating the need for extensive configuration. With embedded servers, simplified setup, and production-ready features, it allows developers to focus on business logic without worrying about low-level configuration.
While SQL databases have traditionally been the go-to for many applications, NoSQL databases like MongoDB offer significant advantages for modern applications. MongoDB is a document-based, distributed database that stores data in a JSON-like format called BSON. Here are a few reasons why MongoDB might be a good choice for your Spring Boot application:
- Schema-less Data Model: MongoDB allows dynamic schemas, providing flexibility to store various types of data without requiring a rigid structure.
- Scalability: It is horizontally scalable, making it a great choice for applications that expect rapid growth and high traffic.
- High Performance: MongoDB supports fast read and write operations, making it suitable for real-time data processing.
- Easy Integration with Spring Boot: Spring Boot provides native support for MongoDB through the Spring Data MongoDB module, enabling seamless repository management, queries, and aggregation functions.
Step 1: Create a Cluster in MongoDB Atlas
- Create an account on MongoDB Atlas.
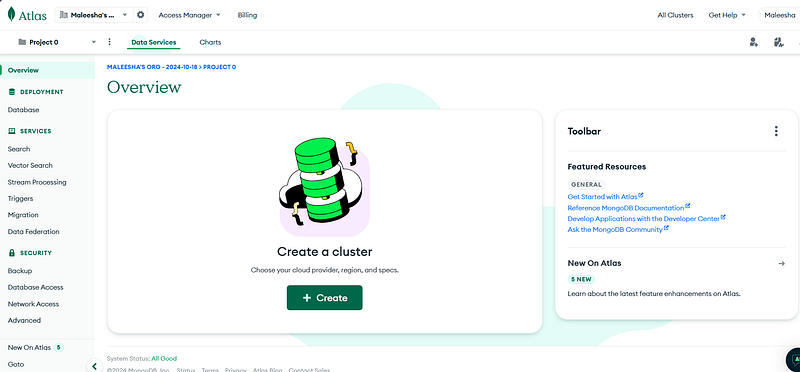
- After logging in, click on the “Create a Cluster” tab in the overview.
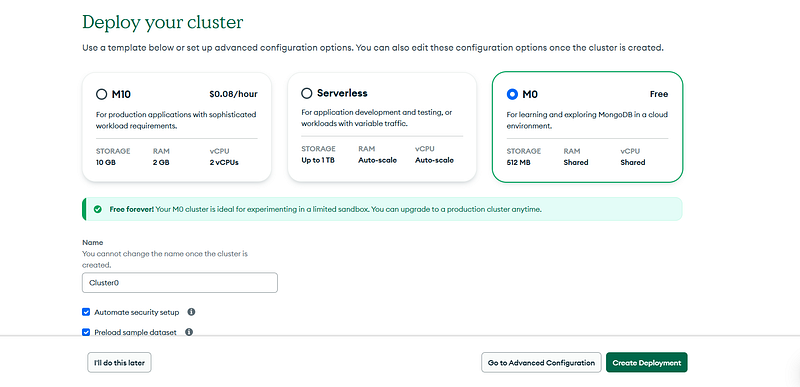
3. Select the free MongoDB cloud environment.
4. Name your cluster.
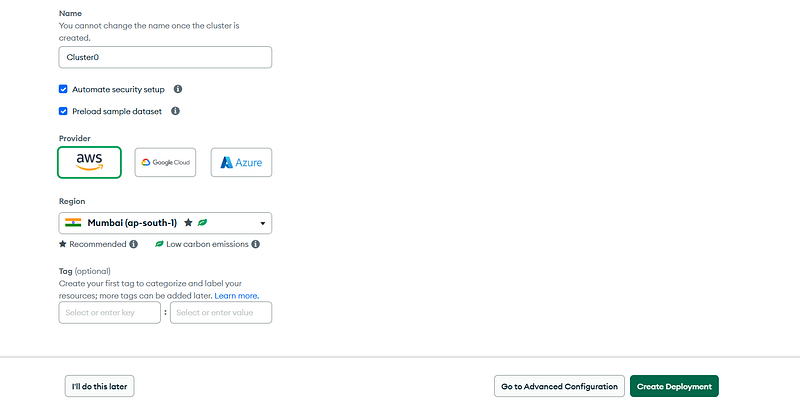
5. Choose a cloud provider.
6. Select a region (you can choose the nearest one for better performance).
7. (Optional) Add tags, though they are not necessary here.
8. Click “Create Deployment.”
9. Once the cluster is created, connect to it.
10. Set up a database user by providing a username and password.
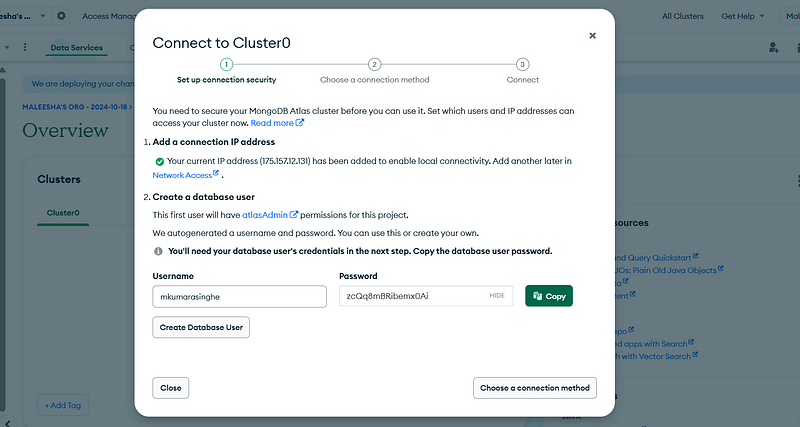
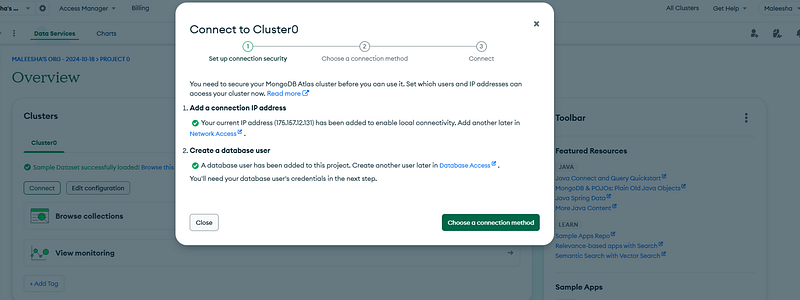
11. In the second step, choose a connection method.
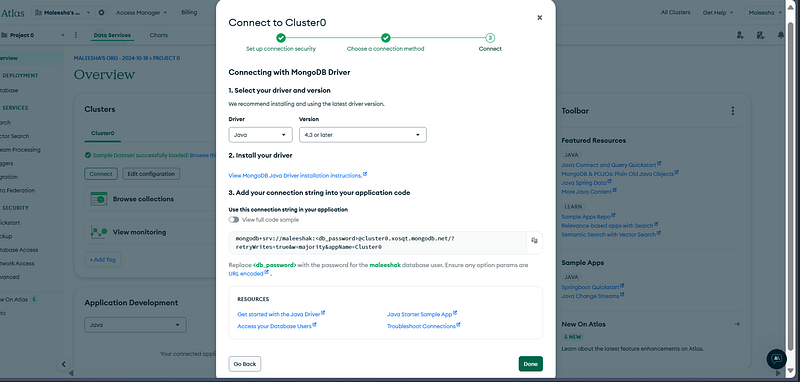
12. Select “Drivers.”
13. Choose the Java driver.
14. Copy the connection string and save it in a notepad. This will be needed later when connecting the database to your application.
15. Your cluster is now ready, and you can see a sample database with collections. You can remove the sample database if you don’t need it.
Step 2: Create the Spring Boot Project in IntelliJ IDEA
- Open IntelliJ IDEA.
- Click on “New Project.”
- Select “Spring Initializr.”
- Configure your project settings:
- Language: Java
- Project SDK: Select the installed JDK version.
- Project Metadata: Provide a project name (e.g.,
demo). - Packaging: Jar
- Java Version: Choose the version you are using (e.g., Java 17).
5. Add the following dependencies:
- Spring Web
- Spring Data MongoDB
- Lombok
6. Click “Finish” to create the project. IntelliJ IDEA will generate the project structure and download the necessary dependencies.
7. To verify that the project is set up correctly, navigate to the main class annotated with @SpringBootApplication in the src/main/java directory.
8. Right-click on the main class and select “Run.”
9. Check the console output to ensure the application is running, and the embedded Tomcat server has started.
Step 3: Configure the Database Connection
Now, configure the MongoDB database connection by updating the application.properties file in the src/main/resources directory. Add the following configurations:
spring.application.name=SpringWithMongo
spring.data.mongodb.uri=mongodb+srv://<username>:<password>@cluster0.xosqt.mongodb.net/<databasename>?retryWrites=true&w=majority&appName=Cluster0
Replace <username>, <password>, and <databasename> with your MongoDB credentials. This connection string will allow your Spring Boot application to communicate with the MongoDB database.
Step 4: Create a Simple CRUD Application with MongoDB
Now that your project is connected to the database, let’s implement a simple CRUD (Create, Read, Update, Delete) application. Unlike relational databases, non-relational databases like MongoDB store data in flexible formats, such as key-value pairs, documents, columns, or graphs.
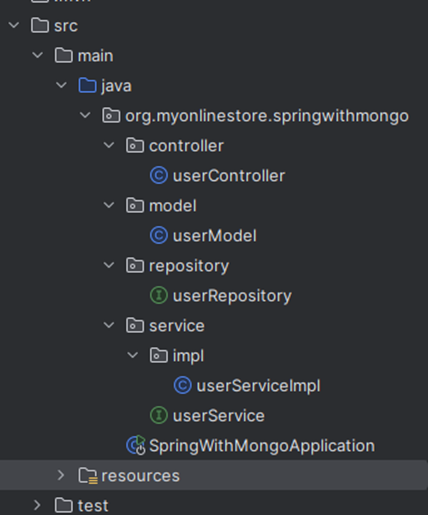
Here’s the folder structure we’ll use:
- Controller Package: Create a
UserControllerclass to handle HTTP requests. - Model Package: Create a
Userclass representing the MongoDB entity. - Repository Package: Create a
UserRepointerface for repository operations. - Service Package: Create a
UserServiceclass for business logic. - Service Implementation Package: Implement the service logic in this layer.
Key Annotations in Spring Boot with MongoDB
Before moving forward, it’s important to understand some key annotations that simplify development in Spring Boot:
@Id: Indicates the primary key of the entity (mandatory with@Entity).@Autowired: Enables dependency injection. Spring Boot automatically provides the necessary dependencies.@GetMapping,@PostMapping,@PutMapping,@DeleteMapping: These annotations handle HTTP request methods for RESTful APIs.@RestController: Combines@Controllerand@ResponseBody, used for handling RESTful requests.@RequestMapping: Maps HTTP requests to handler methods in the controller.@Service: Indicates that a class contains business logic.@Getterand@Setter: Lombok annotations to generate getter and setter methods.@Document: Specifies the MongoDB document name.@RequestBody: Used to map the HTTP request body to a Java object.@PathVariable: Used to extract values from URI templates.
Step 4: Create the Model Class
Create the model class for User, which will represent the MongoDB document.
@Getter
@Setter
@Document(collection = "users")
public class userModel {

    @Id
    private String id;
    private String username;
    private String email;
    private int age;
    private String mobileNumber;

}
Step 5: Create the Repository
Next, create a repository interface that extends MongoRepository to handle data access.
public interface userRepository extends MongoRepository<userModel, String> {
}
Step 6: Create the Service and Service Implementation Layers
The service layer handles business logic, while the repository is used for data access. Implement the CRUD operations here.
@Service
public interface userService {

    public userModel saveUser(userModel user);
    public Optional<userModel> getUserById(String id);
    public List<userModel> getUsers(userModel user);
    public String deleteUserById(String id);
    public userModel updateUserById(String id, userModel user);
}
@Component
public class userServiceImpl implements userService {
@Autowired
private userRepository userRepo;
@Override
public userModel saveUser(userModel user) {
return userRepo.save(user);
}
@Override
public Optional<userModel> getUserById(String id) {
return userRepo.findById(id);
}
@Override
public List<userModel> getUsers(userModel user) {
return userRepo.findAll();
}
@Override
public String deleteUserById(String id) {
Optional<userModel> user = userRepo.findById(id);
if(user.isPresent()) {
userRepo.deleteById(id);
return "User deleted";
}else {
return "User not found";
}
}
@Override
public userModel updateUserById(String id, userModel user) {
Optional<userModel> updateUser = userRepo.findById(id);
if(updateUser.isPresent()) {
userModel newUser = updateUser.get();
newUser.setUsername(user.getUsername());
newUser.setEmail(user.getEmail());
newUser.setAge(user.getAge());
newUser.setMobileNumber(user.getMobileNumber());
return userRepo.save(newUser);
}else{
throw new RuntimeException("User not found with id: " + id);
}
}
}Step 6: Create the Controller class
The controller layer in a Spring Boot application handles HTTP requests and responses, bridging the gap between the client and the service layer.
@RestController
@RequestMapping("/api/user")
public class userController {

    @Autowired
    private userService userservice;

    @PostMapping(value = "/save")
    public userModel save(@RequestBody userModel user){
        return userservice.saveUser(user);
    }

    @GetMapping(value= "/get-user/{id}")
    public Optional<userModel> getUser(@PathVariable String id){
        return userservice.getUserById(id);
    }

    @GetMapping(value="/users")
    public List<userModel> getAllUsers(userModel users){
        return userservice.getUsers(users);
    }

    @DeleteMapping(value="/delete/{id}")
    public String deleteUser(@PathVariable String id){
        return userservice.deleteUserById(id);
    }

    @PutMapping(value = "/update/{id}")
    public userModel updateUser(@PathVariable String id, @RequestBody userModel user){
        return userservice.updateUserById(id, user);
    }

}
Step 7: Testing with Postman
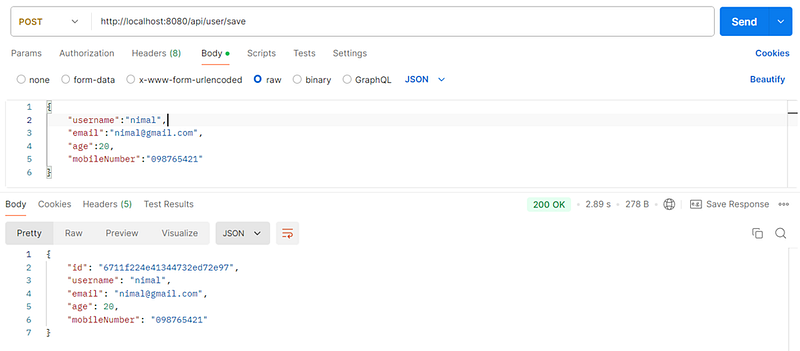
Now that the CRUD operations are set up, you can use Postman to test them by sending POST, GET, PUT, and DELETE requests to the application.
When creating a request in Postman, first select the request type, then enter the localhost URL and specify the appropriate endpoint mapping. Once you send the request successfully, you should see a `200 OK` message in the console, indicating that the data has been processed correctly.
- Insert User
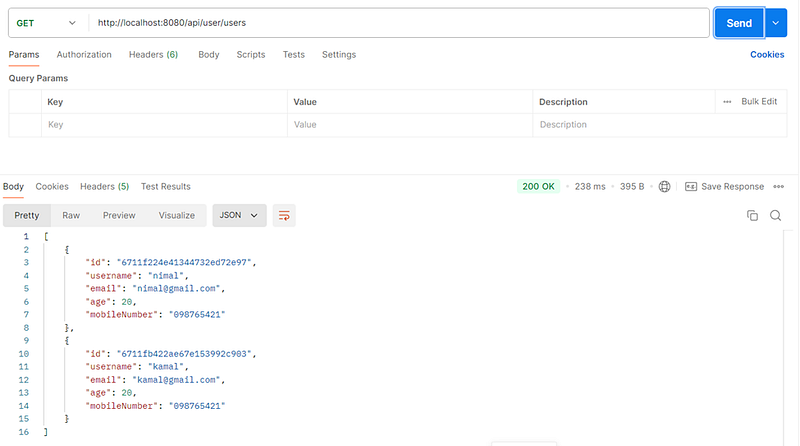
2. Get All Users
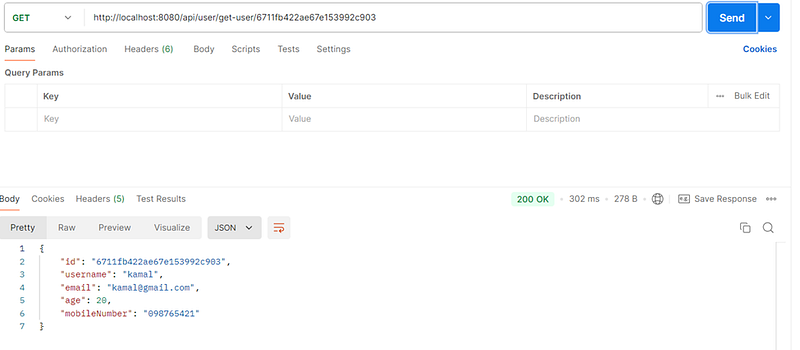
3. Get user by Id
4. Delete User

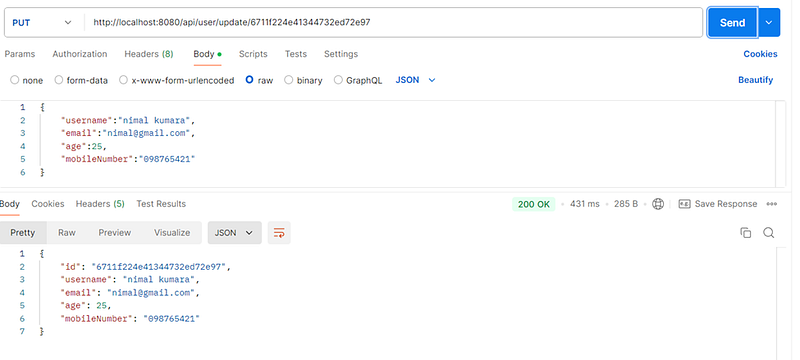
5. Update User.
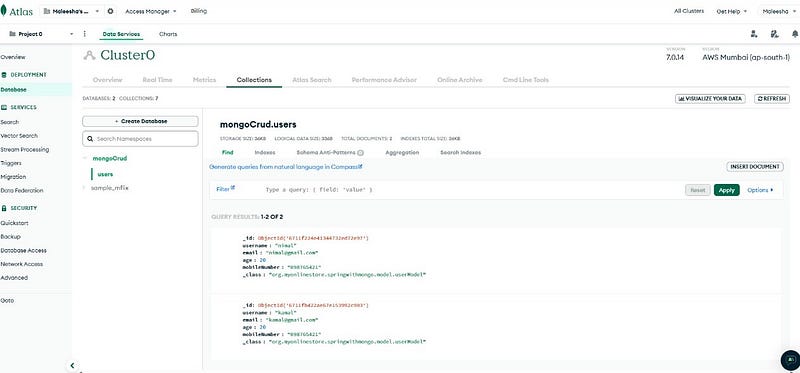
Step 8: Check the MongoDB
if you have correctly done the implementation you can see there is a collection in the MongoDB with you given name and a document as user.
Done !
In this article, we explored how to create a complete CRUD operation using Spring Boot and MongoDB, covering everything from setting up your project to implementing and testing your APIs. We hope this guide has provided you with valuable insights and practical experience in building robust applications with Spring Boot. 🚀
Thank you for joining us on this journey. We look forward to seeing you in our next article, I will create a docker image for this simple project. Until then, happy learning, and stay tuned for more updates! 📚✨
Goodbye, and best wishes on your coding adventures! 👋💻
Sample Code : https://github.com/KMaleesha/SpringBoot-with-mongoDB.git