
Creating a Simple CRUD Application with Spring Boot and MySQL — Part 2

In the previous article, we discussed setting up the project and establishing a database connection. We also covered the basics of Spring Boot and the project requirements. If you haven’t already, please review the previous article here: Creating a Simple CRUD Application with Spring Boot and MySQL.
Today, we will implement CRUD operations — Create, Read, Update, and Delete — to manage data records in the database. For this tutorial, we are developing a program to manage user details for a restaurant. Our goal is to enable inserting, reading, updating, and deleting customer data through a REST API. I previously discussed REST APIs in this article: Unlocking the Power of APIs: A Beginner’s Guide.
Before we start coding, let’s add the ModelMapper dependency to our Maven project. ModelMapper is a library that simplifies object mapping, which is useful for converting between entity objects and Data Transfer Objects (DTOs).
- Open the
pom.xmlFile — Thepom.xmlfile in a Maven project lists the project dependencies, name, properties, and other configuration details. - Add the ModelMapper Dependency — Inside the
<dependencies>tag in yourpom.xmlfile, add the following dependency. You can find the latest version of the ModelMapper dependency at the Maven Repository: ModelMapper on Maven Central.
<dependency>
    <groupId>org.modelmapper</groupId>
    <artifactId>modelmapper</artifactId>
    <version>3.2.1</version>
</dependency>3. Save the pom.xml File — After adding the dependency, save the pom.xml file. Maven will automatically download the ModelMapper library and include it in your project.
4. Create a Bean in the main file.
@SpringBootApplication
public class DemoApplication {

    public static void main(String[] args) {
        SpringApplication.run(DemoApplication.class, args);
    }
     @Bean
    public ModelMapper modelMapper() {
        return new ModelMapper();
    }

}
With the ModelMapper dependency added, you’re ready to proceed with implementing the CRUD operations in your Spring Boot application. This will involve creating RESTful endpoints to handle various data operations for managing restaurant customer details.
Let’s get started on the implementation!
Step 1 : Create the Project Structure
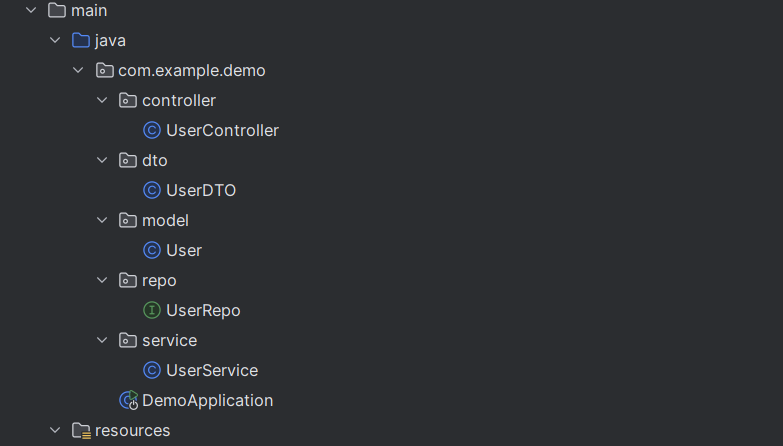
controllerPackage: Create aUserControllerclass to handle HTTP requests.dtoPackage: Create aUserDTOclass for data transfer objects.modelPackage: Create aUserclass for the entity.repoPackage: Create aUserRepointerface for repository operations.servicePackage: Create aUserServiceclass for business logic.
Before moving on to the next step, let’s take a moment to explore some key annotations that will be used throughout this project. Understanding these annotations will help you better grasp how Spring Boot operates and simplifies development.
What is an Annotation?
In Spring Boot, an annotation is a special type of metadata that provides additional information about the code to the Spring framework. Annotations are used to configure and customize the behavior of Spring applications, simplifying the setup and reducing the amount of boilerplate code. They are applied to classes, methods, or fields to indicate how they should be processed by the Spring container.
@Entity: Defines a class as a JPA entity that maps to a database table. This annotation is used to create a table without needing explicit SQL queries.@Table: Specifies the table name in the database for the entity. This is useful when the table name differs from the class name.@Id: Indicates the primary key of the entity. It is mandatory when using the@Entityannotation.@Autowired: Used for dependency injection. Spring Boot automatically provides the required dependencies for the class.@Component: Marks a class as a Spring component, making it eligible for component scanning and dependency injection.@GetMapping,@PostMapping,@PutMapping,@DeleteMapping: These annotations are used to handle HTTP request methods for RESTful endpoints. They correspond to HTTP GET, POST, PUT, and DELETE methods, respectively.@RestController: Combines@Controllerand@ResponseBody, indicating that the class handles RESTful requests and responses.@RequestMapping: Maps HTTP requests to handler methods in controller classes. It can be used to specify the request path and method.@CrossOrigin: Enables Cross-Origin Resource Sharing (CORS) to allow requests from different origins. This is useful when the backend and frontend are hosted on different servers.@Service: Indicates that a class is a service component, typically containing business logic.@Transactional: Ensures that a method or class executes within a transaction. If a transaction fails, it rolls back to maintain data integrity. Commonly used for operations involving multiple tables or financial transactions.@NoArgsConstructor: Generates a no-argument constructor for a class.@AllArgsConstructor: Generates a constructor with all class fields as parameters.@Data: A Lombok annotation that automatically generates getters, setters,toString(),equals(), andhashCode()methods for a class.
For more information about Spring Boot annotations, you can visit this GeeksforGeeks article.
Step 2: Create the Entity Class
In this step, you’ll create an entity class that maps to a database table. This class will represent the data model for your application and interact with the database through JPA (Java Persistence API).
@Entity
@NoArgsConstructor
@AllArgsConstructor
@Data
public class User {

    @Id
    private int id;

    private String name;

}
Step 3: Create the DTO Class
In this step, you will create a Data Transfer Object (DTO) class that will be used to transfer data between layers of your application, particularly between the service and the controller. DTOs help in shaping the data sent to and received from the client, keeping the entity model separate from the representation layer.
@Data
@AllArgsConstructor
@NoArgsConstructor
public class UserDTO {

    private int id;
    private String name;
}
Step 4: Create the Repository
In this step, you’ll create a repository interface to manage the data access layer of your application. The repository will provide methods to perform CRUD (Create, Read, Update, Delete) operations on your entity.This interface will extend JpaRepository or another appropriate Spring Data interface.
@Repository
public interface UserRepo extends JpaRepository<User, Integer> {

}
Step 5: Create the Service Layer for CRUD Operations
The service layer in a Spring Boot application is responsible for containing the business logic and coordinating data access through the repository layer.
@Service
@Transactional
public class UserService {

    @Autowired
    private UserRepo userRepository;

    @Autowired
    private ModelMapper modelMapper;

    public List<UserDTO> getAllUsers() {
        List<User> userList = userRepository.findAll();
        return modelMapper.map(userList, new TypeToken<List<UserDTO>>() {}.getType());
    }

    public UserDTO saveUser(UserDTO userDTO) {
        userRepository.save(modelMapper.map(userDTO, User.class));
        return userDTO;
    }

    public UserDTO updateUser(UserDTO userDTO) {
        userRepository.save(modelMapper.map(userDTO, User.class));
        return userDTO;
    }

    public String deleteUser(int userId) {
        userRepository.deleteById((userId));
        return "User deleted";
    }
}
Step 6: Write the Controllers for CRUD Operations
The controller layer in a Spring Boot application handles HTTP requests and responses, bridging the gap between the client and the service layer.
@RestController
@CrossOrigin
@RequestMapping(value = "api/v1/")
public class UserController {

    @Autowired
    private UserService userService;

    @GetMapping("/getusers")
    public List<UserDTO> getUser() {
        return userService.getAllUsers();
    }

    @PostMapping("/saveuser")
    public UserDTO saveUser(@RequestBody UserDTO userDTO) {
        return userService.saveUser(userDTO);
    }

    @PutMapping("/updateuser")
    public UserDTO updateUser(@RequestBody UserDTO userDTO) {
        return userService.updateUser(userDTO);
    }

    @DeleteMapping("deleteuser/{userId}")
    public String deleteUser(@PathVariable int userId) {
        return userService.deleteUser(userId);
    }

}
Step 7: Insert Data Using Postman
Postman is a powerful tool for API development, testing, and debugging. It provides an intuitive interface to interact with your APIs, allowing you to send HTTP requests and view responses easily. In this step, you’ll use Postman to insert data into your application by sending a POST request to your API.
If you haven’t already installed Postman, you can download and install it from the official website: Postman Downloads.
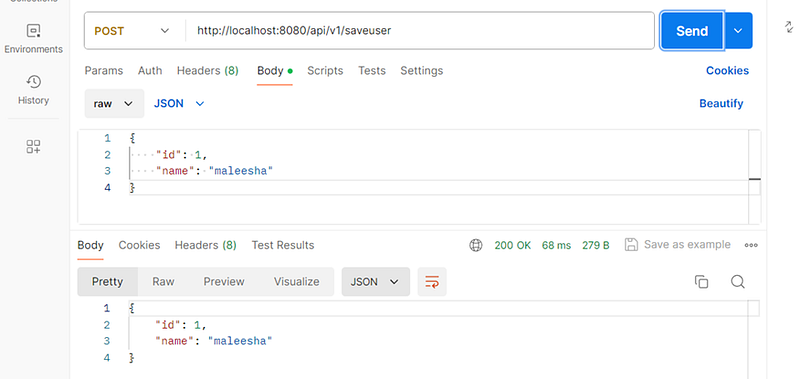
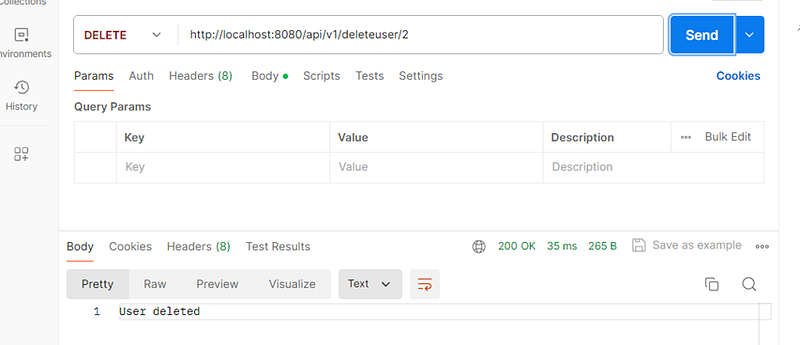
When creating a request in Postman, first select the request type, then enter the localhost URL and specify the appropriate endpoint mapping. Once you send the request successfully, you should see a `200 OK` message in the console, indicating that the data has been processed correctly.
- Insert User
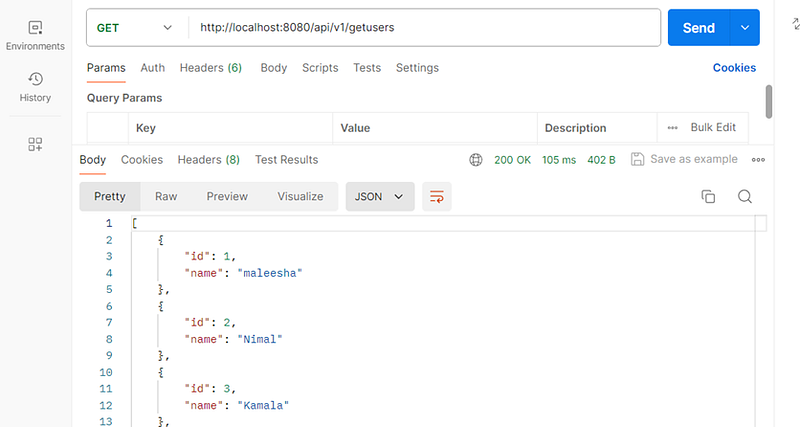
2. Get all Users
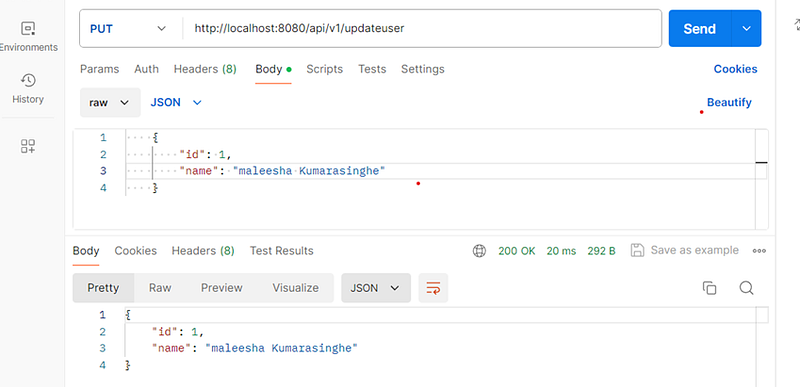
3. Update User
4. Delete User
Step 8: Adding a Custom Query Method
In this step, you’ll add a custom query method to your JPA repository to find a record based on a user’s ID. Here’s how to do it:
1. Update the Repository
In your UserRepo interface, which extends JpaRepository, you need to define a custom query method. The @Query annotation allows you to write a custom SQL query. However, using the JPQL (Java Persistence Query Language) is recommended over native SQL queries for better portability and integration with JPA. Here’s how you can define it:
@Repository
public interface UserRepo extends JpaRepository<User, Integer> {

    @Query(value = "SELECT * FROM User where id = ?1", nativeQuery = true)
    User getUsersById(int userId);
}
2. Update the Service Class
In your service class, you need to use this new repository method to fetch the user and map it to a UserDTO (Data Transfer Object). Here’s how you can do it:
public UserDTO getUser(int userId) {
        User user = userRepo.getUsersById(userId);
        return modelMapper.map(user, UserDTO.class);
    }
3. Update the Controller
In your controller, create an endpoint to handle the HTTP GET request to retrieve a user by ID. Here’s how you can do it:
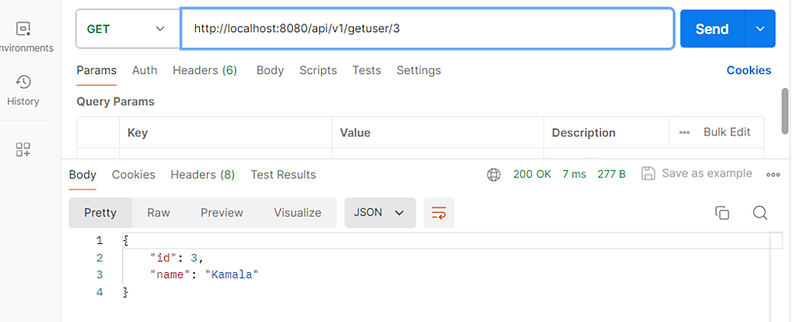
  @GetMapping("getuser/{userId}")
    public UserDTO getUserById(@PathVariable int userId) {
        return userService.getUser(userId);
    }
Let’s check it using Postman
Done !
In this article, we explored how to create a complete CRUD operation using Spring Boot and MySQL, covering everything from setting up your project to implementing and testing your APIs. We hope this guide has provided you with valuable insights and practical experience in building robust applications with Spring Boot. 🚀
Thank you for joining us on this journey. We look forward to seeing you in our next article, where we’ll dive into more exciting topics. Until then, happy learning, and stay tuned for more updates! 📚✨
Goodbye, and best wishes on your coding adventures! 👋💻
Sample Code : https://github.com/KMaleesha/SpringBoot-CRUD-Medium.git


