
Elevate Your Next.js App with Prisma: A Step-by-Step Tutorial (Part 2)
Welcome back to the second part of our tutorial series. In the previous installment, we delved into the foundational steps of integrating Prisma into your Next.js application.
Now, let’s continue our journey by exploring a powerful feature: seeds. Seeds are a valuable tool for populating your database with initial data.
I’ll guide you through the process, from setting up the project structure to writing and running seeds using Prisma. So, buckle up as we uncover the intricacies of leveraging Prisma in your Next.js app to ensure a seamless and efficient development experience.

Let’s continue where we left off. If you missed the previous part, you can read it here: Part 1.
Seeds
This is a cool feature. I used it for data that is not user-related, meaning data that cannot be directly created or updated from the app. For example, I have currencies or languages in the app, so I can repopulate the database. You can use it for various reasons.
Prisma
Start by creating a file db.ts in a lib folder. Create the lib folder in the root of the app.
import { PrismaClient } from "@prisma/client";

declare global {
    // eslint-disable-next-line no-var
    var cachedPrisma: PrismaClient;
}

let prisma: PrismaClient;
if (process.env.NODE_ENV === "production") {
    prisma = new PrismaClient();
} else {
    if (!global.cachedPrisma) {
        global.cachedPrisma = new PrismaClient();
    }
    prisma = global.cachedPrisma;
}

export const db = prisma;
Why is it so complicated, and why do we need it? It enables us to use Prisma in the seeds or in the app. The complexity arises because, in production, we can simply use prisma = new PrismaClient(). However, in development, with hot reloading, using it straightforwardly won't work properly.
Tsconfig
The next step is to add tsconfig-seed.json to the root of the app, specifically suited for the seeds.
{
  "compilerOptions": {
    "target": "es5",
    "lib": [
      "dom",
      "dom.iterable",
      "esnext"
    ],
    "allowJs": true,
    "skipLibCheck": true,
    "strict": false,
    "forceConsistentCasingInFileNames": true,
    "noEmit": true,
    "incremental": true,
    "esModuleInterop": true,
    "module": "CommonJS",
    "moduleResolution": "node",
    "resolveJsonModule": true,
    "isolatedModules": true,
    "jsx": "preserve",
    "baseUrl": ".",
    "plugins": [
      {
        "name": "next"
      }
    ],
    "paths": {
      "@/components/*": [
        "./components/*"
      ],
      "@/hooks/*": [
        "./hooks/*"
      ],
      "@/lib/*": [
        "./lib/*"
      ],
      "@/styles/*": [
        "./src/styles/*"
      ],
      "@/prisma/*": [
        "./prisma/*"
      ],
      "@/assets/*": [
        "./assets/*"
      ]
    }
  },
  "include": [
    "next-env.d.ts",
    ".next/types/**/*.ts",
    "**/*.ts",
    "**/*.tsx"
  ],
  "exclude": [
    "node_modules"
  ]
}
Also, we would like to run our seeds from the command line, so add this code to the package.json. Additionally, this involves installing ts-node if you don't have it already in your app.
"prisma": {
  "seed": "ts-node -P tsconfig-seed.json -r tsconfig-paths/register --transpileOnly prisma/seed.ts"
}
npm i -D ts-node
Code
We have everything set up; now we can write some seeds. Hooray! In the prisma folder, we need to create seed.ts because that's how we defined it in the package.json in the previous step.
You can place it somewhere else if you don't like it, but it is suitable to put it where you can find it easily.
Also, in the prisma folder, create a folder named seedData with a usersSeed.ts file.
// seed.ts

import { usersSeed } from "@/prisma/seedData/usersSeed";
import { db } from "@/lib/db";

async function main() {
    await usersSeed();
}

main()
    .then(async () => {
        await db.$disconnect();
    })
    .catch(async (e) => {
        console.error(e);
        await db.$disconnect();
        process.exit(1);
    });
We can import db (Prisma) and directly call user on it because we executed npx prisma generate. To get it fully working, we also need either npx prisma migrate dev or npx prisma db push. We used the first one to track the history of changes we made to the database. The second one can be used, for example, with Planetscale, where the history is preserved on their side.
// seedData/usersSeed.ts

import { db } from "@/lib/db";

const users = [
    {
        firstName: "Tomas",
        lastName: "Svojanovsky",
    },
    {
        firstName: "John",
        lastName: "Doe",
    },
];

export async function instrumentCategoriesSeed() {
    for (const { firstName, lastName } of users) {
        await db.user.create({
            data: {
                firstName,
                lastName,
            },
        });
    }
}
In the model, we can use create or other methods that Prisma provides. For example, for fetching, there are methods like findMany, findFirst, and so on. The create method expects an object with a data property, and we can place our data into it according to the model.
Run the seeds
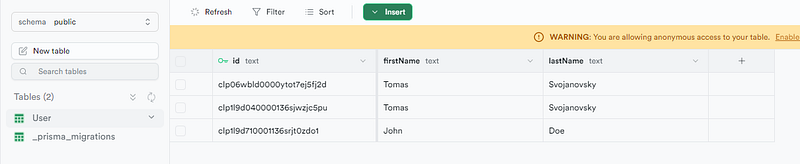
npx prisma db seed
And now, we should have our data in the database structured like this:
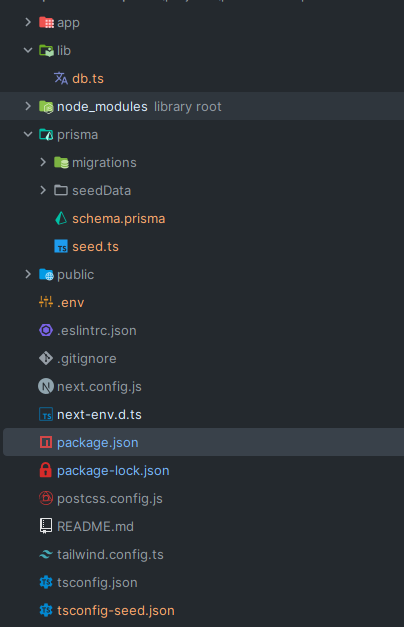
Folders
If you are not sure how the folders should be structured I will add the screenshot, so you can check it.
If you’re eager to continue the journey, feel free to dive into Part 3 and explore further enhancements for your Next.js app!
Thanks for reading my article!
If you enjoyed the read and want to be part of our growing community, hit the follow button, and let’s embark on a knowledge journey together.
Your feedback and comments are always welcome, so don’t hold back!
Stackademic
Thank you for reading until the end. Before you go:
- Please consider clapping and following the writer! 👏
- Follow us on Twitter(X), LinkedIn, and YouTube.
- Visit Stackademic.com to find out more about how we are democratizing free programming education around the world.