
Elevate Your Next.js App with Prisma: A Step-by-Step Tutorial (Final)
Now we have everything set up. We can write an API, and server actions, or directly use Prisma in server components. I prefer using Prisma directly in server components because I can leverage all the advantages it offers — types, and I don’t need to write anything extra. Of course, I see use cases for other approaches like APIs or server actions, but this is really cool.

In this series, we won’t go deep into API or server actions. I’ll show you how to start using Prisma in your app in a few steps, and we’ll delve deeper into other topics in the next stories.
I will continue where we left off. If you didn't catch the previous step, you can check it here: Part 2.
Fetch data
This one is easy and can be done on the server. Go to the page.tsx file and delete all the content within the main tag. Since we don't have use client at the top, it means this component will be rendered on the server, allowing us to use Prisma safely here. Additionally, server components can be asynchronous, which is beneficial for server-side operations.
Find all
const users = await db.user.findMany();Find one
const user = await db.user.findFirstOrThrow({
    where: {
        firstName: "John",
    },
});
Create data
This one is a little bit harder because we can’t just write a query, and that’s it. It must be attached to some form or click event. Since we are on the server, we aren’t allowed to use click events due to the absence of the window object. So, let’s try server actions; you can think of them as an API, but you need to write much less code than with a classic endpoint.
Server actions
We need to call one important thing and it is revalidatePath, because without data we won’t get any new data to the user’s list. It’s a little bit different from client-side rendering.
async function createPerson(formData: FormData) {
    "use server";
    const firstName = formData.get("firstName") as string;
    const lastName = formData.get("lastName") as string;

    await db.user.create({
        data: {
            firstName,
            lastName,
        },
    });

    revalidatePath("/");
}
You may wonder how we get data. It will be from a form like this. I’ve added some styles with Tailwind. It’s not very pretty, but at least not ugly.
<form action={createPerson} className={"max-w-xs"}>
    <div className="flex flex-col gap-1">
        <label htmlFor="firstName">First Name:</label>
        <input className="border-zinc-900 border" type="text" name="firstName"/>
    </div>

    <div className="flex flex-col gap-1">
        <label htmlFor="firstName">First Name:</label>
        <input className="border-zinc-900 border" type="text" name="lastName"/>
    </div>

    <button className="bg-zinc-900 text-white w-full mt-2 p-2 rounded-md" type="submit">Create</button>
</form>
Full code
import { db } from "@/lib/db";
import { revalidatePath } from "next/cache";

type UserFormValues = {
  firstName: string;
  lastname: string;
};

export default async function Home() {
    const users = await db.user.findMany();
    const user = await db.user.findFirstOrThrow({
        where: {
            firstName: "John",
        },
    });

    async function createPerson(formData: FormData) {
        "use server";
        const firstName = formData.get("firstName") as string;
        const lastName = formData.get("lastName") as string;

        await db.user.create({
            data: {
                firstName,
                lastName,
            },
        });

        revalidatePath("/");
    }

    return (
        <main className="flex flex-col gap-4 h-screen text-zinc-900 bg-white p-8">
            <section>
                <h2>Users:</h2>

                <ul>
                    {users.map(user => (
                        <li key={user.id}>{user.firstName} {user.lastName}</li>
                    ))}
                </ul>
            </section>

            <section>
                <h2>User:</h2>

                <p>{user.firstName} {user.lastName}</p>
            </section>

            <section>
                <h2>Form:</h2>

                <form action={createPerson} className={"max-w-xs"}>
                    <div className="flex flex-col gap-1">
                        <label htmlFor="firstName">First Name:</label>
                        <input className="border-zinc-900 border" type="text" name="firstName"/>
                    </div>

                    <div className="flex flex-col gap-1">
                        <label htmlFor="firstName">First Name:</label>
                        <input className="border-zinc-900 border" type="text" name="lastName"/>
                    </div>

                    <button className="bg-zinc-900 text-white w-full mt-2 p-2 rounded-md" type="submit">Create</button>
                </form>
            </section>
        </main>
    );
}
Result
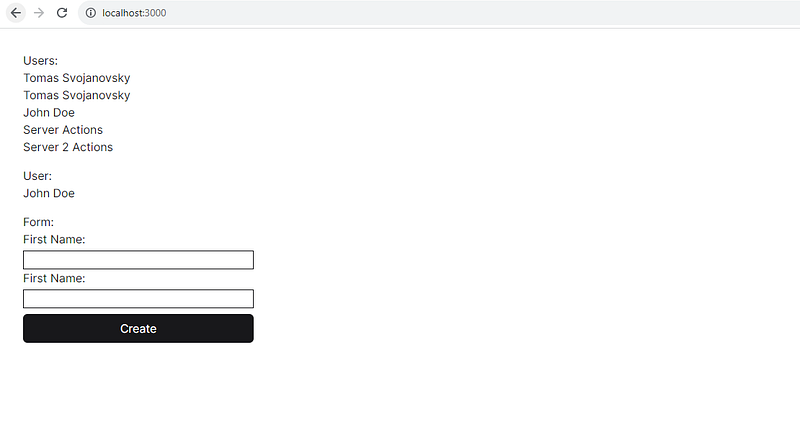
This is what you should see if everything works fine.
Thanks for reading my article!
If you enjoyed the read and want to be part of our growing community, hit the follow button, and let’s embark on a knowledge journey together.
Your feedback and comments are always welcome, so don’t hold back!
Stackademic
Thank you for reading until the end. Before you go:
- Please consider clapping and following the writer! 👏
- Follow us on Twitter(X), LinkedIn, and YouTube.
- Visit Stackademic.com to find out more about how we are democratizing free programming education around the world.