
Building S3 File Storage With Next.js: 3. Upload and download files using Next.js API route (4MB limit)
This article is part of a series of articles about building a file storage application with Next.js, PostgreSQL, and Minio S3. Here are the links to the other articles in the series:
- Building a Local Development Environment
- Main concepts and shared components
- Upload and download files using Next.js API route (4MB limit)
- Upload and download files using presigned URLs
- Delete files from S3
- Deploying locally using Docker Compose
You can find the full source code for this tutorial on GitHub
In this part, we will implement the file upload and download functionality using Next.js API routes.
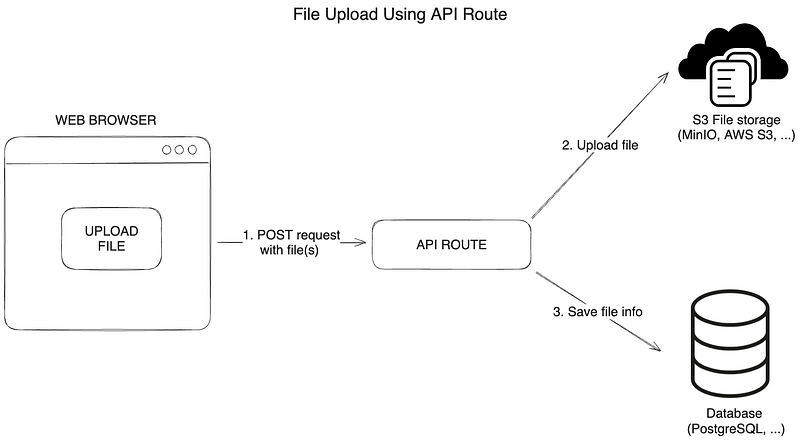
The diagram above shows the steps involved in uploading and downloading files using Next.js API routes.
To upload files:
- User sends a POST request to the API route with the file to upload.
- The API route uploads the file to S3 and returns the file name.
- The file name is saved in the database.
1. Upload files using Next.js API routes (4MB limit)

Frontend — Upload form logic for API routes
First, we will create a UploadFilesRoute.tsx file with the logic for the upload form.
The algorithm for uploading files to the server is as follows:
- The user selects files to upload, and the
fileInputRefis updated with the selected files. - Form data is created from the selected files using the
createFormDatafunction and FormData API. - The form data is sent to the server using POST request to the
/api/files/upload/smallFilesroute. - The server uploads the files to S3 and returns status and message in the response.

It’s usually a good idea to extract the logic of the UI component into a separate file. One way is to create hooks for the logic and use the hooks in the UI component, however, for simplicity, we will create a separate file for the logic “fileUploadHelpers.ts” and use it in the “UploadFilesRoute” component.
/**
 * Create form data from files
 * @param files files to upload
 * @returns form data
 */
export function createFormData(files: File[]): FormData {
  const formData = new FormData()
  files.forEach((file) => {
    formData.append('file', file)
  })
  return formData
}
Here is a simplified version, without validation, loading state and error handling:
import { useState, useRef } from 'react'
import { validateFiles, createFormData } from '~/utils/fileUploadHelpers'
import { MAX_FILE_SIZE_NEXTJS_ROUTE } from '~/utils/fileUploadHelpers'
import { UploadFilesFormUI } from './UploadFilesFormUI'

type UploadFilesFormProps = {
  onUploadSuccess: () => void
}

export function UploadFilesRoute({ onUploadSuccess }: UploadFilesFormProps) {
  const fileInputRef = useRef<HTMLInputElement | null>(null)

  const uploadToServer = async (event: React.FormEvent<HTMLFormElement>) => {
    event.preventDefault()

    const files = Object.values(fileInputRef.current?.files)

    const formData = createFormData(files)
    const response = await fetch('/api/files/upload/smallFiles', {
      method: 'POST',
      body: formData,
    })
    const body = (await response.json()) as {
      status: 'ok' | 'fail'
      message: string
    }
  }

  return (
    <UploadFilesFormUI
      isLoading={isLoading}
      fileInputRef={fileInputRef}
      uploadToServer={uploadToServer}
      maxFileSize={MAX_FILE_SIZE_NEXTJS_ROUTE}
    />
  )
}
Check the full code in the GitHub repository.

Backend — Upload files using Next.js API routes
1. Create utility functions to upload files using Minio S3
To upload files to S3, we will create a utility function saveFileInBucket that uses the putObject method of the Minio client to upload the file to the S3 bucket. The function createBucketIfNotExists creates a bucket if it doesn't exist.
/**
 * Save file in S3 bucket
 * @param bucketName name of the bucket
 * @param fileName name of the file
 * @param file file to save
 */
export async function saveFileInBucket({
  bucketName,
  fileName,
  file,
}: {
  bucketName: string
  fileName: string
  file: Buffer | internal.Readable
}) {
  // Create bucket if it doesn't exist
  await createBucketIfNotExists(bucketName)

  // check if file exists - optional.
  // Without this check, the file will be overwritten if it exists
  const fileExists = await checkFileExistsInBucket({
    bucketName,
    fileName,
  })

  if (fileExists) {
    throw new Error('File already exists')
  }

  // Upload image to S3 bucket
  await s3Client.putObject(bucketName, fileName, file)
}

/**
 * Check if file exists in bucket
 * @param bucketName name of the bucket
 * @param fileName name of the file
 * @returns true if file exists, false if not
 */
export async function checkFileExistsInBucket({ bucketName, fileName }: { bucketName: string; fileName: string }) {
  try {
    await s3Client.statObject(bucketName, fileName)
  } catch (error) {
    return false
  }
  return true
}
2. Create an API route to upload files
Next, we will create an API route to handle file uploads. Create a file smallFiles.ts in the pages/api/files/upload folder. This file will do both the file upload and save the file name in the database.

To parse the incoming request, we will use the formidable library. Formidable is a Node.js module for parsing form data, especially file uploads.
The algorithm for uploading files to the server
- Get files from the request using formidable.
Then, for each file:
- Read the file from the file path using
fs.createReadStream. - Generate a unique file name using the nanoid library.
- Save the file to S3 using the
saveFileInBucketfunction that invokes theputObjectmethod of the Minio client. - Save the file info to the database using Prisma
file.createmethod. - Return the status and message in the response to the client.
The file upload and saving the file info to the database will be done concurrently using Promise.all. Also consider using Promise.allSettled to handle errors in the file upload and saving the file info to the database.
If an error occurs during the file upload or saving the file info to the database, we will set the status to 500 and return an error message.
import type { NextApiRequest, NextApiResponse } from 'next'
import fs from 'fs'
import { IncomingForm, type File } from 'formidable'
import { env } from '~/env'
import { saveFileInBucket } from '~/utils/s3-file-management'
import { nanoid } from 'nanoid'
import { db } from '~/server/db'

const bucketName = env.S3_BUCKET_NAME

type ProcessedFiles = Array<[string, File]>

const handler = async (req: NextApiRequest, res: NextApiResponse) => {
  let status = 200,
    resultBody = { status: 'ok', message: 'Files were uploaded successfully' }

  // Get files from request using formidable
  const files = await new Promise<ProcessedFiles | undefined>((resolve, reject) => {
    const form = new IncomingForm()
    const files: ProcessedFiles = []
    form.on('file', function (field, file) {
      files.push([field, file])
    })
    form.on('end', () => resolve(files))
    form.on('error', (err) => reject(err))
    form.parse(req, () => {
      //
    })
  }).catch(() => {
    ;({ status, resultBody } = setErrorStatus(status, resultBody))
    return undefined
  })

  if (files?.length) {
    // Upload files to S3 bucket
    try {
      await Promise.all(
        files.map(async ([_, fileObject]) => {
          const file = fs.createReadStream(fileObject?.filepath)
          // generate unique file name
          const fileName = `${nanoid(5)}-${fileObject?.originalFilename}`
          // Save file to S3 bucket and save file info to database concurrently
          await saveFileInBucket({
            bucketName,
            fileName,
            file,
          })
          // save file info to database
          await db.file.create({
            data: {
              bucket: bucketName,
              fileName,
              originalName: fileObject?.originalFilename ?? fileName,
              size: fileObject?.size ?? 0,
            },
          })
        })
      )
    } catch (e) {
      console.error(e)
      ;({ status, resultBody } = setErrorStatus(status, resultBody))
    }
  }

  res.status(status).json(resultBody)
}

// Set error status and result body if error occurs
export function setErrorStatus(status: number, resultBody: { status: string; message: string }) {
  status = 500
  resultBody = {
    status: 'fail',
    message: 'Upload error',
  }
  return { status, resultBody }
}

// Disable body parser built-in to Next.js to allow formidable to work
export const config = {
  api: {
    bodyParser: false,
  },
}

export default handler
Remember to include export const config, this prevents built-in body parser of Next.js from parsing the request body, which allows formidable to work.
2 Download files using Next.js API routes (4MB limit)
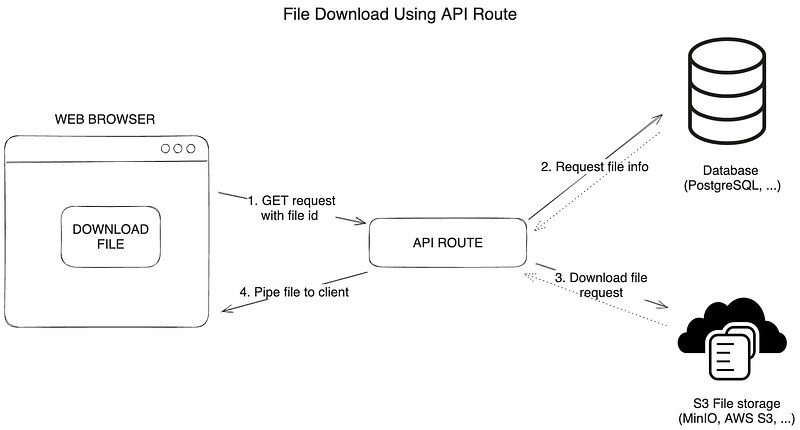
To download files:
- User sends a GET request to the API route with the file id to download.
- The API route requests the file name from the database.
- The API route downloads the file from S3.
- The file is piped to the response object and returned to the client.
Frontend — Download files using Next.js API routes
To download files, we will create a function downloadFile inside of the FileItem component. The function sends a GET request to the API route to download the file from S3. The file is returned to the user from the API route.
const downloadFile = async (file: FileProps) => {
  window.open(`/api/files/download/smallFiles/${file.id}`, '_blank')
}
Backend — Download files using Next.js API routes
1. Create a utility function to download files from S3
To download files from S3, we will create a utility function getFileFromBucket that uses the getObject method of the Minio client to download the file from the S3 bucket.
/**
 * Get file from S3 bucket
 * @param bucketName name of the bucket
 * @param fileName name of the file
 * @returns file from S3
 */
export async function getFileFromBucket({ bucketName, fileName }: { bucketName: string; fileName: string }) {
  try {
    await s3Client.statObject(bucketName, fileName)
  } catch (error) {
    console.error(error)
    return null
  }
  return await s3Client.getObject(bucketName, fileName)
}
2. Create an API route to download files
To download files, we will create an API route to handle file downloads. Create a file [id].ts in the pages/api/files/download/ folder. This file will download the file from S3 and return it to the user.
Here we use a dynamic route of Next.js with [id] to get the file id from the request query. More information about dynamic routes can be found in the Next.js docs.
The algorithm for downloading files from the server is as follows:
- Get the file name and original name from the database using Prisma
file.findUniquemethod. - Get the file from the S3 bucket using the
getFileFromBucketfunction. - Set the header for downloading the file.
- Pipe the file to the response object.
import { type NextApiRequest, type NextApiResponse } from 'next'
import { getFileFromBucket } from '~/utils/s3-file-management'
import { env } from '~/env'
import { db } from '~/server/db'

async function handler(req: NextApiRequest, res: NextApiResponse) {
  const { id } = req.query
  if (typeof id !== 'string') return res.status(400).json({ message: 'Invalid request' })

  // get the file name and original name from the database
  const fileObject = await db.file.findUnique({
    where: {
      id,
    },
    select: {
      fileName: true,
      originalName: true,
    },
  })
  if (!fileObject) {
    return res.status(404).json({ message: 'Item not found' })
  }
  // get the file from the bucket and pipe it to the response object
  const data = await getFileFromBucket({
    bucketName: env.S3_BUCKET_NAME,
    fileName: fileObject?.fileName,
  })

  if (!data) {
    return res.status(404).json({ message: 'Item not found' })
  }
  // set header for download file
  res.setHeader('content-disposition', `attachment; filename="${fileObject?.originalName}"`)

  // pipe the data to the res object
  data.pipe(res)
}

export default handler
Thanks for reading the third part of the series “File storage with Next.js, PostgreSQL, and Minio S3”. In the next part, we will implement the file upload and download functionality using resigned URLs and direct S3 upload and download.

Here are the links to the other articles in the series:
You can find the full source code for this tutorial on GitHub
If you have any questions or suggestions, feel free to leave a comment below.


