
Build and Use GStreamer With Yocto Project and BeagleBone Black
In this article, I am going to walk you through the process of setting up the Yocto Project to fetch the necessary content and build an Embedded Linux distribution supporting the GStreamer framework. Furthermore, I shall provide you with command-line examples to test-run the ability of GStreamer to run various sorts of multimedia.
Introduction
Gstreamer is an open-source multimedia framework that can be used to build all kinds of media applications (e.g. media playback, streaming, editing). The framework is designed to simplify the handling of video and audio or both simultaneously.
GStreamer works on with all major operating systems like Linux, Windows, Android, OS X, iOS. It may run on all major hardware architectures including x86, ARM, MIPS, SPARC.
To achieve its job, GStreamer uses its plug-ins to provide codecs, support for multiple container formats, filters, etc.
Read more about GStreamer here:
The scenario of my article
In this article, I am going to present the build and use of GStreamer with/in a Yocto Project distribution (Linux for Embedded devices) running on an ARM hardware architecture (namely AM335x — BeagleBone Black)
Read more about BeagleBone Black single-board computer (SBC) here:
My example deals with: Yocto Project release 3.1 (Codename Dunfell) , Release Date April 2020, Long Term Support.
Read more about the Releases of the Yocto Project here:
Build a custom Linux distribution with Yocto Project that includes the GStreamer multimedia framework
Step 1. Set up a Yocto Project build environment on your machine
As I wrote previously, I am referring to the Yocto Project 3.1 Dunfell release.
Clone Yocto dunfell
$ git clone — branch yocto-3.1.1 git://git.yoctoproject.org/poky.git poky_dunfell
This will clone the Yocto repository and set it to version 3.1.1 in a directory called “poky_dunfell” on your machine.
Clone meta-layers of utility
$ cd poky_dunfell
$ git clone — branch dunfell https://github.com/openembedded/meta-openembedded.git
$ git clone — branch dunfell https://github.com/openembedded/openembedded-core.git
These are necessary meta-layers adding extra functionality to your basic Yocto set up.
$ git clone — branch dunfell https://github.com/meta-qt5/meta-qt5.git
This adds the meta-layer which supports running Qt cross platform application on your embedded device.
$ git clone — branch dunfell https://github.com/kraj/meta-clang.git
$ git clone — branch dunfell https://git.openembedded.org/meta-python2
$ git clone https://github.com/OSSystems/meta-browser.git
The last three addition are good to have. Not necessarily needed, but I recommend adding them for enabling future use-cases.
This is
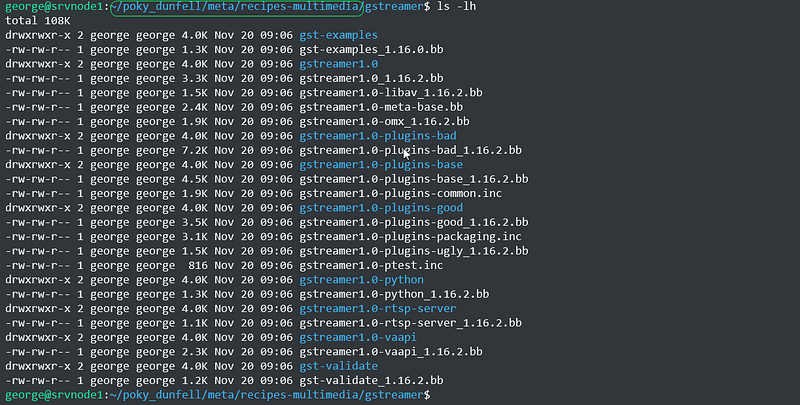
By the way, this is where the GStreamer finds its place on your machine (it is inside poky.. dir, under meta/recipes-multimedia)
Step 2. Source Poky and the necessary layers to build the GStreamer enabled Yocto distro
$ cd .. $ source poky_dunfell/oe-init-build-env build_dunfell
Step 3. Create or modify the content of the file ‘bblayers.conf’ inside the ‘conf’
Create or modify the content of the file ‘bblayers.conf’ inside the ‘conf’ subdirectory of ‘ build_dunfell’
build_dunfell$ vim conf/bblayers.conf

Step 4. Check if the layers have been added correctly
After saving the bblayers.conf, check if the layers are compatible and they have been added correctly. If not, the following command will throw errors.
build_dunfell$ bitbake-layers show-layers
NOTE: Starting bitbake server… layer path priority ========================================
… … …
… … …
… … …
Step 5. Modify the content of the file conf/local.conf to specify the features of your Yocto build
This local.conf file is going to carry the information about the machine (hardware) for which you wish to build the Yocto Image. In the local.conf file you are going to specify which kind of image you intend to build. Similarly, here, in the local.conf you specify which are the packages you wish to add to the Yocto Operating System Image.
A ready to use example of local.conf
The local.conf file itself is a large file, I am going to include a ready to use example for you below.
build_dunfell$ vim conf/local.conf
Notes:
- comments are preserved in the local.file to ease your understanding.
- My example of local.conf supports the creation of Yocto Image that allows
- execution of applications build with the Qt cross platform framework.
- includes various goodies (cronie — Yocto’s flavour for Linux cron tool, lighttpd — Light web server, with php support, i2c tools , touchscreen support, etc)
The package added functionality is organized in “local.conf” styled variables (e.g. ${Qt_UTILS},${WEB_SERVER_UTILS}…) to make it easy to structure. I recommend this layout.
Yocto will look for these packages in the meta-layers you already specified in bblayers.conf and perform several tasks upon them, in the end, adding these as ready to use in the Yocto Image . The Yocto image is actually a custom made Linux Embedded Operating System.
You place Yocto on a micro SD card or whatever booting device, and you use Yocto to bring to life your embedded device. It is a Linux built by you, precisely for your embedded friend.
Step 6. Bitbake (Build) the Yocto Project Image taking into consideration the parameters you specified in the previous steps
I have additional details in my previous medium articles, in case you need a refreshment or you just landed here:
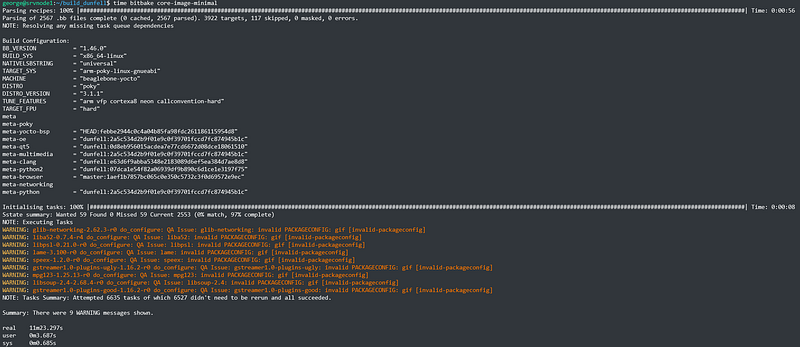
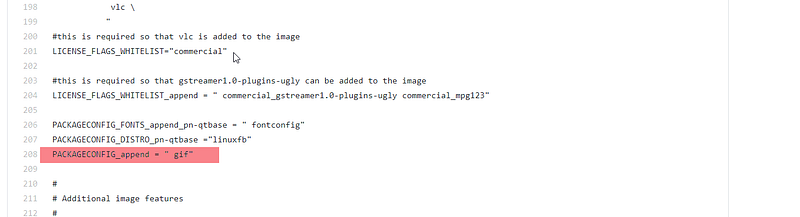
Don’t mind the Warnings: they refer to attention markers towards the packages supporting .gif files. They happen because I am not certain where to address its PACKAGECONFIG, but anyway, it finds its way in the end, and animated .gif-s can be rendered correctly.
If you do not want to see the orange color :), then comment/delete line 208 from the local.conf. Mind that you lose the support for animated .gif-s if you take it out of local.conf.
Step 7. Copy the Yocto .wic image file locally and deploy the image to the micro SD card
In my example, I am using Ubuntu 18.04 on a Virtual Machine running with Oracle VM VirtualBox

The micro SD Card /dev/sdb will contain the Operating System to power up your embedded device.
Test-run GStreamer with BeagleBone Black (ARM AM335x) and Yocto Project. Command line examples.
Verify that you have a working installation and inspect all the available plugins
Use gst-launch withtwo plug-ins that you really should have in all cases : fakesrc and fakesink
root@beaglebone-yocto:~# gst-launch-1.0 -v fakesrc silent=false num-buffers=3 ! fakesink silent=false
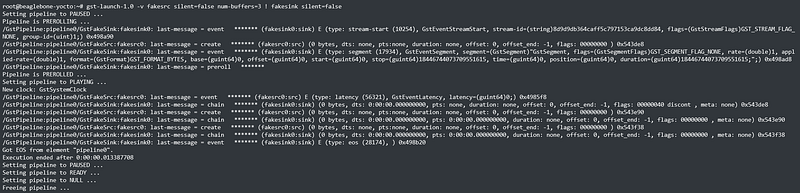
If the output looks similarly, then GStreamer is running correctly.
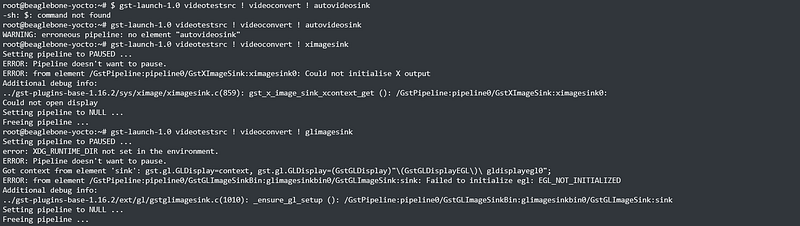
Display a test video
There are several possibilities to run the video: either on the framebuffer or via X11 Window System. It depends on your Yocto Image if it has these, or which can be used (e.g. core-image-minimal does not include an X11 window system, while core-image-sato includes X11)
If autovideosink doesn’t work, try an element that’s specific for your operating system and windowing system, such as ximagesink or glimagesink or (on windows) d3dvideosink.
glimagesink and ximagesink require an X instance, while fbdevsink uses a frame buffer directly.
Punctually, if your Yocto image is core-image-minimal (my example — or other) use the fbdevsink . If your Yocto image includes X11 (core-image-sato or other) then test ximagesink or glimagesink .
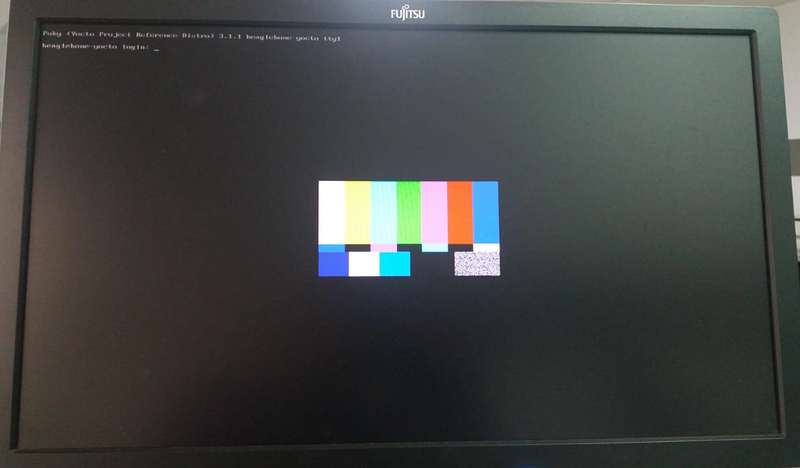
root@beaglebone-yocto:~/video-samples# gst-launch-1.0 videotestsrc ! videoconvert ! fbdevsinkSetting pipeline to PAUSED ...Pipeline is PREROLLING ...Pipeline is PREROLLED ...Setting pipeline to PLAYING ...New clock: GstSystemClock
Actually, on my display (connected via HDMI to the BeagleBone Black):
Use this command to delete the framebuffer:

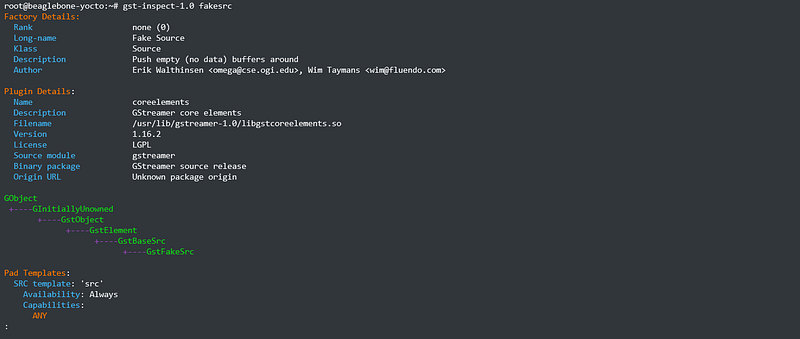
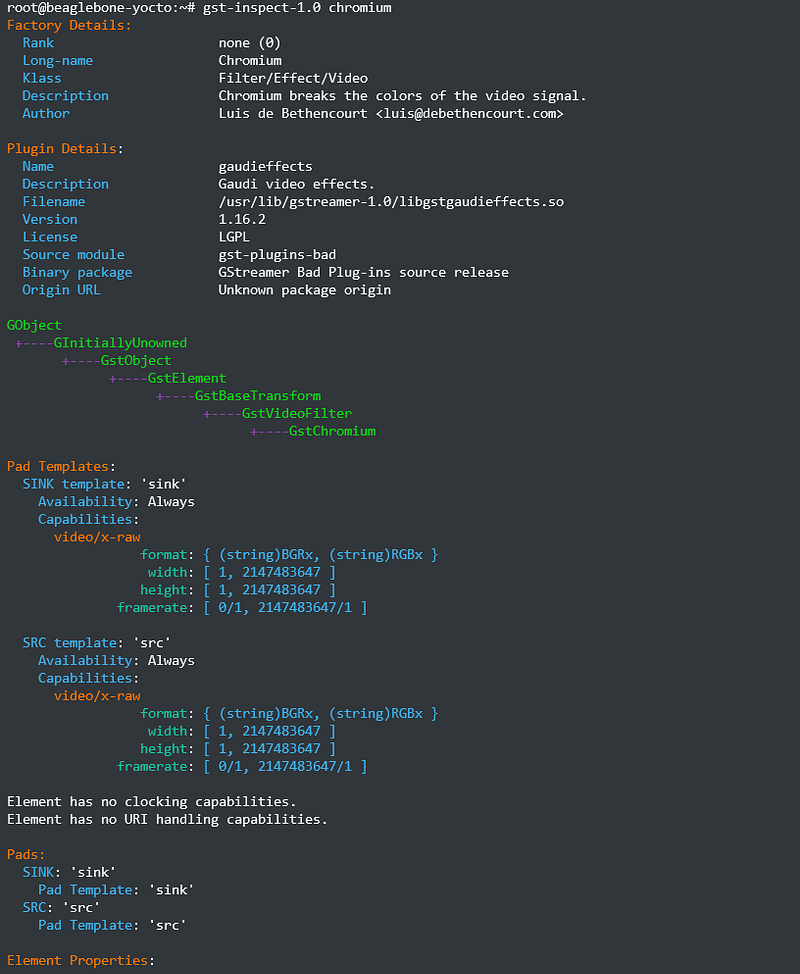
List what GStreamer plugins you have on your system

root@beaglebone-yocto:~# gst-inspect-1.0gaudieffects: burn: Burngaudieffects: chromium: Chromiumgaudieffects: dilate: Dilategaudieffects: dodge: Dodgegaudieffects: exclusion: Exclusiongaudieffects: solarize: Solarizegaudieffects: gaussianblur: GstGaussianBlursubenc: srtenc: Srt encodersubenc: webvttenc: WebVTT encoderogg: oggdemux: Ogg demuxerogg: oggmux: Ogg muxerogg: ogmaudioparse: OGM audio stream parserogg: ogmvideoparse: OGM video stream parserogg: ogmtextparse: OGM text stream parserogg: oggparse: Ogg parserogg: oggaviparse: Ogg AVI parsermpegtsdemux: tsparse: MPEG transport stream parsermpegtsdemux: tsdemux: MPEG transport stream demuxerdtls: dtlsenc: DTLS Encoderdtls: dtlsdec: DTLS Decoderdtls: dtlssrtpdec: DTLS-SRTP Decoderdtls: dtlssrtpenc: DTLS-SRTP Encoderdtls: dtlssrtpdemux: DTLS SRTP Demultiplexerremovesilence: removesilence: RemoveSilencehls: hlsdemux: HLS Demuxerhls: hlssink: HTTP Live Streaming sinkhls: hlssink2: HTTP Live Streaming sinkdebugutilsbad: checksumsink: Checksum sinkdebugutilsbad: fpsdisplaysink: Measure and show framerate on videosinkdebugutilsbad: chopmydata: FIXMEdebugutilsbad: compare: Compare buffersdebugutilsbad: debugspy: DebugSpydebugutilsbad: watchdog: Watchdogdebugutilsbad: errorignore: Convert some GstFlowReturn types into othersdebugutilsbad: fakevideosink: Fake Video Sinkdebugutilsbad: testsrcbin: Generic bincoreelements: capsfilter: CapsFiltercoreelements: concat: Concatcoreelements: dataurisrc: data: URI source elementcoreelements: downloadbuffer: DownloadBuffercoreelements: fakesrc: Fake Sourcecoreelements: fakesink: Fake Sinkcoreelements: fdsrc: Filedescriptor Sourcecoreelements: fdsink: Filedescriptor Sinkcoreelements: filesrc: File Sourcecoreelements: funnel: Funnel pipe fittingcoreelements: identity: Identitycoreelements: input-selector: Input selectorcoreelements: output-selector: Output selectorcoreelements: queue: Queuecoreelements: queue2: Queue 2coreelements: filesink: File Sinkcoreelements: tee: Tee pipe fittingcoreelements: typefind: TypeFind...Learn more about a particular plugin
root@beaglebone-yocto:~# gst-inspect-1.0 chromiumFactory Details:Rank none (0)Long-name ChromiumKlass Filter/Effect/VideoDescription Chromium breaks the colors of the video signal.Author Luis de Bethencourt <[email protected]>Plugin Details:Name gaudieffectsDescription Gaudi video effects.Filename /usr/lib/gstreamer-1.0/libgstgaudieffects.soVersion 1.16.2License LGPLSource module gst-plugins-badBinary package GStreamer Bad Plug-ins source releaseOrigin URL Unknown package originGObject+----GInitiallyUnowned+----GstObject+----GstElement+----GstBaseTransform+----GstVideoFilter+----GstChromiumPad Templates:SINK template: 'sink'Availability: AlwaysCapabilities:video/x-raw
format: { (string)BGRx, (string)RGBx }width: [ 1, 2147483647 ]height: [ 1, 2147483647 ]framerate: [ 0/1, 2147483647/1 ]SRC template: 'src'Availability: AlwaysCapabilities:video/x-raw
format: { (string)BGRx, (string)RGBx }width: [ 1, 2147483647 ]height: [ 1, 2147483647 ]framerate: [ 0/1, 2147483647/1 ]Element has no clocking capabilities.Element has no URI handling capabilities.Pads:SINK: 'sink'Pad Template: 'sink'SRC: 'src'Pad Template: 'src'Element Properties:..
How to play an audio file with GStreamer from the command line
Use one of these:
gst-launch-1.0 playbin uri=file:///path/to/song.mp3or
gst-play-1.0 song.mp3
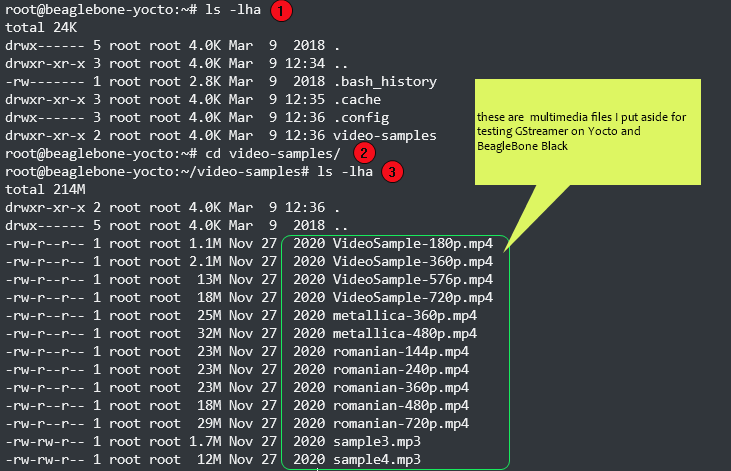
How to play a video file with GStreamer from the command line
root@beaglebone-yocto:~/video-samples# gst-launch-1.0 filesrc location=//home/root/video-samples/SampleVideo_480p.mp4 ! decodebin ! videoconvert ! fbdevsink
Note: In my scenario, BeagleBone Black did not cope well with rendering video when playing videos of Full HD or HD resolutions (1080p-720p-576p).
However, BeagleBone Black video rendering worked acceptably when playing videos at (SD) 480p and very well at 360p.
Nothing to say against it, BeagleBone Black stays to what it’s been defined, namely a decent low-cost community-supported development platform. It was not meant for HD video.
Samples from my display
(… sorry for the quality of the recordings…)
So, if you want HD or upward, you have to choose a more powerful platform.
Where to go next
Learn how to use the GStreamer API in your applications
I intend to provide an article about this later, meanwhile use the following documentation to learn more:
If you consider my articles to be helping you, you could support me in writing the next articles by using this page.
Thank you.


