
Box2DCreateJS = Box2d + CreateJS
Box2DCreateJS: Creating the project initial setup
A guide to setting up the initial project configuration

In this article, I will explain how to create the project initial setup for Box2DCreateJS. It can be used as a template and starting point for the development of 2D physics games using JavaScript.
If you don’t know what Box2DCreateJS is, take a look at the article linked below:
Let’s get started!
Download and Unzip Box2DCreateJS
Access https://ivangfr.github.io/box2dcreatejs/. At the bottom of the page, you will find the Downloads section. Go ahead and download the latest version.
Unzip the file in a folder where you will place all the game files. I will use a folder called my-game.
Once extracted, the folder name will be something like box2dcreatejs-x.y.z, where x.y.z is the version you have downloaded. Let’s remove the -x.y.z so that the final folder name should be box2dcreatejs.
Create MyGame.js
In my-game folder, create a JavaScript file called MyGame.js. Copy and paste the following content:
this.Box2DCreateJS = this.Box2DCreateJS || {};

(function () {

    function MyGame() {
        this.initialize()
    }

    Box2DCreateJS.MyGame = MyGame

    MyGame.prototype.initialize = function () {
        const easeljsCanvas = document.getElementById("easeljsCanvas")
        const box2dCanvas = document.getElementById("box2dCanvas")
    }

}())
The provided JavaScript code defines a Box2DCreateJS namespace object and encapsulates its code within an immediately-invoked function expression (IIFE) for encapsulation and scoping.
It includes a MyGame constructor function that is assigned to Box2DCreateJS.MyGame. The initialize method is added to the MyGame prototype, which is expected to be called after creating an instance of MyGame.
Finally, two constants, easeljsCanvas and box2dCanvas are set up by fetching the corresponding DOM elements with the IDs easeljsCanvas and box2dCanvas.
Create index.html
In my-game folder, create an HTML file called index.html. Copy and paste the content below:
<!DOCTYPE html>
<html lang="en">

<head>
    <meta charset="UTF-8">
    <title>My Game</title>

    <link rel='stylesheet' href='box2dcreatejs/css/cssreset-min.css' type='text/css' media='all'/>
    <style>
        #easeljsCanvas, #box2dCanvas {
            position: absolute;
        }

        #easeljsCanvas {
          background-color: #8DB8E3;
        }
    </style>

    <script src="MyGame.js"></script>
    <script>
        window.addEventListener("load", () => new Box2DCreateJS.MyGame())
    </script>
</head>

<body>
    <canvas id="easeljsCanvas" width="980" height="500"></canvas>
    <canvas id="box2dCanvas" width="980" height="500"></canvas>
</body>

</html>
The provided HTML code represents a basic HTML document for a web-based game.
It includes references to CSS and JavaScript files, defines some styles for canvas elements, and initializes the application by creating a new instance of the MyGame constructor function from the MyGame.js file when the HTML document finishes loading.
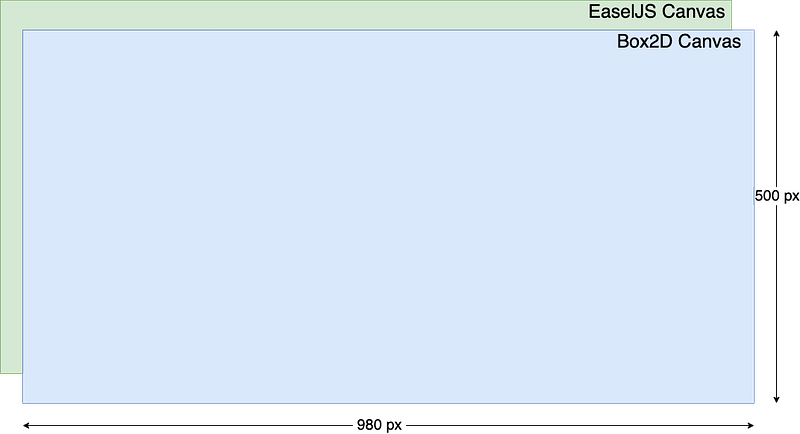
The <canvas> elements with IDs easeljsCanvas and box2dCanvas will be used for rendering EaselJS and Box2D graphics, respectively. Both canvas have a width of 980 pixels and a height of 500 pixels.
Create the images folder
Inside the my-game folder, let’s create another folder called images. In it, we will save all the images used in our games.
Project Structure of Folders and Files
The final project must have the following configuration of folders and files
.
├── box2dcreatejs
│   ├── css
│   └── js
├── images
├── index.html
└── MyGame.js
That is all! You are ready to start creating 2D Physics Games in JavaScript using Box2DCreateJS.
Additional Readings
The source code can be found at Box2DCreateJS GitHub Repository.
Support and Engagement
If you enjoyed this article and would like to show your support, please consider taking the following actions:
- 👏 Engage by clapping, highlighting, and replying to my story. I’ll be happy to answer any of your questions;
- 🌐 Share my story on Social Media;
- 🔔 Follow me on: Medium | LinkedIn | Twitter | GitHub;
- ✉️ Subscribe to my newsletter, so you don’t miss out on my latest posts.