
Learning Android Development
Android View Scrolling Made Simple
Program your own scrolling logic using OverScroller

Sometimes, we have an ImageView that contains an image that is bigger than the view. We would like to move around to see the entire image.
How can we code that?
Using ScrollTo (or ScrollBy)
In View (not just ImageView), there are two functions, i.e.
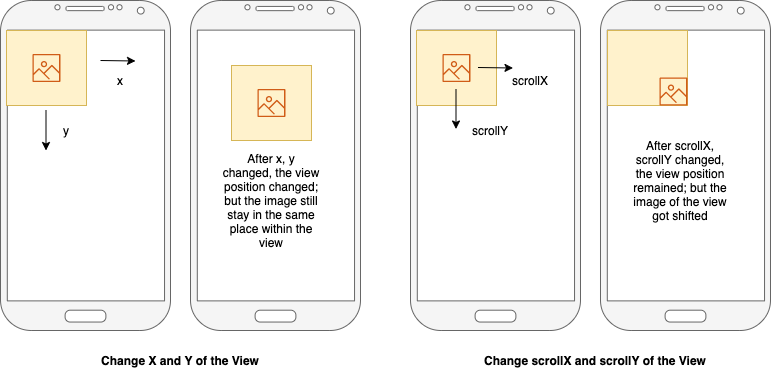
scrollTo(x, y)— scroll to a specific scroll coordinate (x, y)scrollBy(x, y)— scroll from the current coordinate with delta of (x, y)
public void scrollBy(int x, int y) {
    scrollTo(mScrollX + x, mScrollY + y);
}
This is different from changing the x and y coordinate of the view. It is NOT moving the view, instead move the internal content of the view (in our case, the Image itself).
With the above understanding, we can now easily code to moving the content using onTouchEvent.
class MovableImageView @JvmOverloads constructor(
    context: Context, attrs: AttributeSet? = null,
    defStyleAttr: Int = 0
) : AppCompatImageView(context, attrs, defStyleAttr) {

    var lastX: Int = 0
    var lastY: Int = 0

    override fun onTouchEvent(event: MotionEvent): Boolean {
        when (event.action) {
            MotionEvent.ACTION_DOWN -> {
                lastX = event.rawX.toInt()
                lastY = event.rawY.toInt()
            }
            MotionEvent.ACTION_MOVE -> {
                var disX = event.rawX - lastX
                var disY = event.rawY - lastY

                scrollBy(-disX.toInt(), -disY.toInt())

                lastX = event.rawX.toInt()
                lastY = event.rawY.toInt()
            }
        }
        return super.onTouchEvent(event)
    }
}
One simple note is the scrollBy is provided negative values, because the direction of hand move and view content move is in reverse order.

Setting the boundary of movement
With the above code, the movement is all good. But it doesn’t prevent the Image got moved out of the view entirely. Shown below, we can move the image out and see the cyan color padding area.

To avoid that, we need to have some way of identifying the image boundary. The tricky bit is, we cannot get the image actual width and height, as the image might have been scaled.
So in order to get the image post-scaled height, width and it’s default position in the view, we can use the mapRect function of the imageMatrix as shown below
private val bounds = RectF()
imageMatrix.mapRect(bounds, RectF(drawable.bounds))
With that, the image bounds.left and bounds.right is the horizontal side value of the view and bounds.top and bounds.bottom is the vertical side value of the view.
To understand how the imageMatrix determined the position and scaling of the image, check out
Using the bounds information, we can now do some computation to control the limit
val leftLimit = if (bounds.left < 0) bounds.left else 0f
val topLimit = if (bounds.top < 0) bounds.top else 0f
val rightLimit = (if (bounds.right > width) bounds.right '
    else width.toFloat()) - width
val bottomLimit = (if (bounds.bottom > height) bounds.bottom
    else height.toFloat()) - height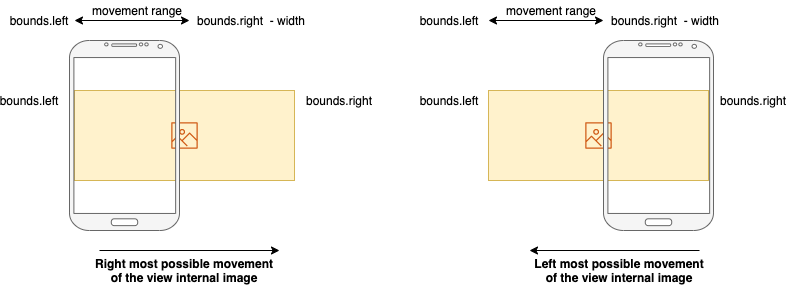
With this in place, we can now cap the movement if it reaches the edge limit as below.
var disX = xPos - lastX
var disY = yPos - lastY

if (scrollX - disX.toInt() < leftLimit) {
    // Cap movement to left edge
    disX = scrollX.toFloat() - leftLimit
} else if (scrollX - disX.toInt() > rightLimit) {
    // Cap movement to right edge
    disX = scrollX.toFloat() - rightLimit
}

if (scrollY - disY.toInt() < topLimit) {
    // Cap movement to top edge
    disY = scrollY.toFloat() - topLimit
} else if (scrollY - disY.toInt() > bottomLimit) {
    // Cap movement to bottom edge
    disY = scrollY.toFloat() - bottomLimit
}

scrollBy(-disX.toInt(), -disY.toInt())

lastX = xPos.toInt()
lastY = yPos.toInt()
Now, the movement of the internal image will be kept within the bounds of the view.
Animate Scroll Movement
While the above might seems okay, but it lacks the smoothness. The movement of the image within the view stops immediately upon ActionUp.
To make it smoother, we want to have some animation to move a little. This can be done using OverScroller class provided by Android.
Do bear with me a little introduction of OverScroller, before showing the nice animation.
The OverScroller is just a class to automatically perform changes in value when given a min, max, current value, and sometimes the velocity (for Fling).
To instantiate it, it is given an interpolator as well (for scrolling behavior calculation).
private val scroller = OverScroller(context,
    AccelerateDecelerateInterpolator())
To further understand Interpolator, check out the below
After instantiating the overScroller, let’s also have a function that will update the view change upon each computation. This can be achieved with computeScroll that is automatically called when onDraw is performed.
override fun computeScroll() {
    if (scroller.computeScrollOffset()) {
        scrollTo(scroller.currX, scroller.currY)
        invalidate()
    }
}
In it, we’ll check if the scroller has completed it’s computation, using computeScrollOffset. If the computation is still in progress, just update the view drawing using the scroller.currX and scroller.currY value accordingly (in this case we use scrollTo). After that just use invalidate() to continue the further animation drawing as needed.
Now, that’s all we need to know the general need of OverScroller for the 4 types of animation I’ll be introducing you.
1. SpringBack.
The OverScroller has a simple function to calculate animation back to it’s defined state of rectangle.
What we do is, upon ActionUp, we can call the springBack function.
One just need to provide the current scrollX and scrollY, and the rectangle area where it has to scroll back to (the 4 coordinate). By providing it to 4 0 as below, it basically states for it to go back to its original position.
scroller.springBack(scrollX, scrollY, 0, 0, 0, 0)
invalidate()
Note: we need the
invalidate()to get thecomputeScrollget called later to perform the drawing update.

This springBack function is also used for for the fling overshoot internally that gets back to its position later
If you notice carefully, the above animation, the springBack will first reach the side first before it goes back to the top. This is because it applies the same velocity across both horizontal and vertical. The horizontal distance is shorter than the vertical distance, therefore causes the image to reach the left side first before heading top.
To have a more balanced scrolling back movement, let’s look at the the second animation below.
2. StartScroll
OverScroll also provides us a function that can scroll from one point to the other point specifically. It is called startScroll.
For us, we just want to scroll back to the original position. Hence upon ActionUp, we call the function by providing current scrollX and scrollY, followed by the delta x and y heading towards, with a duration of 1000 millisecond, as below
scroller.startScroll(scrollX, scrollY, -scrollX, -scrollY, 1000)
invalidate()
Note: we need the
invalidate()to get thecomputeScrollget called later to perform the drawing update.

You notice the animation moved diagonally, without hitting any edge (left or top) first. The horizontal and vertical velocity is adjusted to ensure both vertical and horizontal movements use up the 1000 milliseconds.
3. Fling
The first 2 animations shown are scrolling back. The remaining 2, I’ll be showing you fling, which is the continuous momentum movement after ActionUp. This makes the view content movement more realistic.
To perform fling, we need to provide the velocity. We use VelocityTracker provided by Android to get the velocity.
var velocityTracker = VelocityTracker.obtain()The way to get it is upon each action i.e. ActionDown, ActionMove and ActionUp, we record the movement by using addMovement.
velocityTracker?.addMovement(event)To fling, we start by computing the velocity in the last 1 second, then we can get the velocity from xVelocity and yVelocity. Pass it to fling, together with the current location and the boundaries.
velocityTracker?.let {
    // Compute velocity within the last 1000ms
    it.addMovement(event)
    it.computeCurrentVelocity(1000)

    scroller.fling(
        scrollX, scrollY,
        -it.xVelocity.toInt(), -it.yVelocity.toInt(),
        leftLimit.toInt(), rightLimit.toInt(),
        topLimit.toInt(), bottomLimit.toInt()
    )
    invalidate()
}
Note: we need the
invalidate()to get thecomputeScrollget called later to perform the drawing update.

At the end of tracking the velocity (either ActionUp or ActionCancel), we just need to recycle it using
velocityTracker?.recycle()
velocityTracker = null
A new velocity tracker is created on every new tracking.
4. Fling Overshoot
As you can see in the example fling above, the flight stops abruptly when it reaches the edge of the image. Sometimes to make it a little nicer, we want the image to overshoot a little and spring back.
This can be done easily using the same fling function, but just provide the overshoot distance allowed, both horizontally and vertically.
scroller.fling(
    scrollX, scrollY,
    -it.xVelocity.toInt(), -it.yVelocity.toInt(),
    leftLimit.toInt(), rightLimit.toInt(),
    topLimit.toInt(), bottomLimit.toInt(),
    overshootValue, overshootValue
)
invalidate()
Note: we need the
invalidate()to get thecomputeScrollget called later to perform the drawing update.

The slight overshoot can be seen by seeing the padding, but it auto-scroll back, as internally, it is calling spring back function (as mentioned in animation 1 above).
You can get the code here, using the design that is used to explain the scale type per the below article.


